Preface
You might often ask yourself: 'What if my 1C Infobase gets corrupt, how can I restore it to the most recent state? Should I back it up automatically? How often and what kind of backups should I take? Wouldn't constant backups pile up and overload my server? Shall I delete the previous backups to avoid the overloading? How should I restore my database?'
Backing up your 1C Infobase is essential for protecting your data. This topic answers the above questions and introduces various types of backup work, developing a maintenance plan and how you may want to use them in a backup strategy.
SQL Server backup types
The main three backup types that MS SQL offers are: full, differential and log backups.
Full backup
The simplest kind of backup is a full database backup - a complete copy of the database that provides a single point-in-time to which the database can be restored. Even though it may take many hours for the backup process to run, you can still only restore the backup to a single point (effectively at the end of the backup).
Differential backup
The other type of data backup is a differential backup. A differential backup performs the same operations as a full backup, but only contains all the data that has changed or been added since the previous full backup. The differential backups are cumulative and successive backups after a full backup and will increase in size as more data is changed or added. So why are differential backups useful? This will be discussed in the backup strategy section, differential backups can really speed up restore operations by allowing many transaction log backups to be skipped in the restore process. It's much faster to essentially jump forward in time using a differential backup than to have to replay a lot of transaction log records to get to the same point in time.
Transaction log backup
A transaction log backup contains all the transaction log records generated since the last log backup (or full backup that starts a log backup chain) and is used to allow the database to be recovered to a specific point in time (usually the time right before a disaster strikes). This means they are incremental, unlike differential backups, which are cumulative. Since these are incremental, if you want to restore the database to a particular point in time, you need to have all the transaction log records necessary to replay database changes up to that point in time. These are contained in the log backup chain.
Although a log backup chain stretches back to a full backup, you don't necessarily need to restore all those log backups during recovery. If you took a full backup, say, on Sunday night and on Wednesday night, with log backups every half hour since Sunday night, then restoring the database after a disaster on Friday could use Wednesday's full backup plus all the log backups since Wednesday night instead of having to go all the way back to Sunday night's full backup.
A log backup chain is an unbroken series of log backups that contain all the transaction log records necessary to recover a database to a point in time. A chain starts with a full database backup, and continues until something breaks the chain, thus preventing more log backups being taken until another full (or differential) backup is taken. Log backups are required to help manage the size of the transaction log. Regular log backups must be performed to prevent the log file from growing out of control. Log backups can be applied only in Full Recovery model explained in the next section.
Server recovery models
SQL Server provides three different recovery models that allow you to specify the way SQL Server manages log files and prepares your enterprise for a disaster. Each of these models represent a different approach to balancing the tradeoff between conserving disk space and providing for granular disaster recovery options. The three disaster recovery models offered by SQL Server are:
- Simple Recovery Model
- Full Recovery Model
- Bulk-logged Recovery Model
Simple recovery model
The simple recovery model is just that: simple. In this approach, SQL Server maintains only a minimal amount of information in the transaction log. SQL Server truncates the transaction log each time the database reaches a transaction checkpoint, leaving no log entries for disaster recovery purposes.
In databases using the simple recovery model, you may restore full or differential backups only. It is not possible to restore such a database to a given point in time, you may only restore it to the exact time when a full or differential backup occurred. Therefore, you will automatically lose any data modifications made between the time of the most recent full/differential backup and the time of the failure.
Full recovery model
The full recovery model also bears a self-descriptive name. With this model, SQL Server preserves the transaction log until you back it up. This allows you to design a disaster recovery plan that includes a combination of full and differential database backups in conjunction with transaction log backups.
In the event of a database failure, you have the most flexibility restoring databases using the full recovery model. In addition to preserving data modifications stored in the transaction log, the full recovery model allows you to restore a database to a specific point in time. For example, if an erroneous modification corrupted your data at 2:36 am on Monday, you could use SQL Server's point-in-time restore to roll your database back to 2:35 am, wiping out the effects of the error.
Bulk-logged recovery model
The bulk-logged recovery model is a special-purpose model that is not applicable to our case and won't be considered in the article.
Disaster recovery
Disaster recovery is a process that you can use to help recover information systems and data, if a disaster occurs. Some examples of disasters include a natural or a man-made disaster such as a fire, or a technical disaster. Disaster recovery planning is the work that is devoted to preparing all the actions that must occur in response to a disaster. The planning includes the selection of a strategy to help recover valuable data. To be better protected in such cases we recommend keeping already restored data with at most 30 min. intervals on a separate server preferably located in a far distance from your production server. While this could be an expensive backup strategy it will serve for at least two purposes:
- Keep your data away from a potential disaster area
- Connect your users to already restored database vs. restoring it from scratch
Backup strategy planning
With a strategy that only includes full backups you're somewhat limited in what you can restore. Basically, you can only restore to the time of each full backup, as in Figure 1. If disaster strikes at 23:59 on Saturday, just before the next full backup is scheduled, then all the work since the last full backup might be lost. For this reason, if data-loss needs to be avoided and the data cannot be recreated, log backups are also included, as shown in Figure 2.
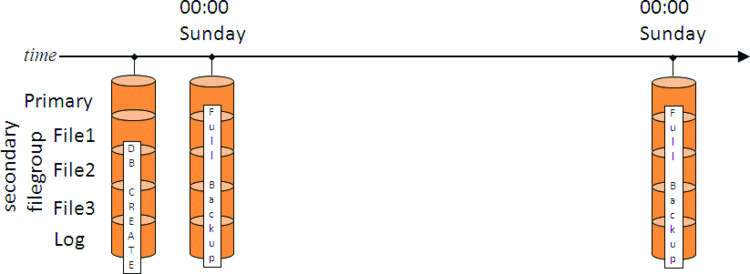
Figure 1. Backup strategy with only full backups
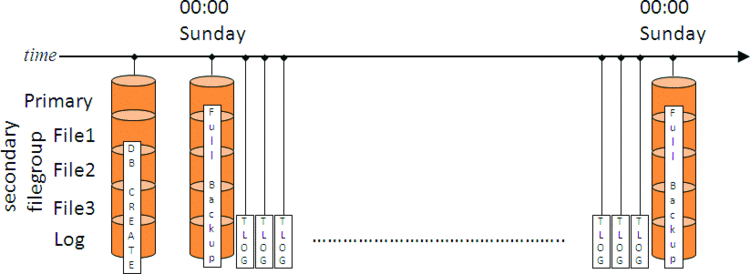
Figure 2. Backup strategy with full and log backups
Imagine that the log backups are being taken every 30 minutes. As long as all the backups are available, this means that when running Transaction Log backups every half an hour you can guaranty that you never lose more than half an hour worth of work. However, this still may not be the best strategy. What if disaster strikes at 23:59 on Saturday with this strategy in place? First thing would be to take a tail-of-the-log backup and then start restoring. A tail-of-the-log backup is a transaction log backup that includes the portion of the log that has not previously been backed up (known as the active portion of the log). A tail-log backup does not truncate the log and is generally used when the data files for a database have become inaccessible but the log file is undamaged.
To restore the database up to the point of the disaster would mean restoring last Sunday's full backup and then 336 log backups (that's six days of 48 log backups per day, plus 47 on Saturday plus the tail-of-the-log backup). Depending on how much data there was in the database over the week that could be a huge amount of transaction log that will take a very long time to reply. That's clearly not an optimal restore strategy.
To mitigate this problem, some strategies use more frequent full backups - but these might be prohibitively large to take every day, for instance. The alternative is to use differential backups, which only contain the data that has changed since the previous full backup. Continuing our example, that strategy is illustrated in Figure 3.
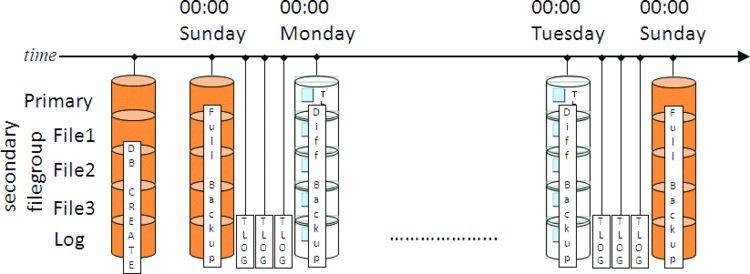
Figure 3. Backup strategy with full, log, and differential backups
With this strategy, recovering from a disaster at 23:59 on Saturday is a lot faster. Remember that a differential backup is cumulative so the restore strategy is the Sunday full backup, the 00:00 Saturday differential backup, plus all the log backups from Saturday. Having the differential backup from 00:00 Saturday means that all the log backups before that can be skipped, as the differential backup contains the same as the net-result of restoring all those log backups.
This was a pretty simple and contrived example, but it clearly shows the benefits of each backup type.
Applying the backup strategy to 1C Infobase
In this section we will demonstrate the recommended strategy for backing up 1C Infobase based on the MS SQL Server 2012 database called 'Demo'. First, let's create a maintenance plan by opening 'Management' \ 'Maintenance Plans', then right-click this item and click 'New Maintenance Plan' and let's call it 'Demo Backup'.

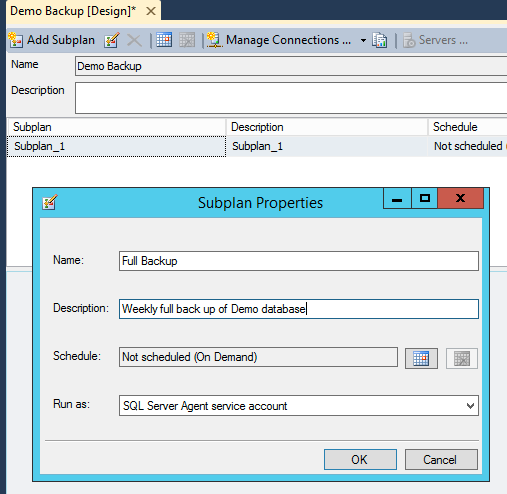
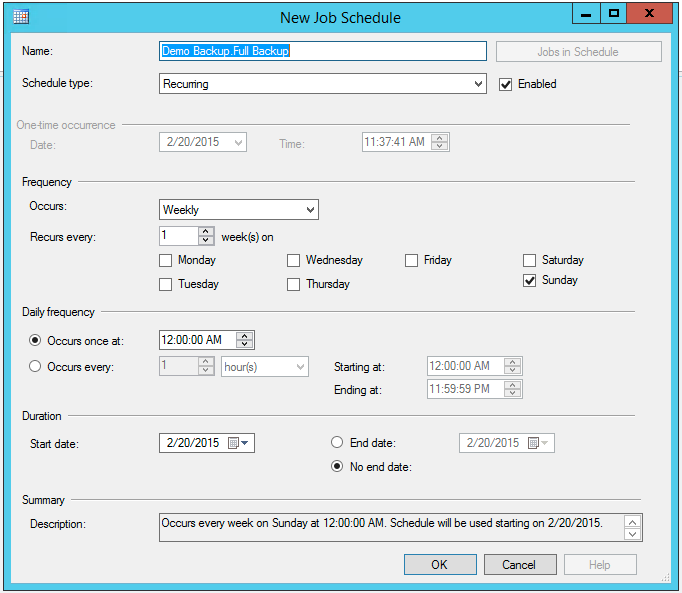
On the new screen double-click 'Subplan_1' and enter 'Full Backup' for the name and 'Weekly full backup of Demo database'.
Click on the icon next to 'Schedule' and in the new window make sure that Schedule Type is enabled and set to 'Recurring'. Frequency is set to occurring 'Weekly' every week Sunday. Daily frequency occurs once at 12:00:00 AM (probably the least loaded time). Set the desired start date and 'No end date' and click 'OK'. This step will enable auto-creation of a Full Backup of the 'Demo' database every Sunday at 12:00 am.
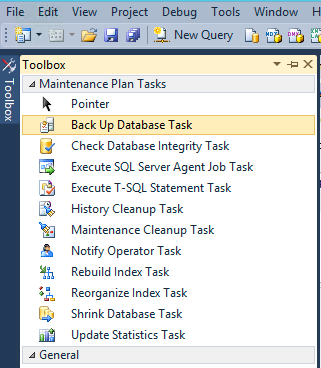
In the next step we guide SQL Server where to save the full backup file. Click 'Toolbox' button on the upper left corner and double-click 'Back Up Database Task'.
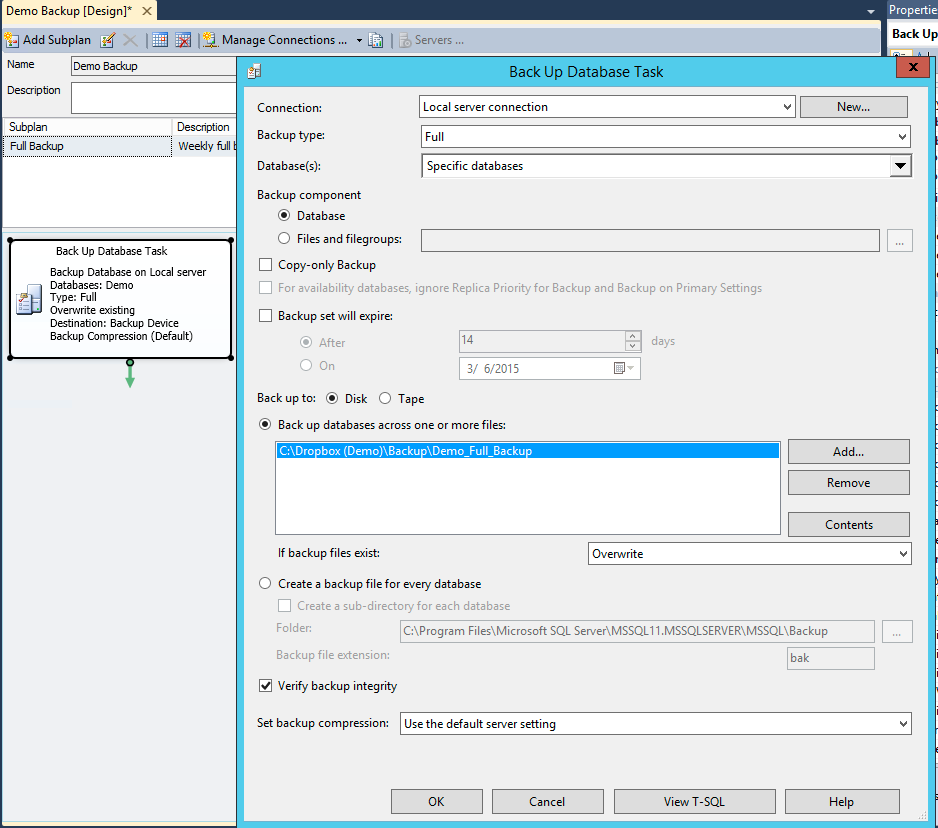
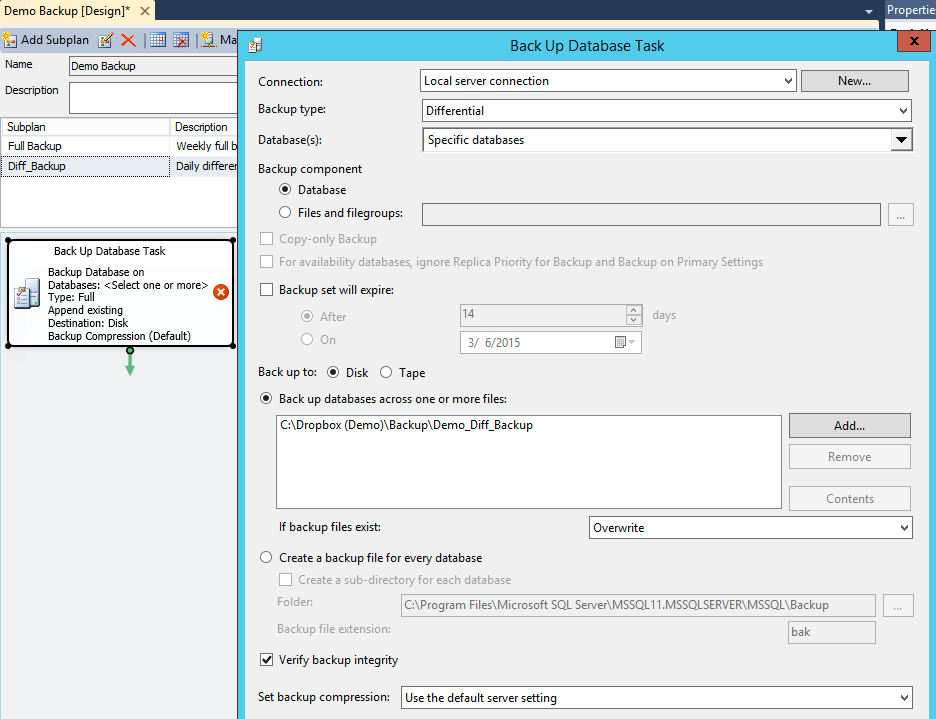
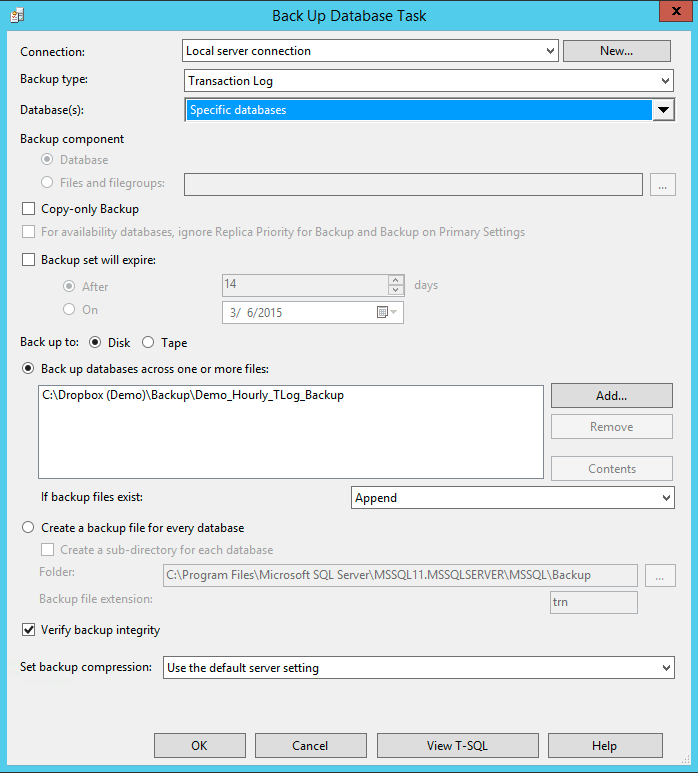
Double-click on the new box that starts with 'Back Up Database Task' and select the following options (shown on the image below): for Backup type select 'Full'; from the 'Database(s)' dropdown list select the database that you are going to back up (in our case 'Demo'). Then select 'Back up database across one or more tabs', click 'Add' and then select the location where the full backup file is to be saved. In our example we save all (full, differential and transaction log) backup files on DropBox so they will become available on our disaster recovery server immediately after the backup procedure ends. It is important to select 'Overwrite' in 'If backup files exist' to avoid piling the full backup files up. It is also recommended to select 'Verify backup integrity'. Although not required, verifying a backup is a useful practice. Verifying a backup check that the backup is intact physically, to ensure that all the files in the backup are readable and can be restored, and that you can restore your backup in the event you need to use it. Click 'OK'.
The next step for an efficient backup plan (as discussed above) is creating daily Differential Backups. Each daily differential backup will contain the information from the moment the full backup took place (plus 30 min to allow the full backup to complete) up to the moment the differential backup got created, in other words, each following Differential backup will accumulate the data from previous differential backups and it would be safe to overwrite the previous backup with the new one. Now we need to add a new Subplan by clicking the 'Add Subplan' button. You can name it for example 'Diff_Backup' with the description 'Daily differential backup'.
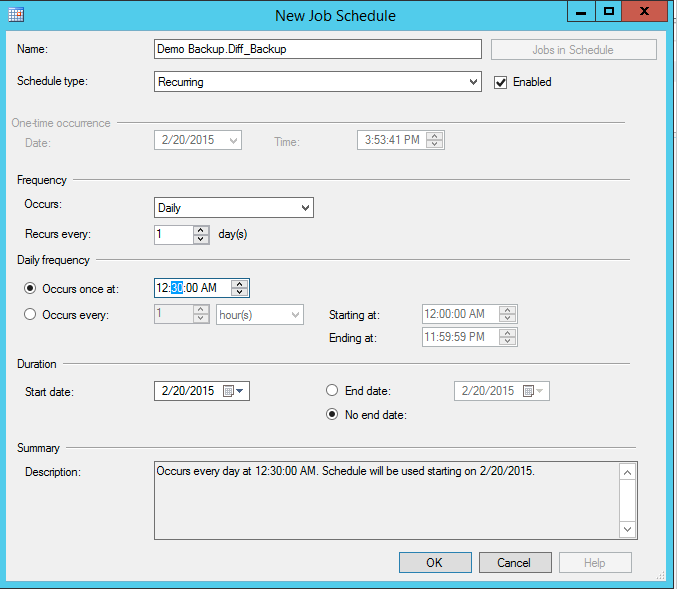
Now we need to create a backup task that will determine where and how to save the 'Diff_Backup' files. Make sure you selected 'Differential' backup type and the output file name should vary from the '...Full_Backup' to avoid overwriting.
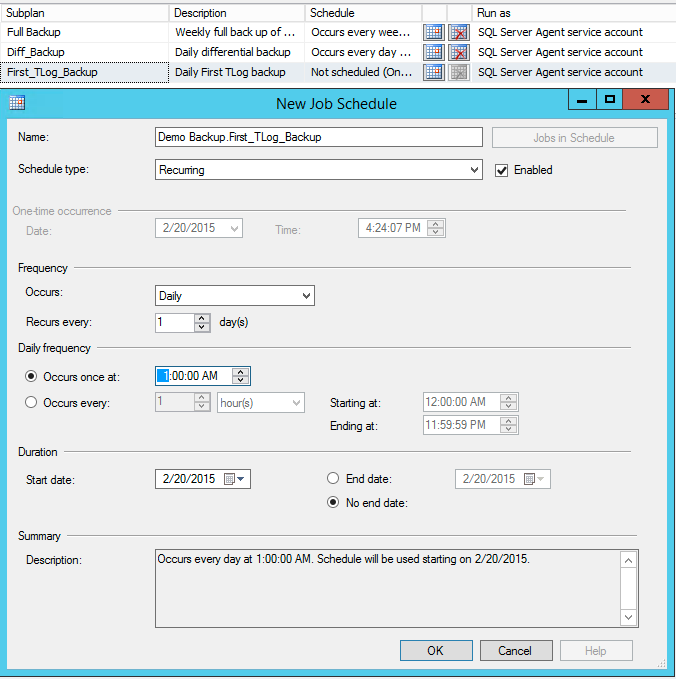
Following the same steps for Full and Differential backup we create the First TLog backup that runs once daily at 1:00 am to allow differential backup to complete.
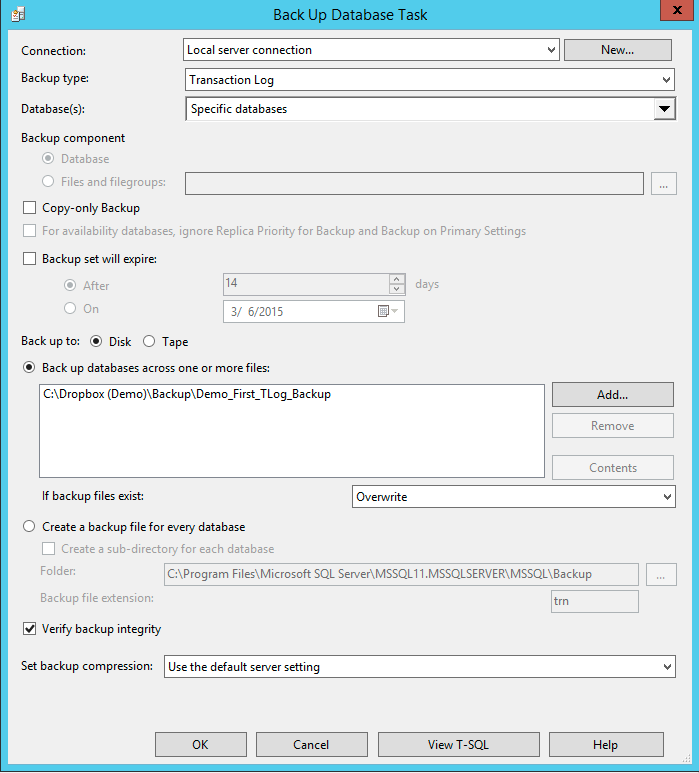
Make sure you select 'Transaction Log' and 'Overwrite' in the 'If backup files exist' section. This will make sure that with every new differential backup we start the new set of Transaction Log backups.
All the following Transaction Log files will be running on an hourly basis and will need to be added up to the previous Transaction Log. For that purpose, when creating Hourly TLog backups the start time should be selected as 1:30 am to allow First Hourly Backup to complete and end time should be 11:59:59 pm since the next Differential backup will start at 12:30 am.
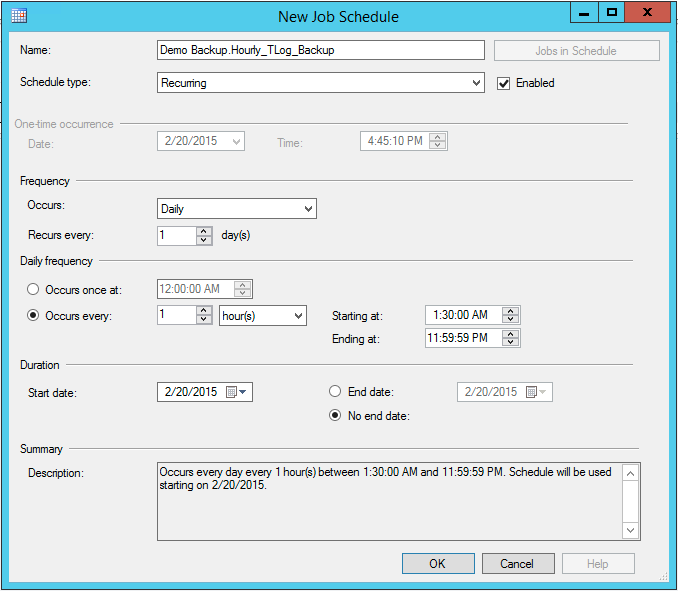
It is very important to select 'Append' when creating Hourly Backup. Click 'OK' button to save the backup task.
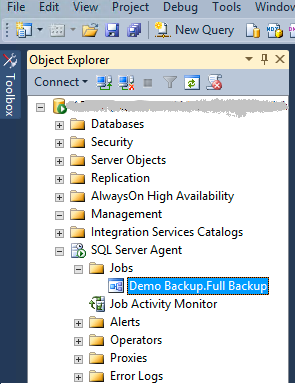
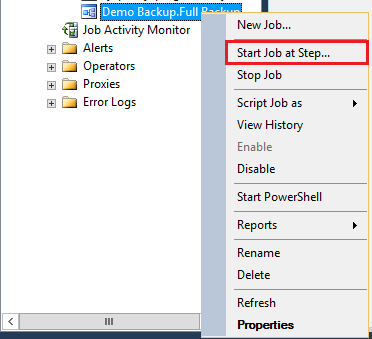
Now it is a time to verify that all backups work and are saved to the specified destination. Let's now test that the backup is being created and saved at the specified location. For that purpose, first save the Maintenance Plan by clicking 'Save' button, then navigate to 'SQL Server Agent' >'Jobs', right-click this item and select 'Start Job at Step ...'
The message shown below indicates that Full backup went well and got saved to the required destination,
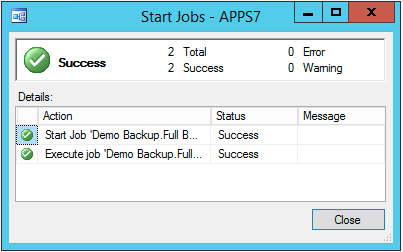
but let's double-check to make sure that the file exists at the location specified in the backup task section. This file will keep all the data and structure of the database prior to Sunday 12:00:00 when the backup got created.

It's time to do the same procedure for all the backup tasks to make sure there are no errors and that files are created in the specified folder.

Restoring 1C Infobase from the backups
As discussed above, we recommend creating auto-backups on the production server and keep a separate Disaster Recovery server located away from your area where you can auto-recover those backups within the same time intervals (at most 30 min). In our example, we record all our backup files on a cloud server like DropBox and then restore them to a Disaster server located hundreds of miles away with about 30 minutes delay to allow some extra time for the files to copy on the cloud (especially full backup file might take long time to record). For example, if Full backup was scheduled at 12:00 am then we recommend scheduling a full restore at 12:30 am given that the disaster recovery server is on the same time zone as the production server, otherwise, time difference must be taken into account. For example, if the production server is located at the Pacific Time Zone and the Disaster recovery server is at the Eastern Standard Time then all the restore operations should be scheduled 3.5 hrs ahead of each backup. In other words, if a full backup was scheduled at 12:00 am then the restore should be scheduled at 3:30 am to use the latest backup file taking into account time difference.
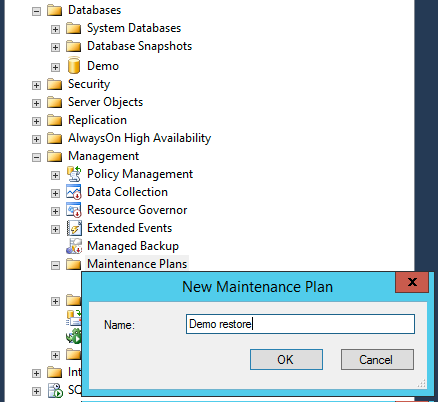
The restore process has to follow the same sequence as backup: Full backup on a weekly basis, daily Differential and then hourly Transaction Log. First, on the Disaster Recovery server let's create a maintenance plan by opening 'Management'->'Maintenance Plans', then right-click this item, click 'New Maintenance Plan' and then let's call it 'Demo Restore'
The next step is to create a Subplan by either double-clicking 'Subplan1' or 'Add Subplan' button. In this example we named it 'Full Restore'.
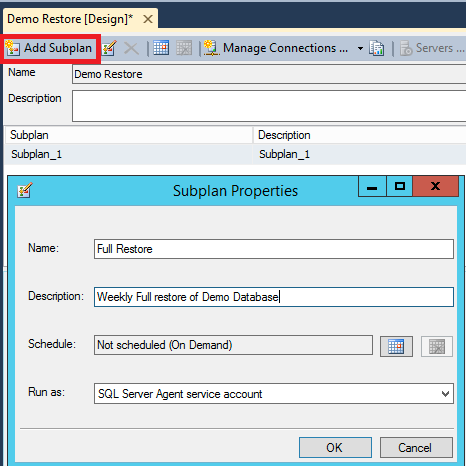
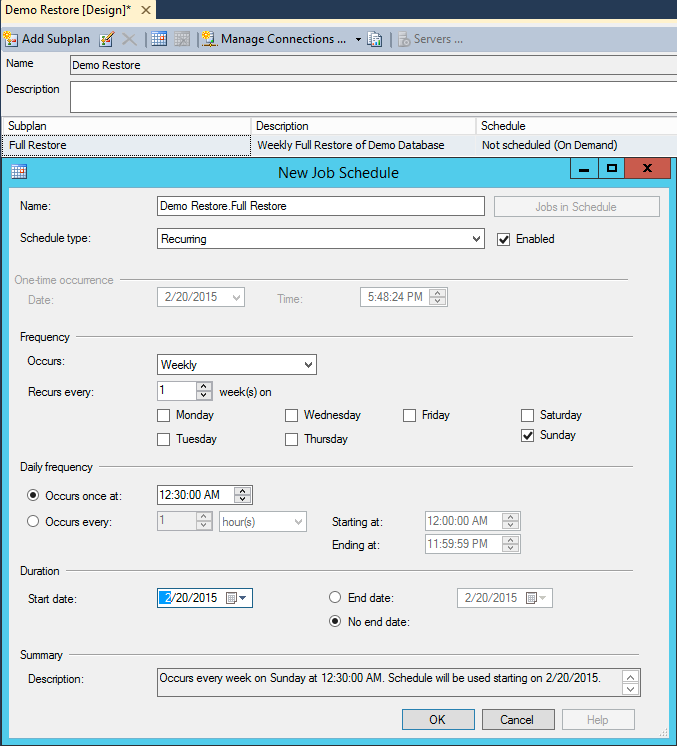
Now we need to create a restore schedule. Note that the start time for the restore is chosen 12:30 am (30 min ahead of Full backup time) to allow the backup to complete and record the file.
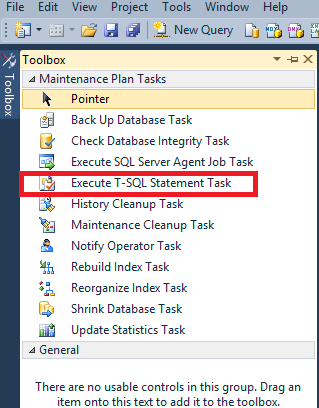
At the next step we need to create T-SQL Task that will guide MS SQL Server where to grab the backup files and what database to restore them at. For that purpose we click on 'Toolbox' button on the upper left corner and double-click on 'Execute T-SQL Statement Task' and in the opened windows type:
USE master;
ALTERDATABASE [>Demo] SET SINGLE_USER WITH ROLLBACK IMMEDIATE;
RESTOREDATABASE [Demo] FILE = N'>Demo'
FROM DISK = N'C:\Users\Administrator\Dropbox\Backup\>Demo_Full_Backup.bak'
WITH FILE = 1,
MOVEN'Demo' TO
 N'C:\Program Files\Microsoft SQL Server\MSSQL12.MSSQLSERVER\MSSQL\DATA\>Demo.mdf',
MOVEN'Demo_log'TO
 N'C:\Program Files\Microsoft SQL Server\MSSQL12.MSSQLSERVER\MSSQL\DATA\>Demo_log.ldf',
NORECOVERY, NOUNLOAD,  REPLACE,  STATS = 10'
where the word 'Demo' needs to be replaced with your database name, and the path to the backup files has to match the one at your server. In our example the backup files are kept at C:\Users\Administrator\Dropbox\Backup\. The default recommended the location for SQL Server 12 backup is at C:\ProgramFiles\Microsoft SQL Server\MSSQL12.MSSQLSERVER\MSSQL\DATA.
Create Diff_Restore task the same way as you did for Full_Restore but make the task repeat on a daily basis starting 1:00 am to allow Diff_Backup file to complete and get saved on the server.
Then create the following T-SQL replacing 'Demo' with your database name:
RESTOREDATABASE [>Demo] FILE = N'a'
FROM DISK = N'C:\Users\Administrator\Dropbox\Backup\>Demo_Diff_Backup.bak'
WITH FILE = 1,
MOVEN'Demo' TO
 N'C:\Program Files\Microsoft SQL Server\MSSQL12.MSSQLSERVER\MSSQL\DATA\>Demo.mdf',
MOVEN'Demo_log' TO
 N'C:\Program Files\Microsoft SQL Server\MSSQL12.MSSQLSERVER\MSSQL\DATA\>Demo_log.ldf',
NORECOVERY, NOUNLOAD,  REPLACE,  STATS = 10
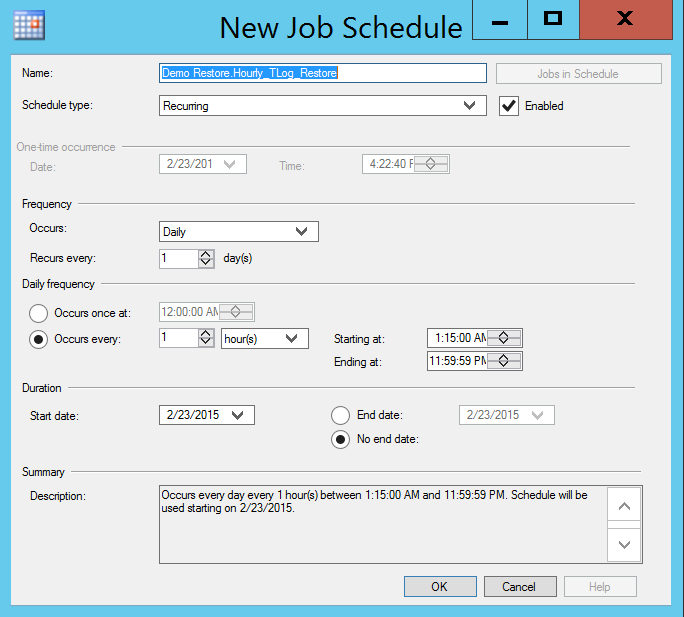
Follow the same steps to create Hourly_TLog_Restore as a recurring event starting 1:15 am daily to allow 15 min for the First_Tlog_Backup to complete and get saved on the server.
The T-SQL for the TLog restore file should be as follows:
'DECLARE@Table table
  (
BackupName nvarchar(128),
BackupDescription nvarchar(255) ,
BackupType smallint ,
ExpirationDate datetime ,
Compressed bit ,
Position smallint ,
DeviceType tinyint ,
UserName nvarchar(128) ,
ServerName nvarchar(128) ,
DatabaseName nvarchar(128) ,
DatabaseVersion int ,
DatabaseCreationDate datetime ,
BackupSize numeric(20,0) ,
FirstLSN numeric(25,0) ,
LastLSN numeric(25,0) ,
CheckpointLSN numeric(25,0) ,
DatabaseBackupLSN numeric(25,0) ,
BackupStartDate datetime ,
BackupFinishDate datetime ,
SortOrder smallint ,
CodePage smallint ,
UnicodeLocaleId int ,
UnicodeComparisonStyle int ,
CompatibilityLevel tinyint ,
SoftwareVendorId int ,
SoftwareVersionMajor int ,
SoftwareVersionMinor int ,
SoftwareVersionBuild int ,
MachineName nvarchar(128) ,
Flags int ,
BindingID uniqueidentifier ,
RecoveryForkID uniqueidentifier ,
Collation nvarchar(128) ,
FamilyGUID uniqueidentifier ,
HasBulkLoggedData bit ,
IsSnapshot bit ,
IsReadOnly bit ,
IsSingleUser bit ,
HasBackupChecksums bit ,
IsDamaged bit ,
BeginsLogChain bit ,
HasIncompleteMetaData bit ,
IsForceOffline bit ,
IsCopyOnly bit ,
FirstRecoveryForkID uniqueidentifier ,
ForkPointLSN numeric(25,0) NULL,
RecoveryModel nvarchar(60) ,
DifferentialBaseLSN numeric(25,0) NULL,
DifferentialBaseGUID uniqueidentifier ,
BackupTypeDescription nvarchar(60) ,
BackupSetGUID uniqueidentifier NULL,
CompressedBackupSize numeric(20,0),
   Containmentbit
  );

INSERTINTO @Table EXEC('RESTORE HEADERONLY FROM DISK =
 N''C:\Users\Administrator\Dropbox\Backup\>Demo_TLog_Backup.bak''WITH NOUNLOAD');

--select * from @Table

Declare@LogBackupPos int;

DeclareLogBackups Cursor For
   Select position
   from @Table;

OpenLogBackups;
FETCHNEXT FROM LogBackups INTO @LogBackupPos;
WHILE@@FETCH_STATUS = 0 BEGIN

   RESTORE LOG [a]
   FROM  DISK = N'C:\Users\Administrator\Dropbox\Backup\>Demo_TLog_Backup.bak'
   WITH  FILE = @LogBackupPos,
   NORECOVERY,  NOUNLOAD,  STATS = 10;
   FETCH NEXT FROM LogBackups INTO @LogBackupPos;
END
CloseLogBackups;
DeallocateLogBackups;'
To verify that restore was successful first save the Maintenance Plan by clicking 'Save' button then navigate to 'SQL Server Agent' >'Jobs', right-click this item and select 'Start Job at Step ...' The restoring should be done in the following sequence: Full, Differential, Transaction Log. Check for error messages in Job agent as well as open up the database itself to make sure the data has been restored successfully.
Next page: Choosing server-side hardware for 1C:Enterprise system

