This recommendation is optional
This recommendation has the following purposes:
- Improve the quality of configurations being developed
- Streamline development and testing workflows
- Facilitate continuous configuration development with strict deadlines
1. Definitions
A planned release is an applied solution version featuring significant functionality development, its release is scheduled in advance.
A patch is a version intended for urgent fixing of critical issues. In rare cases a patch might include new functionality (for example, enhancements that reflect legislation changes). The release date is defined based on the number of issues discovered in the planned release and their importance.
A design project is a task that describes additions and changes to the applied solution. Each design project includes a clearly defined goal and a list of changes required to achieve the goal.
2. Patch development
2.1. For each patch, create a new configuration repository based on the latest released version.Important! Do not copy the main repository, create a new one.
2.2. A patch must not contain changes that require significant development time. If you need to implement such changes, consider revising the planned release date.
2.3. All of the records in the patch repository version must have comments.
The requirements for these comments are identical to the requirements to planned release comments (see paragraph 3.4).
2.4. All of the changes implemented in the patch repository must be applied to the main repository. If you add new objects or object attributes in the patch repository, apply the changes only by comparing and merging configurations to preserve internal configuration object IDs.
2.5. When you build a patch version, we recommend that you assign a label with a build number to the revision in the repository that you use for building the patch. It is usually the latest revision in the repository.
3. Planned release development
3.1. Perform the development of planned versions in the main configuration repository.
3.2. Each revision in the main repository must switch the stored configuration from a functional (ready-for-release) state to another functional state.
Committing revisions that are not fully debugged is not allowed! The main repository must always stay in the functional state to ensure that the building of the release version can be started at any time.
3.3. You can perform the following tasks in the main repository:
- fixing issues when this does not require design changes or significant development and testing time. Otherwise, the development requires a design project (in this scenario use the procedure of working with the repository that you use for other design projects).
- including new library versions;
- including fully debugged projects;
- in exceptional cases, you can perform project development in the main repository (such as mass refactoring).
3.4. All of the revisions in the main repository must have comments.
The comment content depends on the changes included in the revision:
- if you fixed an issue, provide the issue number and brief description from the bug tracking system;
- if you included a new library version, provide the library name and its full version number;
- if you included a new design project, provide the project number and brief description from the design document storage system;
- if the new revision includes changes based on a design project, in addition to the project number and brief description, provide the description of changes included in the revision.
3.5. Apply all of the changes based on a design project to the main repository as a single revision. If you need to apply the changes several times, open several projects.
3.6. Once you apply the changes to the main repository, you can fix the issues caused by the changes made in this project. To review the design, open a new project.
3.7. When you build a planned release, we recommend that you assign a label with a build number to the revision in the repository that you use for building the release. It is usually the latest revision in the repository.
4. Design project development
4.1. Develop each design project in a separate repository.
Create the design project repository according to the procedure described in Appendix 1.
4.2. When you specify that a configuration stored in the design project repository is supported based on the configuration stored in the main repository, the platform sets the "Vendor object changes not allowed" rule. To be able to work with the design project, change the rule to "Vendor object changes allowed w/o breaking support".
Set the "Vendor object changes allowed w/o breaking support" rule only for objects that will be changed during the development of the design project. Use this rule as sparingly as possible. For example, if the design project changes affect a form, set the rule for the form but keep the "Vendor object changes not allowed" rule for the form's parent object.
In order to change the support rules, you only need to lock the configuration root. You do not have to lock the objects whose support rules you want to change.
These recommendations simplify the process of replicating the changes between the main repository and the design project repository.
4.3. The person responsible for the design project can update the design project configuration periodically. It is up to them to decide how often they perform the updates.
The following factors might affect the update frequency:
- whether the design project affects objects that are in the responsibility of other developers;
- whether refactoring of common code is being performed;
- whether mass fixing of issues is performed in the main repository.
The design project update procedure is described in Appendix 2.
4.4. Once the development is finished, the person responsible for the project gets approval for the deadlines for debugging and for applying the design project changes to the main repository. We recommend that for projects that include modification of a great number of objects, you apply the changes at the end of the development cycle to reduce their impact on other projects.
People responsible for other projects can submit requests to postpone the deadlines.
4.5. Apply the project changes to the main repository when the project debugging is complete. We recommend that, once the debugging of the design project is finished, you generate a file with a comparison of the design project configuration and the main configuration.
4.6. Applying design project changes to the main repository must not lead to prolonged object lockouts in the main repository. To achieve that, first update the design project repository from the main repository using the procedure described in Appendix 2. In case of numerous changes, the update might take significant time (up to several days) and the main repository configuration might change during this period. Therefore, the update process will include several iterations, each reducing the number of changes until only the changes introduced in the design project are left.
We recommend that you perform a quick design project functionality check after each update iteration.
Start applying changes to the main repository (which requires locking the main repository objects) only when the majority of the differences between the repositories come from the changes introduced by the design project.
4.7. The person responsible for the design project must be careful with applying changes to the main repository. They should remember that the main repository must be ready for building a planned release at all times.
Once the changes are applied to the main repository, the design project developers and testers perform a quick check to ensure that the changes are applied correctly and they do not have any impact on the related functionality. The person responsible for the project defines what exactly requires checking, as well as how the check is performed.
4.8. After the check is performed and before the changes are committed to the main repository, the person responsible must run a configuration check with all of the check options enabled.
Committing the changes to the main repository is only allowed when all of the errors introduced by the design project and found during the configuration check are successfully resolved.
4.9. Once the changes are applied to the main repository, the person responsible for the design project deletes the project repository.
5. Build numbering
The version numbering standards are described in Version and revision numbering.
The following additional rules apply to the build number (the fourth part of the full number).
5.1. Increment the build number both in the main repository and in the patch repository in the following cases:
-
before building a release version. This is required to ensure that the release number is different from the previous release number;
-
when an Infobase update handler is added. This is required to ensure that all of the developers will have the handler started automatically (only available for configurations based on 1C:Subsystems Library).
5.2.1. When you add Infobase update handlers to a repository, increment the build number for this revision. The following scenarios are available:
-
The update handler is added to the design project repository during the development of the design project. When you apply the changes to the main repository, increment the build number in the main repository.
-
The update handler is added when fixing an issue. If the issue is fixed in a single repository (either the main repository or the patch repository), increment the build number in that repository. If the issue is fixed in both repositories, increment the build number is both repositories.
5.2.2. The handler and the build number increment must belong to the same revision. The update handler must be "tied" to the build number that is added to the repository together with the handler.
5.2.3. If available update handlers belong to different subsystems within a configuration, increment both the handler's subsystem build number and the configuration build number.
5.3. Increment the build number:
-
In the configuration properties.
-
In the InfoBaseUpdate<LibraryName>.OnAddSubsystem procedure (only for configurations based on 1C:Subsystems Library 2.0).
Appendix 1. Creating a design project repository
- Update the configuration bound to the main repository from that repository.
- Create a distribution file (*.cf) for the configuration from the main repository.
- Load the configuration from the distribution file to the Infobase that you want to use for the design project development. The loaded configuration is supported and changing this option is not allowed.
- Create a configuration repository in a shared folder. Once the repository is created, the platform allows making changes to the configuration.
- Add the ReadOnly user (no password, no right to lock objects). Do not use this user for binding the Infobase to the repository; use it only for updating the configuration from the repository.
- Add the users involved in the project as repository users (the logon name matches the employee surname, no password, with the right to lock objects). Do not use the ReadOnly user for project development.
Appendix 2. Procedure of updating a design project repository from the main repository
Before applying changes from the design project repository (hereafter, DPR) to the main repository (hereafter, MR), update DPR from MR.
To update DPR from MR, perform the following actions:
- Update the Infobase bound to MR.
- Create a distribution file for the MR configuration.
- Lock all of the objects in DPR.
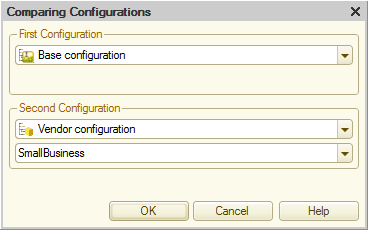
- Compare the main configuration with the vendor configuration (on the Configuration menu, click Compare configurations). Save the comparison result to a file, it will contain the changes introduced by the design project. On the Actions menu, click Configuration comparison report. We recommend that you save the file both in text and spreadsheet formats for future use.
- Update the configuration (on the Configuration menu, point to Support and click Update configuration. Click Select update file and specify the configuration distribution file created during step 2).
In the configuration comparison and merge window that is opened, click the Filter button and select the Show only properties that were changed twice the checkbox.
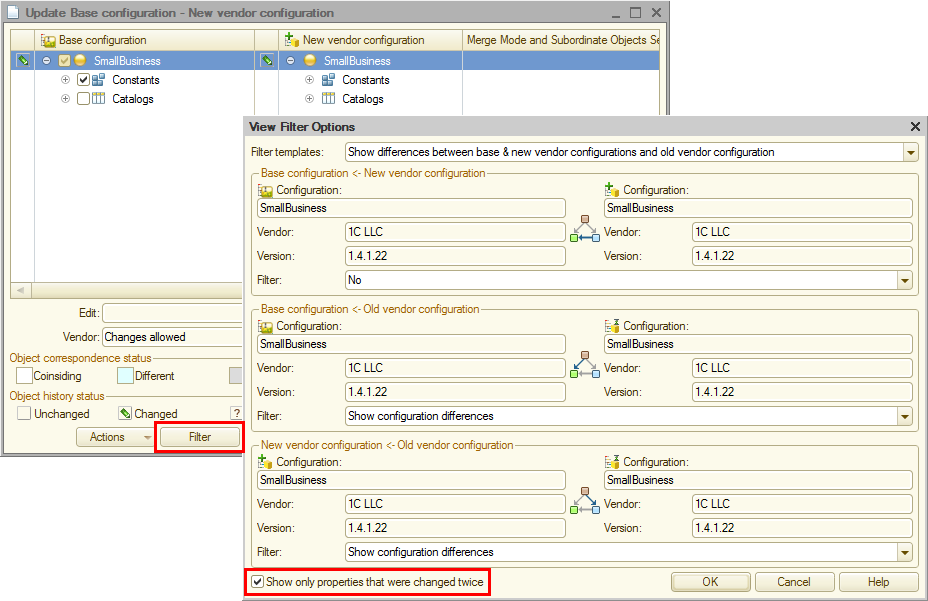
When merging the configurations, pay attention to the listed objects. You can merge the rest of the objects without any additional checks.

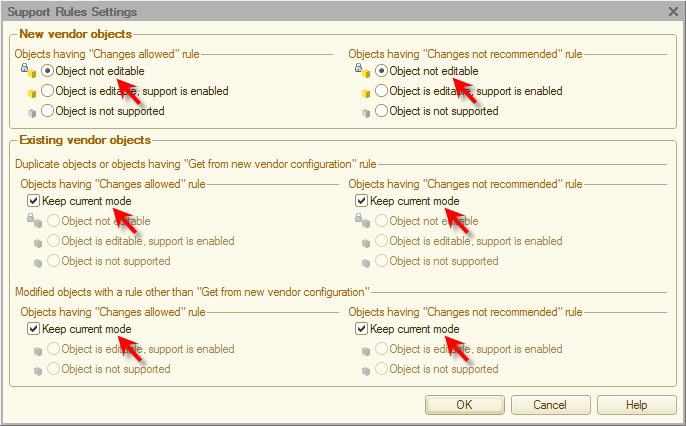
- In the window that is opened when you click Execute in the configuration comparison and merge window, set the Object not editable rule for all of the vendor objects (for both objects with the Changes not recommended rule and objects with the Changes allowed rule). For the rest of the objects, select the Keep current mode checkbox (it is selected by default).
- Once the comparison is complete, correct the objects where changes introduced by the design project were overwritten during the update. This actually means that you have to redo all of the design projects changes to these configuration objects.
- Run the comparison of the main design project configuration and the updated vendor configuration (on the Configuration menu, click Compare configurations).
- Save the comparison result to a file. The file name must be different from the file name from step 4. On the Actions menu, click Configuration comparison report. We recommend that you save the file in text format for future use.
- Compare the files created during steps 4 and 9. If the update is performed correctly, the files will be identical.

