In-App Purchases in Mobile Applications Built on the 1C:Enterprise Platform

Modern mobile operating systems allow application developers to generate revenue from the use of their applications. In general, such revenue can come from two sources: displaying ads in a mobile application and selling (activation) premium features. For example, users get a demo or limited feature version and get access to premium features after they make a payment.
The 1C:Enterprise mobile platform has implemented both in-app ads and in-app purchases.
In this article, we will try to cover the topic of in-app purchases.
So, what is an in-app purchase mechanism?
The 1C:Enterprise platform supports Android and iOS in-app purchase mechanisms. In Android, it is Google Play in-app billing. And in iOS, it is Apple in-app purchase.
Mobile operating systems allow three types of purchases:
- Non-consumable products. Users make a purchase once, and it never expires.
- Consumable products. Users can purchase them as many times as they want. In Android, such a purchase becomes available after the depletion of the previous one. In iOS, users do not have to wait for the product to deplete and can purchase as many consumable products as they want;
- Subscription. It is a single purchase product valid for a limited time. Subscriptions can be auto-renewable. In this case, a user account gets charged with the subscription amount on each renewal.
To enable in-app purchases, a developer should go to the developer account on Google or Apple and specify in-app purchases that should be available to users. After that, the developer should place identifiers (IDs) of the allowed in-app purchases into the respective mobile application. One of the ways to do it is to use string constants.
With identifiers added, we can proceed with in-app purchases. First, we need to get to the in-app purchases manager. It handles the in-app purchases process. We do it via the global context’s property InAppPurchases:

Now we should check if it is possible to make purchases at all. These are two methods that should help us:

Why do we need these checks after all? Things are simple here. In some cases, the in-app purchase option might be locked on a mobile device. For this reason, developers add to the code the purchase availability check to prevent the application from throwing an exception and crashing.
As soon as we ensure that in-app purchases are possible and know the purchase types available, it is time to try buying something. Before we attempt to make a purchase, it is better to make sure that the respective user did not purchase the product under consideration on another device using his/her Google account. For this, we want to use the following method:
![]()
This method requires Internet access, and it takes some time to get the result. The method sends identifiers to a marketplace to check purchase history. Then it saves (or updates) the information on the device in the locally stored purchase history. In the future, the method can use the locally stored purchase history without accessing the Internet, which speeds up the process.
Now we can make a purchase or consume a product. In any case, we need up-to-date information on a specific purchase. We can retrieve this information from the list of available and purchased items. For this purpose, we use this method:
![]()
Every purchase is described via object InAppPurchase. The object contains an identifier (ID), title, description, price, and purchase currency:
To buy or consume a product, we use one of the two methods:

Method BeginPurchasing() sends a request for payment approval. After that, the system transfers control to the payment processing interface provided by the operating system. Upon completing a purchase (success or fail), the user returns to the mobile application.
This is basically the logic of the in-app purchase mechanism. Still, before we proceed to create code, let us consider how we can test in-app purchases functionality.
While iOS allows testing in-app purchases on the mobile development platform, that is, during the development process, there is no such functionality in Android. The mobile development platform provides no way of testing in-app purchases with the Google Play in-app billing mechanism.
Nevertheless, 1C has got you covered. The company has introduced a dedicated web service called Debug purchases, an in-app purchases emulator.
This service comes with 1C Mobile Application Builder. Here is how you can use the service for testing purposes:
- Install 1C Mobile Application Builder, make necessary settings, and publish the in-app purchases emulator on your web server.
- Add to 1C Mobile Application Builder the purchases that need testing.
- Set in the mobile application the web address of the published service (the in-app purchases emulator);
- With this setting, the mobile development platform gets redirected to the emulator each time it calls methods of object InAppPurchasesManager;
- The emulator gets the call and acts as Google Play in-app billing mechanism.
Below I would like to show you how to create a 1C:Enterprise platform-based application with in-app purchases and test the mechanism of the in-app purchase with the emulator Debug purchases.
First, we install and set up 1C Mobile Application Builder. Remember, we need this configuration to build both Android and iOS applications. I strongly recommend that you always use the latest release of this configuration.
We are not going through a detailed setup as it is out of the scope of this article. Thus you need some prior experience with setting up 1C Mobile Application Builder and building 1C:Enterprise platform-based applications.
So, we have 1C Mobile Application Builder adequately set up. Log in as administrator in Designer mode and add one more user to the user list. We need this user account for testing the in-app purchase mechanism:
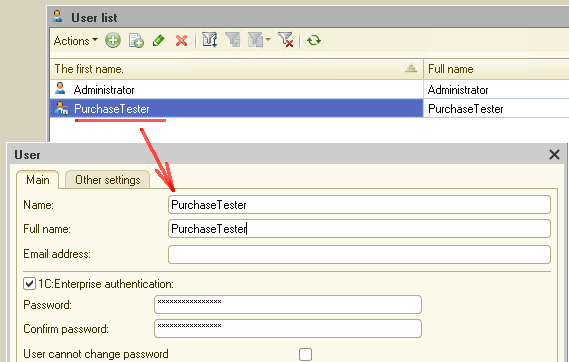
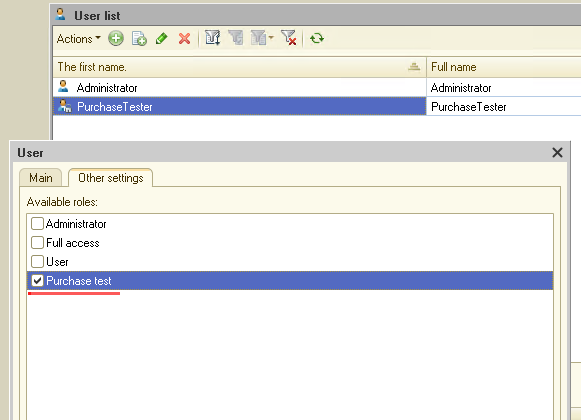
Set a password for this user. We should need it at a later stage. Set the user access rights:
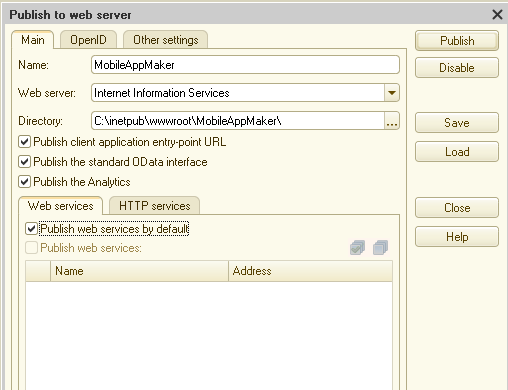
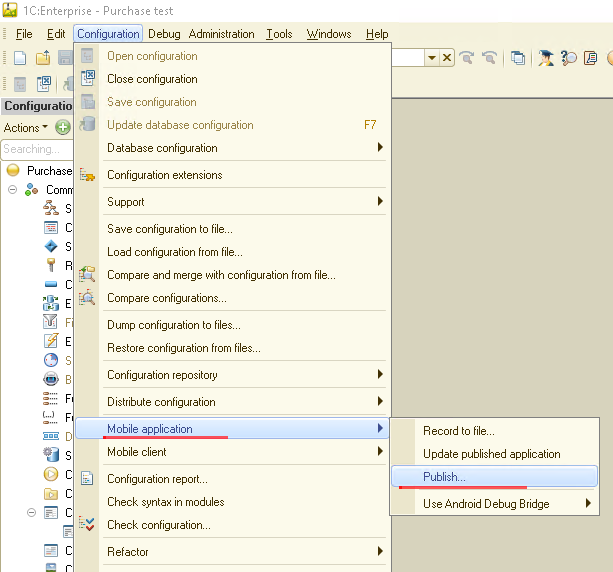
The next step is to publish HTTP service Debug purchases Menu: Administration -> Publish to web server. You get the following window:
Switch to tab HTTP services and set a flag on HTTP service PurchasesTest:
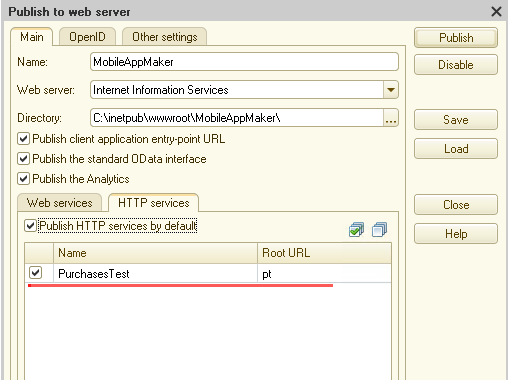
Click Publish to publish the HTTP service on our web server.
This is all we need to do in 1C Mobile Application Builder at this stage. Time to build our mobile application.
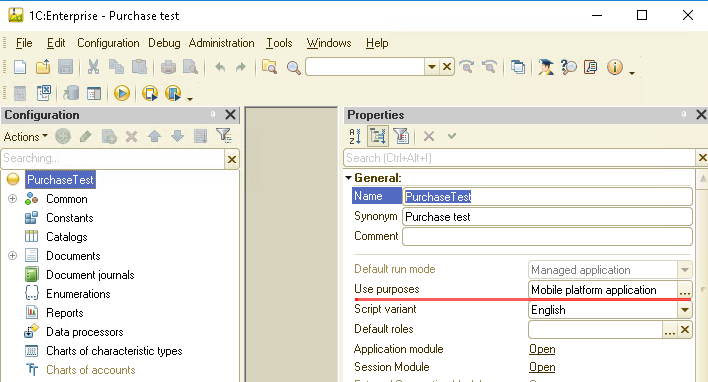
Create a new 1C application, set Use purpose to Mobile platform application:
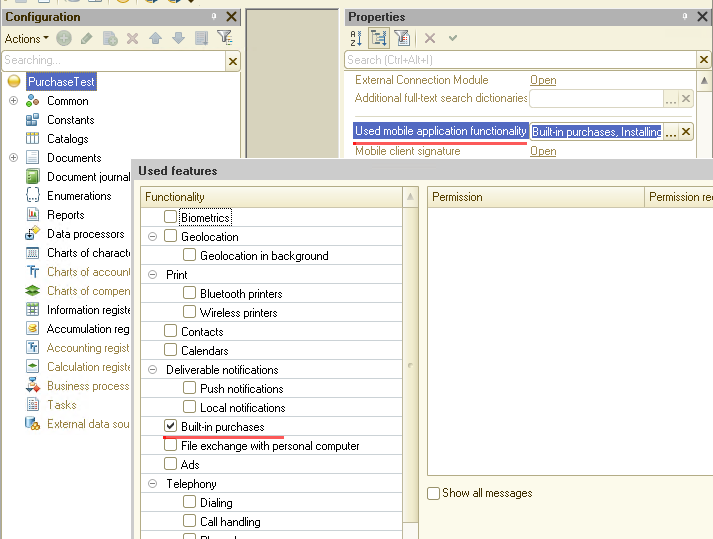
Make sure you enabled in-app purchases:
Create a common form that should contain commands for the in-app purchase mechanism.
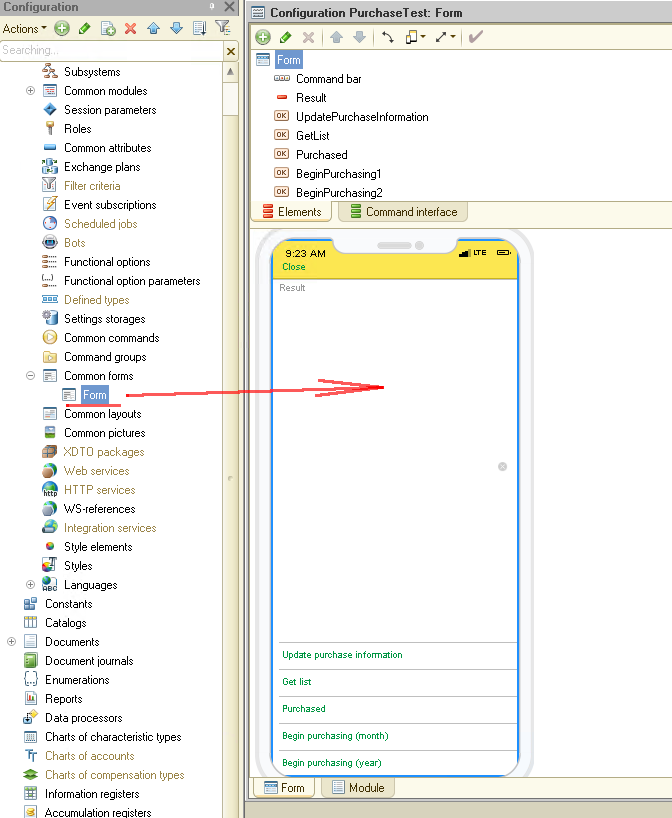
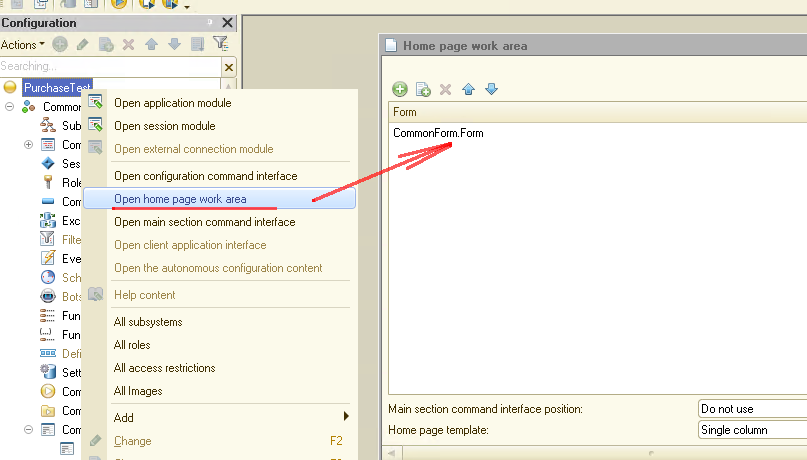
Put it on the home page to have this form open immediately on the application start:
Now we can create the program code. As mentioned above, before we can proceed, we should update the list of available purchases. Create command UpdatePurchaseInformation to the form and add the following code for this command:
|
&AtClient Procedure UpdatePurchaseInformation(Command)
#if MobileAppClient then If InAppPurchases.PurchasesSupported() Then
// Get a list of purchase/subscription IDs PurchaseIDs = GetPurchaseIDs();
// Update information on the list of identifiers InAppPurchases.UpdatePurchaseInformation(PurchaseIDs);
Result = "Updated: " + CurrentDate(); EndIf; #endif
EndProcedure |
In the code, we start with checking if in-app purchases are available at all:
InAppPurchases.PurchasesSupported
Then we call function GetPurchaseIDs() that returns the IDs of in-app purchases. Here is the code for this function
|
&AtClient Function GetPurchaseIDs() Export
PurchaseIDs = New Array; PurchaseIDs.Add("one_month_subscription"); PurchaseIDs.Add("one_year_subscription");
Return PurchaseIDs;
EndFunction |
Our next step is to call method UpdatePurchaseInformation(PurchaseIDs), which receives the list of in-app purchases in the form of an array. This method retrieves the purchased product list and updates relevant data in the local storage. Remember that this method requires Internet access.
Fine. Now, as we have our purchase history updated, let us get the list of products available for purchase. We do it with procedure GetList:
|
&AtClient Procedure GetList(Command)
#if MobileAppClient then Result = "In-App purchases:" + Chars.LF;
// Get a list of purchase/subscription IDs PurchaseIDs = GetPurchaseIDs();
// Getting a description of available in-app purchases // Internet access is not needed in this case since the list is stored locally on the device. // The update happens after calling UpdatePurchaseInformation // and also after BeginPurchasing AvailablePurchaseIDs = InAppPurchases.GetList(PurchaseIDs, False);
For Each InAppPurchase In AvailablePurchaseIDs Do
Result = Result + ?(Result = "", "", Chars.LF) + "Currency: " + InAppPurchase.Currency + Chars.LF + "Description: " + InAppPurchase.Description + Chars.LF + "ID: " + InAppPurchase.ID + Chars.LF + "Price: " + InAppPurchase.Price + Chars.LF + "Title: " + InAppPurchase.Title + Chars.LF + "----";
EndDo; #endif
EndProcedure |
The code is pretty straightforward. First we retrieve ID array (GetPurchaseIDs()), then we call method GetList(PurchaseIDs, False). The data returned by this method get processed in a loop and then displayed on the form.
Procedure GetList returns general information on in-app purchases, but it has no data on whether a certain product has been purchased. Assume we need to know whether a specific product has been purchased. Then we go for method Purchased(). Create procedure Purchased to display info on purchased products:
|
&AtClient Procedure Purchased(Command)
#if MobileAppClient then Result = "In-App purchase status:" + Chars.LF;
// Get a list of purchase/subscription IDs PurchaseIDs = GetPurchaseIDs(); AvailablePurchaseIDs = InAppPurchases.GetList(PurchaseIDs, False);
For Each InAppPurchase In AvailablePurchaseIDs Do
// Internet access is not needed in this case, // since the list is stored locally on the device. // The update happens after calling "UpdatePurchaseInformation" // and also after "BeginPurchasing" Result = Result + ?(Result = "", "", Chars.LF) + InAppPurchase.ID + " " + InAppPurchases.Purchased(InAppPurchase) + Chars.LF + "----";
EndDo; #endif
EndProcedure |
As you can see, the code for procedure Purchased is almost identical to procedure GetList. The difference is that with this procedure, the system first calls method Purchased(), which shows its purchase status.
And the final step. Create two commands to make an in-app purchase. We want to buy a monthly subscription (ID one_month_subscription) and an annual subscription (ID one_year_subscription).
Below is the code for procedure BeginPurchasingOneMonth to purchase a monthly subscription:
|
&AtClient Procedure BeginPurchasingOneMonth(Command)
#if MobileAppClient then Result = "BeginPurchasing (month): " + CurrentDate() + Chars.LF;
NotifyDescription = New NotifyDescription("PurchasingEnd", ThisForm);
// To start the purchase, we need to pass in-app purchase ID InAppPurchases.BeginPurchasing(NotifyDescription, "one_month_subscription"); #endif
EndProcedure |
As you can see in the source code, the whole purchasing process in about calling method BeginPurchasing() that receives previously created NotifyDescription and the ID of a product to be purchased.
Below is the code for handler NotifyDescription:
|
&AtClient Procedure PurchasingEnd(Purchase, Bought, Receipt, AdditionalInformation) Export
#if MobileAppClient then Result = Result + ?(Result = "", "", Chars.LF) + "ID: " + Purchase + " Type: " + TypeOf(Purchase) + Chars.LF + "Bought: " + Bought + Chars.LF + "Receipt: " + Receipt + Chars.LF + "Service: " + Receipt.Service + Chars.LF + "Additional information: " + AdditionalInformation + Chars.LF + "----"; #endif
EndProcedure |
Codes for procedure BeginPurchasingOneMonth and BeginPurchasingOneYear are almost identical. The only difference is that we pass a different product ID to method BeginPurchasing().
So now we have a simple mobile application built on the 1C:Enterprise platform and supporting in-app purchases. It is time to check how it works.
As mentioned above, in-app purchases require Google Play in-app billing or Apple in-app purchase mechanism, depending on the operating system required.
Assume that we do not have access to these operating systems at the moment. Still, as mentioned earlier, we have the in-app purchases emulator by 1C. Let us run the required test with this emulator.
Before we proceed with testing, we need to make some arrangements.
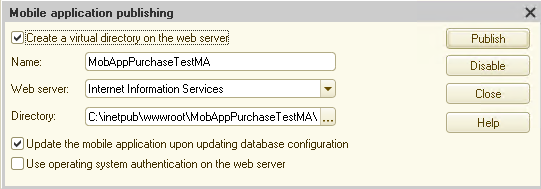
First, we publish the application on our web server:
Then we save the mobile application as a file so that we can add it to 1C Mobile Application Builder at the next step.
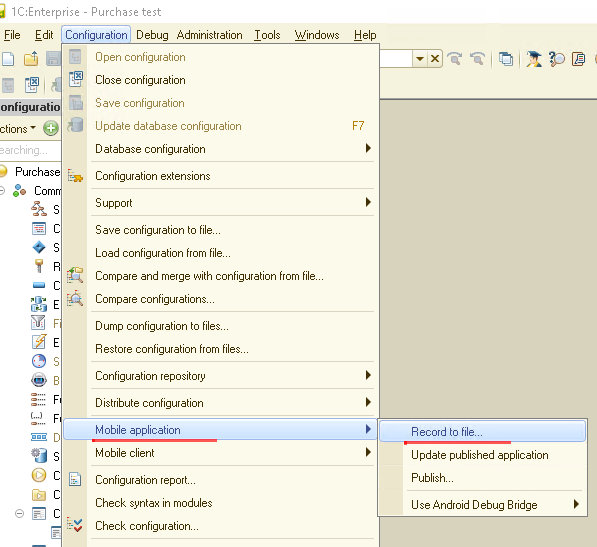
We get file 1cema.zip.
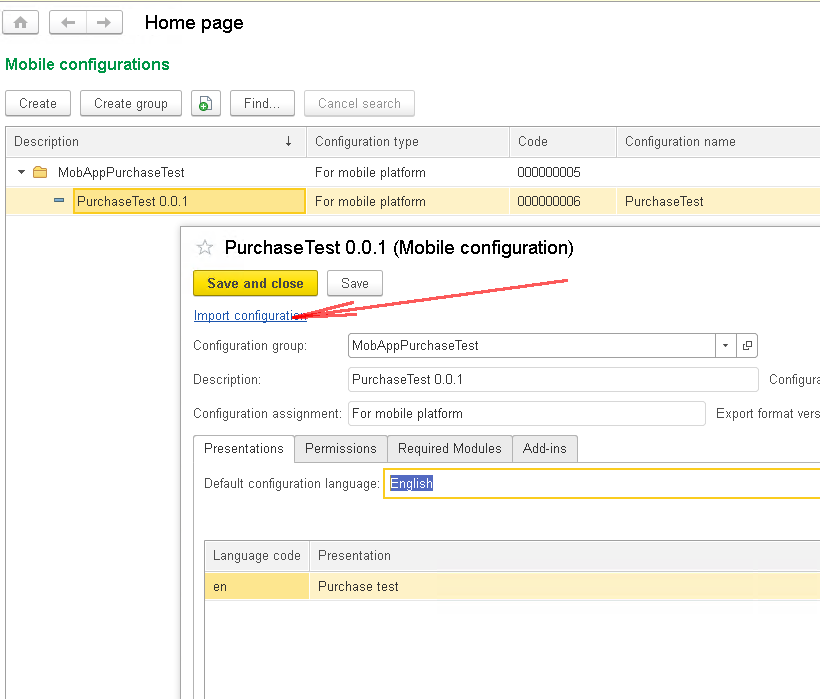
Now we run 1C Mobile Application Builder in dialog mode and add our application to catalog Mobile configurations. To do this, click Import configuration link and select 1cema.zip in the dialogue window.
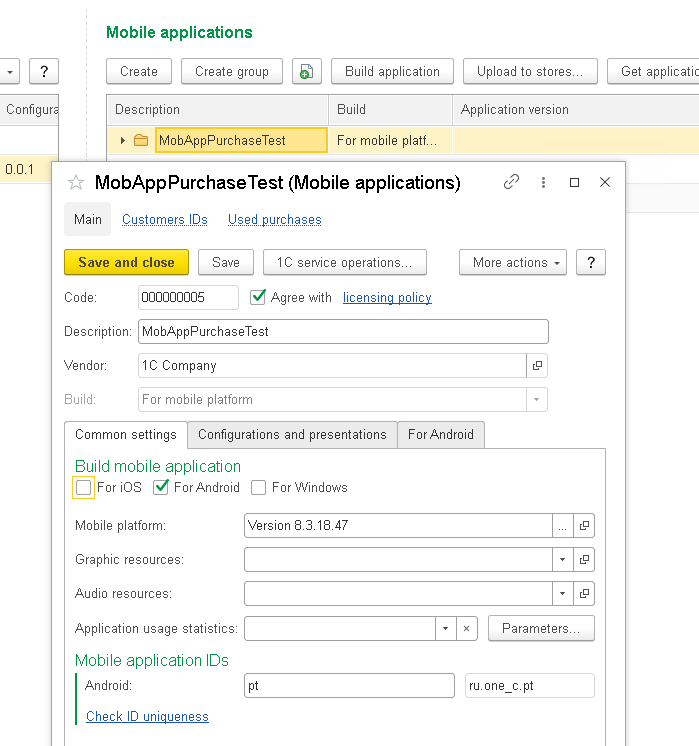
Then in catalog Mobile applications, create a new group MobAppPurchaseTest and make some adjustments to it:
Go to tab Customer IDs and create virtual users that should make purchases:
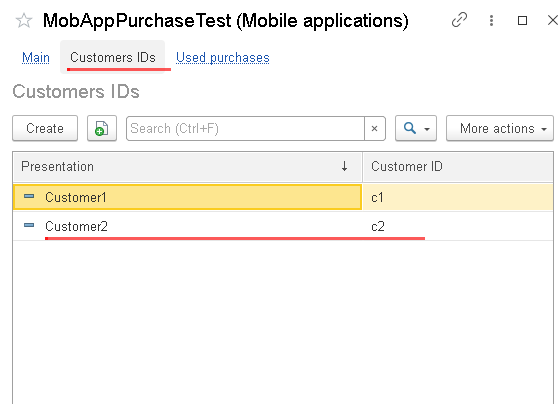
Keep in mind that these are not users of our application but rather virtual Google Play accounts. Naturally, each customer ID should be identical to the respective Google Play account ID.
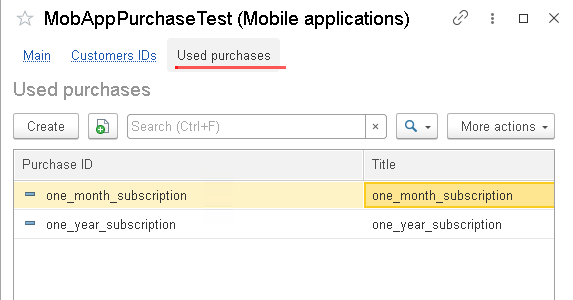
Then on tab Used purchases, create products available for sale:
Here is, for example, a form for creating a monthly subscription:
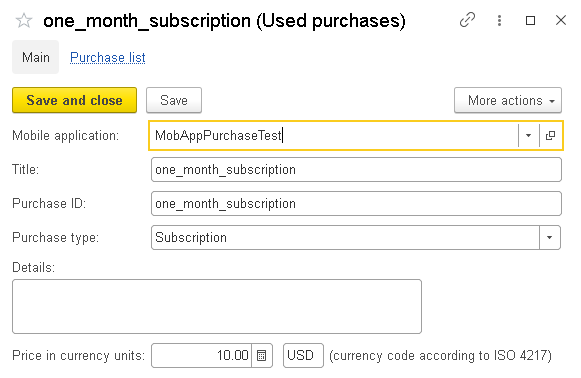
As you can see, we can specify the purchase type, price, currency, and ID.
After creating group MobAppPurchaseTest in catalog Mobile applications, we create a new mobile application in this group and specify the required parameters:
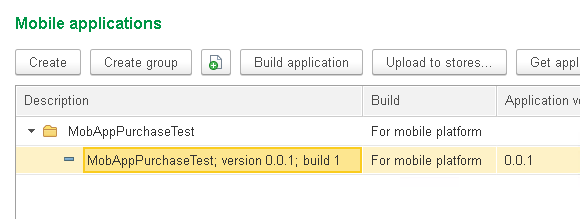
We are not going to dive deep into this process at this stage, as testing in-app purchases does not actually require building an application.
As soon as we are through with all the arrangements, we can proceed to test.
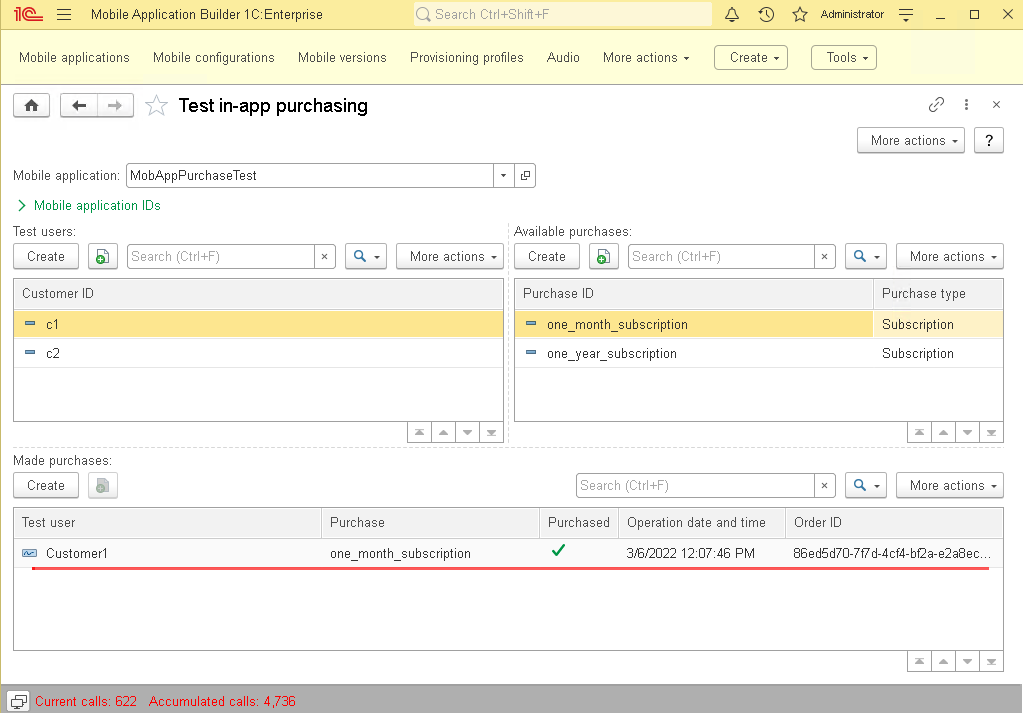
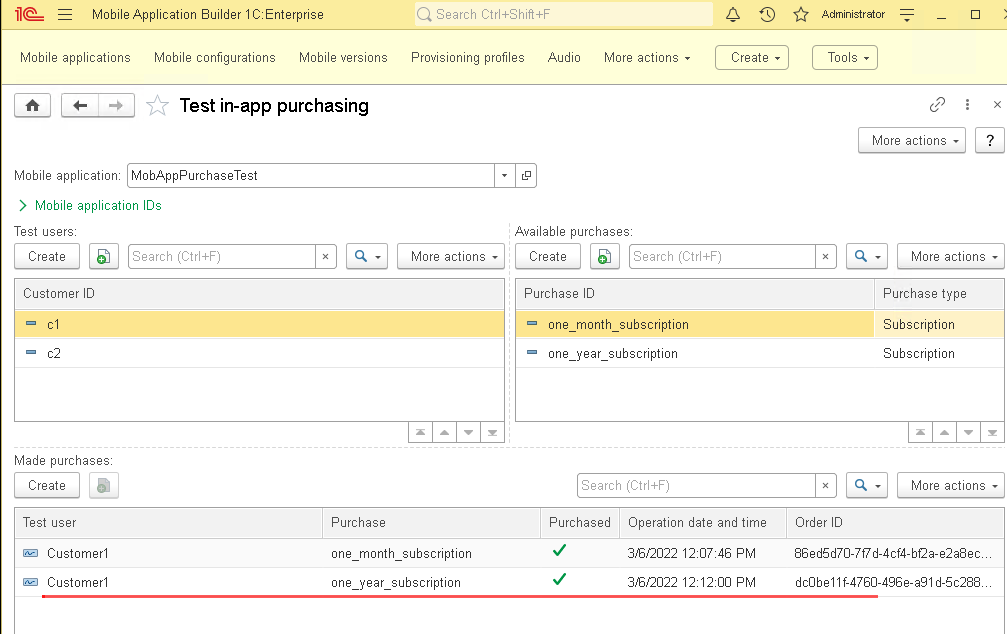
1C Mobile Application Builder has a special service form designed for application testing. Let us open it:
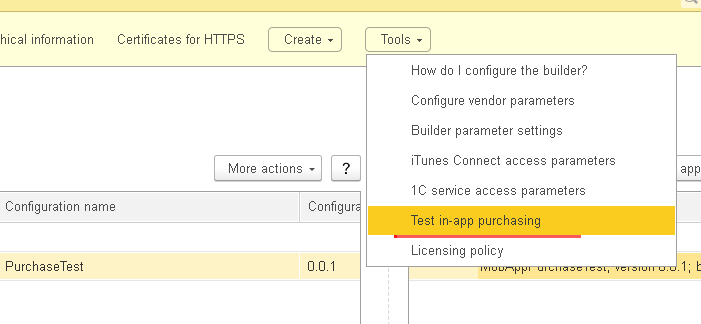
Here is what it looks like:

As we make purchases via the mobile application, respective products get listed in the lower area of this form.
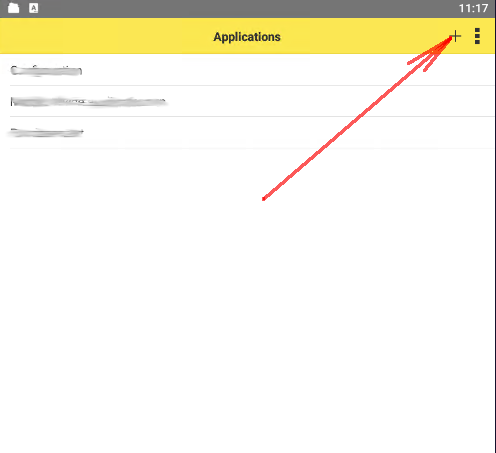
Now, let us go back to our application. As we did not build the application, we want to use the mobile development platform for our tests. Add our application:
We download it from our web server:
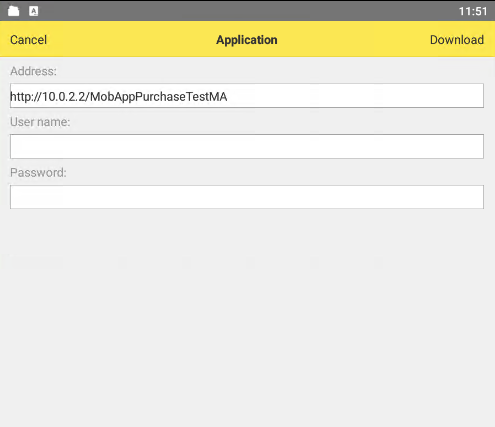
I am using a mobile device emulator that results in such unusual IP as 10.0.2.2. In your case the IP can be different.
Go to the mobile application settings and specify the server to process our purchases. Also, add customer ID, user name, and password to access the HTTP service:
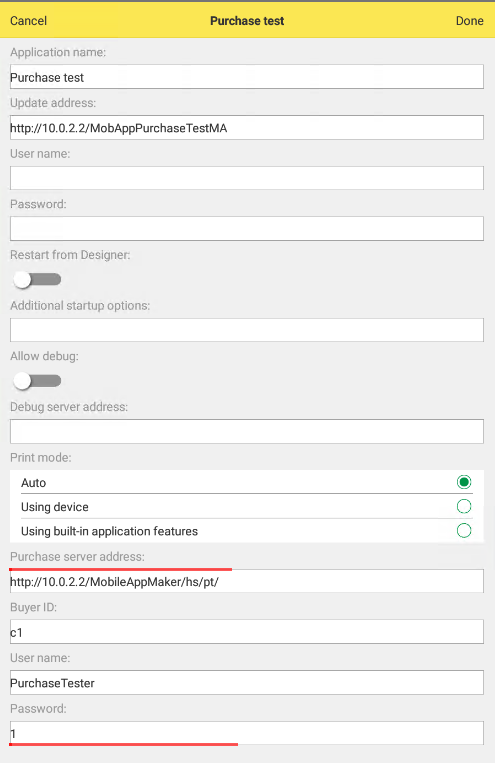
After that, we can start the mobile application and test it. Before we proceed, make sure you have 1C Mobile Application Builder open to monitor the purchasing process in real time.
So, we start the mobile application and run the first command Update purchase information. The application accesses the purchases server and updates the local history of purchases. The result should be as follows:

Now, let us try command Get list:
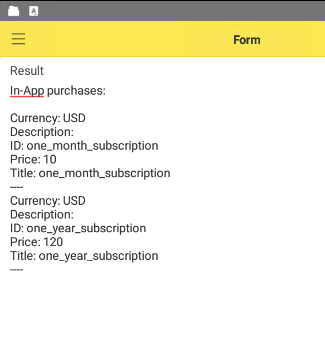
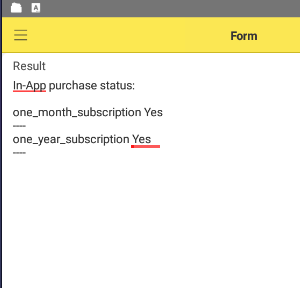
We see it returns the list of products available for purchase. Next, command Purchased returns the list of products available for purchase and their purchase statuses:
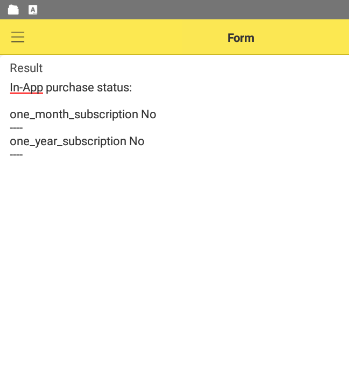
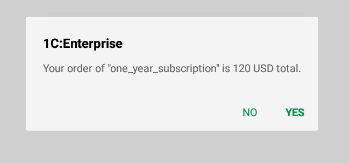
Currently, there are no purchased products. Let us buy a monthly subscription. Use command BeginPurchasingOneMonth. In the pop-up form, we confirm our purchase:
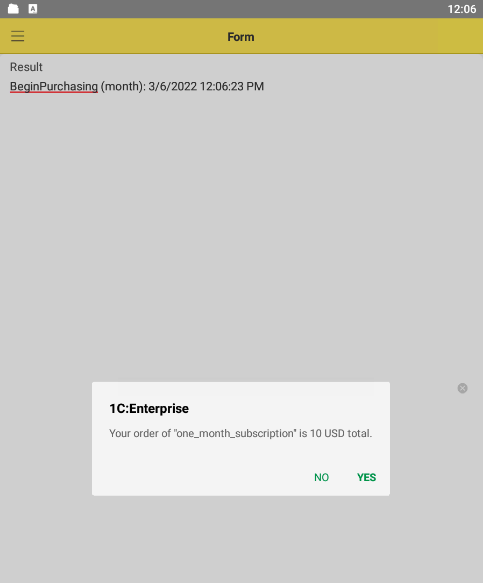
Keep in mind that the look of the confirmation form can vary depending on a mobile device. Click Yes, and done:
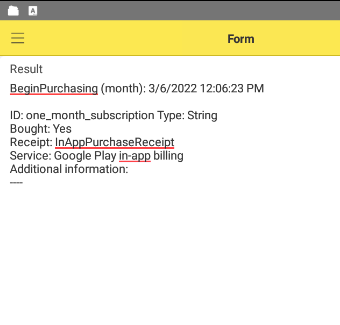
The purchase server has confirmed the transaction. Now, as we switch to 1C Mobile Application Builder, we can see our purchase there:
Click button Purchased
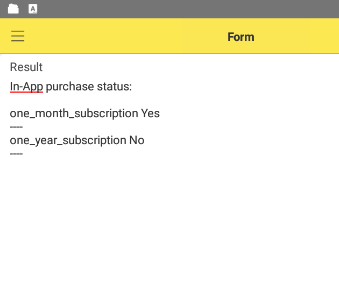
According to the screen, we have purchased one product.
Let us get the annual subscription:
So, everything works as designed. It could be the end of the article, but still, there is something more to mention. We know that in-app purchases are not for fun but to generate revenue. As mentioned before, one way to motivate users to pay for an application is to let them use a limited version free of charge but give access to all functions after a single payment or through a subscription.
In other words, users purchase products not for the sake of purchasing but to get extra features. It means that we should set up our application to change the set of available features depending on user purchases. We can do it by using functional options that enable certain features after purchase.
To set up functional options properly, we check if a user purchased the option to enable the premium features and, if so, activate them.
It is a good idea to start with checking purchase history via method UpdatePurchaseInformation(). There is a chance that a user has purchased some products using the same account on some other device. After that, we check the existence of required purchases with method Purchased().
One more way is to use method GetList() with the second parameter set to TRUE. Thus, the method returns us only the products that have not been purchased.
Naturally, the most convenient solution is to run checks and modify settings on the application start.
So now we have reviewed the basics of utilizing the in-app purchases mechanism in mobile applications built on the 1C:Enterprise platform. But this is not all. Stay with us. There is plenty of fantastic stuff ahead!
As usual, here is a link to the mobile application described in the article.

Writen by
1C Developer
20+ years of experience in the software industry in Russia, UAE and Germany. My main fields of expertise are developing and implementation of business applications (Retail, CRM, WMS, and Accounting) and integration of software with POS equipment and web portals.


