Integration of 1C with Amazon. How to Pass Amazon Orders to the 1C:Enterprise Platform.

I believe you agree that most purchases are now made online and that online sales have noticeably increased during the pandemic.
As the 1C:Enterprise platform does not offer standard mechanisms for organizing online sales, the best option for us, when we have to deal with such a task, is to use an independent website, and after a client places an order on such site, somehow pass the order to the platform.
Which method should we choose to transfer orders from the site to the 1C:Enterprise platform? Developers can decide what they like most. Still, they need to consider the CSM such site is running on. The easiest integration method is to download from the site a flat file, such as XLS or XML, containing order and customer details. And then upload the file directly to the 1C:Enterprise platform. It is the easiest way for data exchange, and nothing prevents us from using it. Nevertheless, if the site’s CSM has an API for data exchange, then exchanging data via this API is a more reliable way.
Let us consider a simple example of how to use the API of one of the popular marketplaces to exchange data and receive orders in an application built on the 1C:Enterprise platform.
So, assume we sell our products on Amazon and want orders from Amazon to get into our 1C application automatically.
Let's go!
To begin with, we briefly describe the 1C application that should receive orders. In real life, this will likely be an off-the-shelf product, but for our training example, I want to use the simplest configuration, in which there is only one document called SalesOrder and two catalogs, Products and Customers. Despite the simplicity of the example, it should help you understand the principle of data exchange and develop a solution that suits your needs.
So, here is the configuration of the application that will receive data:
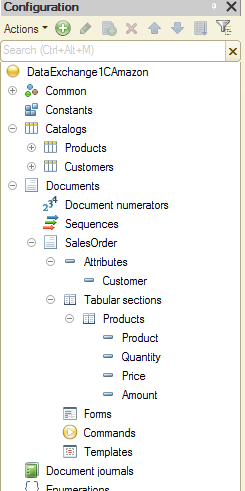
In the process, we will add a few more objects and attributes to the configuration, but at this point, we are good to go with this simple structure.
Well, we are through with the 1C configuration. The next step is to enable our application to access the Amazon Seller Central portal.
Let me give you a brief comment before we proceed. Amazon has two different methods of accessing data: one is the Selling Partner API (SP API), and the second is the Amazon Marketplace Web Service (Amazon MWS).
As Amazon MWS is deprecated and will stop working after December 31, 2023, we want to use only the SP API.
A reasonably detailed guide on the SP API is available at https://developer-docs.amazon.com/sp-api/
I will use Postman to debug POST and GET queries to the SP API. A detailed description of how to efficiently use this tool with the SP API is available at https://developer-docs.amazon.com/sp-api/docs/using-postman-for-selling-partner-api-models
Naturally, you need an Amazon account with access to Amazon Seller Central to proceed.
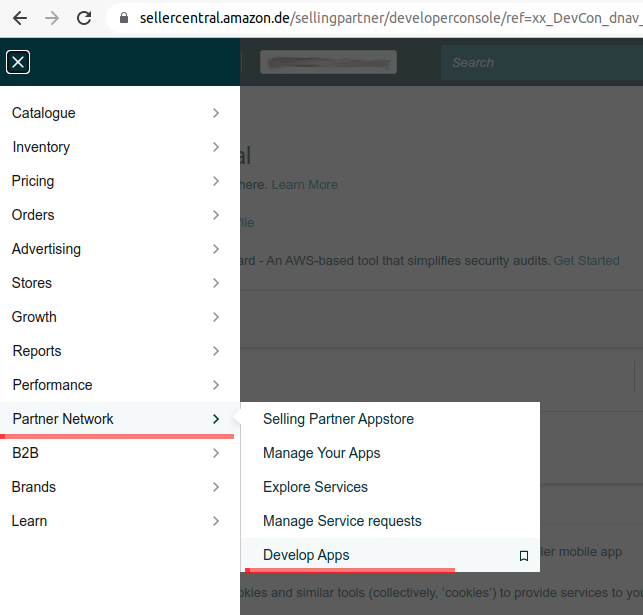
We need to register our application with Amazon Seller Central and then specify the data access level we want.
Go to Amazon Seller Central and open the Develop Apps section:
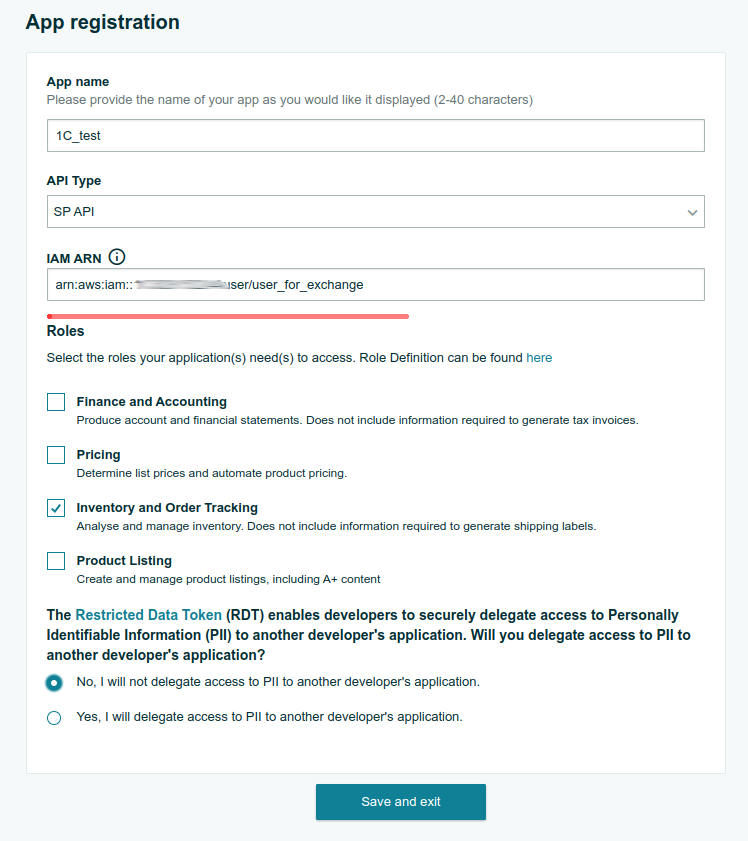
In this section, we can add our 1C application to the list of allowed ones and get access keys for it. Click button Add new app client:
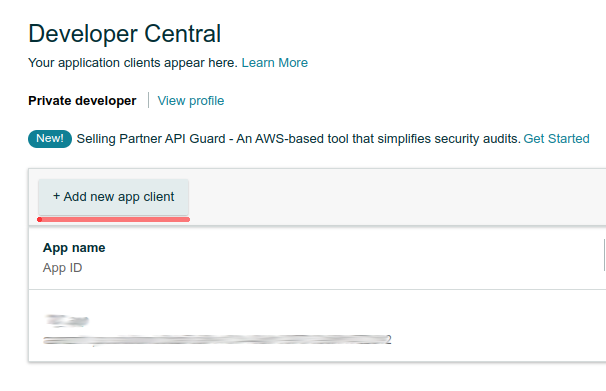
The following form opens:
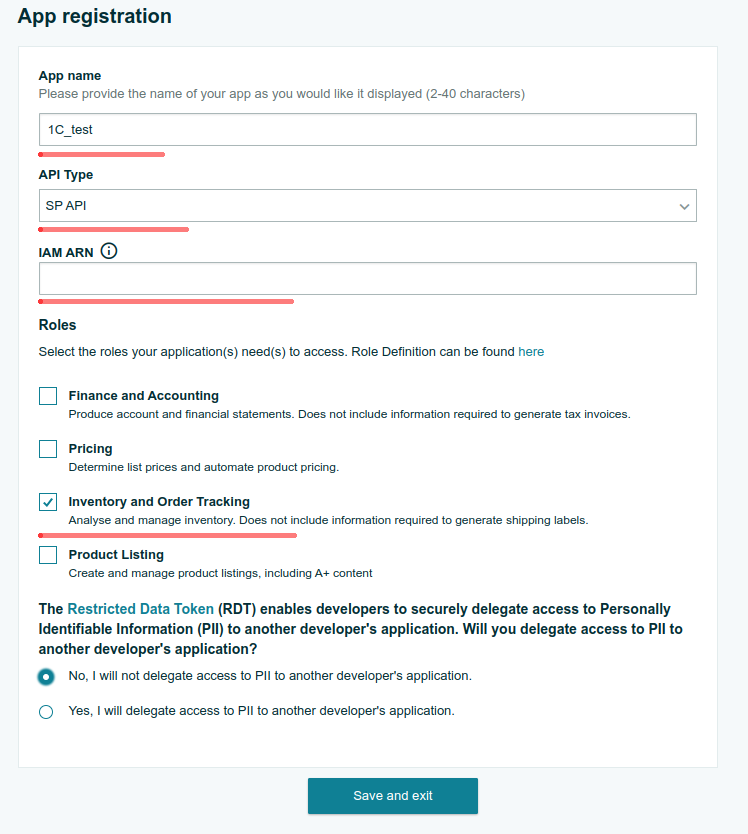
Fill in fields App name and API Type. Then select the required role. In our case, it is Inventory and Order Tracking.
As you can see, we have one more field blank. It is IAM ARN, which is an abbreviation for Identity and Access Management (IAM) Amazon Resource Names (ARN).
A detailed description of how to get a value for this field is available at https://developer-docs.amazon.com/sp-api/docs/tutorial-create-a-private-selling-partner-api-application#Step-2-Create-and-configure-IAM-resources
In brief, you need to register with AWS, create a user, and grant the user the required rights.
The ARN format for IAM users is as follows: "arn:aws:iam::{Account-ID}:user/{Username}" (note that the curly braces aren't part of the format). An example IAM ARN looks like this: arn:aws:iam::100123456789:user/Daniel
So, we get the value for IAM ARN and enter it in the form shown above:
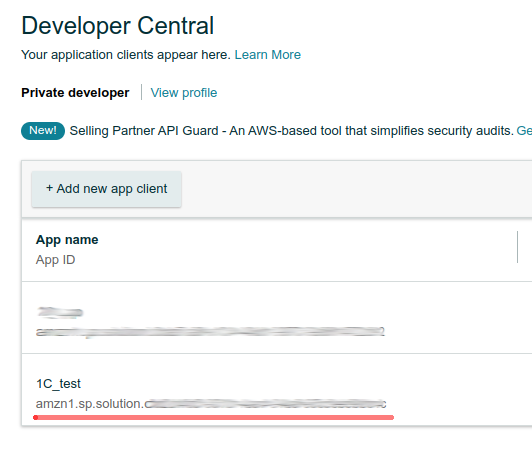
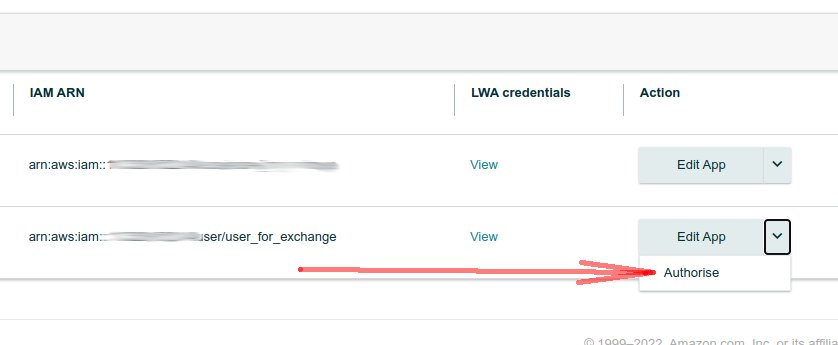
Then we click button Save and exit. Our application is now included in the list of allowed apps and has its App ID:
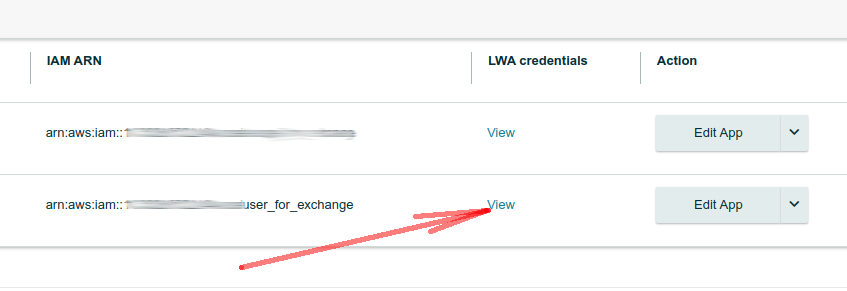
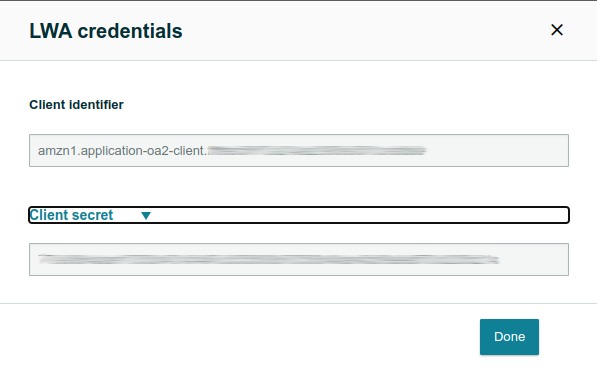
To look up for client identifier and client secret for this application, we go here:
Also, in addition to client identifier and client secret, we need to know the so-called refresh_token. It can be generated as follows:
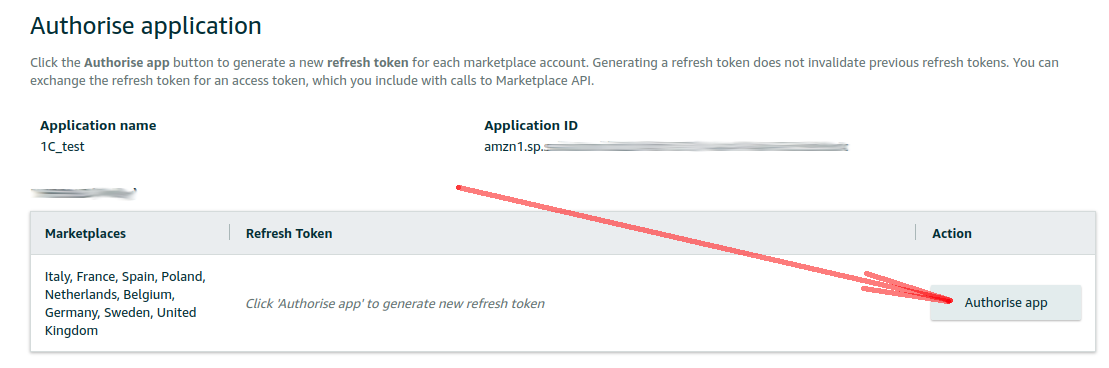
After clicking button Authorize app, the system automatically creates a new refresh_token:
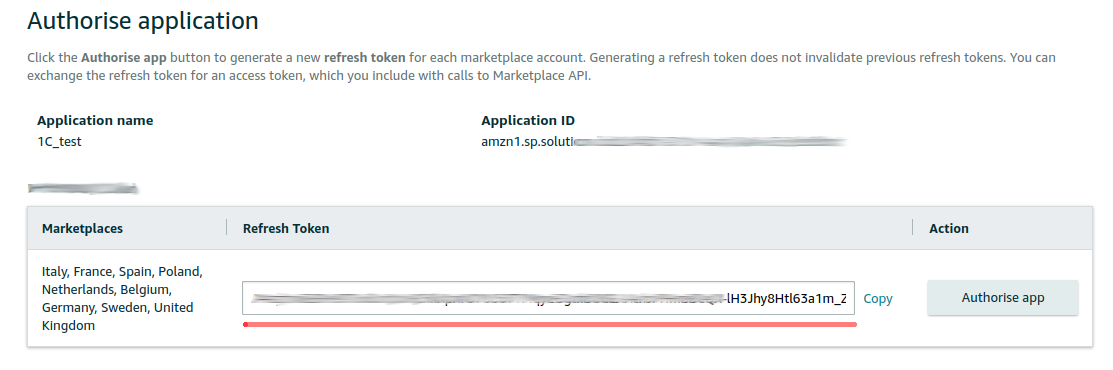
Make sure you save the token elsewhere since it will no longer be available after closing the window.
Now let us try to get an active data access token called access_token.
To do this, we need to send query POST with the required parameters to https://api.amazon.com/auth/o2/token
A detailed description of query parameters is given in the documentation for the SP API.
To check that everything is configured correctly and that the system returns an active access_token, I run this query from Postman. And here is the result we get:
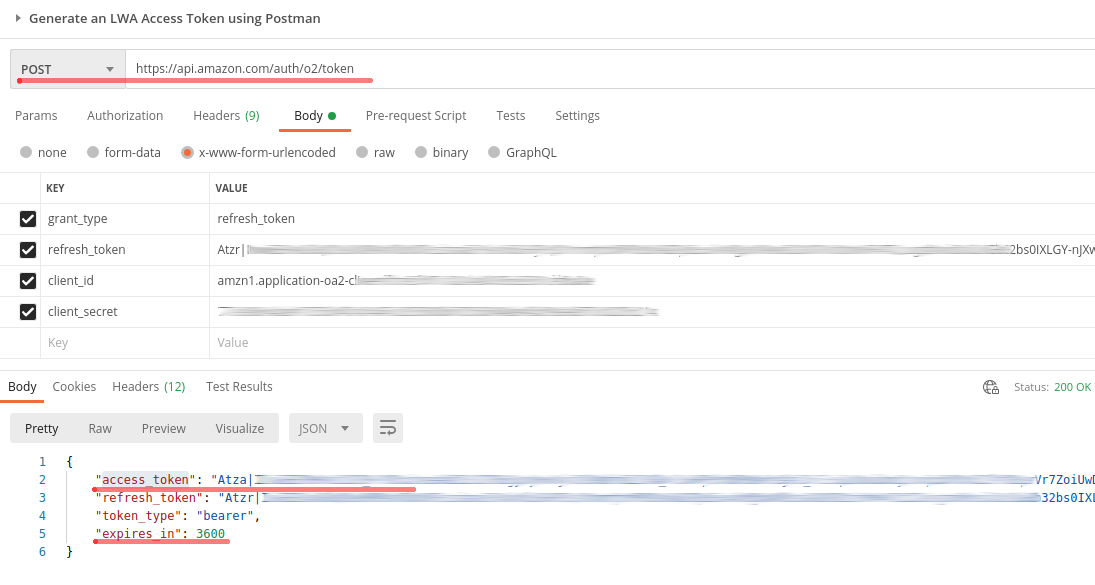
As you see, in response to our query, we have received a valid access token, which we can use to access the data. Remember that this token has a limited lifetime. In our case, the limit is one hour (3,600 seconds).
Wow, we are doing quite well: we registered our application with Amazon, allowed the application to get data, and learned how to get an access token.
It's time to do some work for the 1C application.
At the beginning of this article, I mentioned that we would have to add several objects to our 1C application. Now is the time.
What objects do I want to add? Do you remember that we need to know client identifier, client secret, and refresh_token to generate a data access token? And what about access token limited lifetime?
I suggest we place this data inside the 1C:Enterprise platform so the application itself can retrieve the access token.
We go back to the 1C Designer and create five constants there:
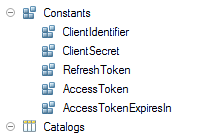
The first constants are of type String of unlimited length, and the last constant’s type is Date and Time.
This constant is for storing the lifetime of the active access token. We need it so that we do not download a new access token from Amazon while the current one is still valid.
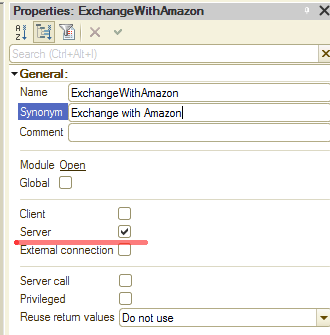
Next, create common module ExchangeWithAmazon:
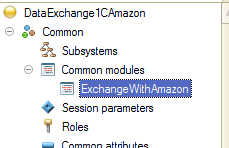
This module will use server calls:
Let's create function GetToken() in this module. Its role is to run query POST query and receive an access token:
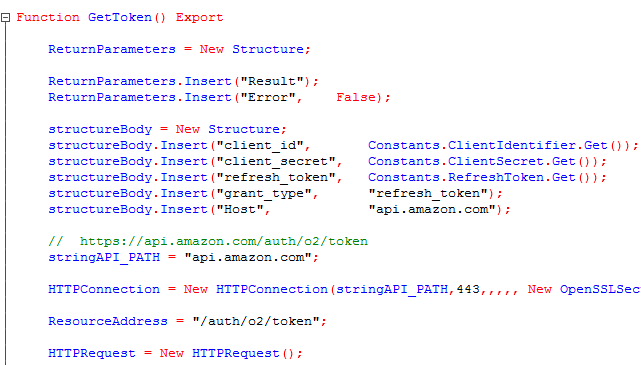
I’m not giving the function’s source code here as it is rather large. But no worries, you can find all source codes at the end of this article.
In brief, this function does the same as we previously did with Postman, sending query POST to https://api.amazon.com/auth/o2/token and getting an access token and its lifetime.
The access token and its lifetime get written to the respective constants.
Well, we have everything ready. Why not try getting some orders?
A detailed description of API for handling orders is available at https://developer-docs.amazon.com/sp-api/docs/orders-api-v0-reference
We do not need this much for our training. We are interested only in one query: query GET to address /orders/v0/orders.
This query returns a list of orders. At that, the query allows filtering the list by such parameters as order creation date, order status, and similar. We retrieve the Amazon orders to the 1C:Enterprise platform using this query.
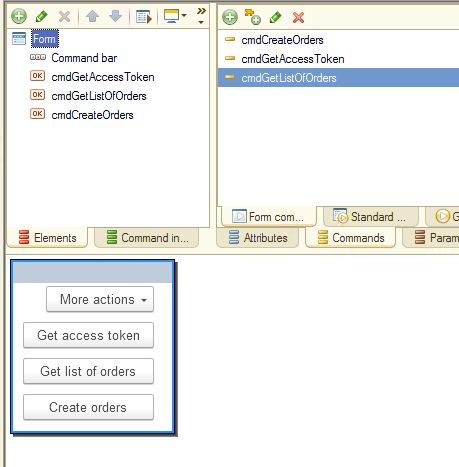
To make the process more convenient, inside the platform we create a data handler to do the job of receiving orders from an external source:
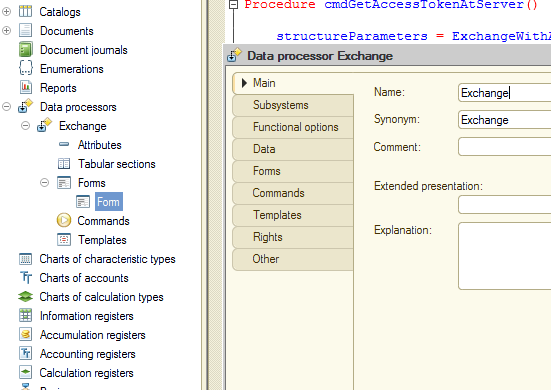
We add a form to this handler, and inside this form, we create command getAccessToken. Here is a handler for this command:
|
&AtClient Procedure cmdGetAccessToken(Command) cmdGetAccessTokenAtServer(); EndProcedure
&AtServer Procedure cmdGetAccessTokenAtServer() structureParameters = ExchangeWithAmazon.GetToken(); If Not structureParameters.Error Then Constants.AccessToken.Set(structureParameters.Result.access_token); Constants.AccessTokenExpiresIn.Set(CurrentDate() + structureParameters.Result.expires_in); EndIf; EndProcedure |
The command gets an access token and its lifetime and writes this data to constants. Very easy!
Now we create a second command GetListOfOrders that should use the acquired access token to retrieve the list of orders. Here is the source code for this command:
|
&AtClient Procedure cmdGetListOfOrders(Command) cmdGetListOfOrdersAtServer(); EndProcedure
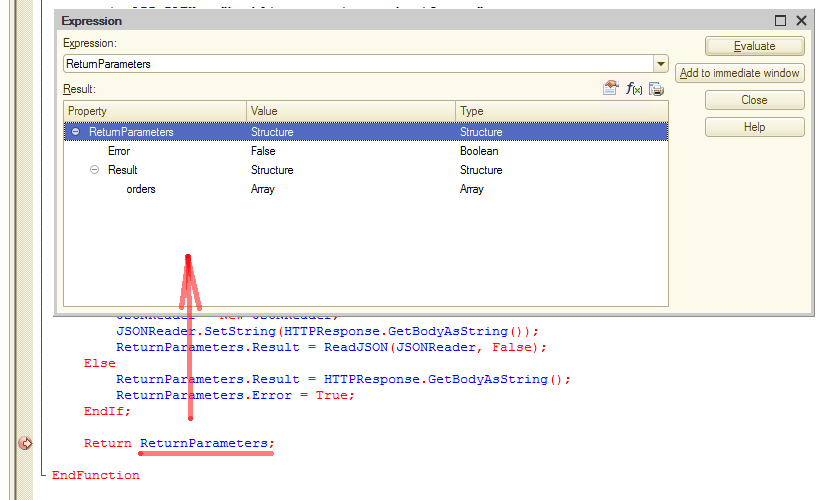
&AtServer Function cmdGetListOfOrdersAtServer() ReturnParameters = New Structure; ReturnParameters.Insert("Result"); ReturnParameters.Insert("Error",False); stringAPI_PATH = "sellingpartnerapi-eu.amazon.com"; HTTPConnection = New HTTPConnection(stringAPI_PATH,443,,,,, New OpenSSLSecureConnection); ResourceAddress = "/orders/v0/orders"; HTTPRequest = New HTTPRequest(); HTTPRequest.ResourceAddress = ResourceAddress; HTTPRequest.Headers.Insert("access_token", Constants.AccessToken.Get()); HTTPRequest.Headers.Insert("Content-Type", "application/json"); HTTPResponse = HTTPConnection.Get(HTTPRequest); If Not HTTPResponse.StatusCode <> 200 Then JSONReader = New JSONReader; JSONReader.SetString(HTTPResponse.GetBodyAsString()); ReturnParameters.Result = ReadJSON(JSONReader, False); Else ReturnParameters.Result = HTTPResponse.GetBodyAsString(); ReturnParameters.Error = True; EndIf; Return ReturnParameters; EndFunction |
The logic is very simple. We access the resource with query GET, make sure the system does not return an error, and if everything is fine, return the service’s response in JSON format.
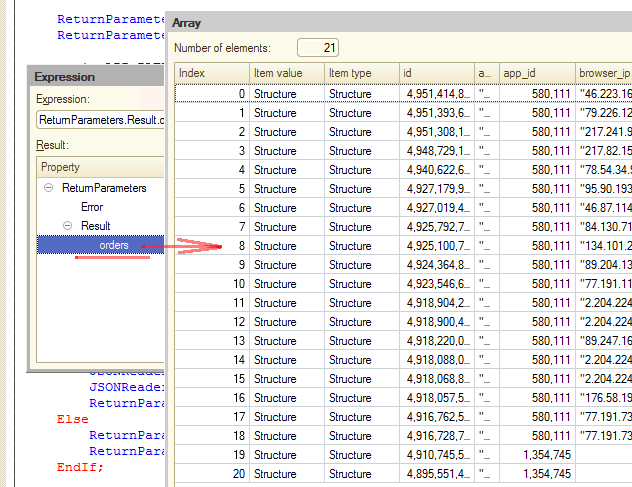
Let us see how the code works in practice. Launch the platform in dialog mode and open the handler. Don't forget to set a breakpoint to check the received data in the Debugger. Then we first call command Get access token, and then command Get list of orders:
Array Orders
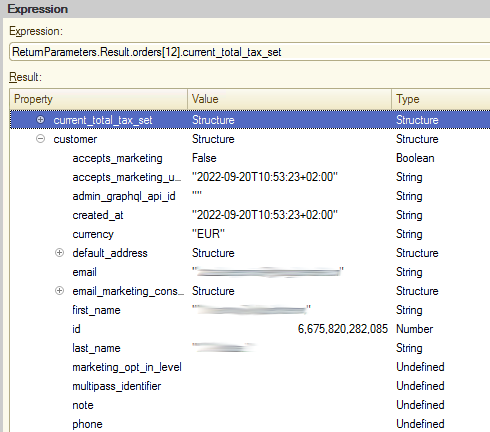
contains the orders that came from Amazon. You can view the orders list and structure directly in the Debugger:
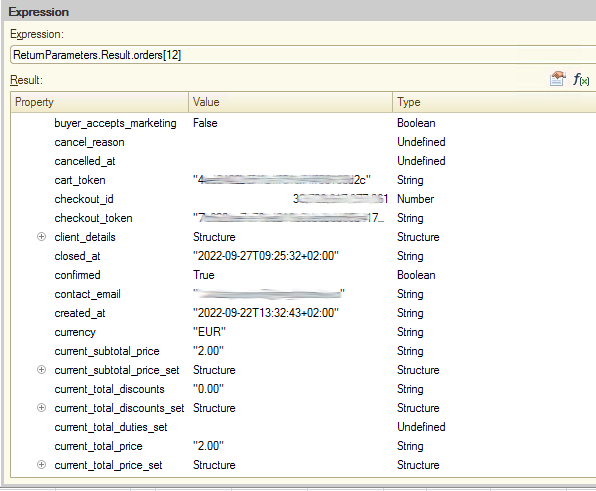
This is how customer information is presented in the order:
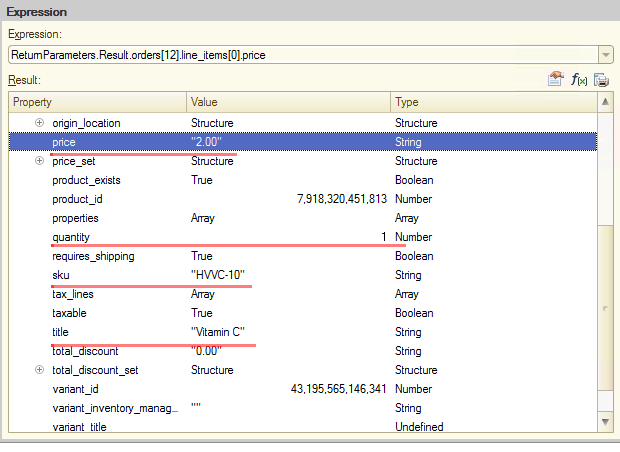
And here is the information about the product:
In fact, this information is already enough to modify our code and create an order based on the available data directly in 1C.
Let's create another command Create orders:
And create a handler for this command:
|
&AtClient Procedure cmdCreateOrders(Command) cmdCreateOrdersAtServer(); EndProcedure
&AtServer Procedure cmdCreateOrdersAtServer()
structureResult = cmdGetListOfOrdersAtServer(); If structureResult.Error Then Return; EndIf;
arrayOrders = structureResult.Result.orders; For Each curOrder In arrayOrders Do CreateOrder(curOrder); EndDo; EndProcedure |
First, the application receives a list of orders from the site (using the previously created function cmdGetListOfOrdersAtServer()). Then, if no error occurs, the array of received orders is processed in a loop, and a new order is created at each iteration (procedure CreateOrder()):
|
&AtServer Procedure CreateOrder(structureOrder)
newOrder = Documents.SalesOrder.CreateDocument();
newOrder.Number = structureOrder.order_number; newOrder.Date = ConvertDateTime(structureOrder.created_at);
If Not IdentifyCustomer(newOrder, structureOrder) Then Message("Customer not found", MessageStatus.Attention); Return; EndIf;
If Not IdentifyProducts(newOrder, structureOrder) Then Message("Item not found", MessageStatus.Attention); Return; EndIf;
Try newOrder.Write(DocumentWriteMode.Posting); Except Message("Error posting document", MessageStatus.Attention); Return; EndTry;
EndProcedure |
The search for clients is carried out by their name (first_name):
|
&AtServer Function IdentifyCustomer(OrderObject, structureOrder)
customerRef = Undefined; customer_first_name = TrimAll(structureOrder.customer.first_name);
Query = New Query; Query.Text = "SELECT | Customers.Ref AS Ref |FROM | Catalog.Customers AS Customers |WHERE | Customers.firts_name = &firts_name";
Query.SetParameter("firts_name", customer_first_name); Selection = Query.Execute().Select();
If Selection.Next() Then CustomerRef = Selection.Ref; Else Return False; EndIf;
OrderObject.Customer = CustomerRef; Return True; EndFunction |
The search for products is carried out by the SKU field. This process is performed in function IdentifyProducts(), and the document tabular section, including the price and quantity of the product, gets filled in immediately:
|
&AtServer Function IdentifyProducts(newOrder, structureOrder)
result = True; newOrder.Products.Clear();
If TypeOf(structureOrder.line_items) = Type("Array") Then arrayProducts = structureOrder.line_items; Else result = False; EndIf;
For Each curProduct In arrayProducts Do structureProduct = FindProduct(curProduct);
If structureProduct.Product = Catalogs.Products.EmptyRef() Then Continue; EndIf;
quantity = curProduct.quantity;
If Quantity = 0 Then Continue; EndIf;
Price = curProduct.price; Amount = curProduct.price * quantity;
newLine = newOrder.Products.Add(); newLine.Product = structureProduct.Product; newLine.Quantity = Quantity; newLine.Amount = Amount; newLine.Price = Price; EndDo;
Return result; EndFunction
&AtServer Function FindProduct(curProduct)
structureResult = New Structure; structureResult.Insert("Product", Catalogs.Products.EmptyRef());
query = New Query; query.Text = "SELECT | Products.Ref AS Product |FROM | Catalog.Products AS Products |WHERE |Products.sku = &sku";
query.SetParameter("sku", TrimAll(curProduct.sku)); selection = query.Execute().Select();
If selection.Next() Then structureResult.Product = selection.Product; EndIf;
Return structureResult;
EndFunction |
Please note that we are creating neither customers nor products in our training project. In other words, if a product with an unknown SKU is received from an external server, it does not get added to the order. The same is true for clients. If this is a new client not yet in catalog Customers, the platform does not create an order for such a client.
This is done to simplify the code. In real-life deployments, most often, new customers, who are not in catalog Customers, get added there at the time of loading orders.
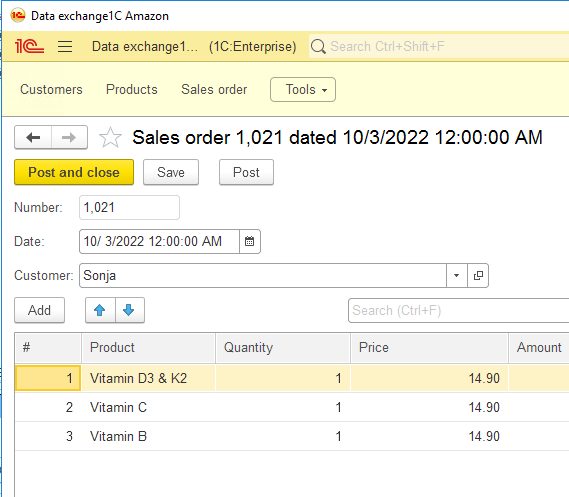
It's time to check how our application works. We start the platform in dialog mode again and fill in catalogs Customers and Products with the required data. Then we open the handler with the commands we created and call command Create orders.
If everything is done correctly, the platform creates a new order:
Let us some everything up. We have covered registering an application on the Amazon portal, configuring the permissions necessary for the application to work, and getting an access token. Then we retrieved an Amazon order to our 1C application using the Amazon API.
And although our example is very simplified, it is good enough to demonstrate the basic principles of working with services like Amazon.
In the next article, we will talk about using Alaiko API (www.alaiko.com). Alaiko is a large fulfillment company that handles storing and shipping customer orders.
As usual, I am glad to share the link to the code we have used in this article. Enjoy:

Writen by
1C Developer
20+ years of experience in the software industry in Russia, UAE and Germany. My main fields of expertise are developing and implementation of business applications (Retail, CRM, WMS, and Accounting) and integration of software with POS equipment and web portals.


