Work with Google Maps from 1C
In this example, we will see how a user can easily integrate an application developed on 1C with the Google Maps service.
Suppose, for example, that you own a small flower shop and you want to start delivering flowers to your customers. We will skip processes of order placing and sale, let’s proceed directly to the shipment automation.
So, there is a courier and we have to create delivery tasks for this employee. Such a task must contain a destination address, an area map with building numbers, etc.
We will use Google Maps as a cartographic service and 1C as a development platform.
Let’s begin with Google Maps.
In order to use Google Maps, first, it’s necessary to get a special API Key. The process is described in sufficient detail in the official documentation: https://cloud.google.com/apis/docs/getting-started
After activating payment account, we need to enable the Geocoding API (using this API we will get the geolocation of the place required) and the Maps Static API (this API will make it possible to get the map picture as a file):

We also need the API Key:

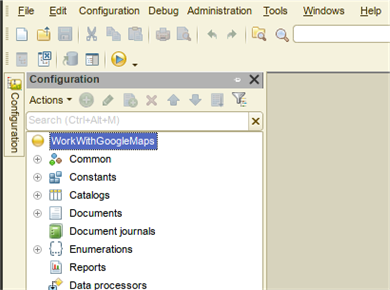
Having completed all the preliminary actions, let’s proceed to 1C. Create a new configuration there and name it WorkWithGoogleMaps:
Right here we add all the necessary objects to this configuration, the code will be written later.
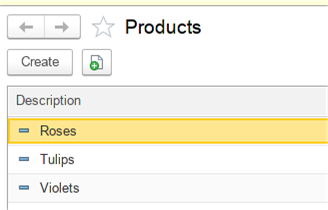
First, add the Products catalog where the list of our goods will be stored. This catalog doesn’t have any attributes.
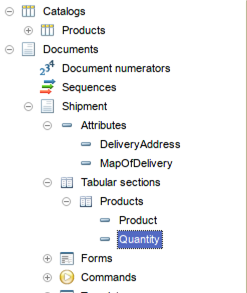
Then, create the Shipment document. Its attributes include:
DeliveryAddress, String(0) type
MapOfDelivery, ValueStorage type, it will store the map image.
Next, add the Products tabular section, the list of goods, with the following attributes:
Product, Products catalog type
Quantity, Number(10) type.
We also create a document form and place the items on it (see the screenshot below). Besides, we will need the GetMap command and the RefMapPicture string attribute which stores a reference to the map image displayed on the document form. Let’s look through the creation of this attribute. First, create an attribute of the RefMapPicture form. Then, drag and drop it to the form. Next, change the type of this attribute to Image field.

Our form is ready, now we need only to write the program code. We will do it a bit later. Meanwhile, let’s continue creating the remaining objects necessary for the work.
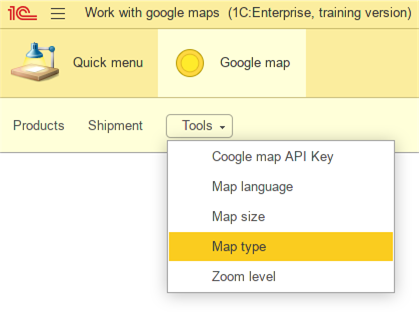
We create three enumerations: MapSizes, MapTypes and MapLanguages. The values of these enumerations are presented below in a table:

From the names of our enumerations, you can understand that they are used for the work with Google Maps. Please, pay special attention to the Synonym Names field – precisely this value will be further inserted into the query transmitted by the Google Maps API.
Some of the values look like as follows in 1C:


After creating enumerations, we add five constants:
GoogleMapAPIKey, String(0) type
MapSize, EnumRef.MapSizes type
MapType, EnumRef.MapTypes type
MapLanguage, EnumRef.MapLanguages type
ZoomLevel, Number (2,0) type

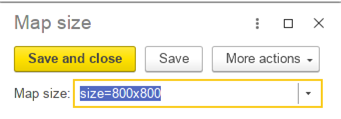
MapSize, MapType, and MapLanguage constants serve for storing actual parameters for the work with Google Maps. For example, a user wants to get a map in English with the sizes 600x600 – in this case, he indicates “en” for the MapLanguage constant, and “size_600_600” for the MapSize constant.
We also want to draw your attention to the ZoomLevel constant which is a so-called level of scaling. Maps on Google Maps have an integer 'zoom level' which defines the resolution of the current view. This level may take a value from 1 to 20, so we have to limit the ZoomLevel constant value with these values. You can do it in the following way:

Thus, we set an interval of permitted values for the constant with no extra programming.
The GoogleMapAPIKey constant will store the key for access to the Google API.
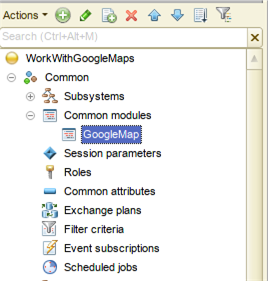
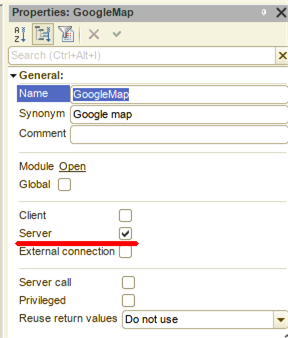
In conclusion, we create the GoogleMap common module:
The module should be server-based:
Next, we create the GoogleMap subsystem and add all the necessary objects:

Well, we have all the necessary preparations done, let’s proceed directly to programming.
Return to the Shipment document, open its form and create a handler for the GetMap command – the command itself were created earlier:

The code is the following:
&AtClient
Procedure GetMap(Command)
If Modified Then
Message = New UserMessage;
Message.Text = "Save the document";
Message.Message();
Return;
EndIf;
GetMapAtServer();
Modified = True;
EndProcedure
&AtServer
Procedure GetMapAtServer()
// 1. Looking for coordinates
structureCoordinates = GoogleMap.GetCoordinatesByAddress(Object.DeliveryAddress);
// 2. Getting a map picture
DeliveryMap = GoogleMap.GetMapPicture(structureCoordinates);
RefMapPicture = PutToTempStorage(DeliveryMap, UUID);
EndProcedure
First, the procedure checks whether the document was modified or not. If yes, the program asks us to save changes. If not, the system calls the GetMapAtServer() procedure which carries out getting the map image.
The GetMapAtServer() procedure is performed in three stages: first, by the delivery address we get the coordinates of the location required, then, by the coordinates received we get the map picture, and after that, we display the picture on the document form.
So, how do we get coordinates by the address? To do this, the system calls the GetCoordinatesByAddress() function of the common module:
Function GetCoordinatesByAddress(Address) Export
strucrureResult = New Structure;
strucrureResult.Insert("longitude", 0);
strucrureResult.Insert("latitude", 0);
HTTPConnection = New HTTPConnection("maps.googleapis.com",,,,,,New OpenSSLSecureConnection());
RequestText = "maps/api/geocode/json?address=" + Address + "&key=" + GoogleMapAPIKey();
HTTPRequest = New HTTPRequest(RequestText);
Try
Answer = HTTPConnection.Get(HTTPRequest);
Except
Message("Error determining the coordinates!", MessageStatus.Attention);
Return strucrureResult;
EndTry;
JSONReader = New JSONReader();
JSONReader.SetString(Answer.GetBodyAsString());
Result = ReadJSON(JSONReader);
JSONReader.Close();
If Result.status = "OK" Then
strucrureResult.latitude = Result.results[0].geometry.location.lat;
strucrureResult.longitude = Result.results[0].geometry.location.lng;
EndIf;
Return strucrureResult;
EndFunction //
Function GoogleMapAPIKey()
Return Constants.GoogleMapAPIKey.Get();
EndFunction
This function is very simple. As an input parameter, it receives the address in the form of a string, then, this string is transmitted to Google Maps as a parameter of the HTTP request. Please, note that additionally to the address we also transmit an API Key – the GoogleMapAPIKey() function returns it.
The usage of the Google Maps service is convenient because we can transmit an address as a parameter in any form – we can write London, or Boxhagener Str, 35 Berlin – this service understands any address forms and, if possible, returns coordinates of the required location.
So, we received the coordinates, now it’s time we got the map picture. This task is fulfilled by the GetMapPicture() function of the common module:
Function GetMapPicture(structureCoordinates) Export
HTTPConnection = New HTTPConnection("maps.googleapis.com");
RequestText = GetPathToMapImage(structureCoordinates);
HTTPRequest = New HTTPRequest(RequestText);
Try
Answer = HTTPConnection.Get(HTTPRequest);
Except
Message("Attention! Error receiving map!", MessageStatus.Attention);
Return New Picture;
EndTry;
If Answer.StatusCode = 200 Then
BinaryData = Answer.GetBodyAsBinaryData();
Picture = New Picture(BinaryData);
Else
Picture = New Picture;
EndIf;
Return Picture;
EndFunction
Here everything is also quite simple. The program first creates an HTTP connection, generates a request to the API (the GetPathToMapImage function will be described later), creates an HTTP request (HTTPRequest = New HTTPRequest(RequestText);), as a parameter transmitted there it uses just generated request text, after that the HTTP is performed.
During execution of the function, the HTTP request returns an output parameter (Answer = HTTPConnection.Get(HTTPRequest)). We transform this answer into binary data (BinaryData = Answer.GetBodyAsBinaryData()) and using this binary data we compose a picture (Picture = New Picture(BinaryData)).
Now let’s learn how the GetPathToMapImage function works:
Function GetMapSize()
Return "&" + Constants.MapSize.Get();
EndFunction
Function GetMapType()
Return "&" + Constants.MapType.Get();
EndFunction
Function GetZoomLevel()
Return "&zoom=" + Constants.ZoomLevel.Get();
EndFunction
Function GetMapLanguage()
Return "&" + Constants.MapLanguage.Get();
EndFunction
Function GetPathToMapImage(structureCoordinates)
MapSize = GetMapSize();
MapType = GetMapType();
ZoomLevel = GetZoomLevel();
MapLanguage = GetMapLanguage();
stringResult = "maps/api/staticmap?center=" + structureCoordinates.latitude + "," + structureCoordinates.longitude + MapSize + MapType + ZoomLevel + MapLanguage + "&markers=" + structureCoordinates.latitude + "," + structureCoordinates.longitude + "&key=" + GoogleMapAPIKey();
Return stringResult;
EndFunction
The input data for the function is a structure with location coordinates, it responds with a text string for connecting to the Google Maps API, while the string itself may change depending on the values of the MapSize, MapType, ZoomLevel and MapLanguage constants.
Having received the map picture, we need to display it on the document form. The RefMapPicture = PutToTempStorage(DeliveryMap, UUID); string serves for that.
Recall that RefMapPicture is an attribute of the document form, we created it ourselves, placed it on the form and indicated the Image field type for it. The peculiarity of this element is that it is capable to display graphical information. If we now assign to the RefMapPicture attribute a reference to a graphical file, it will display this file on the form.
How is the picture storing designed in this case? The document has the MapOfDelivery attribute with the ValueStorage data type. The image itself is stored directly in this attribute. But we cannot just display this attribute on the form. First, we have to save the graphical information, then get a reference to the graphical file and then, using this reference, display the picture on the form with aid of the RefMapPicture form attribute.
In our example, we do not save the graphical information in a file, but place it in temporary storage. There is an operation responsible for that - PutToTempStorage() – it returns us a reference which we then display on the form.
The basic preliminary operations are done, let’s test our program.
Run 1C, go to the Google map subsystem and first fill in all the service constants:
For example, the map size:
Next, we fill in the Products catalog:
Then, we create the Shipment document, fill it in with goods and specify some delivery address:
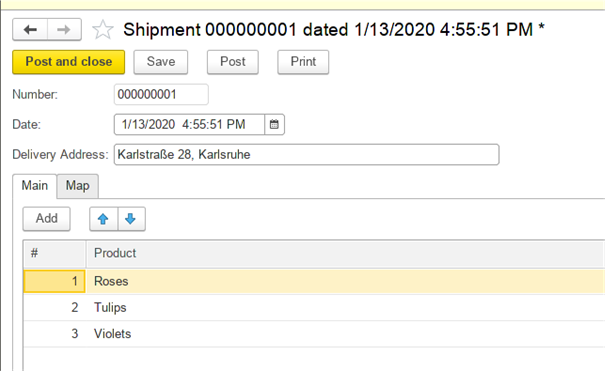
After that, save the document, go to the Map tab and click the Get map button. As a result, you will get something like that:

Now let’s change the MapType constant by setting, for example, the hybrid value:
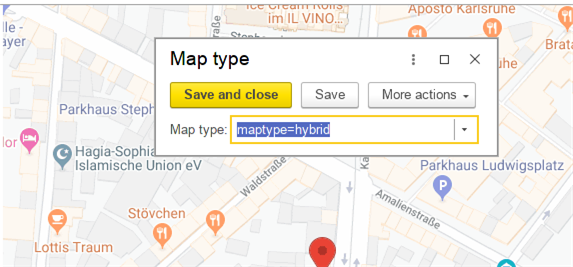
Save the document again and click Get map:

Everything works perfectly.
We also can change other map parameters: MapSize, MapLevel, etc.
Well, we got the map picture for shipping flowers, but we also need to print this information for the courier. Let’s study how we can do it.
We create the Print command for the Shipment document. Then, we set for it the following parameters: Group and Command parameter type:

A button of the command will appear after that on the document form:

In the module of the Print command we write the following code:
&AtClient
Procedure CommandProcessing(CommandParameter, CommandExecuteParameters)
Spreadsheet = New SpreadsheetDocument;
Print(Spreadsheet, CommandParameter);
Spreadsheet.ShowGrid = False;
Spreadsheet.Protection = False;
Spreadsheet.ReadOnly = True;
Spreadsheet.ShowHeaders = False;
Spreadsheet.Show();
EndProcedure
&AtServer
Procedure Print(Spreadsheet, CommandParameter)
Documents.Shipment.Print(Spreadsheet, CommandParameter);
EndProcedure
First, the program calls the CommandProcessing procedure, the Spreadsheet object is created there. This object will be a printing form. Next, the program calls the Print procedure which, in its turn, calls the Print procedure which is placed in the manager’s module of the Shipment document.
The code for this procedure is presented below:
Procedure Print(Spreadsheet, Ref) Export
Template = Documents.Shipment.GetTemplate("PF_MXL_Shipment");
Query = New Query;
Query.Text =
"SELECT
| Shipment.Number AS Number,
| Shipment.DeliveryAddress AS DeliveryAddress,
| Shipment.MapOfDelivery AS MapOfDelivery,
| Shipment.Date AS Date,
| Shipment.Products.(
| LineNumber AS LineNumber,
| Product AS Product,
| Quantity AS Quantity
| ) AS Products
|FROM
| Document.Shipment AS Shipment
|WHERE
| Shipment.Ref IN(&Ref)";
Query.Parameters.Insert("Ref", Ref);
Selection = Query.Execute().Select();
Header = Template.GetArea("Header");
AreaOrderHeader = Template.GetArea("OrderHeader");
AreaProducts = Template.GetArea("Products");
Footer = Template.GetArea("Footer");
Spreadsheet.Clear();
While Selection.Next() Do
Header.Parameters.Fill(Selection);
Header.Parameters.NumberDate = "#" + Selection.Number + " dated " + Format(Selection.Date, "DLF=DD");
Spreadsheet.Put(Header, Selection.Level());
Spreadsheet.Put(AreaOrderHeader);
SelectionProducts = Selection.Products.Select();
While SelectionProducts.Next() Do
AreaProducts.Parameters.Fill(SelectionProducts);
Spreadsheet.Put(AreaProducts, SelectionProducts.Level());
EndDo;
Try
TempFileName = GetTempFileName("png");
BinaryData = Selection.MapOfDelivery.Get();
BinaryData.Write(TempFileName);
Footer.Drawings.D1.Picture = New Picture(TempFileName);
Except
Footer.Drawings.D1.Picture = New Picture;
EndTry;
Spreadsheet.Put(Footer);
EndDo;
EndProcedure
The code is also quite simple. First, we get a template of the printing form where we will output the data:
Template = Documents.Shipment.GetTemplate("PF_MXL_Shipment")
Then, we make a request to the current document, select those its attributes which are to be printed and the program fills in the printing form with the required data.
A single thing which should draw our attention is the code for printing the picture:
Try
TempFileName = GetTempFileName("png");
BinaryData = Selection.MapOfDelivery.Get();
BinaryData.Write(TempFileName);
Footer.Drawings.D1.Picture = New Picture(TempFileName);
Except
Footer.Drawings.D1.Picture = New Picture;
EndTry;
First, we save picture data as a temporary file:
TempFileName = GetTempFileName("png");
BinaryData = Selection.MapOfDelivery.Get();
BinaryData.Write(TempFileName);
Next, we output this file to the printing form:
Footer.Drawings.D1.Picture = New Picture(TempFileName);
Now we can test everything that we’ve done.
But before testing our code, we need to make one more adjustment.
Recall that the data of the picture (map), stored in the document, is binary. To output binary data on the form is not as simple. So, if we open the document that we’ve already created (and received the map image), we will see nothing on the form.
It’s necessary to write on the form just a couple more strings so that the previously saved map might be displayed when opening the document.
For the Shipment document form, we create handlers of the OnReadAtServer and BeforeWriteAtServer events:

The code of these handlers is the following:
&AtServer
Procedure OnReadAtServer(CurrentObject)
RefMapPicture = PutToTempStorage(CurrentObject.MapOfDelivery.Get(), UUID);
EndProcedure
&AtServer
Procedure BeforeWriteAtServer(Cancel, CurrentObject, WriteParameters)
If IsTempStorageURL(RefMapPicture) Then
CurrentObject.MapOfDelivery = New ValueStorage(GetFromTempStorage(RefMapPicture));
EndIf;
EndProcedure
The BeforeWriteAtServer procedure takes out the picture data from the temporary storage and assigns this value to the MapOfDelivery document attribute. In this manner, the program saves the map image data.
The OnReadAtServer procedure, vice versa, places the image data in the temporary storage, gets a reference to this data in response, and this reference then displays the map itself on the document form.
Well, everything is ready, let’s carry out a final test of our program. Run 1C again, go to the previously created Shipment document and click the Print button. Now look at the result:
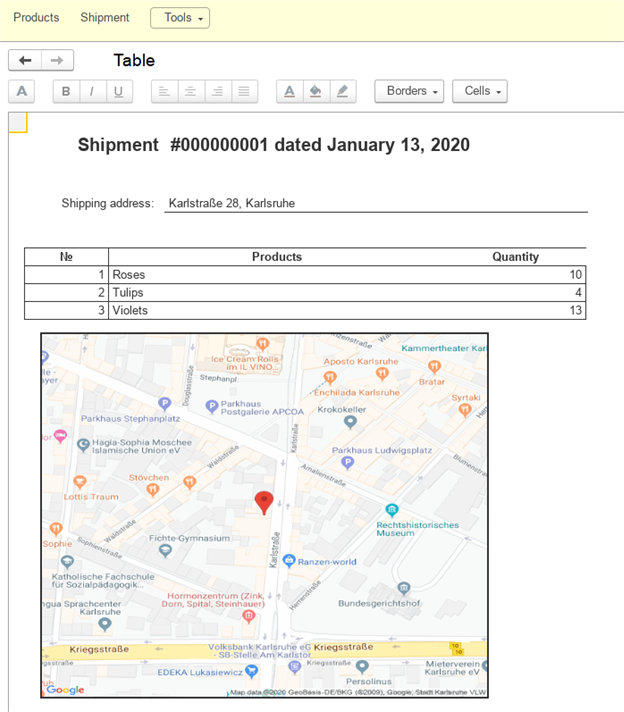
Now we can print this form and give it to our courier. He certainly won’t get lost with such detailed instructions!
As you’ve just seen, using the 1C platform you can develop flexible applications capable to apply any third-party services.
You can download this Example (*.cf) for your own application.
Please, supplement your suggestions for the development of demo applications in our forum.
Stay tuned, it’ll be even more interesting! :)

Writen by
1C Developer
20+ years of experience in the software industry in Russia, UAE and Germany. My main fields of expertise are developing and implementation of business applications (Retail, CRM, WMS, and Accounting) and integration of software with POS equipment and web portals.


