Cost Accounting. Modification of Documents Supplier Invoice and Sales Invoice

Designing Business Applications with the 1C Platform Algorithms. A Detailed Description of the Platform Mechanisms Operation.
Part 5. Cost Accounting. Modification of Documents Supplier Invoice and Sales Invoice
In the previous article of our series on creating an application to keep company records, we have created a report that provides users with the info on warehouse stock balance. With this purpose in mind, we have created two documents, Supplier invoice and Sales invoice, that allow, though in a pretty simplified way, inventory control for any company. There comes a reasonable question if this is totally enough. Have we fully solved the task of keeping records?
The answer is yes and no. If we limit ourselves to the inventory, the solution we have created is totally enough for simplified inventory control.
But we should remember that the purpose of any business is to make a profit. Thus, in addition to managing stock, company owners also need to know how much they want to pay for a product and how much they want to sell it for to get the expected profit. Consequently, we slowly come to the understanding that in addition to inventory control, we need to manage product costs and prices. As soon as we are able to keep track of quantity, cost, and sale price for products stored in our warehouses we should immediately be able to calculate profit generated by our business.
So we want to enable cost accounting in our application. This is what we are going to do right now!
First of all, we should decide where to store the values for amounts (the cost of products in warehouses). The most obvious solution is to create one more accumulation register and place all data in this register. Still, this solution is far from optimal. Let us have a look at the existing register ProductsInWarehouses. Can we use the same register to keep data on the cost of products?
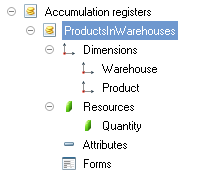
We see that the register has two dimensions: Warehouse and Product plus one resource Quantity. Using the data in this register, we can quickly determine how many units of every product a particular warehouse stores.
But what can prevent us from adding to the register one more resource (Amount) and putting data relating to cost in there? With this, we can always know both the quantity and the cost of every product.
Note that the amount in register ProductsInWarehouses comes from the purchase price. In order words, this is what we pay when we buy products.
So, we add one more resource Amount into register ProductsInWarehouses.

Set data type to Number (10, 2):

Well, we have chosen a place to store data on product cost and can now proceed to documents. The first document is SupplierInvoice. Open it:
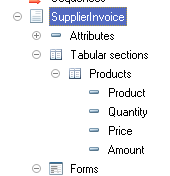
We see that the table section in the document already contains attributes Price and Amount. These are the ones we are going to use.
Attribute Price in this simplified case is optional as we have no intention to store products prices separately. But there is a good chance you might need this attribute on some of your future projects.
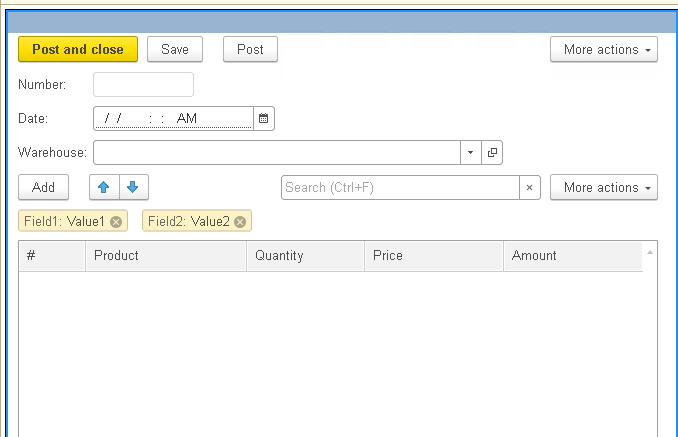
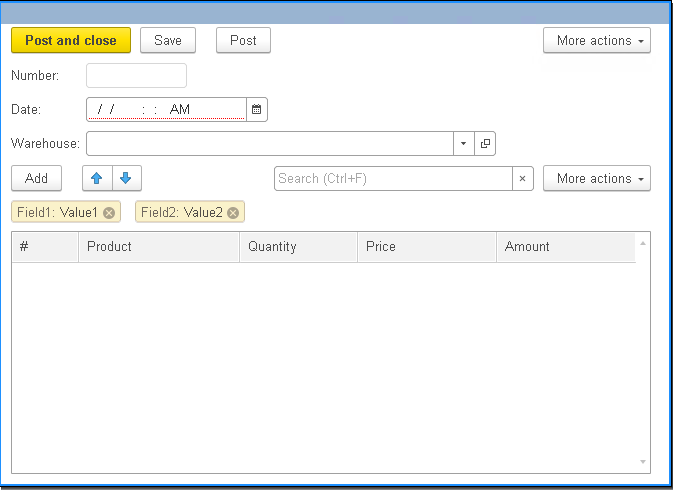
Now we have the structure of document SupplierInvoice ready for cost accounting. The same is true for the document form. All required attributes, Price and Amount, are present in the table section of the document:
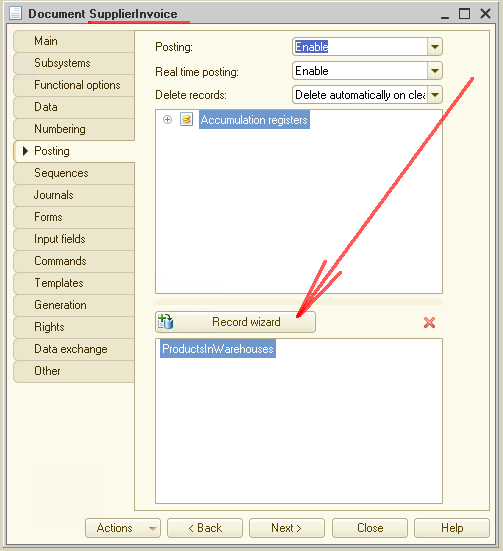
The last thing we need to do is modify the code that handles document posting. We are going to use the Record wizard again:
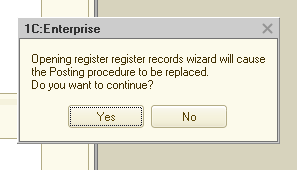
Here we get a warning that the previous code will be replaced. Since the last time we have used the wizard to create the code, we introduced no changes to it, hitting Yes should do just fine:
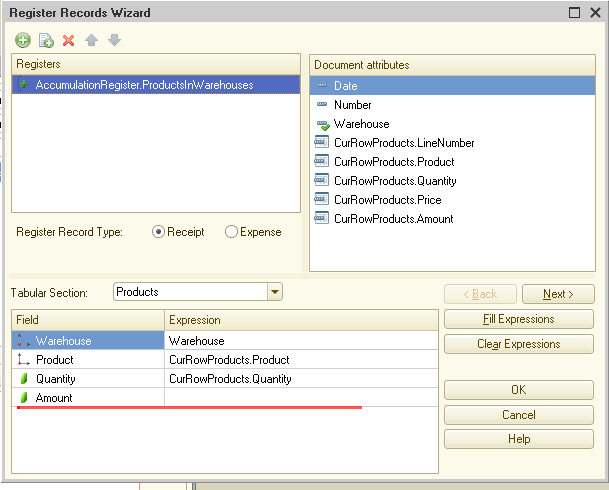
You get the wizard form where the only blank field is Amount:
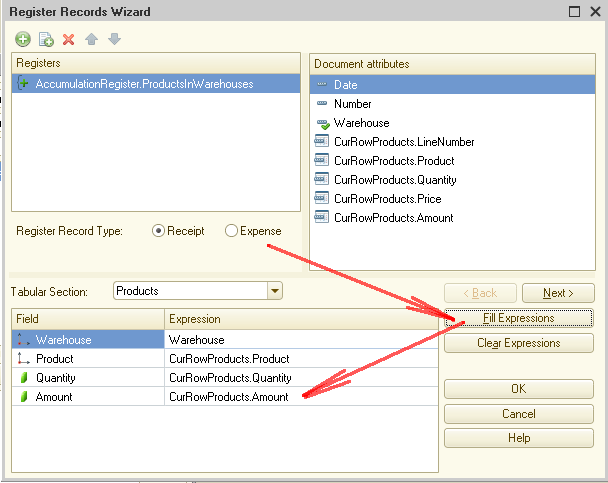
Click button Fill Expressions. The system fills in field Amount automatically. Complete the process with OK:
The wizard creates the program code as follows:
|
Procedure Posting(Cancel, Mode) //{{__REGISTER_REGISTERRECORDS_WIZARD // This fragment was built by the wizard. // Warning! All manual changes will be lost next time you use the wizard.
// register ProductsInWarehouses Receipt RegisterRecords.ProductsInWarehouses.Write = True; For Each CurRowProducts In Products Do Record = RegisterRecords.ProductsInWarehouses.Add(); Record.RecordType = AccumulationRecordType.Receipt; Record.Period = Date; Record.Warehouse = Warehouse; Record.Product = CurRowProducts.Product; Record.Quantity = CurRowProducts.Quantity; Record.Amount = CurRowProducts.Amount; EndDo;
//}}__REGISTER_REGISTERRECORDS_WIZARD EndProcedure |
We are through with document SupplierInvoice. Now we can start 1C in dialog mode and repost existing SupplierInvoice documents.
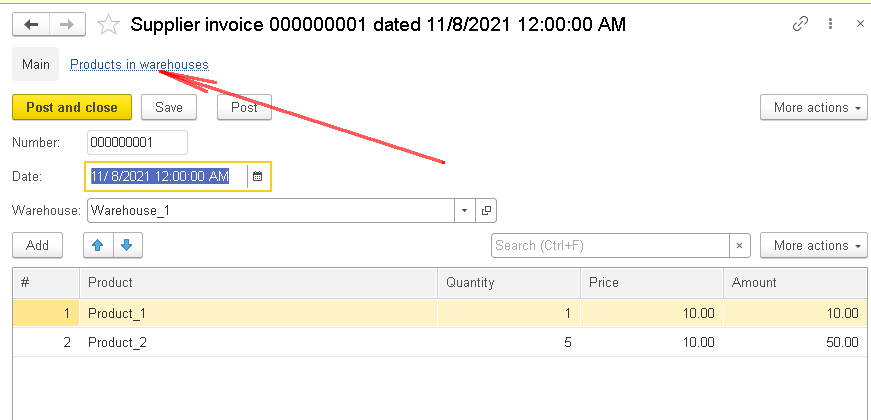
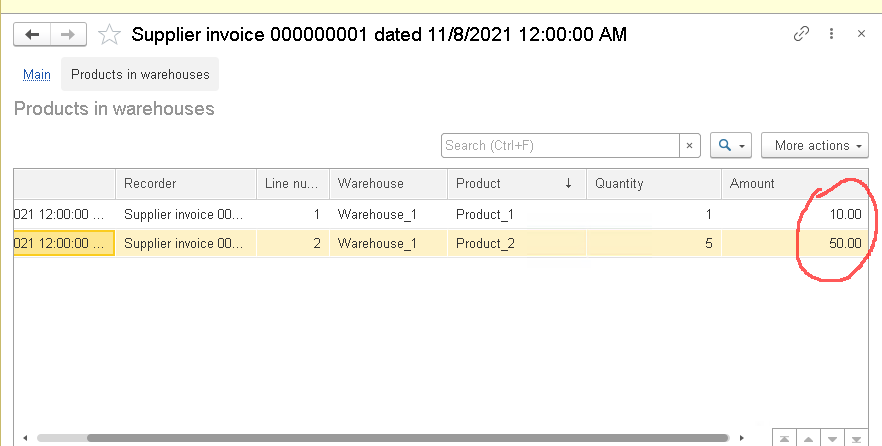
To see how it works, simply open any document and check records added by the document into register ProductsInWarehouses:
We are through with document SupplierInvoice. Turns out it is pretty easy to modify it.
Let us proceed to document SalesInvoice. This one requires harder work :-).
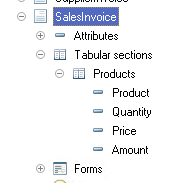
Let us check the document structure:
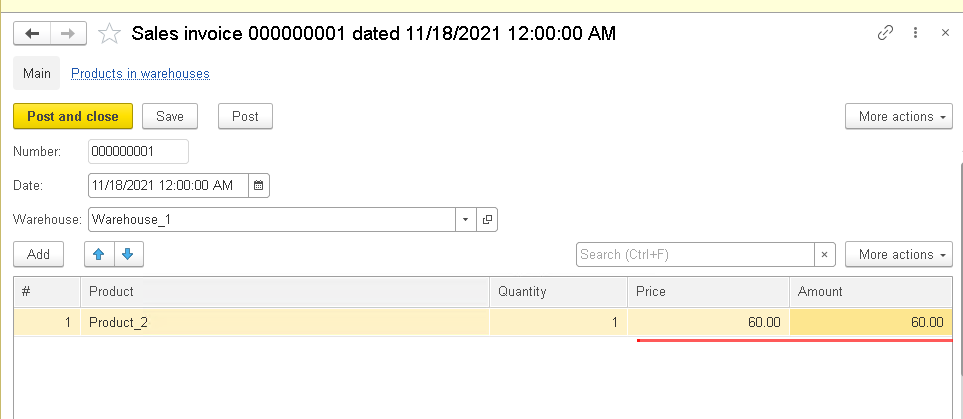
and the form:
We need to make sure that attributes Amount and Price that we need are present in both. Then we open the Register records wizard and do the same actions as in the case with document SupplierInvoice.
Note that the code we have created for this document earlier is of no use to us anymore. So, we can remove it.
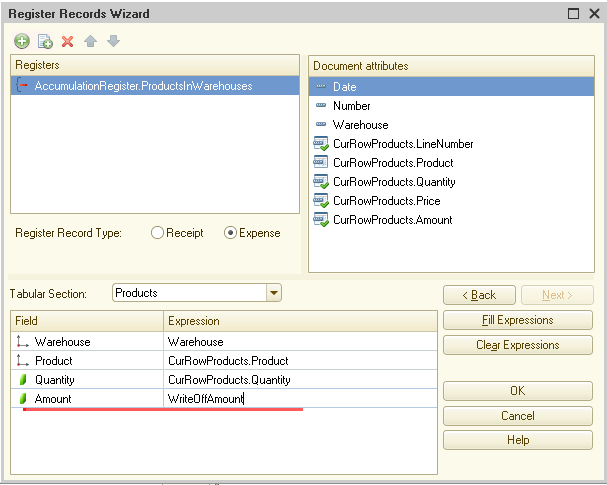
As a result, we get the following picture:
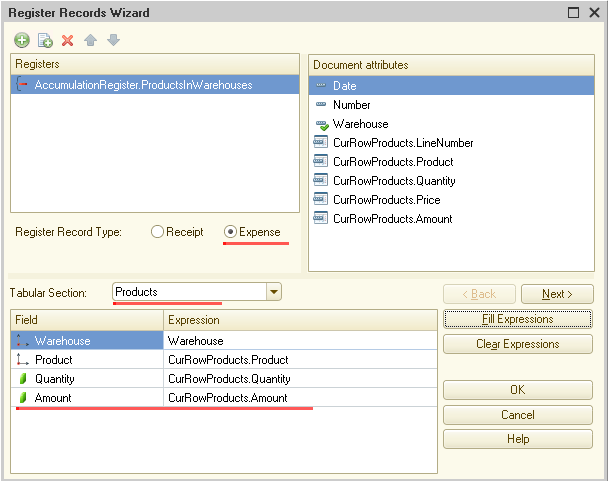
It seems to be fine. Can we click OK? Hold on a moment. Look at field Amount once again!
Remember that register ProductsInWarehouses keeps product costs in purchase prices. But document SalesInvoice contains sale prices, which means that CurRowProducts.Amount refers to product sales prices.
It is the reason we need to modify this string and add variable WriteOffAmount. We are going to calculate this variable's value on our document posting.
Here is what we get:
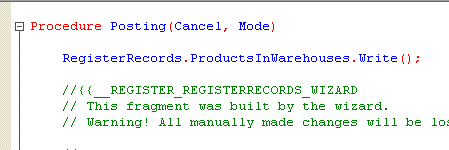
Now you can click OK. The platform creates the following code:
|
Procedure Posting(Cancel, Mode) //{{__REGISTER_REGISTERRECORDS_WIZARD // This fragment was built by the wizard. // Warning! All manual changes will be lost next time you use the wizard.
// register ProductsInWarehouses Expense RegisterRecords.ProductsInWarehouses.Write = True; For Each CurRowProducts In Products Do Record = RegisterRecords.ProductsInWarehouses.Add(); Record.RecordType = AccumulationRecordType.Expense; Record.Period = Date; Record.Warehouse = Warehouse; Record.Product = CurRowProducts.Product; Record.Quantity = CurRowProducts.Quantity; Record.Amount = WriteOffAmount; EndDo;
//}}__REGISTER_REGISTERRECORDS_WIZARD EndProcedure |
What do we do now? Let us start with removing existing records that the document has added into the register. Why do this? Imagine we want to repost a previously posted document that has generated some records. We do not want these records to impact our data, so we delete them.
To remove existing records, we use the following code:
|
RegisterRecords.ProductsInWarehouses.Write(); |
It removes all records into register ProductsInWarehouses made by a specific document. Also, note that data removal happens during a transaction. Then, if a procedure returns an error, everything goes to the initial state.
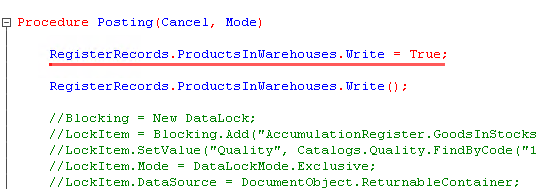
Place this code at the very beginning of the posting procedure:
The next step is to create code for object DataLock. A bit later I will tell you more about the role of object DataLock and how to set it up. For now, we simply copy the code from the Syntax assistant:
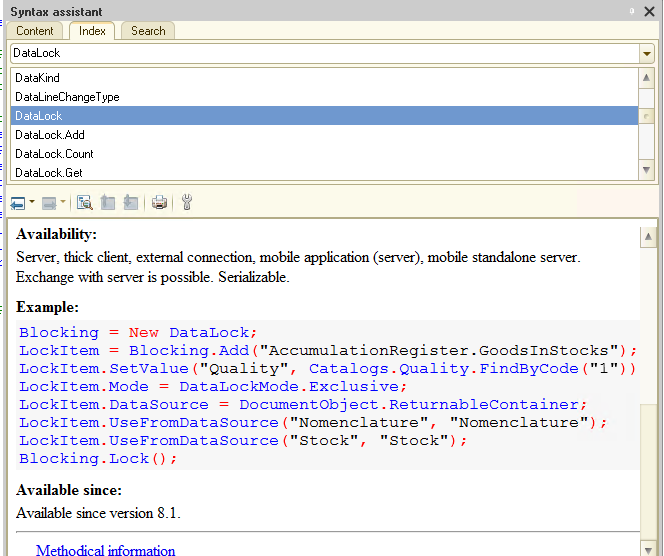
We need to set this object up in a certain way. We are going to do it later, and now just comment out this code.
As a result, the posting procedure should look the following way:
|
Procedure Posting(Cancel, Mode)
RegisterRecords.ProductsInWarehouses.Write();
//Blocking = New DataLock; //LockItem = Blocking.Add("AccumulationRegister.GoodsInStocks"); //LockItem.SetValue("Quality", Catalogs.Quality.FindByCode("1")); //LockItem.Mode = DataLockMode.Exclusive; //LockItem.DataSource = DocumentObject.ReturnableContainer; //LockItem.UseFromDataSource("Nomenclature", "Nomenclature"); //LockItem.UseFromDataSource("Stock", "Stock"); //Blocking.Lock();
//{{__REGISTER_REGISTERRECORDS_WIZARD // This fragment was built by the wizard. // Warning! All manual changes will be lost next time you use the wizard.
// register ProductsInWarehouses Expense RegisterRecords.ProductsInWarehouses.Write = True; For Each CurRowProducts In Products Do Record = RegisterRecords.ProductsInWarehouses.Add(); Record.RecordType = AccumulationRecordType.Expense; Record.Period = Date; Record.Warehouse = Warehouse; Record.Product = CurRowProducts.Product; Record.Quantity = CurRowProducts.Quantity; Record.Amount = WriteOffAmount; EndDo;
//}}__REGISTER_REGISTERRECORDS_WIZARD EndProcedure |
We are through with the preparation and approaching the actual job :-D
Careful analysis of the code given above reveals that variable WriteOffAmount is not defined.
So what is WriteOffAmount? What is the meaning of it? How do we calculate the value?
In fact, it is extremely simple! Imagine we have 10 units of a product for EUR 5 each. We create document SupplierInvoice and register the abovementioned transaction. Now our warehouse has the product for the amount of EUR 50.
Next, we want to sell 5 product units for EUR 10 each. What is the write-off amount? Is it 50 euros?
No. The write-off amount depends on the purchase price and has no relation to the sale price. Thus, we calculate the write-off amount as follows: 5 units (that we sell) multiplied by EUR 5 (purchase price) = EUR 25
The total write-off amount is EUR 25. The synonym for the write-off amount is cost price.
Let me say it again. When we add a sale transaction to register ProductsInWarehouses using document SalesInvoice, the platform writes off the cost price.
With this knowledge in mind, we can define the task as follows: to properly process document SalesInvoice, we need to calculate the write-off amount or product cost price.
Here is the formula for write off amount calculation:
Write off amount = amount balance / quantity balance * number of units for sale
As you can see from the formula, to calculate variable WriteOffAmount, we need to know the number of available product units and their cost. This data is not present in attributes of a posted document, and we should acquire it directly from the database using a query.
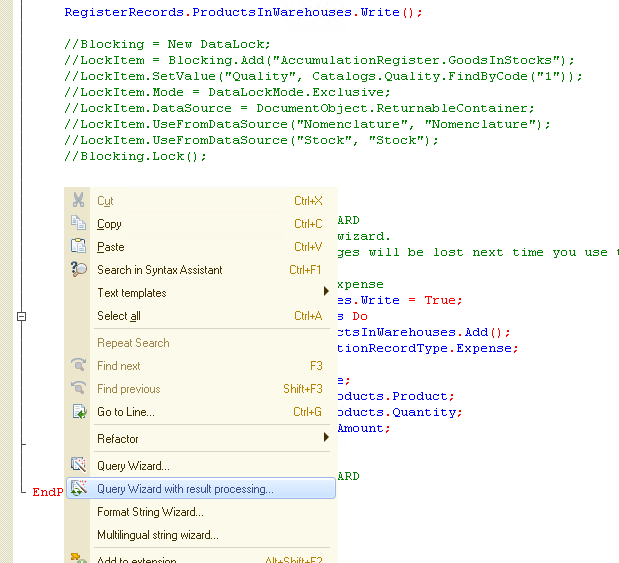
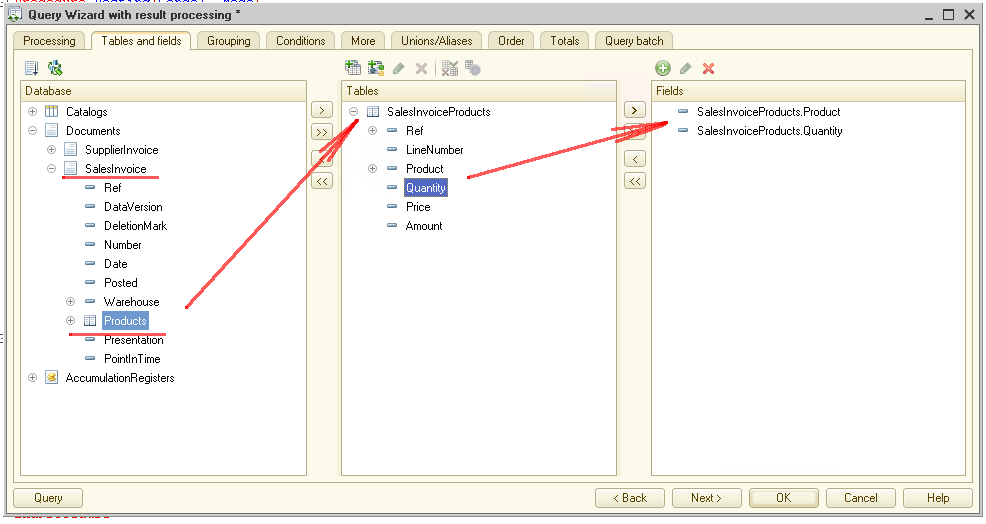
Time to start creating the query. I suggest we use the Query wizard:
In the wizard we select the table section of document SalesInvoice as the source of data and specify fields we should need for further stages:
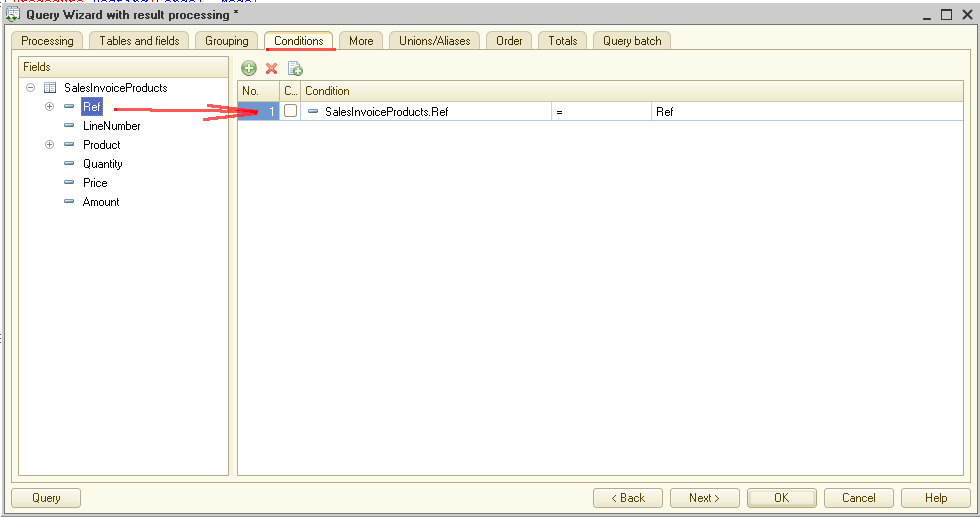
At the next step, we set a condition that selection includes data from this particular document only:
Imagine that when filling up document SalesInvoice, a user adds the same product in several different lines. In such a case, the query we have just created returns all the lines that contain the specified product.
At the next stage, we want to compare product quantity in the document vs. product quantity in the warehouse. Thus, the best option for us is to group by field Product directly in the query. With this setting, the query returns a "folded" product table that is more convenient for processing.
So, let us do the grouping:

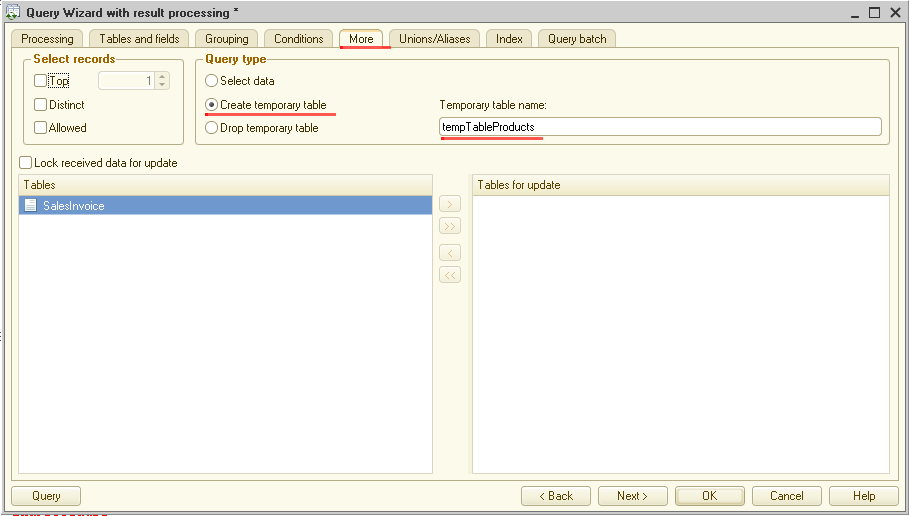
Place the query data into a temporary table:
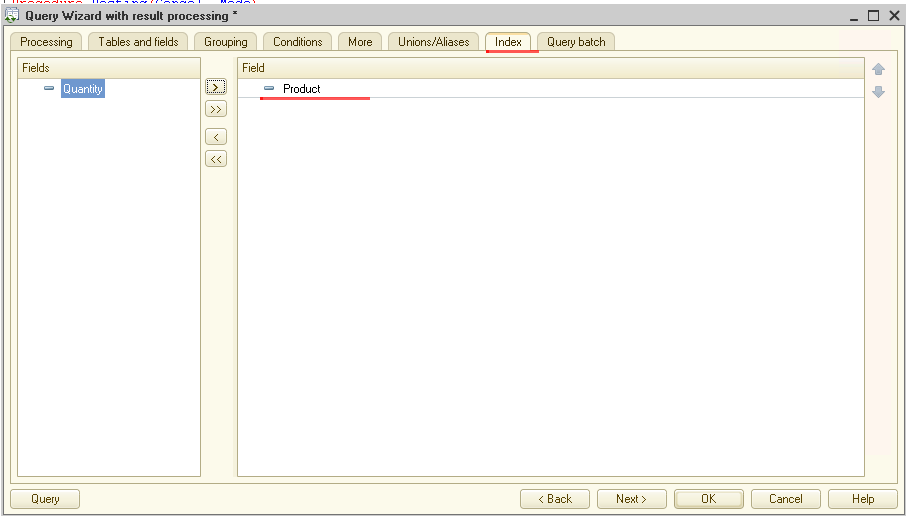
It is a good idea to create indexes for this temporary table as it does not inherit indexes from the main one:
Well, we have created the first additional query that we are going to use later. Now we go to tab Query batch and create one more query:
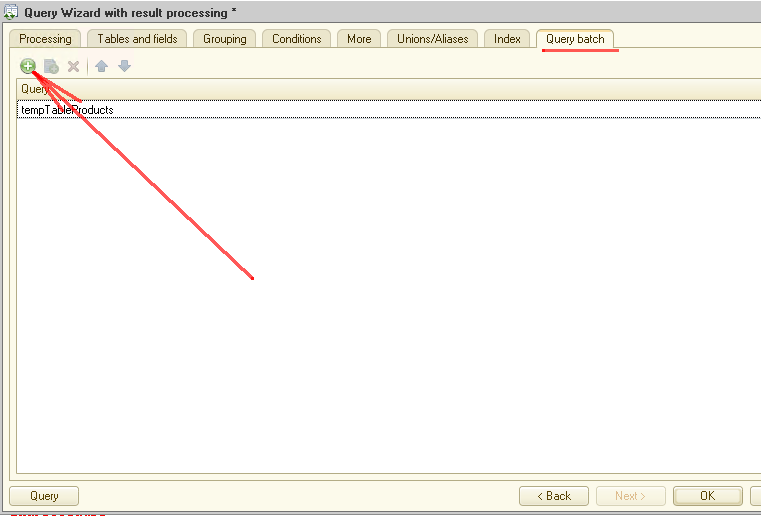
We get a form to create a new query. As you can see, we are able to switch between several queries that come in a single package:
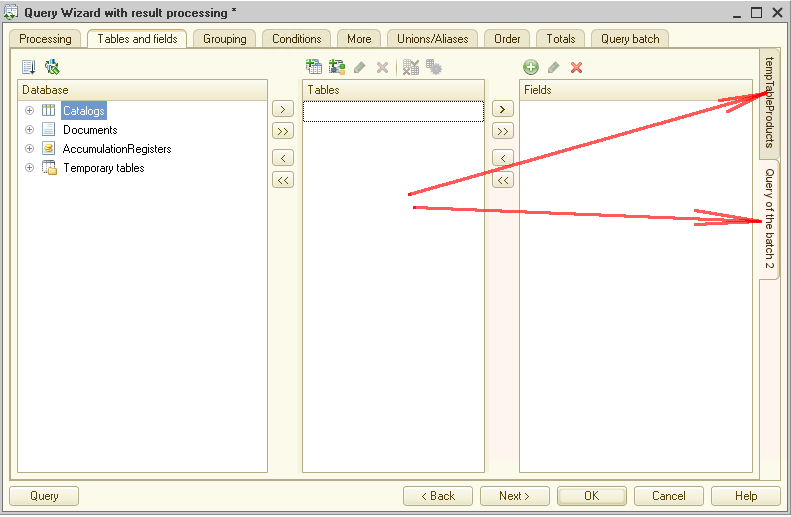
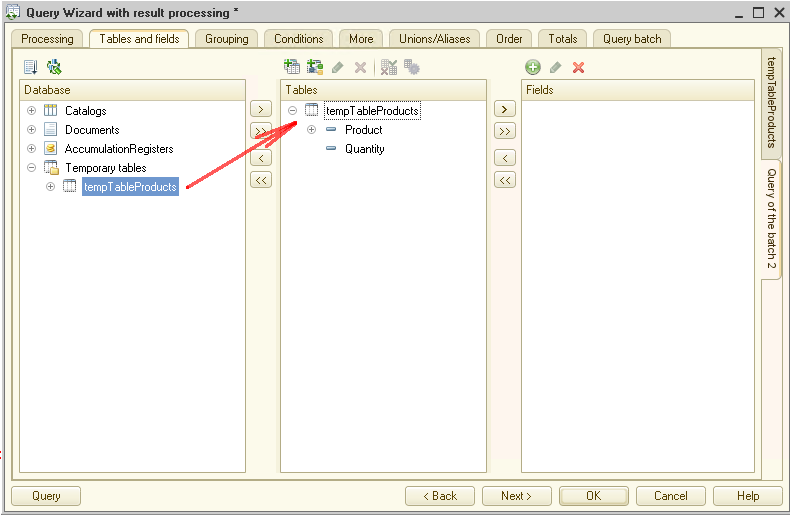
Take the previously created temporary table as the first source for this new query:
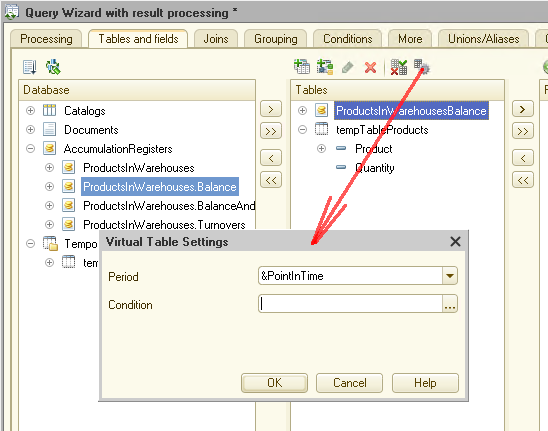
The second source for the query is virtual table Balance in register ProductsInWarehouses:

We need to set parameters for this virtual table. The first parameter is Period:
The second parameter is the warehouse and the list of products we need balance for:
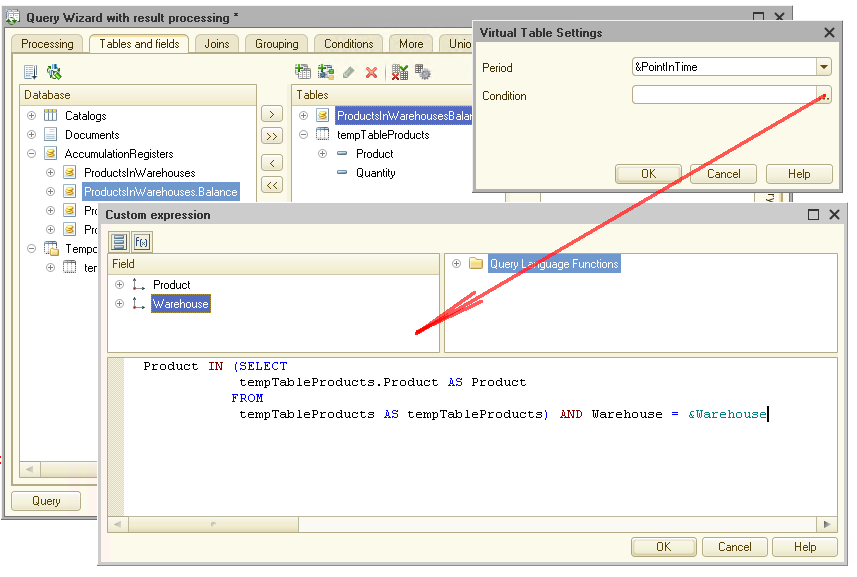
This is how we set parameters for virtual table Balance. Now we click OK twice and go back to the main form.
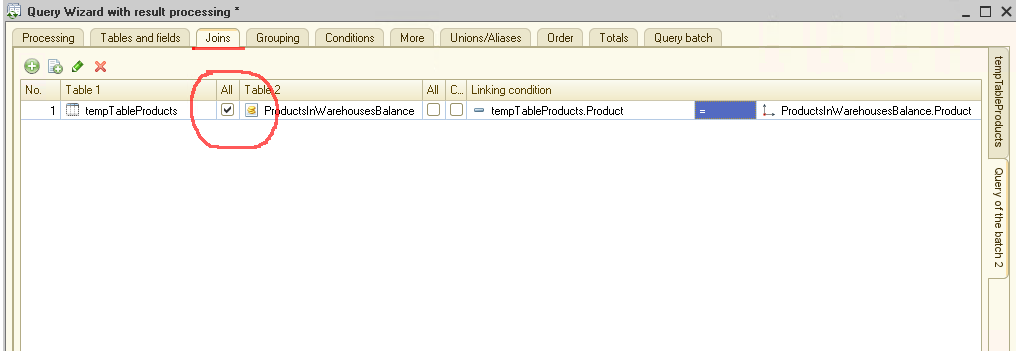
At this point, it is crucial to establish a correct link between temporary table tempTableProducts and virtual table Balance in the register.
To avoid long talks, I should mention that there is a possibility that document SalesInvoice (and consequently temporary table tempTableProducts) contains certain products that are not in stock (with zero records in the virtual table of the register). Thus, the only connection we are allowed to use for the tables in a case like this is left join:
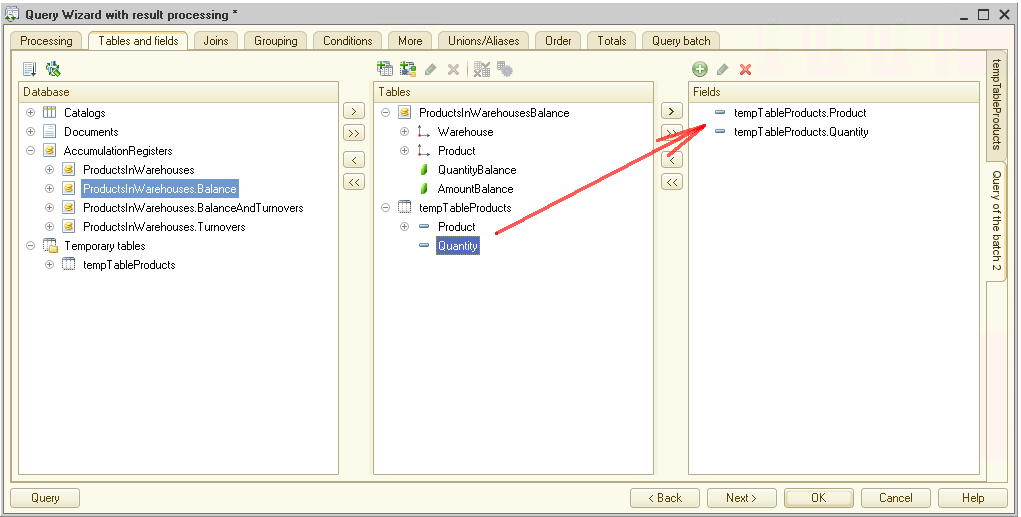
With the connection set, we get to tab Tables and fields and specify the fields that should return our query. In the temporary table, select fields Product and Quantity:
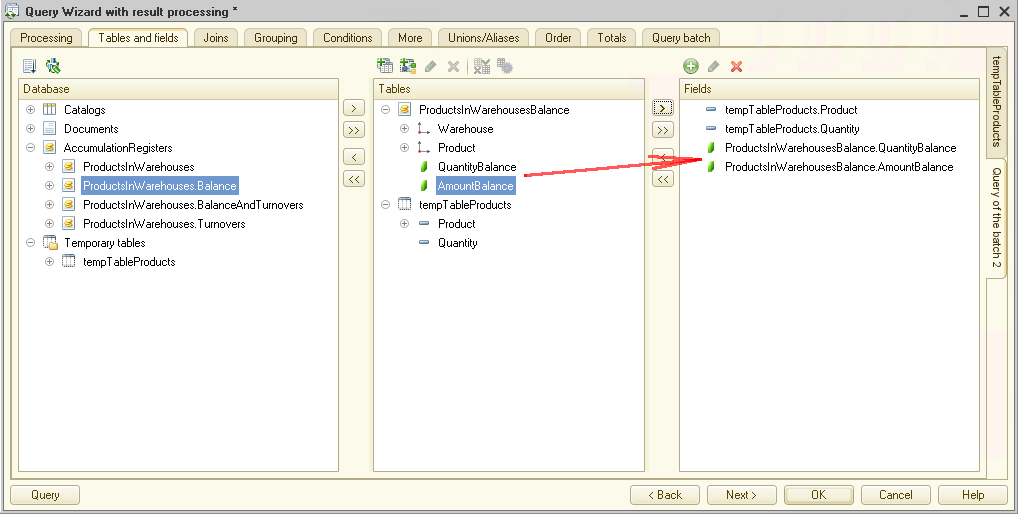
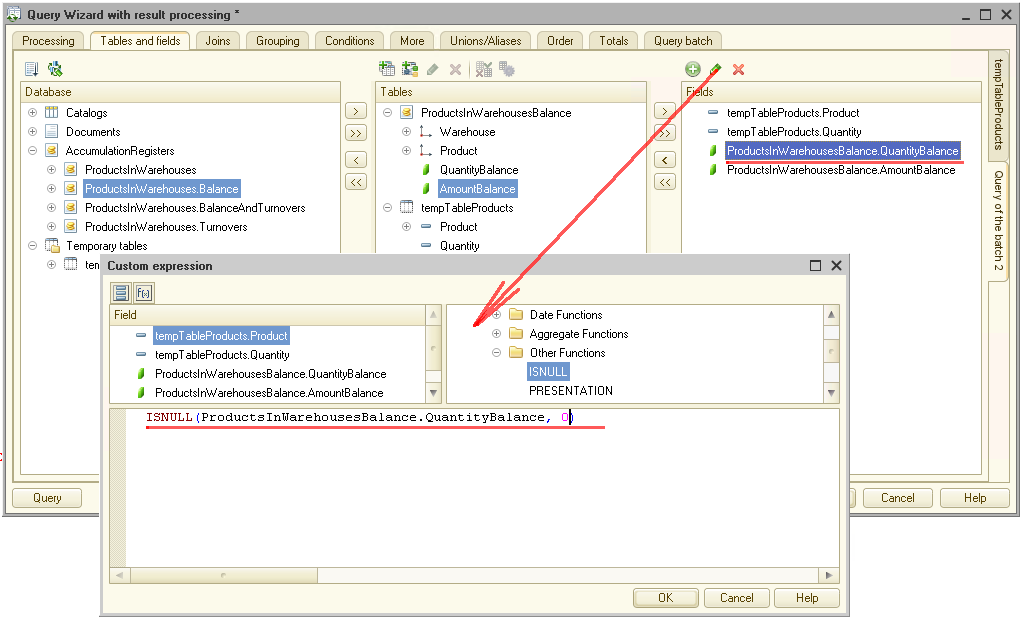
In virtual table Balance select fields QuantityBalance and AmountBalance:
Let us go back to the situation where we have the product in a document and have none on balance. Remember that in this case, the values QuantityBalance and AmountBalance are empty that is NULL. Using such a value is not convenient, and we have to handle this potential case.
This is how we do it:
And we do the same for field AmountBalance:
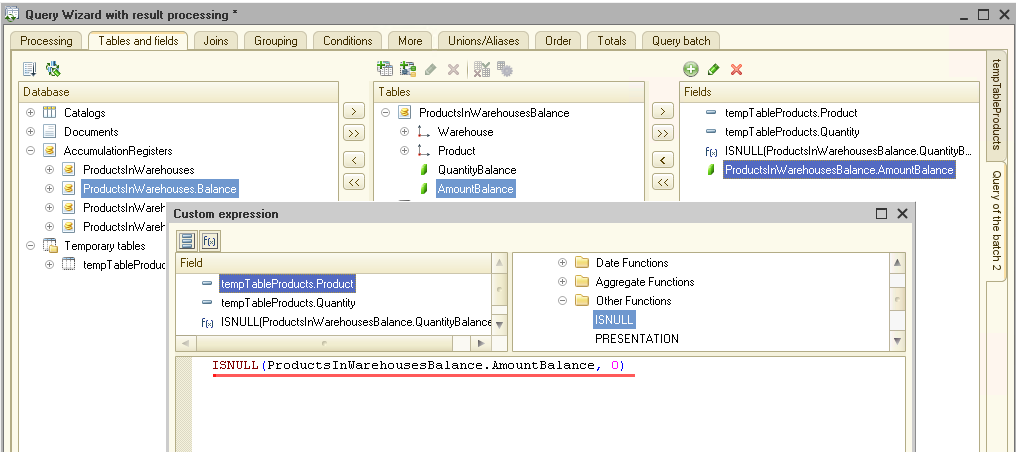
Now we should always get a numeric value no matter how many units of the product are available in the warehouse.
The last field we need to complete the query code is product attribute Presentation:
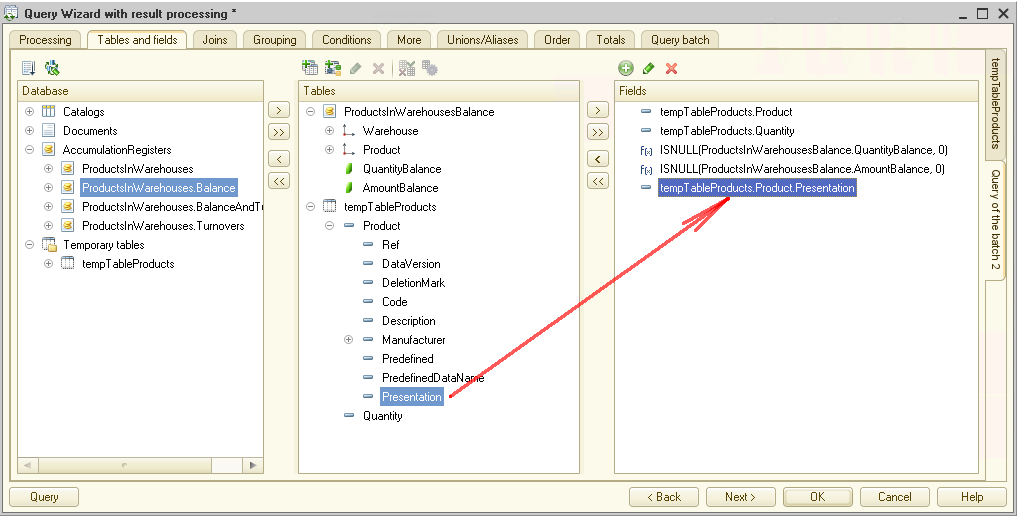
We want to use this field later to create error messages. At that stage I will explain why we need to use field Presentation instead of product Description or some other field.
The last thing we need to do to complete the query code is to set up aliases for fields QuantityBalance and AmountBalance:
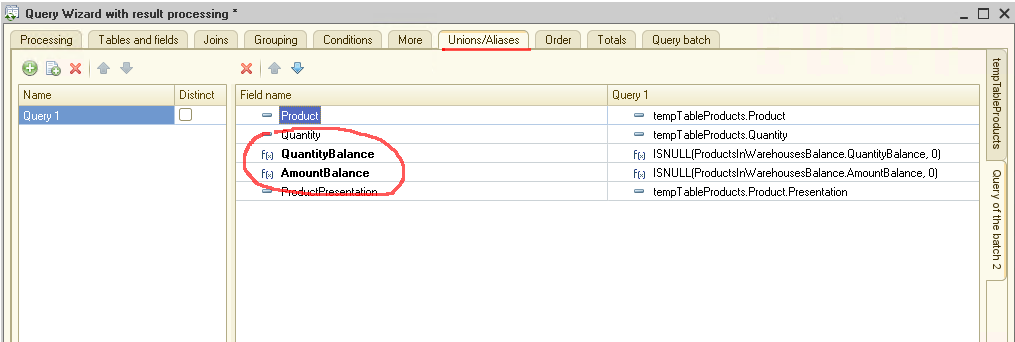
Now click OK to let the wizard create the query code:
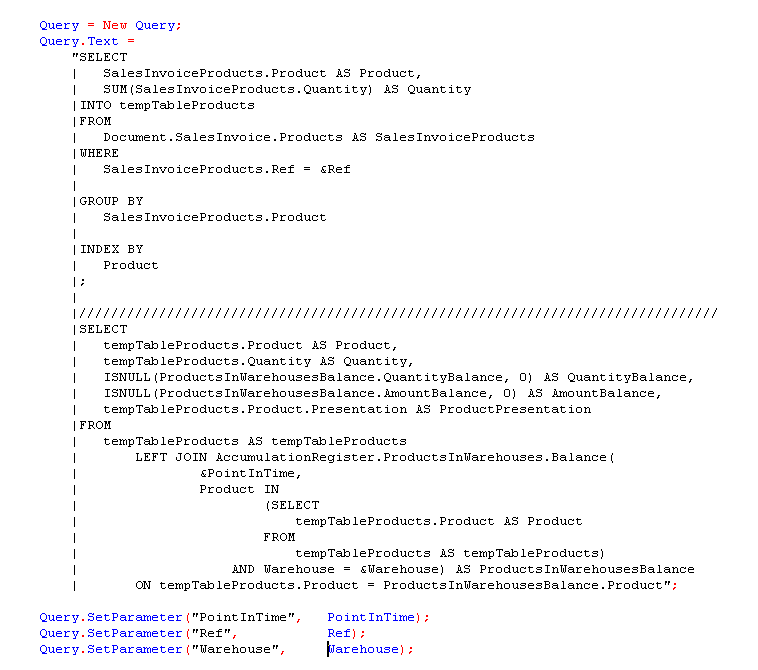
To ensure the query runs properly, we need to set its parameters. Parameters Ref and Warehouse have already been set as these are attributes of the document to be posted. We have to set parameter PointInTime:
|
Query.SetParameter("PointInTime", PointInTime()); |
So, we have set up the query parameters and can process the query result. The Query wizard has already built the code template, and we simply make some modifications to it:
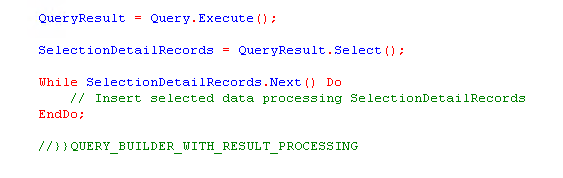
The first thing is to check whether we have enough product units in the warehouse for sale. This is the code to do this:
|
While SelectionDetailRecords.Next() Do
If SelectionDetailRecords.Quantity > SelectionDetailRecords.QuantityBalance Then
Message = New UserMessage; Message.Text = "There is not enough product: " + SelectionDetailRecords.ProductPresentation;
Message.Message();
Cancel = True; Continue;
EndIf;
EndDo; |
If the number of units in the document is greater than in the warehouse, the system creates an error message and sets flag Cancel = True.
Also, pay attention that we use structure SelectionDetailRecords.ProductPresentation instead of SelectionDetailRecords.Product for the error message. Why?
If we use Product instead of ProductPresentation, each call to this field initiates a query to the database that potentially depreciates system performance. To prevent it, we have created a simple text field ProductPresentation, that we use to display messages to users.
Let us keep going. We have created the code to check the balance and our next step is to add records to the register. We can either create the program code from scratch or use the one provided by the wizard:
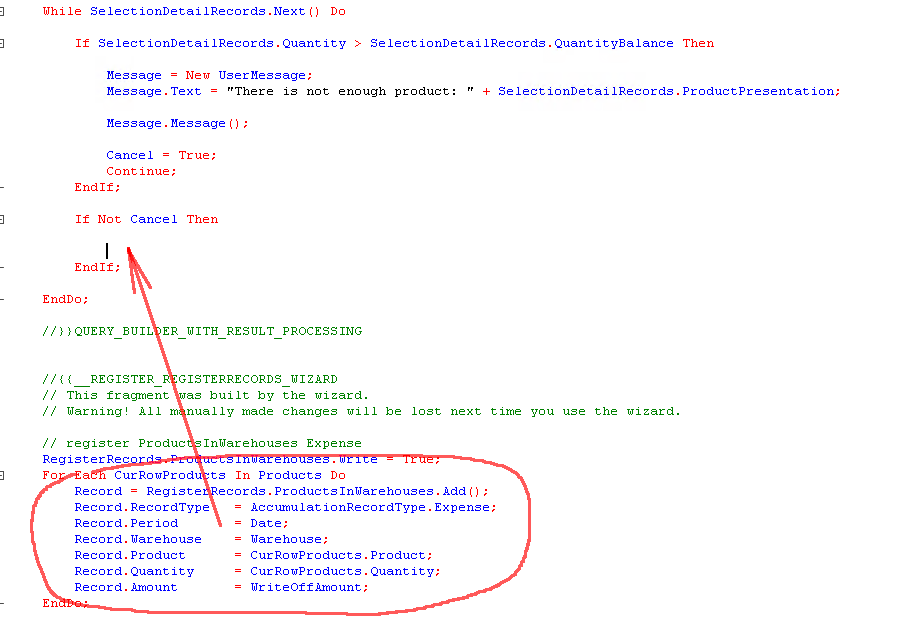
We get the following:
|
While SelectionDetailRecords.Next() Do
If SelectionDetailRecords.Quantity > SelectionDetailRecords.QuantityBalance Then
Message = New UserMessage; Message.Text = "There is not enough product: " + SelectionDetailRecords.ProductPresentation;
Message.Message();
Cancel = True; Continue; EndIf;
If Not Cancel Then // register ProductsInWarehouses Expense Record = RegisterRecords.ProductsInWarehouses.Add(); Record.RecordType = AccumulationRecordType.Expense; Record.Period = Date; Record.Warehouse = Warehouse; Record.Product = SelectionDetailRecords.Product; Record.Quantity = SelectionDetailRecords.Quantity; Record.Amount = WriteOffAmount;
EndIf;
EndDo; |
Now we have to define the cost price (or write off amount). In other words, we should define variable WriteOffAmount.
I have already given you the formula to calculate cost price. According to this formula, the code should look like this:
|
WriteOffAmount = SelectionDetailRecords.AmountBalance / SelectionDetailRecords.QuantityBalance * SelectionDetailRecords.Quantity; |
At first glance, the formula looks perfectly adequate, and it seems we can use it in our code.
Still, there is one thing we should take into account. Imagine we are going to sell the last product item from our warehouse, and the remaining quantity is a fractional value. Say 23.56 kg of sugar. Thus the cost of this product in AmountBalance is also a fractional value.
Ideally, the WriteOffAmount should be equal to AmountBalance. But in some scenarios, these values can differ. The cause is that the system rounds off values received from the division of AmountBalance by QuantityBalance and further multiplying by Quantity.
It obviously might create an error!
How do we avoid such a risk? There are several ways to achieve it. Here is one of them. We simply swap AmountBalance and Quantity in our formula:
|
WriteOffAmount = SelectionDetailRecords.Quantity / SelectionDetailRecords.QuantityBalance * SelectionDetailRecords.AmountBalance; |
Now, if QuantityBalance is equal to Quantity, the result of division is always equal to one. Thus, the WriteOffAmount, in this case, is always equal to AmountBalance.
Well, we have practically completed the procedure for posting document SalesInvoice. The last thing to do is to take care of object DataLock. We are getting there.
But before we do it, let me draw your attention to setting flag Write for the register:
|
RegisterRecords.ProductsInWarehouses.Write = True; |
We can put this code into any part of the posting procedure but to make it more visible, I suggest placing it in the very beginning:
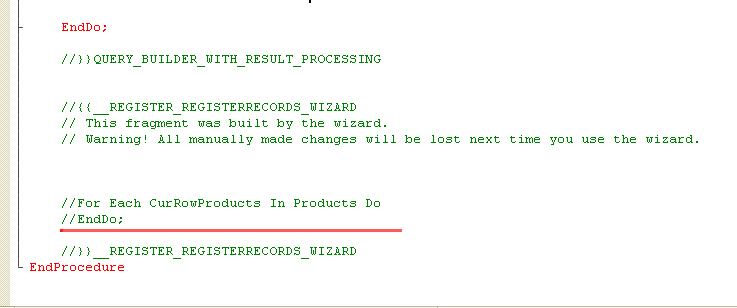
In addition, we should remove or comment out the remaining code created by the wizard:
Now is the right time to check the code we have just created.
Start 1C in dialog mode, open any existing document SalesInvoice, and post it. Then check the records added by the document:
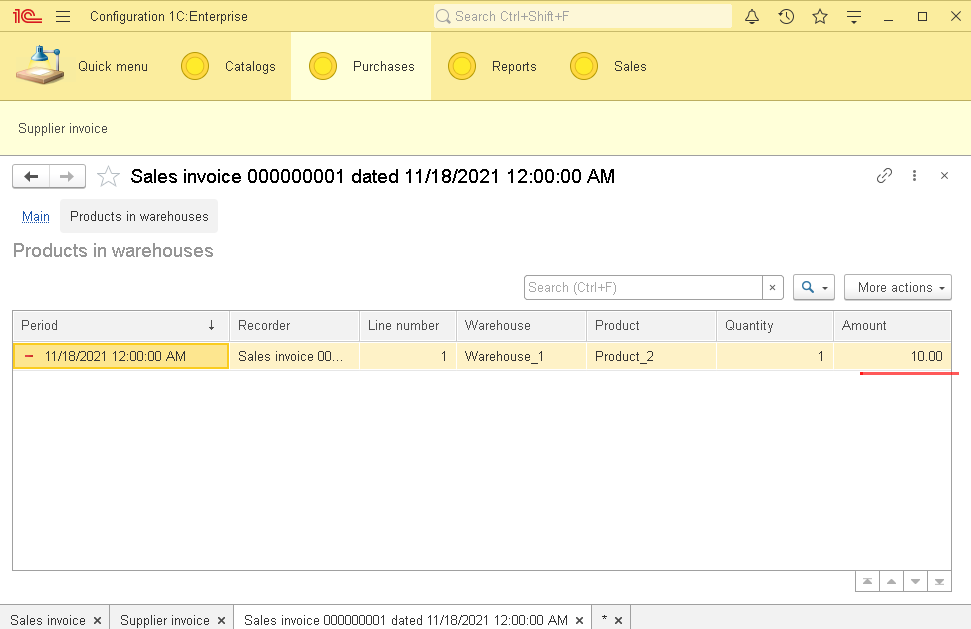
As you see, the system wrote off precisely the amount equal to the cost price and not the sale price:
Excellent! Document SalesInvoice adds required records to register ProductsInWarehouses. It seems we have completed the task successfully.
But we still have to handle the DataLock matter. Let us deal with it.
As you remember, in the previous article, when posting document SalesInvoice, we relied on the following algorithm: add all records into the register and then check if we get a negative balance.
In case of a negative balance, we rolled off the transaction and reported the error to a user. This is the quickest method to post a document. Why not use this method again?
The difference is that in the previous case, we did not attempt to read data from the database when posting a document. We just added our own data to the database. That is, we added product and number of units.
In the current example, before writing data into the register, we need to know the product cost. We do it by reading data from the database. At that, it is important to get up-to-date data. You might wonder how the data might become outdated. Here is an example.
Imagine we are a small company with a single workstation to create both documents SupplierInvoice and SalesInvoice. We always get up-to-date cost prices on posting document SalesInvoice because nobody else can possibly impact the data.
Now imagine a different scenario. We have a huge company with thousands of workstations. Some employees add SupplierInvoice documents while others take care of SalesInvoice documents. It means that there is a high chance that while we are busy posting our document SalesInvoice (or in other words, while the system is busy running our code, thus reading data from the register), someone else might also be issuing document SupplierInvoice or registering sales with other SalesInvoices. All of these actions affect the product quantity and cost balances.
But we need to obtain the correct cost price as of the moment we start posting. How do we handle this matter?
Here the 1C platform object DataLock comes to the rescue. Using this object, we can lock certain lines in the register table so that nobody changes it until we complete our procedure. It guarantees that the data stays intact until we complete the posting procedure.
Within the 1C platform context, we call this process the managed transaction locks.
Keep in mind that in the register table we lock only the records that we first read from and then write to.
Let us uncomment the DataLock section we have previously commented out and make some useful changes to the code:
First of all, specify the register that provides data and then accepts our records:

LockItem.Mode = DataLockMode.Exclusive;
After we have specified the table we want to lock, we set a filter to let the system know the exact lines in the table to be locked. Should we fail to do so, the system locks the whole table.
So, what data do we want to lock, and what filter do we need? Simply go back to the query we have previously created and check what kind of data we included in the selection.
In this query, you can see that we select data per specific warehouse (this is filter #1) and per specific products as defined in the table section of document SalesInvoice (this is filter #2).
So, to properly set up object DataLock, we need to use the same filters there.
The code to set the filter for the warehouse looks this way:
|
LockItem.SetValue("Warehouse", Warehouse); |
The first value Warehouse is the dimension name in the register; the second value Warehouse is the attribute's value in the posted document. This code sets the lock (prevents writing) for register lines that contain value Warehouse equal to the one in our document.
But should we lock it just this way, the amount of locked data turns out to be pretty significant, potentially depreciating our application's performance.
With this point in mind we also want to add a filter by products included into our document. This is how we do it:
|
LockItem.DataSource = Products; LockItem.UseFromDataSource("Product", "Product"); |
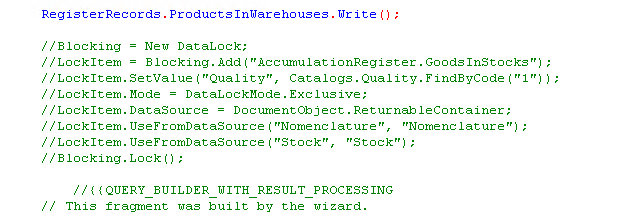
Here is the screenshot to give you a better understanding of what code elements mean:
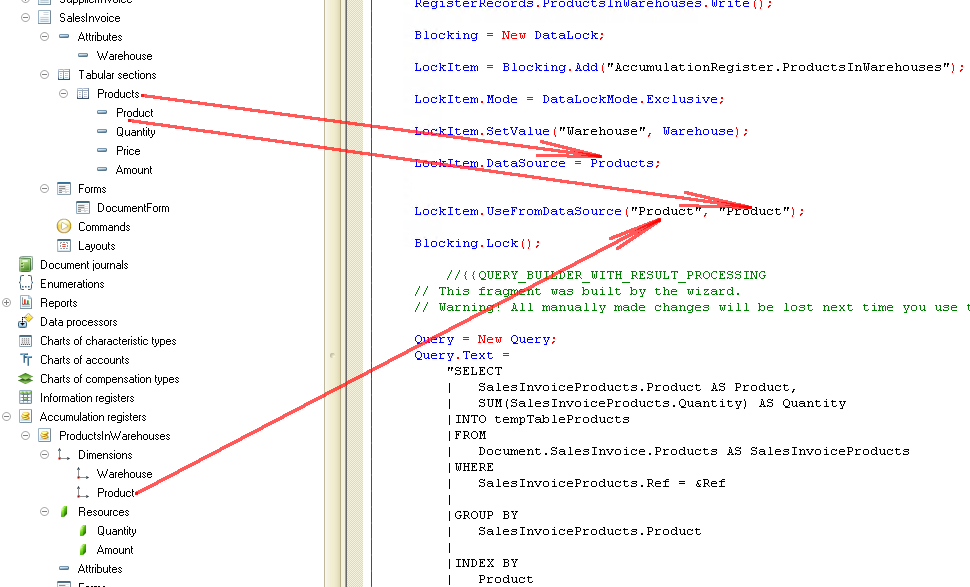
After setting the required filter in the table register, we should set the data lock to the active state. We do it with the following code:
|
Blocking.Lock(); |
And here is the complete code for the data lock:
|
Blocking = New DataLock;
LockItem = Blocking.Add("AccumulationRegister.ProductsInWarehouses");
LockItem.Mode = DataLockMode.Exclusive;
LockItem.SetValue("Warehouse", Warehouse);
LockItem.DataSource = Products; LockItem.UseFromDataSource("Product", "Product");
Blocking.Lock(); |
Two very important comments! To use object DataLock, you need to activate managed transaction lock mode in Designer:
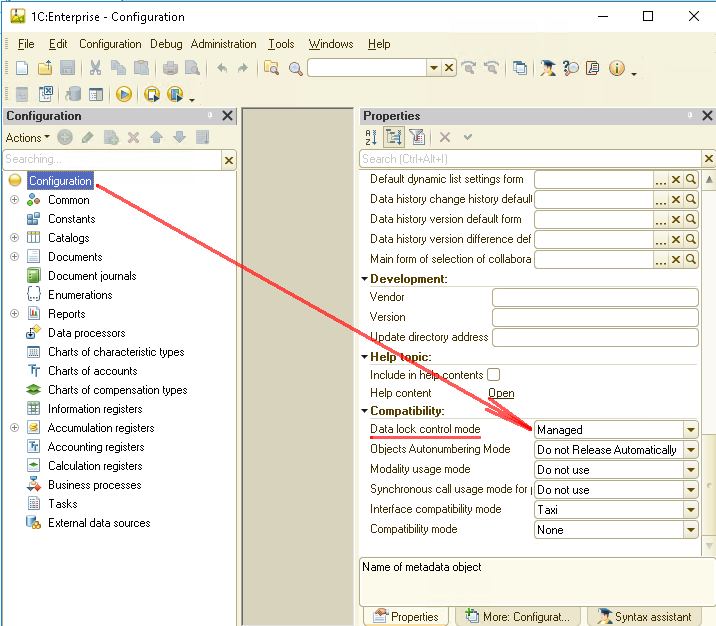
This is number one. And number two is that managed transaction locks apply only to the 1C platform client-server operation mode.
If 1C runs in the file mode, managed transaction locks are not active, and any attempt to write data results in the lock of the whole register table. This is why the file mode in 1C does not provide adequate performance and is suitable only for a small company with a limited number of workstations (in our experience, it is not more than 3) or for study purposes.
It seems we are done here. Now our application allows managing not only quantities but amounts as well. For this purpose, we have modified accumulation register ProductsInWarehouses and documents SupplierInvoice and SalesInvoice.
While dealing with document SalesInvoice, we learned about such a functional 1C object as DataLock.
Our next task is to learn how to calculate the profit earned from our sales. We are going to create one more register and modify our documents again.
This is basically it. Stay with us. There is plenty of fantastic stuff ahead!
As usual, here is the application dump for your convenience.

Writen by
1C Developer
20+ years of experience in the software industry in Russia, UAE and Germany. My main fields of expertise are developing and implementation of business applications (Retail, CRM, WMS, and Accounting) and integration of software with POS equipment and web portals.


