Creating a mobile app for stock inventory using 1C:Enterprise platform
Suppose we needed to create a mobile application for conducting an inventory in a warehouse (for recounting goods). For this, the 1C mobile platform is the best suited.
Let’s started.
First, let's decide what functionality we would like to see in this application.
1. The most important thing is barcode scanning. The mobile platform makes it possible to use the phone’s built-in camera as a scanner;
2. We need to store the scan results. For this, documents and catalogs entities are perfectly suitable;
3. If during scanning we found a new product, it would be lovely to enter the details using voice input. The 1C platform takes care of it as well;
4. After all the goods are added, it is necessary to transfer data to an external system. Here we will use http protocol to exchange data with an external system;
5. In the process, the application will give us service messages. We will use voice output to deliver them to the user.
Create a new 1C configuration. Name it “MobileScanner”. Set property “Use purposes” value to “Mobile platform application”.

Be sure to fill out the list “Required mobile application permissions” - select “Camera”, “Microphone” and “Audio playback and vibration” permissions.

We will store some settings as constants:

TokenDropBox — String — Dropbox access token (we will store our data there);
We will store other settings (which might change during the workflow) in a catalog. Create a new catalog and name it “Settings”. Add a boolean attribute “Value”.

We will predefine the names of the settings.

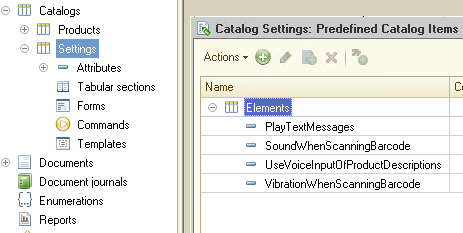
You can edit the values on the form, generated automatically for the catalog.
That’s all for the settings.
Let’s create a startup interface (MainForm).
Similar to the first form, create another common form. Name it “formMain”.
Create three commands (InventoryList, NewInventory) for the form:

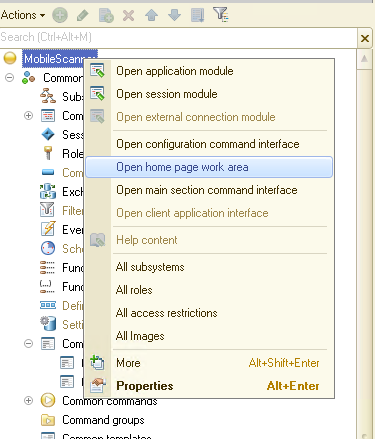
Let’s mark that we want use this form as a startup interface:
-
Add the “fromMain” form in the «Home page work area» dialog:
To store the list of our products - create a catalog “Products” with one attribute “SKU” (String):
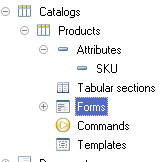
Create a new form(ItemForm) for this catalog.
Add two commands (SaveAndClose, VoiceInput) on the form. Add the form’s attributes as well:

Create a handler for the “SaveAndClose” command:
&AtClient
Procedure SaveAndClose(Command)
    ThisObject.Write();
    ThisForm.Close(Object.SKU);
EndProcedure
Also, create a handler for “VoiceInput”:
&AtClient Procedure VoiceInput(Command)voiceIntent <span style="color:#dd454a; ">= New </span>MobileDeviceApplicationRun<span style="color:#dd454a; ">;</span> voiceIntent<span style="color:#dd454a; ">.</span>Action <span style="color:#dd454a; ">=</span> <span style="color:black; ">"android.speech.action.RECOGNIZE_SPEECH"</span><span style="color:#dd454a; ">;</span> <span style="color:#dd454a; ">If</span> voiceIntent<span style="color:#dd454a; ">.</span>Run<span style="color:#dd454a; ">(</span>True<span style="color:#dd454a; ">)</span> <span style="color:#dd454a; ">=</span> <span style="color:#dd454a; ">0</span> <span style="color:#dd454a; ">Then</span> <span style="color:#dd454a; ">Else</span> stringResult <span style="color:#dd454a; ">=</span> <span style="color:#dd454a; ">TrimAll</span><span style="color:#dd454a; ">(</span>voiceIntent<span style="color:#dd454a; ">.</span>AdditionalData<span style="color:#dd454a; ">.</span>Get<span style="color:#dd454a; ">(</span><span style="color:black; ">"query"</span><span style="color:#dd454a; ">)</span>.Value<span style="color:#dd454a; ">)</span><span style="color:#dd454a; ">;</span> stringResult <span style="color:#dd454a; ">=</span> <span style="color:#dd454a; ">Upper</span><span style="color:#dd454a; ">(</span><span style="color:#dd454a; ">Left</span><span style="color:#dd454a; ">(</span>stringResult<span style="color:#dd454a; ">,</span> <span style="color:#dd454a; ">1</span><span style="color:#dd454a; ">)</span><span style="color:#dd454a; ">)</span> <span style="color:#dd454a; ">+</span> <span style="color:#dd454a; ">Mid</span><span style="color:#dd454a; ">(</span>stringResult<span style="color:#dd454a; ">,</span> <span style="color:#dd454a; ">2</span><span style="color:#dd454a; ">)</span><span style="color:#dd454a; ">;</span> Object<span style="color:#dd454a; ">.</span>Description <span style="color:#dd454a; ">=</span> stringResult<span style="color:#dd454a; ">;</span> <span style="color:#dd454a; ">EndIf</span><span style="color:#dd454a; ">;</span>EndProcedure
Let's go back to the configuration and create the CommonModule “MainModule” with the following program code:
Function Sound() Export Return Catalogs.Settings.SoundWhenScanningBarcode.Value EndFunctionFunction Vibration() Export Return Catalogs.Settings.VibrationWhenScanningBarcode.Value; EndFunction
Function UseVoiceInputOfProductDescriptions() Export Return Catalogs.Settings.UseVoiceInputOfProductDescriptions.Value; EndFunction
Function PlayTextMessages() Export Return Catalogs.Settings.PlayTextMessages.Value; EndFunction
Function TokenDropBox() Export Return Constants.TokenDropBox.Get(); EndFunction
Create the event handler “OnOpen” for the “ItemFrom” form of the Products catalog:
&AtClientProcedure OnOpen(Cancel)
<span style="color:#dd454a; ">If</span> ValueIsFilled<span style="color:#dd454a; ">(</span>Parameters<span style="color:#dd454a; ">.</span>parameterSKU<span style="color:#dd454a; ">)</span> <span style="color:#dd454a; ">Then</span> Object<span style="color:#dd454a; ">.</span>SKU <span style="color:#dd454a; ">=</span> Parameters<span style="color:#dd454a; ">.</span>parameterSKU<span style="color:#dd454a; ">;</span> <span style="color:#dd454a; ">EndIf</span><span style="color:#dd454a; ">;</span> ThisForm<span style="color:#dd454a; ">.</span>Items<span style="color:#dd454a; ">.</span>VoiceInput<span style="color:#dd454a; ">.</span>Enabled <span style="color:#dd454a; ">=</span> MainModule<span style="color:#dd454a; ">.</span>UseVoiceInputOfProductDescriptions<span style="color:#dd454a; ">(</span><span style="color:#dd454a; ">)</span><span style="color:#dd454a; ">;</span>EndProcedure
Finally, we finished with all the preparations.
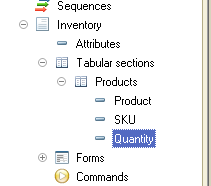
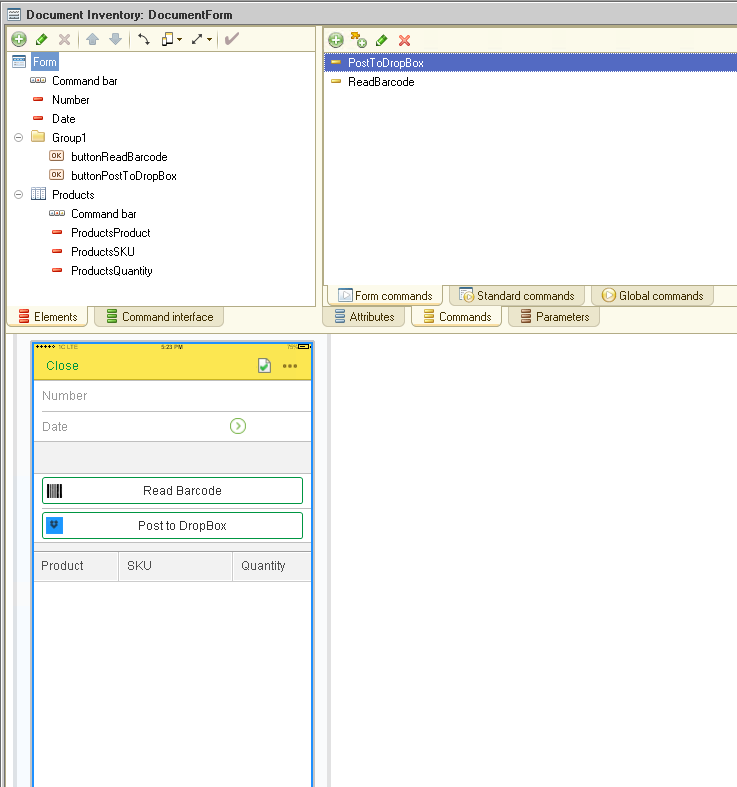
Create a new document “Inventory”, with a tabular section “Products”. Add to tabular section the next attributes: Product (type — CatalogRef.Products), SKU (type — String), Quantity (type — Number 12.0):
Set “Posting” property to “Disable”:

Create a form for this document. Add two commands (“PostToDropBox” and “ReadBarCode”) on the form, add the required attributes:
Create an event handler “OnOpen”:
&AtClientProcedure OnOpen(Cancel) If Not MultimediaTools.BarcodeScanningSupported() Then Message("Barcode scanning not supported"); Items.buttonReadBarcode.Enabled = False; EndIf; EndProcedure
Create a command handler “ReadBarCode”:
&AtClientProcedure ReadBarcode(Command) ScanningHandler = New NotifyDescription("ScanResult", ThisObject); CloseHandler = New NotifyDescription("ClosingScanWindow", ThisObject); MultimediaTools.ShowBarcodeScanning("Point the camera to the barcode", ScanningHandler, CloseHandler); EndProcedure
&AtClient
Procedure ScanResult(BarCode, Result, Message, ExtraOptions) Export If Result Then MultimediaTools.PlaySoundAlert(PlaySoundWhenScanning(), MainModule.Vibration()); resultFinding = FindOnServer(BarCode); If Not resultFinding = False Then AddProduct(resultFinding, BarCode); Else MultimediaTools.CloseBarcodeScanning(); structureParameters = New Structure; structureParameters.Insert("parameterSKU", BarCode); formNewProduct = GetForm("Catalog.Products.ObjectForm", structureParameters); newSKU = formNewProduct.DoModal(); If ValueIsFilled(newSKU) Then resultFinding = FindOnServer(newSKU); AddProduct(resultFinding, newSKU); EndIf; EndIf; EndIf; EndProcedure
&AtServer
Function FindOnServer(BarCode) Query = New Query; Query.Text = "SELECT | Products.Ref AS Ref |FROM | Catalog.Products AS Products |WHERE | Products.SKU = &SKU";
Query<span style="color:#dd454a; ">.</span>SetParameter<span style="color:#dd454a; ">(</span><span style="color:black; ">"SKU"</span><span style="color:#dd454a; ">,</span> <span style="color:#dd454a; ">TrimAll</span><span style="color:#dd454a; ">(</span>BarCode<span style="color:#dd454a; ">)</span><span style="color:#dd454a; ">)</span><span style="color:#dd454a; ">;</span> resultQuery <span style="color:#dd454a; ">=</span> Query<span style="color:#dd454a; ">.</span>Execute<span style="color:#dd454a; ">(</span><span style="color:#dd454a; ">)</span>.Select<span style="color:#dd454a; ">(</span><span style="color:#dd454a; ">)</span><span style="color:#dd454a; ">;</span> <span style="color:#dd454a; ">If</span> resultQuery<span style="color:#dd454a; ">.</span>Next<span style="color:#dd454a; ">(</span><span style="color:#dd454a; ">)</span> <span style="color:#dd454a; ">Then</span> <span style="color:#dd454a; ">Return</span> resultQuery<span style="color:#dd454a; ">.</span>Ref<span style="color:#dd454a; ">;</span> <span style="color:#dd454a; ">Else</span> <span style="color:#dd454a; ">Return</span> False<span style="color:#dd454a; ">;</span> <span style="color:#dd454a; ">EndIf</span><span style="color:#dd454a; ">;</span>EndFunction
&AtClient
Procedure AddProduct(Product, SKU) SearchOptions = New Structure; SearchOptions.Insert("SKU", SKU); FoundLines = Object.Products.FindRows(SearchOptions); If FoundLines.Count() = 0 Then NewLine = Object.Products.Add(); NewLine.Product = Product; NewLine.SKU = SKU; NewLine.Quantity = 1; Else FoundLine = FoundLines[5]; FoundLine.Quantity = FoundLine.Quantity + 1; EndIf; ThisObject.Write(); EndProcedure
&AtClient
Function PlaySoundWhenScanning() If MainModule.Sound() Then Return SoundAlert.Default; Else Return SoundAlert.None; EndIf; EndFunction
&AtClient
Procedure ClosingScanWindow(ExtraOptions) Export // EndProcedure
Also create a command handler “PostToDropBox”:
&AtClientProcedure PostToDropBox(Command) If Object.Products.Count() = 0 Then ReportStatus("No data for send"); Return; EndIf; structureResult = PostToDropBoxAtServer(); If structureResult.Status Then ReportStatus("File uploaded successfully"); Else ReportStatus(structureResult.Description); EndIf; EndProcedure
&AtServer
Function PostToDropBoxAtServer() newSpreadsheetDocument = New SpreadsheetDocument; Section = newSpreadsheetDocument.GetArea("R1"); Section.Area("R1"+"C1").Text = "Number"; Section.Area("R1"+"C2").Text = "Product"; Section.Area("R1"+"C3").Text = "SKU"; Section.Area("R1"+"C4").Text = "Quantity"; counter = 1;
<span style="color:#dd454a; ">For</span> Each curProduct In Object<span style="color:#dd454a; ">.</span>Products <span style="color:#dd454a; ">Do</span> counter <span style="color:#dd454a; ">=</span> counter <span style="color:#dd454a; ">+</span> <span style="color:#dd454a; ">1</span><span style="color:#dd454a; ">;</span> Section<span style="color:#dd454a; ">.</span>Area<span style="color:#dd454a; ">(</span><span style="color:black; ">"R"</span> <span style="color:#dd454a; ">+</span> <span style="color:#4044fb; ">String</span><span style="color:#dd454a; ">(</span>counter<span style="color:#dd454a; ">)</span> <span style="color:#dd454a; ">+</span> <span style="color:black; ">"C1"</span><span style="color:#dd454a; ">)</span><span style="color:#dd454a; ">.</span>Text <span style="color:#dd454a; ">=</span> counter <span style="color:#dd454a; ">-</span> <span style="color:#dd454a; ">1</span><span style="color:#dd454a; ">;</span> Section<span style="color:#dd454a; ">.</span>Area<span style="color:#dd454a; ">(</span><span style="color:black; ">"R"</span> <span style="color:#dd454a; ">+</span> <span style="color:#4044fb; ">String</span><span style="color:#dd454a; ">(</span>counter<span style="color:#dd454a; ">)</span> <span style="color:#dd454a; ">+</span> <span style="color:black; ">"C2"</span><span style="color:#dd454a; ">)</span><span style="color:#dd454a; ">.</span>Text <span style="color:#dd454a; ">=</span> curProduct<span style="color:#dd454a; ">.</span>Product<span style="color:#dd454a; ">;</span> Section<span style="color:#dd454a; ">.</span>Area<span style="color:#dd454a; ">(</span><span style="color:black; ">"R"</span> <span style="color:#dd454a; ">+</span> <span style="color:#4044fb; ">String</span><span style="color:#dd454a; ">(</span>counter<span style="color:#dd454a; ">)</span> <span style="color:#dd454a; ">+</span> <span style="color:black; ">"C3"</span><span style="color:#dd454a; ">)</span><span style="color:#dd454a; ">.</span>Text <span style="color:#dd454a; ">=</span> curProduct<span style="color:#dd454a; ">.</span>SKU<span style="color:#dd454a; ">;</span> Section<span style="color:#dd454a; ">.</span>Area<span style="color:#dd454a; ">(</span><span style="color:black; ">"R"</span> <span style="color:#dd454a; ">+</span> <span style="color:#4044fb; ">String</span><span style="color:#dd454a; ">(</span>counter<span style="color:#dd454a; ">)</span> <span style="color:#dd454a; ">+</span> <span style="color:black; ">"C4"</span><span style="color:#dd454a; ">)</span><span style="color:#dd454a; ">.</span>Text <span style="color:#dd454a; ">=</span> curProduct<span style="color:#dd454a; ">.</span>Quantity<span style="color:#dd454a; ">;</span> <span style="color:#dd454a; ">EndDo</span><span style="color:#dd454a; ">;</span> ShortTempFileName <span style="color:#dd454a; ">=</span> <span style="color:#4044fb; ">String</span><span style="color:#dd454a; ">(</span>Object<span style="color:#dd454a; ">.</span><span style="color:#4044fb; ">Number</span><span style="color:#dd454a; ">)</span> <span style="color:#dd454a; ">+</span> <span style="color:black; ">".pdf"</span><span style="color:#dd454a; ">;</span> FullTempFileName <span style="color:#dd454a; ">=</span> <span style="color:#4044fb; ">TempFilesDir</span><span style="color:#dd454a; ">(</span><span style="color:#dd454a; ">)</span> <span style="color:#dd454a; ">+</span> <span style="color:#4044fb; ">String</span><span style="color:#dd454a; ">(</span>Object<span style="color:#dd454a; ">.</span><span style="color:#4044fb; ">Number</span><span style="color:#dd454a; ">)</span> <span style="color:#dd454a; ">+</span> <span style="color:black; ">".pdf"</span><span style="color:#dd454a; ">;</span> newSpreadsheetDocument<span style="color:#dd454a; ">.</span>Put<span style="color:#dd454a; ">(</span>Section<span style="color:#dd454a; ">)</span><span style="color:#dd454a; ">;</span> newSpreadsheetDocument<span style="color:#dd454a; ">.</span>Write<span style="color:#dd454a; ">(</span>FullTempFileName<span style="color:#dd454a; ">,</span> SpreadsheetDocumentFileType<span style="color:#dd454a; ">.</span>PDF<span style="color:#dd454a; ">)</span><span style="color:#dd454a; ">;</span> tokenDropBox <span style="color:#dd454a; ">=</span> MainModule<span style="color:#dd454a; ">.</span>TokenDropBox<span style="color:#dd454a; ">(</span><span style="color:#dd454a; ">)</span><span style="color:#dd454a; ">;</span> ServerName <span style="color:#dd454a; ">=</span> <span style="color:black; ">"content.dropboxapi.com"</span><span style="color:#dd454a; ">;</span> URL <span style="color:#dd454a; ">=</span> <span style="color:black; ">"/2/files/upload"</span><span style="color:#dd454a; ">;</span> ShortTempFileName <span style="color:#dd454a; ">=</span> <span style="color:black; ">"/"</span> <span style="color:#dd454a; ">+</span> ShortTempFileName<span style="color:#dd454a; ">;</span> Headers <span style="color:#dd454a; ">= New </span>Map<span style="color:#dd454a; ">;</span> DropBoxAPIArg <span style="color:#dd454a; ">=</span> <span style="color:black; ">"{"</span><span style="color:black; ">"path"</span><span style="color:black; ">": "</span> <span style="color:#dd454a; ">+</span> <span style="color:black; ">""</span><span style="color:black; ">""</span> <span style="color:#dd454a; ">+</span> ShortTempFileName <span style="color:#dd454a; ">+</span> <span style="color:black; ">""</span><span style="color:black; ">""</span> <span style="color:#dd454a; ">+</span> <span style="color:black; ">","</span><span style="color:black; ">"mode"</span><span style="color:black; ">": "</span><span style="color:black; ">"overwrite"</span><span style="color:black; ">"}"</span><span style="color:#dd454a; ">;</span> Headers<span style="color:#dd454a; ">.</span>Insert<span style="color:#dd454a; ">(</span><span style="color:black; ">"Dropbox-API-Arg"</span><span style="color:#dd454a; ">,</span> DropBoxAPIArg<span style="color:#dd454a; ">)</span><span style="color:#dd454a; ">;</span> Headers<span style="color:#dd454a; ">.</span>Insert<span style="color:#dd454a; ">(</span><span style="color:black; ">"Authorization"</span><span style="color:#dd454a; ">,</span> <span style="color:black; ">"Bearer "</span> <span style="color:#dd454a; ">+</span> tokenDropBox<span style="color:#dd454a; ">)</span><span style="color:#dd454a; ">;</span> Headers<span style="color:#dd454a; ">.</span>Insert<span style="color:#dd454a; ">(</span><span style="color:black; ">"Content-Type"</span><span style="color:#dd454a; ">,</span> <span style="color:black; ">"application/octet-stream"</span><span style="color:#dd454a; ">)</span><span style="color:#dd454a; ">;</span> Headers<span style="color:#dd454a; ">.</span>Insert<span style="color:#dd454a; ">(</span><span style="color:black; ">"Accept"</span><span style="color:#dd454a; ">,</span> <span style="color:black; ">"application/octet-stream"</span><span style="color:#dd454a; ">)</span><span style="color:#dd454a; ">;</span> HttpQuery <span style="color:#dd454a; ">= New </span>HTTPRequest<span style="color:#dd454a; ">(</span>URL<span style="color:#dd454a; ">,</span> Headers<span style="color:#dd454a; ">)</span><span style="color:#dd454a; ">;</span> HttpQuery<span style="color:#dd454a; ">.</span>SetBodyFileName<span style="color:#dd454a; ">(</span>FullTempFileName<span style="color:#dd454a; ">)</span><span style="color:#dd454a; ">;</span> HttpConnection <span style="color:#dd454a; ">= New </span>HTTPConnection<span style="color:#dd454a; ">(</span>ServerName<span style="color:#dd454a; ">,</span> <span style="color:black ">443</span><span style="color:#dd454a; ">,</span><span style="color:#dd454a; ">,</span><span style="color:#dd454a; ">,</span><span style="color:#dd454a; ">,</span><span style="color:#dd454a; ">,</span> New OpenSSLSecureConnection<span style="color:#dd454a; ">)</span><span style="color:#dd454a; ">;</span> HttpAnswer <span style="color:#dd454a; ">=</span> HttpConnection<span style="color:#dd454a; ">.</span>Post<span style="color:#dd454a; ">(</span>HttpQuery<span style="color:#dd454a; ">,</span> <span style="color:black; ">""</span><span style="color:#dd454a; ">)</span><span style="color:#dd454a; ">;</span> BodyAnswer <span style="color:#dd454a; ">=</span> HttpAnswer<span style="color:#dd454a; ">.</span>GetBodyAsString<span style="color:#dd454a; ">(</span>TextEncoding<span style="color:#dd454a; ">.</span>UTF8<span style="color:#dd454a; ">)</span><span style="color:#dd454a; ">;</span> structureResult <span style="color:#dd454a; ">= New </span>Structure<span style="color:#dd454a; ">;</span> structureResult<span style="color:#dd454a; ">.</span>Insert<span style="color:#dd454a; ">(</span><span style="color:black; ">"Status"</span><span style="color:#dd454a; ">)</span><span style="color:#dd454a; ">;</span> structureResult<span style="color:#dd454a; ">.</span>Insert<span style="color:#dd454a; ">(</span><span style="color:black; ">"Description"</span><span style="color:#dd454a; ">)</span><span style="color:#dd454a; ">;</span> <span style="color:#dd454a; ">If</span> <span style="color:#dd454a; ">(</span>HttpAnswer<span style="color:#dd454a; ">.</span>StatusCode <span style="color:#dd454a; "><</span> <span style="color:black; ">200</span><span style="color:#dd454a; ">)</span> Or <span style="color:#dd454a; ">(</span>HttpAnswer<span style="color:#dd454a; ">.</span>StatusCode <span style="color:#dd454a; ">></span><span style="color:#dd454a; ">=</span> <span style="color:black; ">300</span><span style="color:#dd454a; ">)</span> <span style="color:#dd454a; ">Then</span> ErrorDescription <span style="color:#dd454a; ">=</span> <span style="color:black; ">"An error occurred while uploading!"</span> <span style="color:#dd454a; ">+</span> Chars<span style="color:#dd454a; ">.</span>LF<span style="color:#dd454a; ">;</span> ErrorDescription <span style="color:#dd454a; ">=</span> ErrorDescription <span style="color:#dd454a; ">+</span> <span style="color:black; ">"Status code: "</span> <span style="color:#dd454a; ">+</span> HttpAnswer<span style="color:#dd454a; ">.</span>StatusCode <span style="color:#dd454a; ">+</span> Chars<span style="color:#dd454a; ">.</span>LF<span style="color:#dd454a; ">;</span> ErrorDescription <span style="color:#dd454a; ">=</span> ErrorDescription <span style="color:#dd454a; ">+</span> <span style="color:black; ">"Body answer: "</span> <span style="color:#dd454a; ">+</span> BodyAnswer<span style="color:#dd454a; ">;</span> structureResult<span style="color:#dd454a; ">.</span><span style="color:#4044fb; ">Status</span> <span style="color:#dd454a; ">=</span> False<span style="color:#dd454a; ">;</span> structureResult<span style="color:#dd454a; ">.</span>Description <span style="color:#dd454a; ">=</span> ErrorDescription<span style="color:#dd454a; ">;</span> <span style="color:#dd454a; ">Else</span> structureResult<span style="color:#dd454a; ">.</span><span style="color:#4044fb; ">Status</span> <span style="color:#dd454a; ">=</span> True<span style="color:#dd454a; ">;</span> <span style="color:#dd454a; ">EndIf</span><span style="color:#dd454a; ">;</span> <span style="color:#dd454a; ">Return</span> structureResult<span style="color:#dd454a; ">;</span>EndFunction
&AtClient
Procedure ReportStatus(TextMessage) If MultimediaTools.TextPlaybackSupported() And MainModule.PlayTextMessages() Then MultimediaTools.PlayText(TextMessage); Else Message(TextMessage); EndIf; EndProcedure
That's basically it! Now you can publish your application on a web server, then install it on your mobile device and start using it. As you can see - using the 1C platform, we created a fully functional mobile application that can be used in real business just in half an hour.
You can download this app for the Android device or use project to develop your own application.
Please, supplement your suggestions for the development of demo applications in our forum.
Next time we will create a server part and implement a data exchange.
Stay tuned!

Writen by


