Customizing Ways of Presenting Detailed Data in Reports Built with Data Composition System

In one of our latest publications, we discussed creating reports in 1C with the DCS (Data Composition System). It is a powerful tool with plenty of features. One of the highly convenient features is so-called detailed information or details.
Reports created in 1C with the DCS enjoy a powerful mechanism giving access to details.
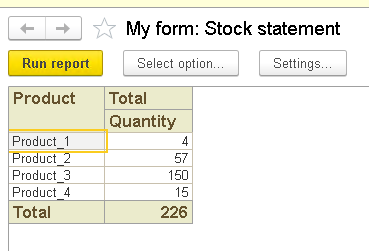
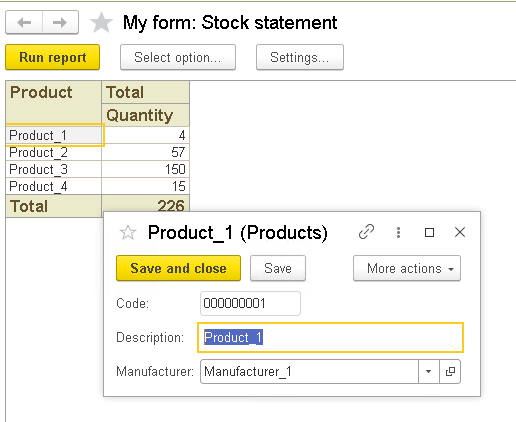
But what do we mean by details? It is an option to obtain detailed information on data already included in a report. Let's have a look at a stock statement report:
A double-click on a product name results in opening the respective product card:
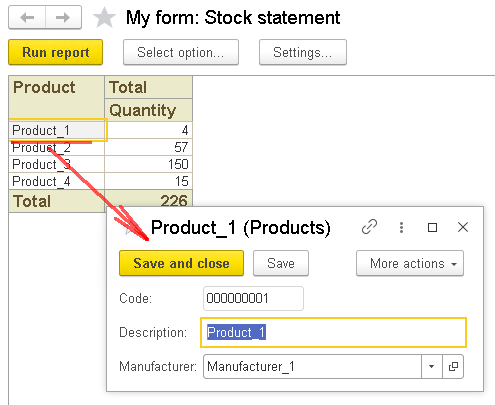
Thus, users can access a particular product card right from a report.
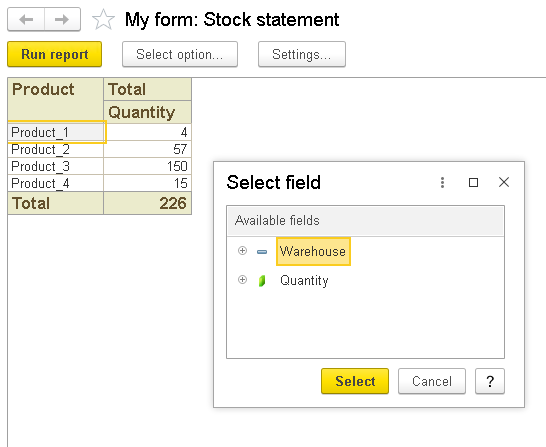
Consider one more example. Imagine we want to know not just the total for Product 2 but how many items each warehouse has. A double-click on quantity brings up a new window. Here we specify the field we want to view in more detail. I suggest we pick the warehouse.
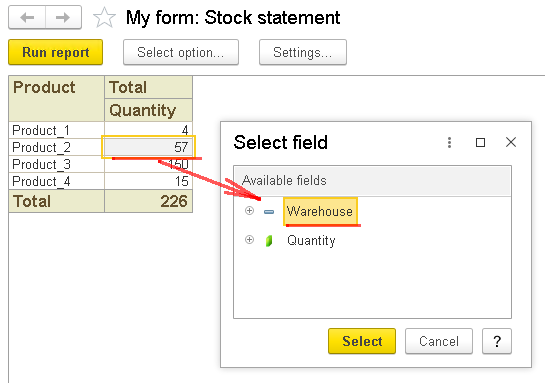
By hitting Select, we tell the 1C platform to create a report with information on the quantity of Product_2 per warehouse:

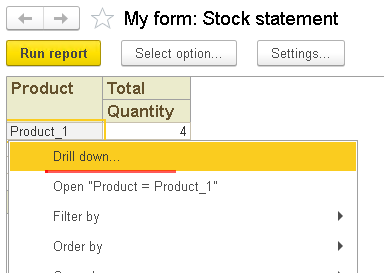
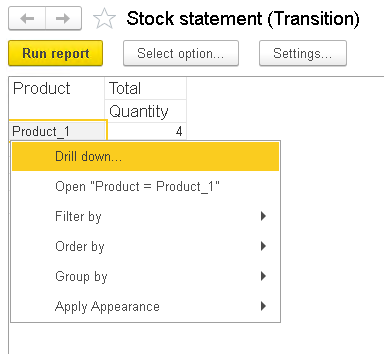
Let's consider one more scenario: the right-click on Product_1 opens a context menu with available options for a detailed report:
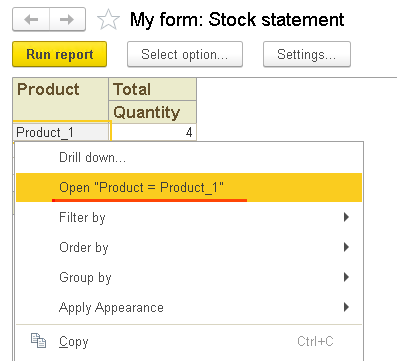
We can also use this context menu to access the product card:
Or drill down to the additional form to specify items we want to see in more detail.
All of the above is possible by utilizing the data details mechanism that picks detailed information for data included in the current report.
In most straightforward cases, the 1C platform creates detailed reports itself. All examples mentioned earlier were processed automatically. Thus, the platform can provide basic functionality without developers' assistance.
But we want to go further. Imagine that we want a double-click to open an alternative product card instead of the standard one (a default form from catalog Products).
In order to implement this or other alternative functionality, we should modify the 1C code. This is what we are going to do right now!
I suggest we use as a basis the configuration we have already created.
I am attaching the infobase dump to this article to save you time.
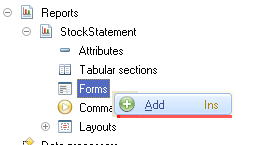
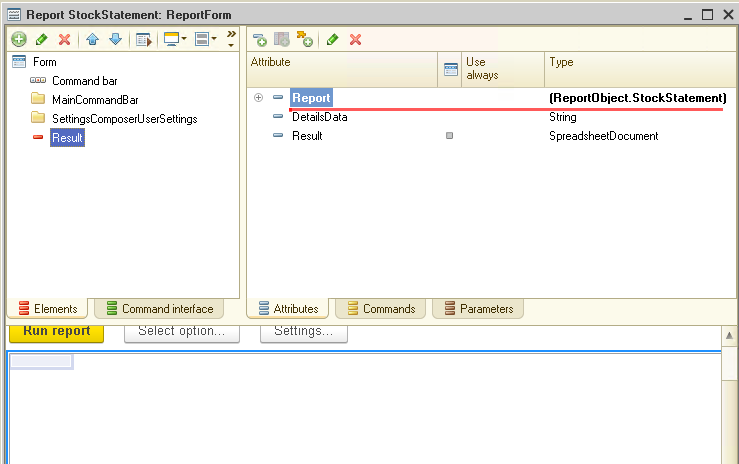
Let's go to Designer and try to customize the way of presenting detailed data in our report:
Keep in mind that in order to be able to customize detailed reports, you need a form for the main report. As you can see on the screenshot, our current report still misses one. The report form we are seeing in the dialog mode has been automatically created by the platform. So we need to create a form of our own. The solution is simple. Do the right-click ...
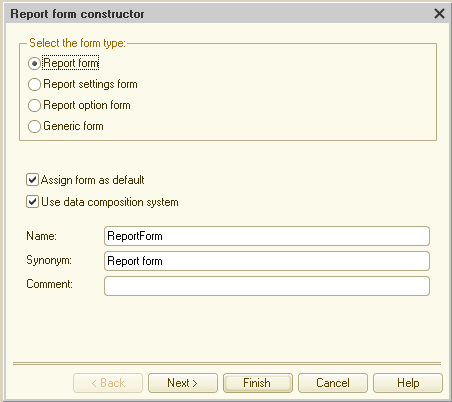
and immediately click Finish:
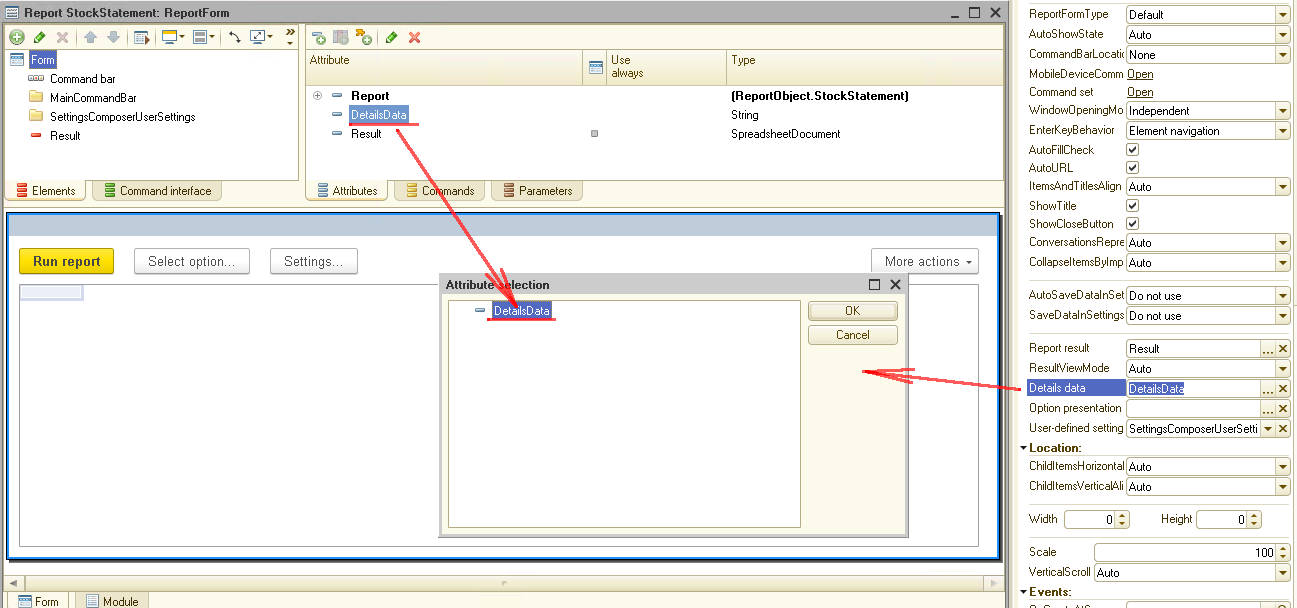
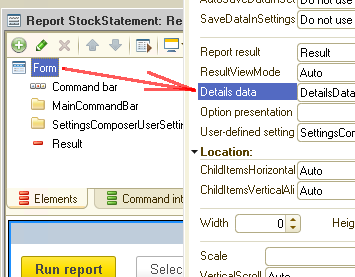
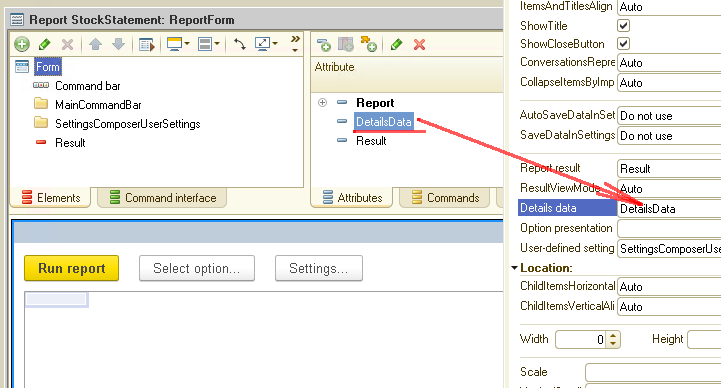
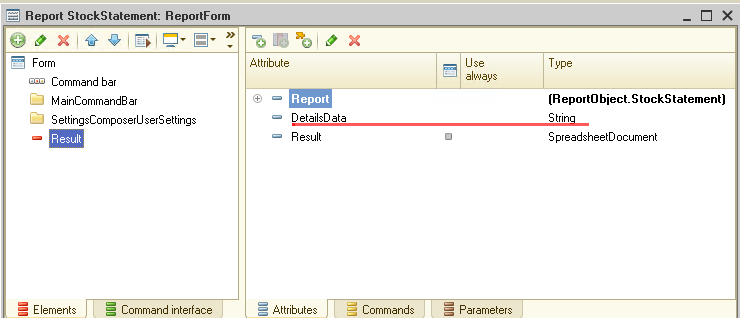
Now open this form and check its attributes. One of the attributes is DetailsData with type String:
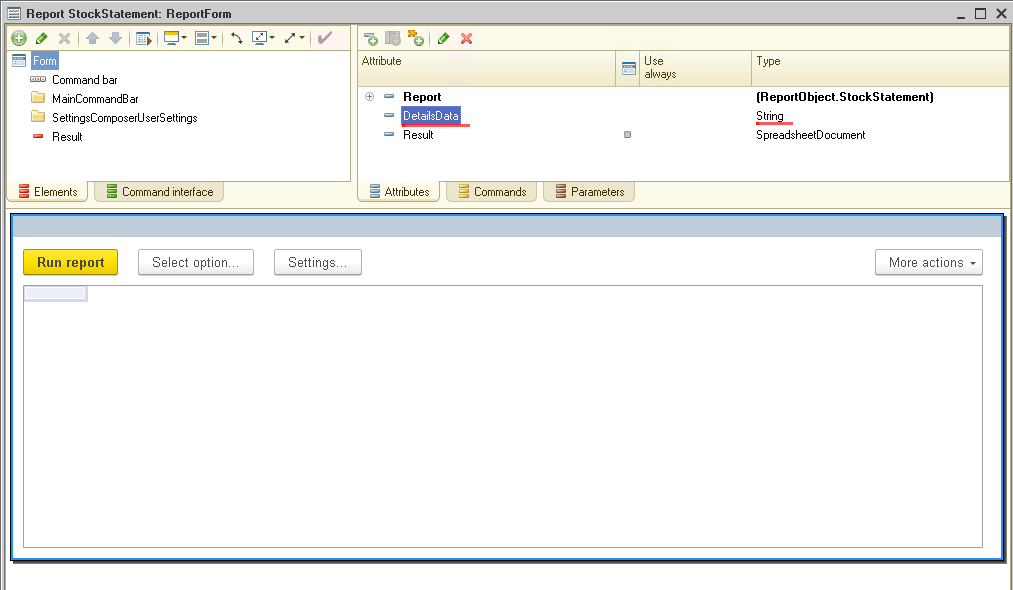
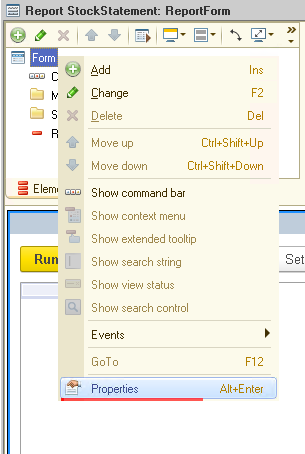
Now, let's check the form properties. One of the elements has an identical name:
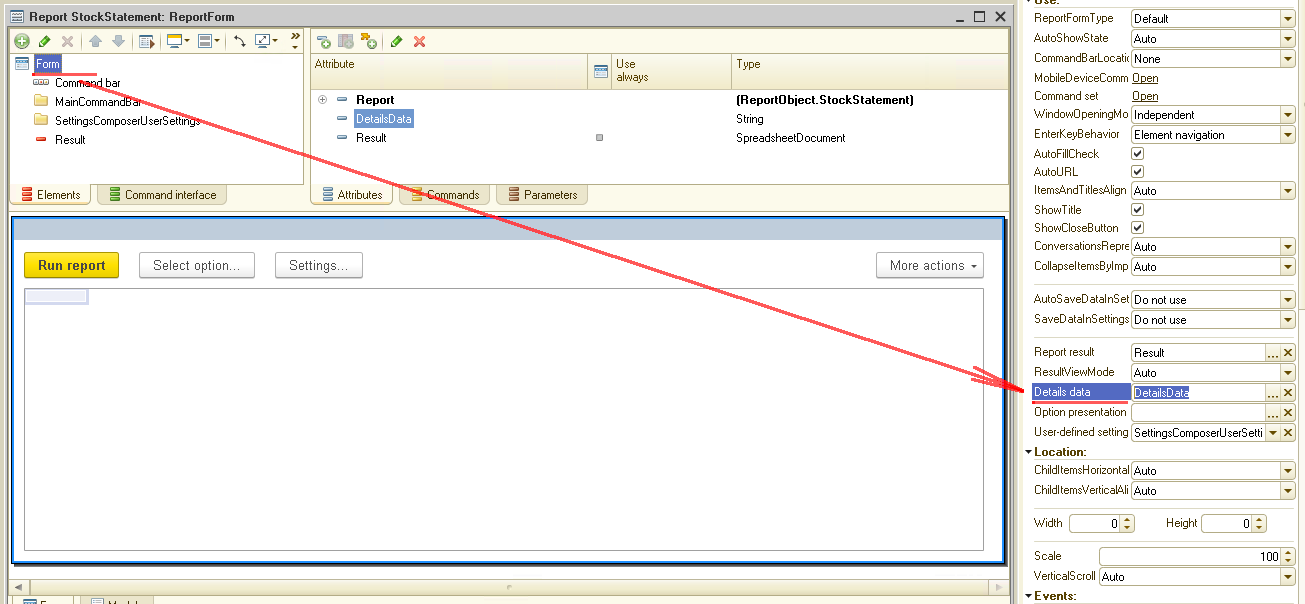
And the value for this item is attribute DetailsData:
But what kind of property is it? What does this attribute mean? And how does it all work together? These are good questions.
The 1C platform allocates data required for a detailed report into temporary storage, and the form contains only addresses of data in the temporary storage. And this is precisely why we need a string-type attribute DetailsData, that stores nothing else but addresses. To be able to access detailed data right within the program code, we link properties of form DetailsData
with the form attribute DetailsData:
It enables the platform to use this data for detailed reports.
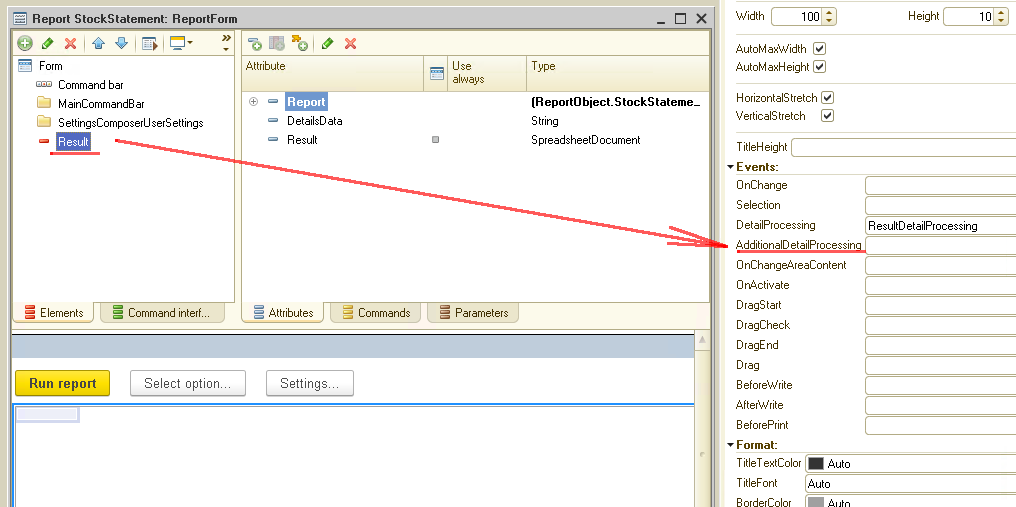
Also, the form contains element Result with type SpreadsheetDocument:
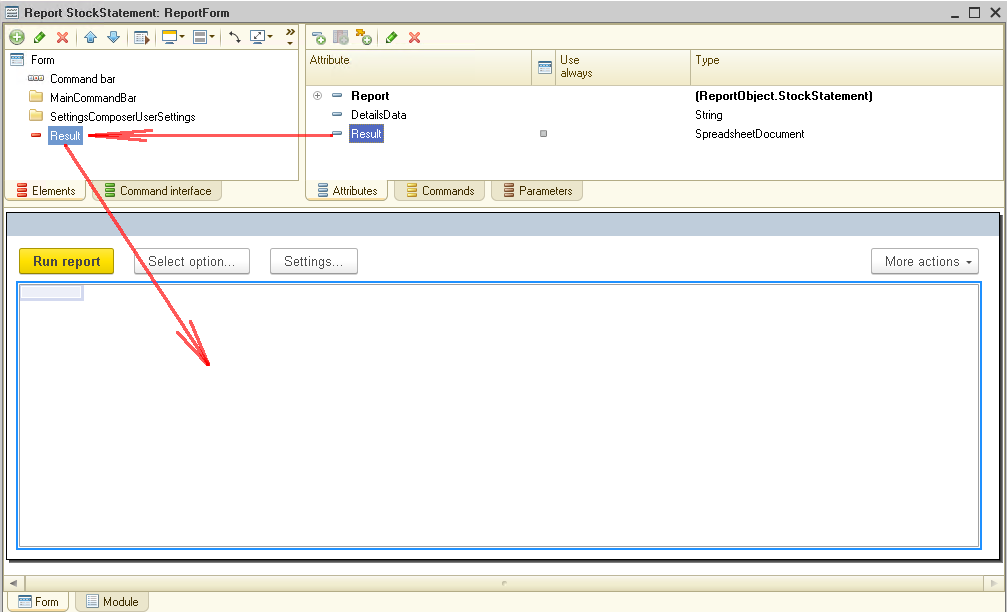
The role of this element is to output data contained in the report. Now go to this element's properties. It has event handler DetailProcessing that gets initiated at the moment a user requests a detailed report in the interactive mode:
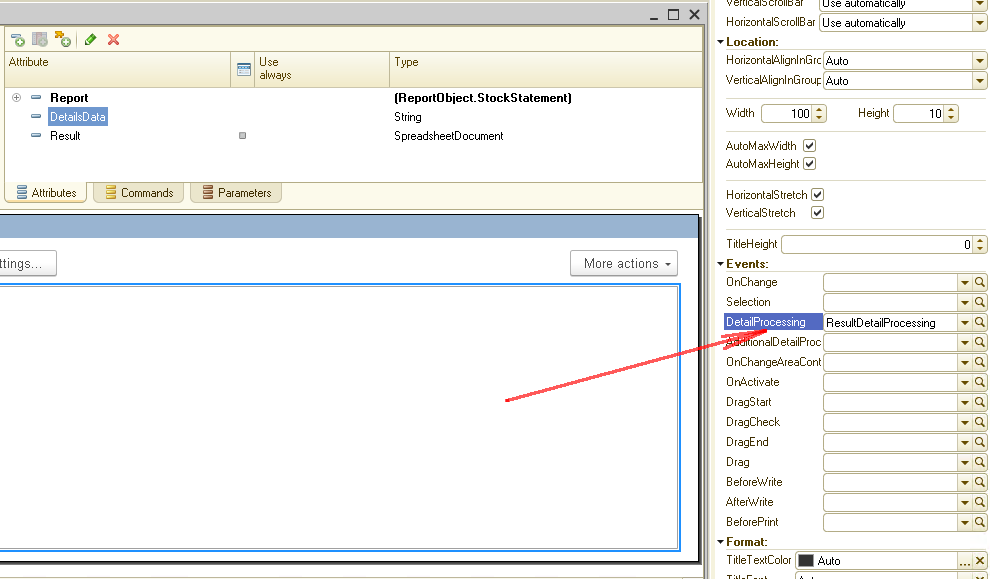
We are going to use this handler to create the code to perform the necessary actions. Remember, we aim to open a product card.
Let’s have a look at the code:
|
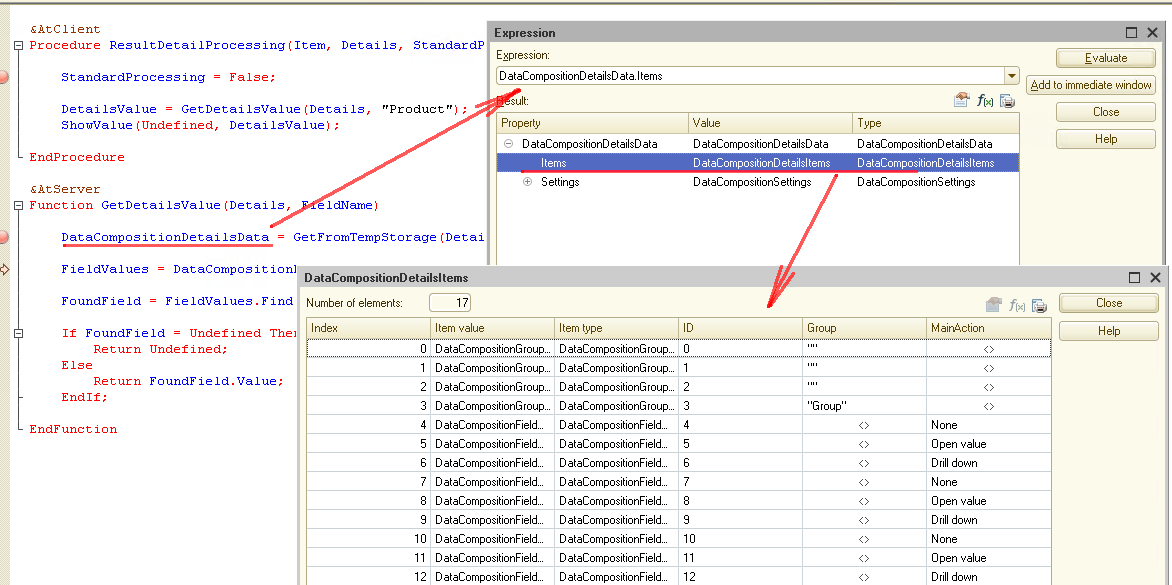
&AtClient Procedure ResultDetailProcessing(Item, Details, StandardProcessing, AdditionalParameters)
StandardProcessing = False; DetailsValue = GetDetailsValue(Details, "Product");
ShowValue(Undefined, DetailsValue);
EndProcedure
&AtServer Function GetDetailsValue(Details, FieldName)
DataCompositionDetailsData = GetFromTempStorage(DetailsData);
FieldValues = DataCompositionDetailsData.Items.Get(Details).GetFields(); FoundField = FieldValues.Find(FieldName);
If FoundField = Undefined Then Return Undefined; Else Return FoundField.Value; EndIf; EndFunction |
It starts we response from event handler DetailProcessing, procedure ResultDetailProcessing. One of the parameters the procedure gets is Details. In fact, this is an ID for detailed information. We are going to use this ID at a later stage.
String StandardProcessing = False; switches off standard handler for detailed data event. Then the system calls function GetDetailsValue that retrieves detailed data.
Let me remind you that DetailsData is kept in temporary storage accessible only from the server. Thus, we should run function GetDetailsValue on the server.
When called, the function retrieves details from temporary storage:
|
DataCompositionDetailsData = GetFromTempStorage(DetailsData); |
Basically, the detailed data is a collection of elements where developers pick what they need. To see this data is indeed a collection, run the code in Debugger:
To pick the required element from the collection, we should use the following code:
|
DataCompositionDetailsData.Items.Get(Details). |
The next step is to collect fields present in the object under consideration. We do it by calling method GetFields(). Here is the code for it:
|
FieldValues = DataCompositionDetailsData.Items.Get(Details).GetFields(); |
Let's use Debugger to check the value variable FieldValues receives:
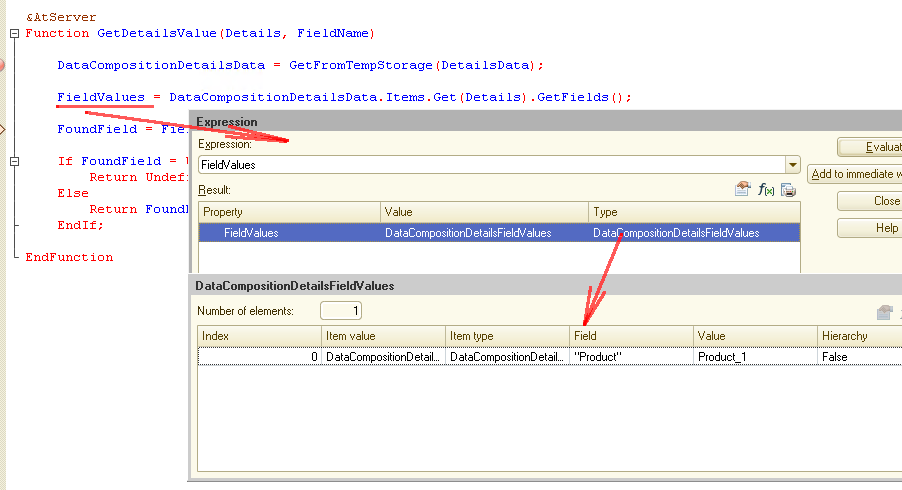
As you can see, the collection contains just one field called Product. The field's value is Product_1. It is the same exact product that we double-clicked in our example.
And this is the field we want to take from the collection. Here is the code for it:
|
FoundField = FieldValues.Find(FieldName); |
Remember that variable FieldName has value Product. Go back to Debugger and check the value assigned to variable FoundField.
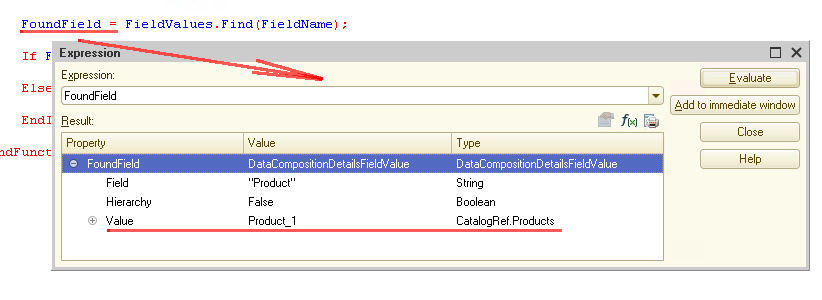
The remaining steps are simple. Check collection FoundField for field Product. If the field exists, as in our case, the function returns this field's value that is a reference to catalog Products.
Now, we, as developers, should get this value within the main procedure and display it to users. We do it by utilizing method ShowValue():
|
ShowValue(Undefined, DetailsValue); |
It seems we got what we wanted... but wait! We intended to open a CUSTOM catalog form, and currently, we get the default one. In other words, we have duplicated the 1C platform's built-in functionality.
More to it. Should we check the structure of catalog Products in Designer, we discover there is no form defined there at all. And the form we get is the one automatically generated by the platform.
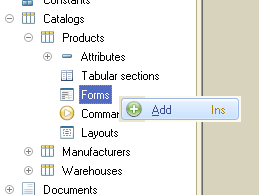
Well, there is something else we should do to complete the task entirely. First, we need to create two forms for catalog Products, the default and the custom one. Feel free to add any attributes and data into the custom form. The most important for us now is understanding the principle of forms opening. So, we begin by adding the default form:
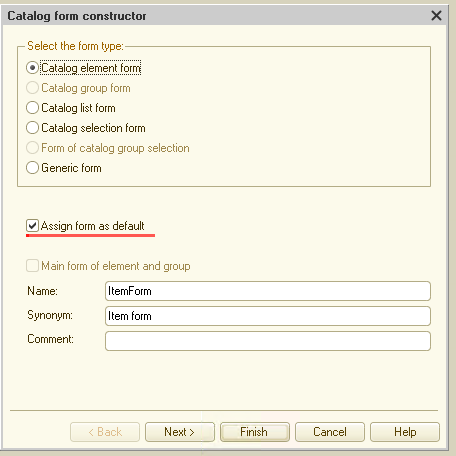
Make sure that flag Assign form as default is active and click Finish. The default form is ready.

Now, if you create a report and request details, you should get this form.
But as we need the custom one, we should do something else. Add one more form to the catalog:
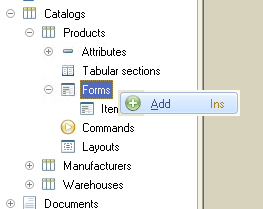
Set the type for the new form as Catalog element form. This step is critical! Give a name to the form. Be it CustomItemForm. Also, remember to check flag Assign form as default. It should be unchecked.
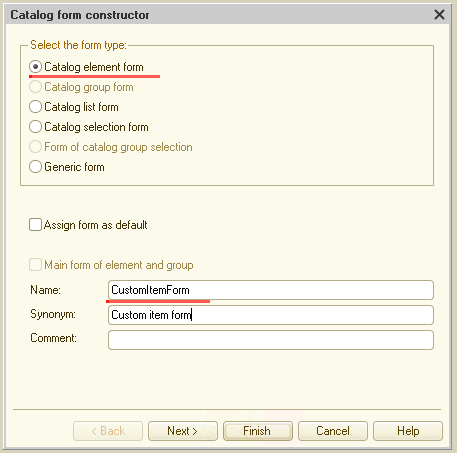
As soon as we click Finish, we get one more form for our catalog Products ready.
Let's open the two created catalog forms:
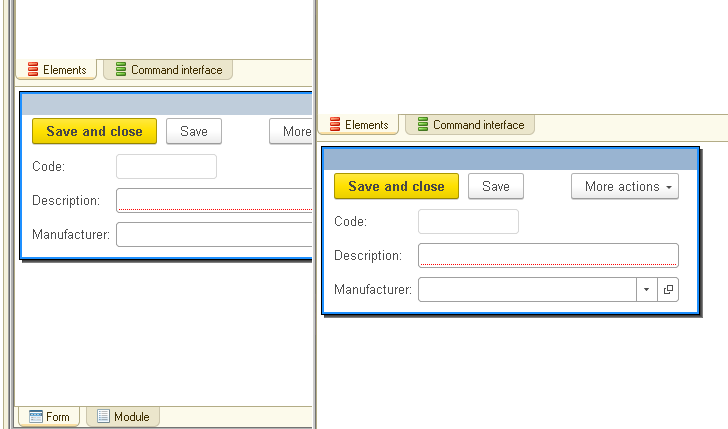
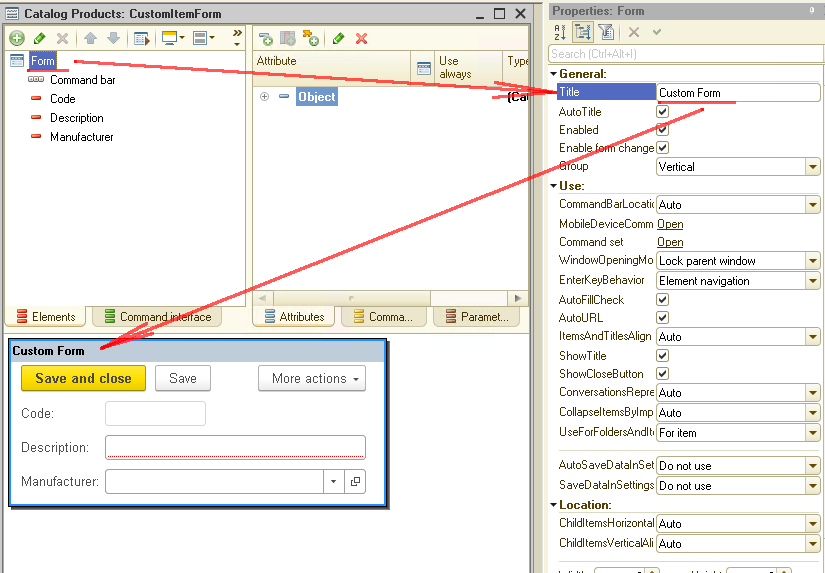
As you can see, currently, the forms are identical. In order to differentiate between these forms, I suggest we add a title:
Now let's return to our report, procedure ResultDetailProcessing. And make some changes to the procedure code:
|
&AtClient Procedure ResultDetailProcessing(Item, Details, StandardProcessing, AdditionalParameters)
StandardProcessing = False;
DetailsValue = GetDetailsValue(Details, "Product"); //ShowValue(Undefined, DetailsValue);
structureParameters = New Structure; structureParameters.Insert("Key", DetailsValue);
OpenForm("Catalog.Products.Form.CustomItemForm", structureParameters);
EndProcedure |
You can see we have commented out string ShowValue(Undefined, DetailsValue) and added some new ones.
Let me explain how this code works. Remember that catalog forms, documents, and other objects have so-called standard parameters. It means that it is the platform that sets these parameters. Still, developers can modify them, telling the platform what they want to get.
One of such standard parameters is Key that plays the role of an object key. It has type CatalogReference.CatalogName. In our case, it is CatalogRef.Products. If we send Key (containing a reference to the appropriate element), we open the form for this preselected catalog element.
It is exactly how this code works. We create a structure, add field Key, and set a reference to a specific catalog element as a value for this field.
After that, using method OpenForm(), we open the required catalog form CustomItemForm, and, using it as the second parameter, pass the structure containing a reference to the catalog element to method OpenForm().
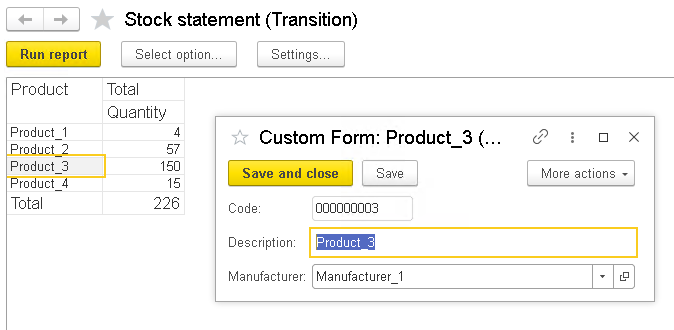
Time to put our code to field test. Start 1C in dialog mode, create the report, and double-click a product:
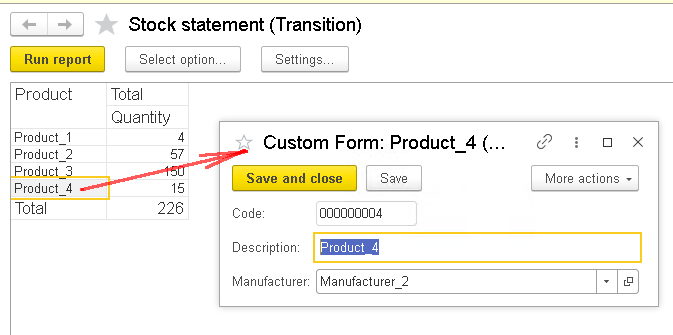
As you can see, we get this exact form, CustomItemForm. Just as we need it.
Now we know how to process detailed data events initiated by the double-click on a field in a report. Still, in addition to a double click, it is possible to initiate an event with the right-mouse click.
Let's try to redefine this event. Go back to Designer, open the report form, and check properties of element Result. This element has event AdditionalDetailProcessing that gets initiated with the right-button click:
Let's create the code to handle this event. The most surprising is that the code is identical to handler event DetailProcessing that we have previously created. Thus, all we need is to create code for the client end and handle actual processing on the server by calling the previously created function GetDetailsValue. Here is how the program code should look like this:
|
&AtClient Procedure ResultAdditionalDetailProcessing(Item, Details, StandardProcessing, AdditionalParameters)
StandardProcessing = False;
DetailsValue = GetDetailsValue(Details, "Product");
structureParameters = New Structure; structureParameters.Insert("Key", DetailsValue);
OpenForm("Catalog.Products.Form.CustomItemForm",structureParameters);
EndProcedure |
As you can see, it is 100 % identical to the previous handler. Let's check it in action. Start 1C in dialog mode, create the report, and right-click on a product field.
If we have done everything correctly, we should get the customized form for catalog Products.
Well, we have made one more step forward.
Let's make something more advanced. In the first example, the double-click opened the product card. Now, we want to use the double click to open a context menu with the list of options.
Go back to the report form and change code in procedure ResultDetailProcessing (this procedure starts on the double-click) as follows:
|
&AtClient Procedure ResultDetailProcessing(Item, Details, StandardProcessing, AdditionalParameters)
StandardProcessing = False;
DetailsProcess = New DataCompositionDetailsProcess(DetailsData, New DataCompositionAvailableSettingsSource(Report));
NotifyDescription = New NotifyDescription("ShowContextMenu", ThisForm);
arrayAvailableActions = New Array; arrayAvailableActions.Add(DataCompositionDetailsProcessingAction.OpenValue);
listAdditionalActions = New ValueList; listAdditionalActions.Add("Action1"); listAdditionalActions.Add("Action2");
DetailsProcess.ShowActionChoice(NotifyDescription, Details, arrayAvailableActions, listAdditionalActions);
EndProcedure
&AtClient Procedure ShowContextMenu(CompletedAction, ParameterCompletedAction, AdditionalParameters) Export
If CompletedAction = DataCompositionDetailsProcessingAction.OpenValue Then
structureParameters = New Structure; structureParameters.Insert("Key", ParameterCompletedAction);
OpenForm("Catalog.Products.Form.CustomItemForm",structureParameters);
ElsIf CompletedAction = "Action1" Then ShowMessageBox(,"Action1"); ElsIf CompletedAction = "Action2" Then ShowMessageBox(,"Action2"); EndIf;
EndProcedure |
Let's have a closer look at the code. We start by creating object DataCompositionDetailsProcess and passing two parameters to it. These are DetailsData (keep in mind this is a string attribute for the report form)
and object DataCompositionAvailableSettingsSource. This object returns a source of available settings for the data composition system
On creating object DataCompositionAvailableSettingsSource, we pass parameter Report (which is our report) to this object. By doing so, we gain access to the list of available settings for our report.
The resulting code should look like this:
|
DetailsProcess = New DataCompositionDetailsProcess(DetailsData, New DataCompositionAvailableSettingsSource(Report)); |
It is object DataCompositionDetailsProcess that creates the context menu by means of method ShowActionChoice().
|
DetailsProcess.ShowActionChoice(NotifyDescription, Details, arrayAvailableActions, listAdditionalActions); |
The remaining code is actually a preparation of parameters to call this method.
Procedure ShowActionChoice() is asynchronous. It means that we start the procedure, and the code keeps on running. To process the output from this method, we use object NotifyDescription.
Here is the code to create the object:
|
NotifyDescription = New NotifyDescription("ShowContextMenu", ThisForm); |
Parameter ShowContextMenu is the name of the procedure that the system calls on completion of method ShowActionChoice().
The following strings generate an array of available standard commands.
|
arrayAvailableActions = New Array; arrayAvailableActions.Add(DataCompositionDetailsProcessingAction.OpenValue); |
Basically, defining this array is not obligatory. Should you skip this step, the right-click on the report produces the list of all available standard commands. This is how it might look like:
The only thing we need from this list is the opening command. So, we add just a single value to this array:
|
arrayAvailableActions.Add(DataCompositionDetailsProcessingAction.OpenValue); |
Final lines generate the list of additional commands for our context menu:
|
listAdditionalActions = New ValueList; listAdditionalActions.Add("Action1"); listAdditionalActions.Add("Action2"); |
I presume everything is clear and requires no additional explanation. Finally, after we have all parameters ready, we call method ShowActionChoice() in object DetailsProcess:
|
DetailsProcess.ShowActionChoice(NotifyDescription, Details, arrayAvailableActions, listAdditionalActions); |
Now, we should figure out how procedure ShowContextMenu() works. It is the procedure that is triggered on completion of method ShowActionChoice(). Here is this code again:
|
&AtClient Procedure ShowContextMenu(CompletedAction, ParameterCompletedAction, AdditionalParameters) Export
If CompletedAction = DataCompositionDetailsProcessingAction.OpenValue Then
structureParameters = New Structure; structureParameters.Insert("Key", ParameterCompletedAction);
OpenForm("Catalog.Products.Form.CustomItemForm", structureParameters);
ElsIf CompletedAction = "Action1" Then ShowMessageBox(,"Action1"); ElsIf CompletedAction = "Action2" Then ShowMessageBox(,"Action2"); EndIf;
EndProcedure |
This procedure gets CompletedAction and ParameterCompletedAction as parameters. The first parameter describes the first command that has just been completed, while the second is the value resulting from the completion of this command.
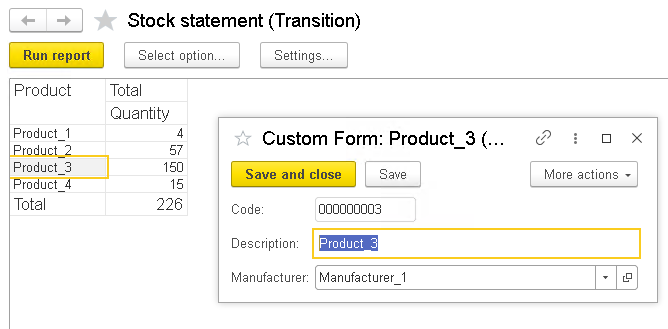
By calling command OpenValue, we open the product card (the reference to the applicable product is stored in ParameterCompletedAction). By calling one of the additional commands, you can display a specific text to users or run some specific program code.
Time to see the code in action. Start 1C again, create the report, and double-click a product:
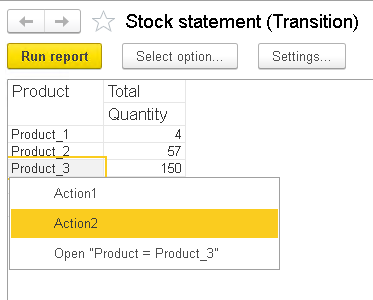
We get a context menu with items we have previously described in our code. Select Open to get to the product card:
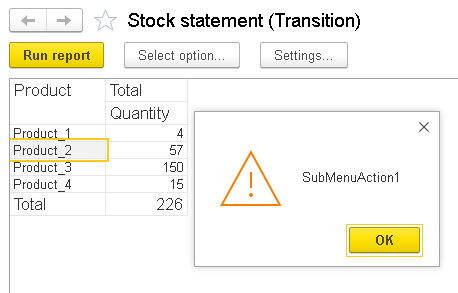
In an attempt to select any of the Action items, we get the following message:
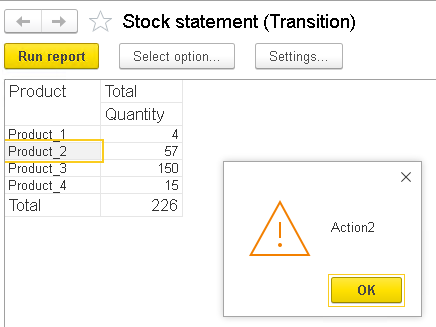
The code obviously runs pretty well. We are able to initiate a call from the context menu in the report form.
Let's make our task even more advanced. I suggest we add a nested submenu. All we should do is slightly modify procedure ResultDetailProcessing.
Here is what we get:
|
&AtClient Procedure ResultDetailProcessing(Item, Details, StandardProcessing, AdditionalParameters)
StandardProcessing = False;
DetailsProcess = New DataCompositionDetailsProcess(DetailsData, New DataCompositionAvailableSettingsSource(Report));
NotifyDescription = New NotifyDescription("ShowContextMenu",ThisForm);
arrayAvailableActions = New Array; arrayAvailableActions.Add(DataCompositionDetailsProcessingAction.OpenValue);
listAdditionalActions = New ValueList; listAdditionalActions.Add("Action1"); listAdditionalActions.Add("Action2");
subMenu = New ValueList; subMenu.Add("SubMenuAction1");
listAdditionalActions.Add(subMenu,"SubMenu");
DetailsProcess.ShowActionChoice(NotifyDescription, Details, arrayAvailableActions, listAdditionalActions);
EndProcedure
Then, we append it with the following code:
subMenu = New ValueList; subMenu.Add("SubMenuAction1");
listAdditionalActions.Add(subMenu,"SubMenu");
Here we have created one more list intended for submenu items and put the list in the previously created list of additional commands.
Naturally, you need to create the program code to handle this new submenu. We do it by modifying procedure ShowContextMenu.
&AtClient Procedure ShowContextMenu(CompletedAction, ParameterCompletedAction, AdditionalParameters) Export
If CompletedAction = DataCompositionDetailsProcessingAction.OpenValue Then
structureParameters = New Structure; structureParameters.Insert("Key", ParameterCompletedAction);
OpenForm("Catalog.Products.Form.CustomItemForm",structureParameters);
ElsIf CompletedAction = "Action1" Then ShowMessageBox(,"Action1"); ElsIf CompletedAction = "Action2" Then ShowMessageBox(,"Action2"); ElsIf CompletedAction = "SubMenuAction1" Then ShowMessageBox(,"SubMenuAction1"); EndIf;
EndProcedure |
As you can see in the code, the changes come down to introducing an additional condition to structure If … Then … EndIf.
Well, I suggest we immediately check how it works. As usual, start 1C in dialog mode, create the report, and do the right-click:
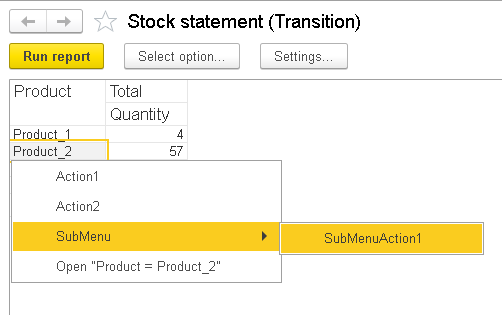
It works! Cool! Using this approach, developers can create submenus on any level.
This is basically it. We have considered some options developers utilize as part of the platform's mechanism for creating detailed reports. This mechanism makes it possible to customize 1C platform standard reports, making them more detailed, convenient, and efficient for use.
Check the link to download the 1C infobase dump with examples. Here you can also download the initial 1C infobase dump
And stay tuned. We are just starting!

Writen by
1C Developer
20+ years of experience in the software industry in Russia, UAE and Germany. My main fields of expertise are developing and implementation of business applications (Retail, CRM, WMS, and Accounting) and integration of software with POS equipment and web portals.


