Designing Business Applications with the 1C Platform Algorithms. Part 3.

Create Sales Invoice Document.
The second part of our series was about creating a Supplier Invoice, the first document for our future system. This type of document describes a business activity reflecting the delivery of products to a company’s warehouse.
It is apparent that the next step is to sell products to customers. Thus the following document we need to create is a Sales Invoice.
Before we proceed, I suggest we consider how it should operate and what attributes it should include.
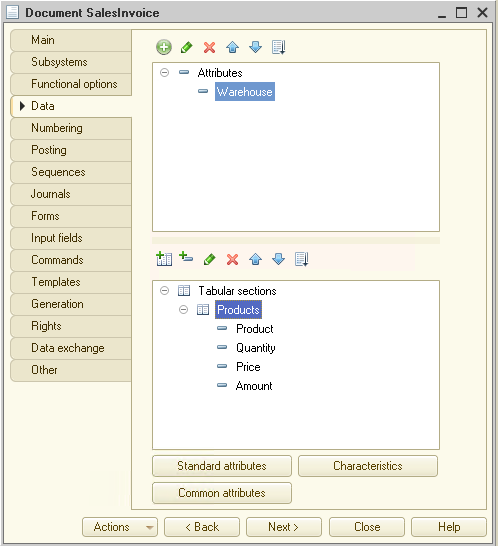
As we want to record the sale of products, it is natural to have a table for our products list. This table should also contain the number of products, unit price, and price per total.
Next, as we store our products in warehouses and a Supplier Invoice document allocates received products to a particular warehouse, we must dispatch products from a specific warehouse. It means we need the Warehouse attribute in our Sales Invoice document.
Basically, this is enough to proceed with creating the actual document.
Let’s open 1C Designer and create one. Still, before we proceed, I suggest we create one more subsystem called Sales. This is a place for objects relating to sales. Make sure you include the newly created subsystem into the command interface:

Now we can create a new Sales Invoice document:

Add the new document into the subsystem we have just created:

Proceed to the Data tab and create the required attributes.
Now, get to the Posting tab and specify a register allowed to add records into this new document. Currently, we have just one register. Select it:

To be able to see register records directly within the document form, we need to create this form:

and set Visible for our register:

As you can recall from the second part of our series, such a setup allows changes to registers right within a document form, which is pretty convenient.
We are done with the settings, and it is time to get back to the Posting tab to start the Record Wizard that should help us create a code that enables recoding into registers. The algorithm is the same as creating a Supplier Invoice document. The only difference is using Expense as the register record type.

Click the OK button to let the wizard create the code:

Here we need to make some changes to the code we get. By default, the wizard starts the code with the following line:
|
RegisterRecords.ProductsInWarehouses.Write = True; |
This line puts an applicable register into write mode. All data added into the register while the procedure is in progress gets stored automatically in the database. In other words, developers can start a procedure with this line, acquire necessary data and write this data into a register. And this is it. 1C platform adds the data into the database immediately on completion of the procedure. This is precisely what we did while creating a Supplier Invoice document.
But the process behind the sales invoice is more sophisticated, as we need to know the current warehouse stock. It means that posting a sales invoice should initiate some verifications along with adding data into the register. Thus, we need to have more options for manage the process of adding data into a register.
With this requirement in mind, we want to modify the suggested code as follows. Remove (or comment) RegisterRecords.ProductsInWarehouses.Write = True line. Add an explicit order to add data into the register immediately after the data is obtained. By this we tell the system to add data into the register BEFORE completion of a posting procedure.

A bit later you will know why we need it. For now, I suggest we check how the newly created Sales Invoice works.
Start 1C in dialog mode, proceed to Sales subsystem, create a new Sales Invoice document and fill it in with data. Then post it:

Check Products in warehouses link and see the records added to the register:

As we can see, the document works as expected. Are we through?
Let’s imagine we have 10 units at our warehouse and we want to add 15 units into our sales invoice. What will happen as we post the document?
That’s the point! The system posts the document with no issues and without any errors. This happens because the 1C platform does not manage the stock balance, and in theory, such value can be negative.
Thus, if we need to keep the stock under control, we, as developers, need to create a code that checks if the stock balance is negative and returns an error or warning.
Thus we append the wizard’s code with some lines to ensure the negative balance caused by our document posting does not get unnoticed.
This is why we have commented RegisterRecords.ProductsInWarehouses.Write = True line, and enabled writing data immediately on completion of the program unit. As soon as we have data added to the register, we can check if the stock balance is negative.
Let me share some theories with you. There are several methods of checking if a balance is negative.
The first option is to check the current balance, compare it to the value stated in our document before document posting, and see if the stock is sufficient to meet current needs. Actually, this method is pretty popular, but it has some hidden dangers.
Imagine there is a single workstation we can use to sell products. As we post a sales invoice, we check the current balance, compare this to the number of products we want to dispatch, and find out (or fail to find out) if the stock balance is negative. In this situation everything seems to run just as expected.
Now, let’s make it more complicated. We have several, say 1000, workstations that a company uses to sell products.
At that, the number of workstations can be even higher. With a proper setup, 1C can easily handle this load.
Imagine we do the same thing: check the current balance and compare it to the value in our document. Hang on for a moment! While we are busy making the comparison, the current stock might change. It is very likely that somebody of the one thousand colleagues around creates and posts a sales invoice for the same product.
As a result, when we start checking current stock (which is obviously outdated), there is a chance that the product has already been sold by one of our colleagues. But as we are unable to see it, posting creates no errors. And only after we do the posting, we find out that the product is missing.
What can we do? 1C addresses the issue by offering a dedicated object called DataLock. By using this object, we can lock a whole table (which is less desirable) or a portion of data (which is a better way), check current stock, and compare it with the value in our document.
In fact, developers frequently use this method in their 1C applications, and this is a good solution. Still, there is a bottleneck here: we have to lock data every time we post a document. It should not create issues with a limited number of transactions. Still, as the load grows, more postings result in more frequent data lock that causes a substantial slow down of the whole system. Every new document joins the queue to get access to a respective portion of data, lock it, check the stock, and so on.
This is why we in 1C Company recommend that you stick to a different register write method for processes involving stock balance managing. The approach here is to start with writing data without any checks (and locks) and only then check if the balance turns negative. If the stock balance is positive, everything is fine. Otherwise, the system rolls the transaction back and removes the record from the register.
This method ensures the highest processing speed where there is a need to process multiple documents. By removing the requirement to lock data, we eliminate the leading cause of the system slowdown.
This is the reason 1C company recommends this method for projects requiring multiple transactions. And this is precisely what we want to implement into our Sales Invoice document.
Let me remind you of the idea behind the method to manage stock balance. We put all document-related records into a register, and then we check if the balance is negative. If no negative value returns, things are just fine, and our document successfully gets posted. A negative value results in a transaction rollback.
And this completes the part relating to writing data into a register. Let’s proceed to the second part that is data comparison. To do this, we need to know the current stock balance. For this purpose we create a query with some parameters. You can code the query manually or select the Query Wizard as on the screenshot below:

Start the wizard and specify your query parameters. Leave the first tab unchanged:

Use the second tab to select required fields. These fields are Product itself, Quantity, and, pay attention to it, we get Presentation field for the Product. This field can be helpful to present some info on the respective product. Here we want to use if for reporting the negative stock balance.

Now there is a very important moment I would like to draw your attention to. We need to know the current stock balance for a particular product within a specific warehouse. Thus, we should include relevant parameters in the query. Here developers sometimes have difficulties in correctly setting such parameters.
The reason for it is that most of the time, we define parameters using the Conditions tab:

Even now we can proceed the same way, and everything should be fine... But are you sure about it? Let me remind you that accumulation registers are simple tables stored within databases. Still, in addition to this main table, the 1C platform creates several virtual ones per register to keep the register’s balances and turnovers. We discussed it in detail in the first article of our series.
You must have noticed that I got the data not from the ProductsInWarehouses main register table but the ProductsInWarehousesBalance virtual table for stock balance. What is the purpose of this action? The answer is simple. This is a way to substantially increase the processing speed. A query to a virtual table returns a response much faster.
But register’s virtual tables have parameters of their own. If they exist, the system applies them first.
We can use a virtual table to select products per warehouse or add this selection condition directly into query parameters. If we stick to the virtual table option, the solution works much faster. It happens because, with a virtual table, the query deals with data prefiltered by an SQL server. So filtering occurs here first. In the second case, the query returns data on all warehouses and only then applies a filter. Thus, it is pretty natural that the first solution offers a higher processing speed.
With this information in mind, we proceed to set the parameters for ProductsInWarehousesBalance virtual table. This is how you do it:

We start by defining the period we want to apply to our balances:

Then we set virtual table parameters:

It is easy to notice that Quantity (Product Quantity) is not included in the virtual table, and we, as you remember, need to pick products with a negative stock balance. Thus, we still need at least one parameter under the Conditions tab.
Go back to the tab and make the necessary adjustments:

After it we can close the wizard (make sure you press the OK button to save changes) and get the following code:

Basically, it consists of three parts: the text of the query itself, the query parameters, and the processing of the response.
We keep the text of the response intact and proceed to the parameters.
Start with the Warehouse parameter. It is pretty simple here; we set it equal to the warehouse selected in a document.
We use IN structure for the Products parameter. Thus this parameter should either be a list or an array of values. Now, let’s create it by modifying the code.
To generate the array values containing a table with all products, we can utilize UnloadColumn() method. This is the code for it:
![]()
Now, it is time to set the Boundary parameter. Selecting the correct value is crucial for the system to run properly.
Before we can proceed, let’s refresh the concept of the negative stock balance control method. As you remember, when we start by comparing balance with a value stated in our document and only then decide to post our document (if the stock is sufficient) or not (if the number of products is not enough). This is why it is vital for us to know the current stock balance. For this purpose, we lock data for a while so that nobody can change it, obtain the current stock data, compare values, and do the posting (or cancel the transaction). It means that this method requires that we explicitly put a software data lock to keep our balance intact for some time.
As with the method we want to use in our document (and, again, this is the approach we strongly advise), we add records into our register and only then check if the stock balance is negative. Fine. How can we be sure that the current stock value we get from the system is correct? Should we lock data just as we did in the case above?
Fortunately, things are much simpler here: we can drop the data lock requirement and significantly speed up the process. Still, how do we get accurate figures without locking the data? To explain it, we have to talk about two objects: Boundary and PointInTime.
Every document in 1C has a Date attribute that combines date and time. In other words, every 1C document has a timestamp with one-second precision. There naturally comes a question if two documents can have two identical timestamps? What if they are created in one and the same second?
It is true. There can be two or even more documents created at the same time. So we come to the second question. How do we know the correct order of created documents? Which one of them comes first if users post them all within the same exact second?
For this purpose, 1С has a dedicated object called PointInTime. It combines a date (with one-second precision) and a reference to an object that can be a specific document. Each document existing in 1C has such PointInTime that places it to a certain point on a timeline. Thus, even if we add two documents with the same date and time (and the same second), the PointInTime for each document is different, and it is easy to place such documents in the correct order.
Within the framework of our task, PointInTime helps us know the place of our document on the timeline and get the stock balance for this specific moment.
The following important object is Boundary. We use it to set certain intervals. It defines a boundary value and a condition of whether such value should be included in a specified range or not. We use Boundary where it is important to include or exclude a boundary value. Thus, this option is helpful for reports and stock balances or registers turnovers, summaries, and queries.
Within the task under consideration, we need a Boundary object to properly define the current stock balance after adding the record into our register. To identify the Boundary, we need two parameters: a document’s PointInTime and BoundaryType. This BoundaryType indicates whether the boundary value is included in or excluded from the range. In our case, we need the register’s balance to include all the records, including those introduced by our document. It means that BoundaryType should have Including value.
Let’s get back to the Boundary parameter in the query above. The code that includes this parameter should look like this:
![]()
We create the Boundary object, then add the document’s PointInTime as its first parameter, and the BoundaryType as the second one. With the Boundary set, the system calculates the current stock balance with the account of records introduced by our document. As there is no need to lock data, the processing happens really fast.
Consider the following. Imagine we need a stock balance that DOES NOT include changes introduced by our current document. In this case, the code should look like this:
![]()
So we get the stock balance for a specific point in time, but all records contained in the document are skipped.
Time to get back to our task. Here is how the section for parameters should look like:

The next part of the code deals with our query results. Keep in mind, the query returns a response only if the balance turns negative when we attempt to post our document.
Consequently, we should process the query result. If the query returns any value, we should notify a user of insufficient stock and roll back the document.
With this information in mind, we should expect the code to look like this:

I believe everything is evident here and requires no additional comment.
Let’s check our document in operation. Start 1C in dialog mode and create a new SalesInvoice document. Add a product in a quantity that exceeds the current stock:

Try posting the document. First, we get a posting error message:

And then a notification on insufficient quantity.

Thus, the application checks the stock balance while posting and prevents creating a record that might lead to a negative value.
Wow! Seems it is time to sum everything up. We have created our SalesInvoice document that enables the sale of products to customers. The significant difference between this document and the previously created SupplierInvoice is that here we need to check current stock balances prior to posting the document. We have considered two possible methods to implement the solution and opted for the one that ensures the highest processing speed.
As usual, I am glad to share the link to the code we have used in this article.
Next time we will learn how to create reports for quick managing of our warehouses’ stock balances.
Stay tuned. We are just starting.

Writen by
1C Developer
20+ years of experience in the software industry in Russia, UAE and Germany. My main fields of expertise are developing and implementation of business applications (Retail, CRM, WMS, and Accounting) and integration of software with POS equipment and web portals.


