Printing from the 1C mobile app
On our forum recently, we were asked a question: how can I print from a mobile app made on the 1C platform? As a result, we decided to create a small example to illustrate this possibility.
In order not to reinvent the wheel, as a basis for an example, we will take the Mobile barcode scanner configuration that we created earlier.
We will add functionality to this configuration that will allow printing a list of scanned products to a network printer directly from a mobile device.
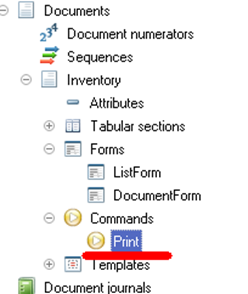
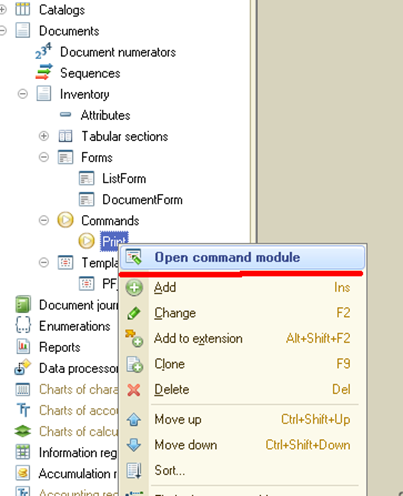
Opening the configuration, and creating the Print command for the Inventory document:
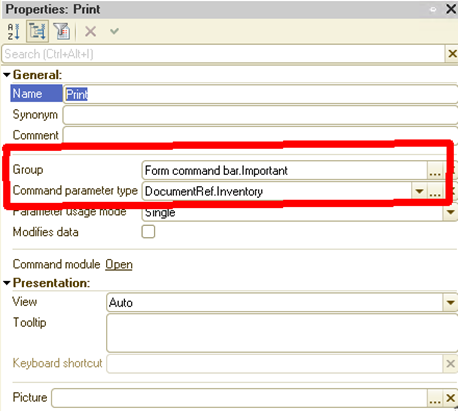
We must fill in the properties of this command:
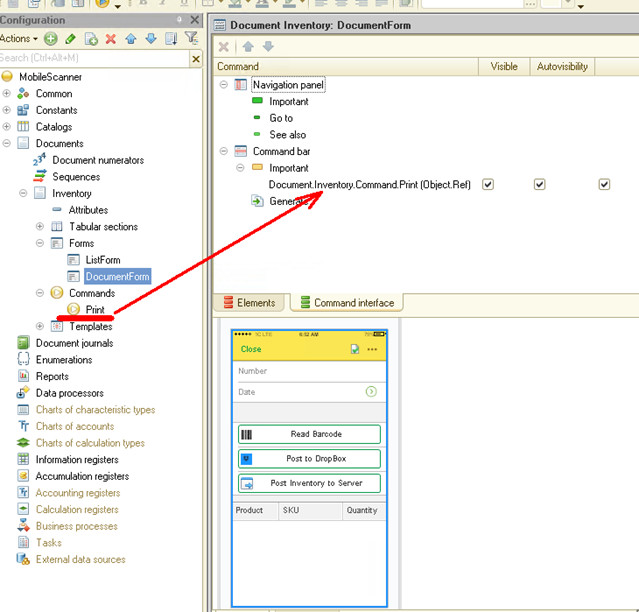
As a result, the Print command button will appear on the Inventory document form:
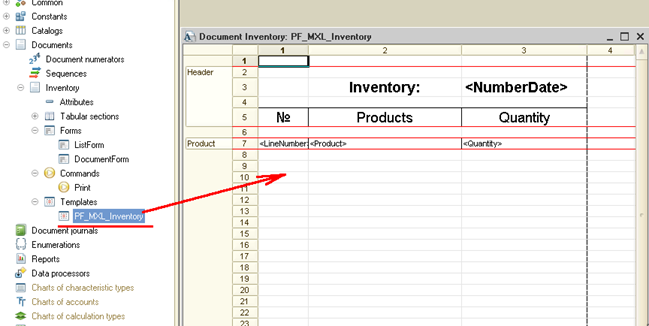
To print information, create a simple print template:
For the template fields that information will be output to, set the value type Parameter:

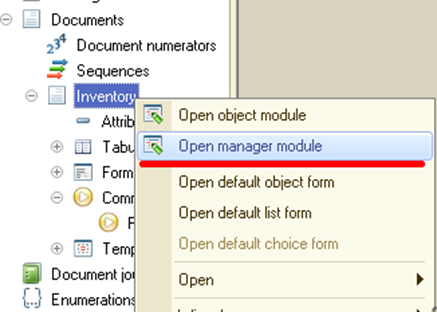
We now turn to write directly the program code. First, open the program module for the Print command:
Let's write the following code in the module:
&AtClient
Procedure CommandProcessing(CommandParameter, CommandExecuteParameters)
Spreadsheet = New SpreadsheetDocument;
Print(Spreadsheet, CommandParameter);
Spreadsheet.ShowGrid = False;
Spreadsheet.Protection = False;
Spreadsheet.ReadOnly = True;
Spreadsheet.ShowHeaders = False;
Spreadsheet.Print(PrintDialogUseMode.Use);
EndProcedure
&AtServer
Procedure Print(Spreadsheet, CommandParameter)
Documents.Inventory.Print(Spreadsheet, CommandParameter);
EndProcedure
The CommandProcessing () procedure is called first, a SpreadsheetDocument object is created in it, this object is filled with data in the Print() procedure, and the already filled object is printed with the Spreadsheet command.Print (PrintDialogUseMode.Use). At the time of executing the Spreadsheet.Print (PrintDialogUseMode.Use) you will be able to select the connection to the desired network printer. Let's look at this a little below. In the meantime, let's go back to the Print () procedure. It has only one line:
Documents.Inventory.Print(Spreadsheet, CommandParameter);
Here the Print procedure of the same name is called from the Inventory Document Manager module. We haven't written this procedure yet – let 's fix it.
Opening the Inventory Document Manager module:
Write the following code in the module:
Procedure Print(Spreadsheet, Ref) Export
Template = Documents.Inventory.GetTemplate("PF_MXL_Inventory");
Query = New Query;
Query.Text =
"SELECT
| InventoryProducts.LineNumber AS LineNumber,
| InventoryProducts.Product AS Product,
| InventoryProducts.Quantity AS Quantity
|FROM
| Document.Inventory.Products AS InventoryProducts
|WHERE
| InventoryProducts.Ref = &Ref";
Query.Parameters.Insert("Ref", Ref);
Selection = Query.Execute().Select();
Header = Template.GetArea("Header");
AreaProducts = Template.GetArea("Product");
Spreadsheet.Clear();
Header.Parameters.NumberDate = "#" + Ref.Number + " dated " + Format(Ref.Date, "DLF=DD");
Spreadsheet.Put(Header);
While Selection.Next() Do
AreaProducts.Parameters.Fill(Selection);
Spreadsheet.Put(AreaProducts);
EndDo;
EndProcedure
Pay special attention to the keyword Export! Without this, the Print procedure will not be visible and the Print command will not be able to execute.
The code itself is not complicated.
First we get the print template as an object:
Template = Documents.Inventory.GetTemplate("PF_MXL_Inventory");
Then we create a query, the results of which we will print:
Query = New Query;
Query.Text =
"SELECT
| InventoryProducts.LineNumber AS LineNumber,
| InventoryProducts.Product AS Product,
| InventoryProducts.Quantity AS Quantity
|FROM
| Document.Inventory.Products AS InventoryProducts
|WHERE
| InventoryProducts.Ref = &Ref";
Query.Parameters.Insert("Ref", Ref);
Selection = Query.Execute().Select();
We get two sections of our print template as two different objects – the header section and the detailed records section:
Header = Template.GetArea("Header");
AreaProducts = Template.GetArea("Product");
The header section immediately filling in with data:
Header.Parameters.NumberDate = "#" + Ref.Number + " dated " + Format(Ref.Date, "DLF=DD");
and outputs this section:
Spreadsheet.Put(Header);
Fill in the detailed records section in the loop:
While Selection.Next() Do
AreaProducts.Parameters.Fill(Selection);
Spreadsheet.Put(AreaProducts);
EndDo;
Please note that we use the Fill() command to fill in the section”:
AreaProducts.Parameters.Fill(Selection);
instead of directly specifying the parameter name, as in the header section:
Header.Parameters.NumberDate = "#" + Ref.Number…….
The result of this procedure will be a data-filled SpreadsheetDocument object, which should now be printed. We have already written the print output code – it is located in the Print command module.
This is all. Now you can build our mobile app (or publish it on a web server) and check whether the data can be printed to a network printer or not.
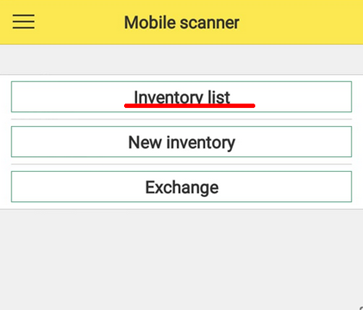
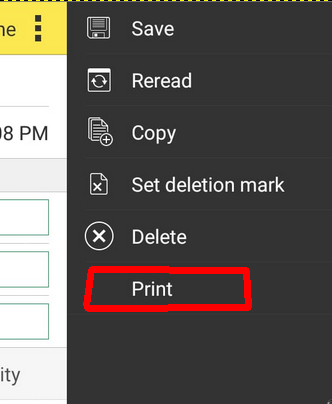
Open the mobile app and click the Inventory list button:
go to any previously created Inventory document (or create a new record) and go to the document menu:
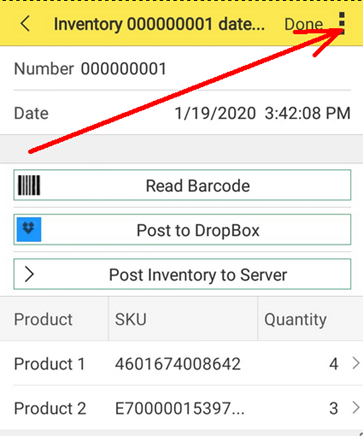
This opens a dialog box where you can configure the connection to the desired printer:
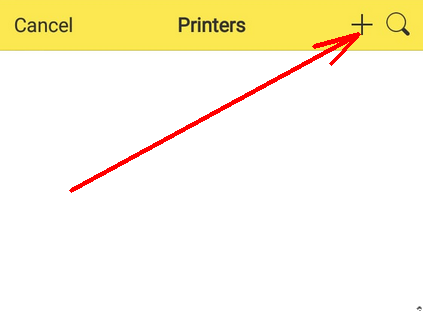
The connection settings may look like this, for example:

After setting all the settings, click OK and – if we have set everything correctly - our data will be printed.
You can print to both WiFi printers and Bluetooth - enabled printers.
This is how you can print data from a mobile app on the 1C platform in a few lines of code.
You can download this Example for your own application.
Please, supplement your suggestions for the development of demo applications in our forum.
Stay with us - it will be more interesting further!

Writen by
1C Developer
20+ years of experience in the software industry in Russia, UAE and Germany. My main fields of expertise are developing and implementation of business applications (Retail, CRM, WMS, and Accounting) and integration of software with POS equipment and web portals.


