Synchronization between a mobile app and a database server on the 1C platform
Previously, we created a mobile application that scans barcodes and stores product information. Our application is almost ready for production.
Imagine that we’ve scanned all our stock and added details for every product. Where should we store all this data? In the previous example, we exported the data to Dropbox as a pdf document. But this is impractical for day to day use.
In this example, you will see how to store the data in a production-ready database using the 1C Platform. You will also create a REST API to expose the database for synchronization.
The steps are as follows:
- Creating the database;
- Modifying the application from the previous example to support synchronization with the database.
1. Creating the database.
You can use any other database solutions to synchronize your data. In this example, we are using the 1C platform to show you some of the exciting features that you can use to interact with the 1C platform.
One of the ways to interact with a database running on the 1C platform is through a REST API.
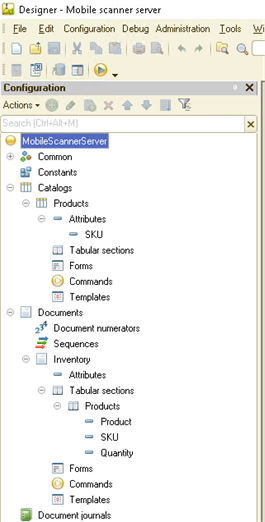
Let’s start. Create an empty infobase.
Create all objects required for synchronization. The catalog Products with the attribute SKU and the document Inventory with tabular data for Products (attributes Product, SKU and Quantity — see the previous example).
Now we’ll need to setup a REST API.
Go to Administration → Publish to Web Server:
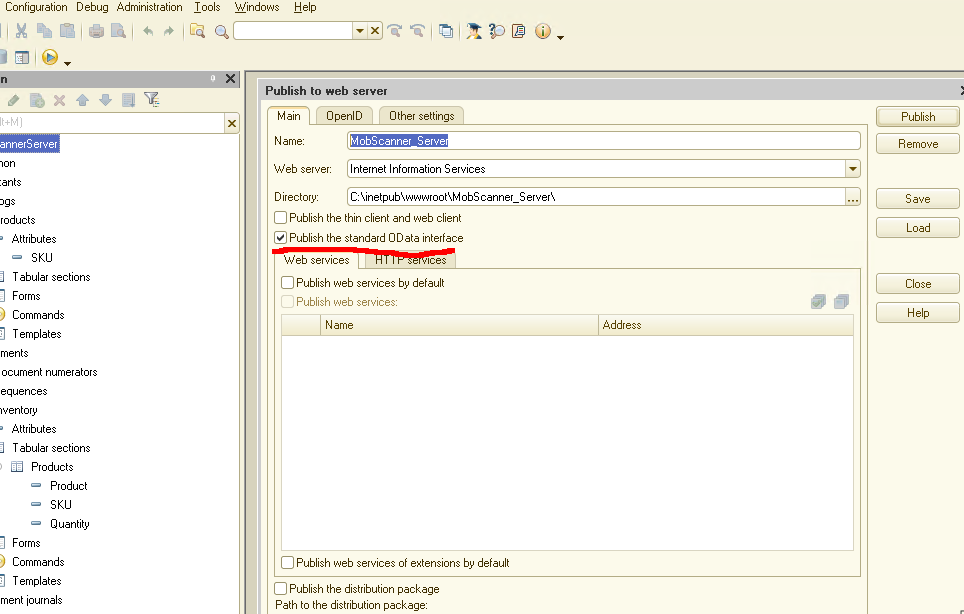
Enable Publish the standard OData interface. Ignore other settings for now — you may disable them.
Click the Publish button. The 1C Platform will publish a REST API.
You’ll have to setup a web server (IIS or Apache) and set all required permissions.
The next part of the setup happens in application mode. Start the application and select (using special processing Composition_Odata.epf) the objects to publish:
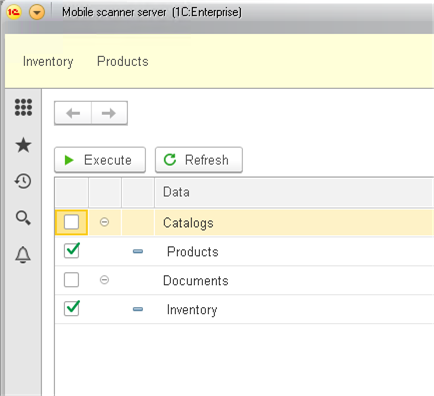
In our case, select all objects and click Execute.
We just created a REST API for our database, without writing a single line of code.
Next, we’ll modify our mobile application to support interactions with the server.
2. Modifying the mobile application.
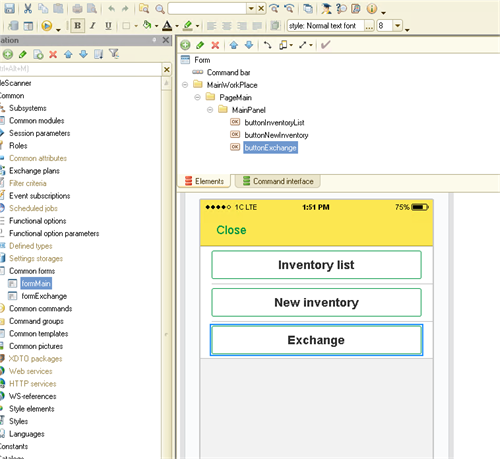
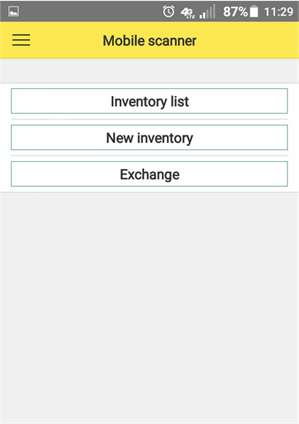
Open the mobile application and add a new button, Exchange, to the formMain form.
This button will create a new form.
OnClick handler for the button:
&AtClient
Procedure Exchange(Command)
OpenForm("CommonForm.formExchange");
EndProcedure
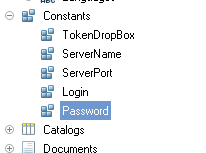
We also need to store connection parameters. Create four constants: ServerName (String), ServerPort (Number), Login (String) and Password (String).
Create a new common form – formExchange. Create and place two commands (UpdateProductsFromServer and PutProductsToServer) onto this form.
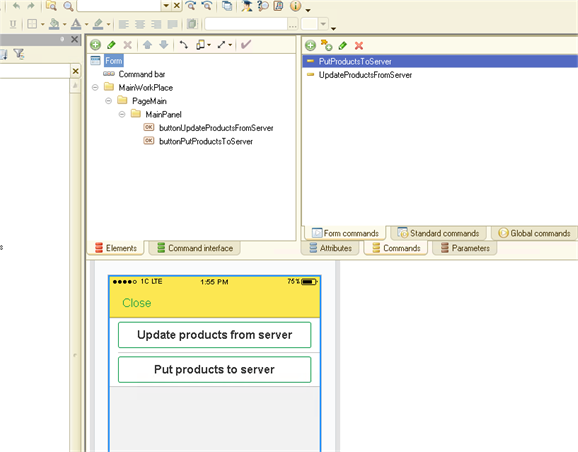
The UpdateProductsFromServer command retrieves products from the database. The PutProductsToServer sends a product list from our app to the server.
To simplify, we will skip the product availability check on the mobile application.
For real production scenarios, we recommend performing the check to avoid extra network traffic which might incur performance costs.
Let’s create a handler for the UpdateProductsFromServer command:
&AtClient
Procedure UpdateProductsFromServer(Command)
UpdateProductsFromServerAtServer();
EndProcedure
&AtServer
Procedure UpdateProductsFromServerAtServer()
ServerName = Constants.ServerName.Get();
ServerPort = Constants.ServerPort.Get(); // Number only!
Login = Constants.Login.Get();
Password = Constants.Password.Get();
URL = "MobScanner_Server/odata/standard.odata/Catalog_Products?$format=json";
HttpConnection = New HTTPConnection(ServerName, ServerPort,Login ,Password ,,,Undefined);
HttpQuery = New HTTPRequest(URL);
HttpAnswer = HttpConnection.CallHTTPMethod("GET", HttpQuery);
BodyAnswer = HttpAnswer.GetBodyAsString(TextEncoding.UTF8);
HeadersAnswer = "Status Code: " + HttpAnswer.StatusCode + Chars.LF;
Reader = New JSONReader;
Reader.SetString(BodyAnswer);
Result = ReadJSON(Reader, True);
Reader.Close();
arrayProducts = Result.Get("value");
For Each curElement In arrayProducts Do
Ref_Key = curElement.Get("Ref_Key");
Code = curElement.Get("Code");
SKU = curElement.Get("SKU");
Description = curElement.Get("Description");
ref_Producd = Catalogs.Products.GetRef(New UUID(Ref_Key));
object_Product = ref_Producd.GetObject();
If object_Product = Undefined Then
object_Product = Catalogs.Products.CreateItem();
object_Product.SetNewObjectRef(ref_Producd);
object_Product.Code = Code;
object_Product.SKU = SKU;
object_Product.Description = Description;
object_Product.Write();
EndIf;
EndDo;
EndProcedure
First, create and setup a GET HTTP request to the API:
"MobScanner_Server/odata/standard.odata/Catalog_Products?$format=json"
As you can see, the request is performed on the Products (Catalog_Products) catalog and expects a JSON formatted response.
The products list is returned as an array, which will be processed in the loop below.
The server returns a unique key for each product (Ref_Key = curElement.Get("Ref_Key")), which may be used for performing client-side existence checks in our mobile application.
ref_Producd = Catalogs.Products.GetRef(New UUID(Ref_Key));
object_Product = ref_Producd.GetObject();
If a product does not exist (If object_Product = Undefined Then), it will be created.
object_Product = Catalogs.Products.CreateItem();
object_Product.SetNewObjectRef(ref_Producd);
object_Product.Code = Code;
object_Product.SKU = SKU;
object_Product.Description = Description;
object_Product.Write();
If a product exists, no further action is required. This is to avoid duplicating products during synchronization.
To sum up, a product list is retrieved from the database and loaded into our mobile application. New products from the database will also be created on the client-side.
Next, implement the Put products to Server command handler to store new products in the database:
&AtClient
Procedure PutProductsToServer(Command)
PutProductsToServerAtServer();
EndProcedure
&AtServer
Procedure PutProductsToServerAtServer()
ServerName = Constants.ServerName.Get();
ServerPort = Constants.ServerPort.Get(); // Number only!
Login = Constants.Login.Get();
Password = Constants.Password.Get();
Headers = New Map;
Headers.Insert("Content-Type", "application/json");
URL = "MobScanner_Server/odata/standard.odata/Catalog_Products?$format=json";
HttpConnection = New HTTPConnection(ServerName, ServerPort,Login ,Password ,,,Undefined);
HttpQuery = New HTTPRequest(URL, Headers);
Query = New Query;
Query.Text = "SELECT
| Products.Ref AS Ref,
| Products.Code AS Code,
| Products.Description AS Description,
| Products.SKU AS SKU
|FROM
| Catalog.Products AS Products";
Selection = Query.Execute().Select();
While Selection.Next() Do
ProductMap = New Map();
ProductMap.Insert("Ref_Key", String(Selection.Ref.UUID()));
ProductMap.Insert("Description", Selection.Description);
ProductMap.Insert("Code", Selection.Code);
ProductMap.Insert("SKU", Selection.SKU);
JSONWriter = New JSONWriter;
SettingsJSON = New JSONWriterSettings(JSONLineBreak.Auto,"",True);
JSONWriter.SetString(SettingsJSON);
WriteJSON(JSONWriter, ProductMap);
BodyString = JSONWriter.Close();
HttpQuery.SetBodyFromString(BodyString,TextEncoding.UTF8);
HttpAnswer = HttpConnection.CallHTTPMethod("POST", HttpQuery);
BodyAnswer = HttpAnswer.GetBodyAsString(TextEncoding.UTF8);
EndDo;
EndProcedure
As with the previous handler, first, create an HTTP request to the API:
“MobScanner_Server/odata/standard.odata/Catalog_Products?$format=json”.
Then perform a query to the Products catalog and process its result:
Query = New Query;
Query.Text = "SELECT
| Products.Ref AS Ref,
| Products.Code AS Code,
| Products.Description AS Description,
| Products.SKU AS SKU
|FROM
| Catalog.Products AS Products";
Selection = Query.Execute().Select();
While Selection.Next() Do
EndDo;
In the loop, create a map with the product data, serialize it, and send it in the HTTP request body. Mind the HTTP request verb: this time we are using POST instead of GET.
Make sure to insert a unique key for each product:
ProductMap.Insert("Ref_Key", String(Selection.Ref.UUID()));
This will enable us to check if a product exists server-side.
We just created two commands in the mobile application — to exchange product data with the server.
Let’s check how it all works.
Run the server and create a few products.
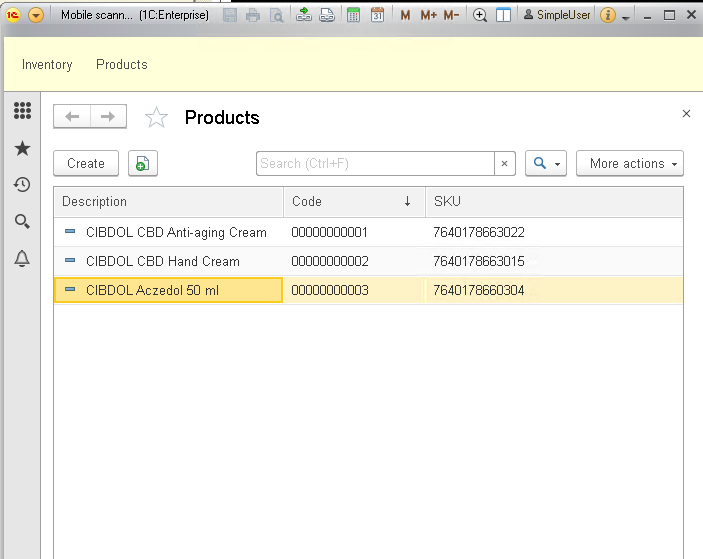
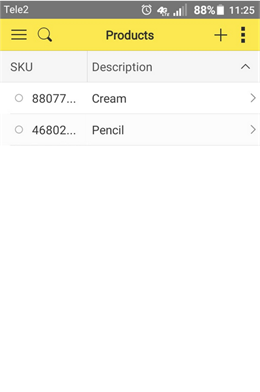
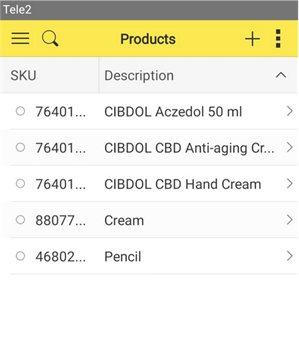
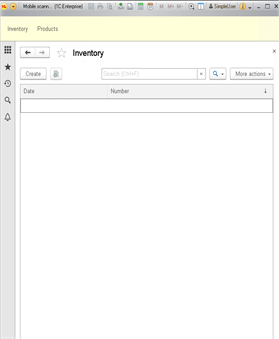
Run the mobile application. Open the Products catalog. We have some products which were added in the previous example:
Switch to the Start screen and press the Exchange button:
A new dialog opens:
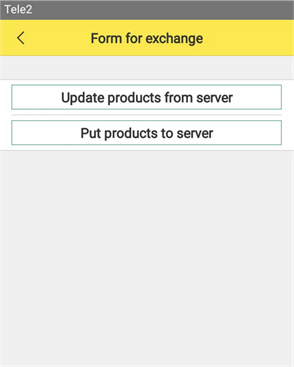
Tap the Update products from server button and open the Products catalog. You can see the updated products list:
Perfect! Now let’s check the server upload functionality. Return to the exchange dialog and tap the Put products to server button. Open the server application and check the product list:
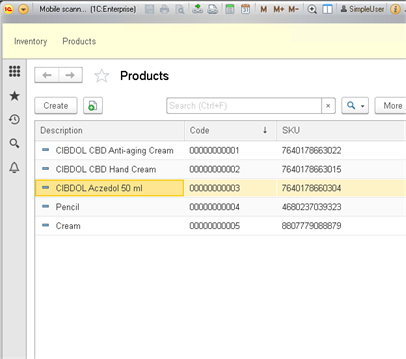
As you can see, there are no duplicates in both catalogs.
We now have synchronization functionality between product catalogs. However, our main goal is to synchronize inventory data.
Open the Inventory document in our mobile application project. Create and place a new command, PostToServer, on the form:
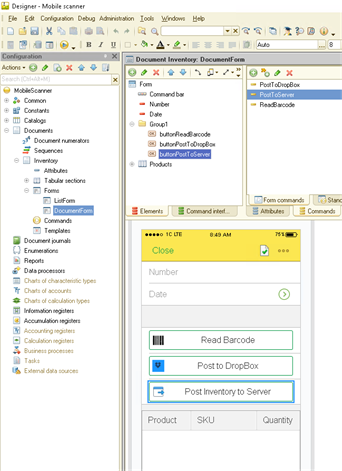
Create the handler for this command:
&AtClient
Procedure PostToServer(Command)
PostToServerAtServer();
EndProcedure
&AtServer
Procedure PostToServerAtServer()
ServerName = Constants.ServerName.Get();
ServerPort = Constants.ServerPort.Get(); // Number only!
Login = Constants.Login.Get();
Password = Constants.Password.Get();
Headers = New Map;
Headers.Insert("Content-Type", "application/json");
URL = "MobScanner_Server/odata/standard.odata/Document_Inventory?$format=json";
HttpConnection = New HTTPConnection(ServerName, ServerPort,Login ,Password ,,,Undefined);
HttpQuery = New HTTPRequest(URL, Headers);
DocumentMap = New Map();
DocumentMap.Insert("Ref_Key", String(Object.Ref.UUID()));
DocumentMap.Insert("Number", String(Object.Number));
DocumentMap.Insert("Date", String(Format(Object.Date,"DF=""yyyy-MM-ddThh:mm:ss""")));
arrayProducts = New Array;
For Each curProduct In Object.Products Do
ProductsMap = New Map();
ProductsMap.Insert("LineNumber", String(curProduct.LineNumber));
ProductsMap.Insert("Ref_Key", String(Object.Ref.UUID()));
ProductsMap.Insert("Product_Key", String(curProduct.Product.UUID()));
ProductsMap.Insert("SKU", String(curProduct.SKU));
ProductsMap.Insert("Quantity", String(curProduct.Quantity));
arrayProducts.Add(ProductsMap);
EndDo;
DocumentMap.Insert("Products", arrayProducts);
JSONWriter = New JSONWriter;
SettingsJSON = New JSONWriterSettings(JSONLineBreak.Auto,"",True);
JSONWriter.SetString(SettingsJSON);
WriteJSON(JSONWriter, DocumentMap);
BodyString = JSONWriter.Close();
HttpQuery.SetBodyFromString(BodyString,TextEncoding.UTF8);
HttpAnswer = HttpConnection.CallHTTPMethod("POST", HttpQuery);
BodyAnswer = HttpAnswer.GetBodyAsString(TextEncoding.UTF8);
EndProcedure
Let’s walk through the code. First, we create a HTTP request to the API:
URL = "MobScanner_Server/odata/standard.odata/Document_Inventory?$format=json";
The request returns data from the Inventory document.
Now we need to setup the request payload. The main gotcha is storing tabular data in the Inventory document.
Create a map and insert document attributes into it:
DocumentMap = New Map();
DocumentMap.Insert("Ref_Key", String(Object.Ref.UUID()));
DocumentMap.Insert("Number", String(Object.Number));
DocumentMap.Insert("Date", String(Format(Object.Date,"DF=""yyyy-MM-ddThh:mm:ss""")));
To add tabular data, you’ll have to create an array first:
arrayProducts = New Array;
Each array element will be another map, of product attributes.
ProductsMap = New Map();
ProductsMap.Insert("LineNumber", String(curProduct.LineNumber));
ProductsMap.Insert("Ref_Key", String(Object.Ref.UUID()));
ProductsMap.Insert("Product_Key", String(curProduct.Product.UUID()));
ProductsMap.Insert("SKU", String(curProduct.SKU));
ProductsMap.Insert("Quantity", String(curProduct.Quantity));
arrayProducts.Add(ProductsMap);
Next, insert data inside the loop:
For Each curProduct In Object.Products Do
EndDo;
Once the array has been filled with products detail, add it to the main map:
DocumentMap.Insert("Products", arrayProducts);
Serialize this map to send it in the body of a POST request to the server.
The server will respond with a status, which may also be processed:
HttpAnswer = HttpConnection.CallHTTPMethod("POST", HttpQuery);
BodyAnswer = HttpAnswer.GetBodyAsString(TextEncoding.UTF8);
Let’s check how it all works.
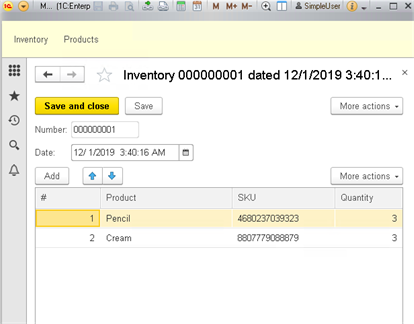
In the beginning, there are no documents in the server-side Inventory:
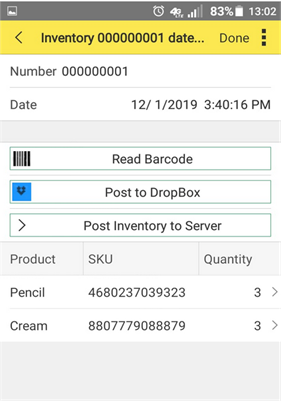
Run the mobile app and open the document in Inventory (or create a new one). Tap the Post Inventory to Server button.
Now check the server app – you can see the document in Inventory:
Let’s sum up:
Using the 1C Platform, we created a database server fronted by a REST API, for the purpose of data synchronization (Products catalog and Inventory documents).
You can download this Example for your own application.
Please, supplement your suggestions for the development of demo applications in our forum.
Stay tuned for the next series!

Writen by
1C Developer
20+ years of experience in the software industry in Russia, UAE and Germany. My main fields of expertise are developing and implementation of business applications (Retail, CRM, WMS, and Accounting) and integration of software with POS equipment and web portals.


