- Chapter 1. Library Subsystems
- Chapter 2. Library Integration Guide
- Chapter 3. Setting and Using Subsystems During Configuration Development
- Event Log Analysis
- Surveys
- Core
- Banks
- Business Processes and Tasks
- Currencies
- Report Options
- Object Versioning
- Business Interactions
- Add-Ins
- Export to Files
- Barcode Generation
- Work Schedules
- Bulk Edit
- Period-End Closing Dates
- Additional Reports and Data Processors
- User Sessions
- Import Data from Spreadsheets
- Notes
- Object Attribute Lock
- OData Interface
- Startup Notifications
- Calendar Schedules
- Formula Editor
- Contact Information
- Data Integrity
- User Monitoring
- National Language Support
- User Reminders
- Item Order
- Application Settings
- Data Exchange
- Infobase Version Update
- Configuration Update
- Conversations
- Text Messaging
- Document Record History
- Performance Monitor
- Print Tools
- Attachable Commands
- Duplicate Cleaner
- Full-Text Search
- Network Download
- Users
- Object Prefixes
- Licensed Update Verification
- Security Profiles
- SaaS
- Email Management
- File Management
- Report Distribution
- Scheduled Jobs
- Infobase Backup
- Infobase Backup
- Properties
- Hierarchy
- To-Do List
- Marked Object Deletion
- Access Management
- Totals and Aggregates
- Source Document Tracking
- Monitoring Center
- Message Templates
- Digital Signature
- Special Cases of Integration
- Appendix 1. Data Exchange Message File Format
- Appendix 2. Application Startup Parameters
- Appendix 3. International SSL Version without National Specifics
Chapter 1. Library Subsystems
1C:Standard Subsystems Library includes a set of multipurpose functional subsystems intended for development of 1C:Enterprise 8.3 applications. The library is not a ready-for-use application. You can integrate either the entire library or individual subsystems into your configuration.
The library is compatible with configurations based on 1C:Enterprise 8.3 (see specific version number in the UpdateSSL.html file). The configuration must have the following property values:
- Default run mode is set to Managed application.
- Use purposes includes PC application.
- Script variant is set to English.
- Data lock control mode is set to Managed.
- Compatibility mode: see allowed values in the UpdateSSL.html file.
- Modality usage mode can be set to Do not use.
- Interface compatibility mode can be set to Version 8.2, Version 8.2. Taxi allowed, or Taxi. Version 8.2 allowed.
- Synchronous call usage mode for platform extensions and add-ins is set to Use.
All of the library subsystems can be divided into the following categories based on their integration methods:
- Subsystems with independent functionalities.
- Subsystems with functionalities intended for use in consumer configuration objects (deep integration).
You can integrate subsystems from the first category by simply copying library metadata objects to consumer configurations. Such subsystems are located in the command interface and do not require a complex setup. They might include user interfaces and might provide an API to be used in consumer configurations. When a new library version is released, it is usually enough to update the copied metadata objects. Examples: Currencies and User sessions subsystems.
To integrate subsystems from the second category, copy the subsystem functionality first and define the list of consumer configuration objects that are subject to functionality integration. Then configure some additional settings and edit the object forms and code (in other words, perform deep integration of the subsystem into the consumer configuration objects). When a new library version is released, simply update these subsystems. Usually, there is no need to change the consumer configuration objects again.
The library does not only contain subsystems but also suggests some application development methodologies, for example, the approach to configuring session parameters.
The key features of all library subsystems are described in the table below.
Note.
- Certain subsystems might have limited functionalities in hosted or SaaS mode.
- Hosted mode and SaaS mode indicate that a subsystem enables or supports hosted and SaaS modes, respectively.
- External users indicates that a subsystem supports external users (for more information, see the Users section).
- Deep integration indicates that a subsystem supports integration into consumer configuration objects. Yes/No indicate whether each of the listed integration options is available.
Administration and Maintenance Tools
| # | Subsystem | Key Features |
|---|---|---|
| 1. | Additional Reports and Data Processors |
|
| 2. | User Monitoring |
|
| 3. | Application Settings |
|
| 4. | Configuration Update |
|
| 5. | Document Record History |
|
| 6. | Performance Monitor |
|
| 7. | Duplicate Cleaner |
|
| 8. | Security Profiles |
|
| 9. | Scheduled Jobs |
|
| 10. | Infobase Backup |
|
| 11. | Marked Object Deletion |
|
| 12. | Totals and Aggregates |
|
Users and Access Rights Administration
| # | Subsystem | Key Features |
|---|---|---|
| 1. | User Sessions |
|
| 3. | Users |
|
| 3. | Access Management |
|
Integration with Other Applications and Systems
| # | Subsystem | Key Features |
|---|---|---|
| 1. | Add-Ins |
|
| 2. | Import Data from Spreadsheets |
|
| 3. | OData Interface |
|
| 4. | Data Exchange |
|
| 5. | Conversations |
|
| 6. | Text Messaging |
|
| 7. | Network Download |
|
| 8. | Email Management |
|
| 9. | Report Distribution |
|
Technological Tools and APIs
| # | Subsystem | Key Features |
|---|---|---|
| 1. | Core |
|
| 2. | Barcode Generation |
|
| 3. | Object Attribute Lock |
|
| 4. | National Language Support |
|
| 5. | Infobase Version Update |
|
| 6. | Attachable Commands |
|
| 7. | Object Prefixes |
|
| 8. | SaaS |
|
| 9. | Monitoring Center |
|
Applied Subsystems and User Workspaces
| # | Subsystem | Key Features |
|---|---|---|
| 1. | Surveys |
|
| 2. | Business Processes and Tasks |
|
| 3. | Report Options |
|
| 4. | Business Interactions |
|
| 5. | File Management |
|
| 6. | To-Do List |
|
| 7. | Source Document Tracking |
|
| 8. | Message Templates |
|
Master Data and Classifiers
| # | Subsystem | Key Features |
|---|---|---|
| 1. | Banks |
|
| 2. | Currencies |
|
| 3. | Work Schedules |
|
| 4. | Calendar Schedules |
|
Service Subsystems
| # | Subsystem | Key Features |
|---|---|---|
| 1. | Object Versioning |
|
| 2. | Export to Files |
|
| 3. | Bulk Edit |
|
| 4. | Period-End Closing Dates |
|
| 5. | Notes |
|
| 6. | Personal Data Protection |
|
| 7. | Startup Notifications |
|
| 8. | Formula Editor |
|
| 9. | Contact Information |
|
| 10. | Data Integrity |
|
| 11. | User Reminders |
|
| 12. | Item Order |
|
| 13. | Print Tools |
|
| 14. | Full-Text Search |
|
| 15. | Licensed Update Verification |
|
| 16. | Properties |
|
| 17. | Declension Tool |
|
| 18. | Hierarchy |
|
| 19. | Digital Signature |
|
Chapter 2. Library Integration Guide
First-time integration of the library subsystems into a configuration significantly differs from updating an integrated library. Generally, the library integration consists of the following steps:
- Copying Metadata Objects from the Library Distribution File to the Configuration.
- Configuring Library Objects.
- Using Subsystems in Configurations.
All functional subsystems included in the library are subordinate to the Standard subsystems subsystem in the metadata object tree of Designer. The subsystems designed for SaaS configurations are subordinate to the SaaS subsystem.
For the first-time integration of the library, use the FirstSSLDeployment.epf external data processor. You can use it to select subsystems for integration while preserving their reference integrity, and exclude unused subsystems. To validate the first SSL integration or further library version updates, use the SSLImplementationCheck.erf external report [1]. It identifies a variety of common problems related to library integration (type composition filling validation, checks for code inserts, and so on).
To quickly start the development of a new configuration based on the library, you can use the Quick Start of Development "from Scratch" section containing only the essential actions required to start the configuration.
[1] In client/server mode, ensure that the user who started the 1C:Enterprise server has sufficient rights to run this report.
Copying Metadata Objects from the Library Distribution File to the Configuration
First-Time Integration
To copy library objects to the configuration during the first-time integration, in Designer, click Configuration – Compare and merge with configuration from file. In the dialog box, specify the library distribution file and confirm enrollment for support.
Step 1. In the configuration comparison and merging window, clear all check boxes and select all objects to be copied using the Actions – Select by file subsystems command. In the StandardSubsystems subsystem group, select the following:[1]
- Required subsystems, as described in Table 2.1.
- Additional subsystems required for SaaS configurations, as described in Table 2.2.
- Other subsystems to be integrated into the configuration.
- Subsystems required by the subsystems you selected, as described in Tables 2.1 to 2.3. [2]
Click Set. Notice.
Ensure that all required subsystems listed in Table 2.1 are selected. If the configuration is designed to run in SaaS mode, the subsystems listed in Table 2.2 are also required. Otherwise, the configuration will not work.
[1] Do not select subsystems that are not in the StandardSubsystems subsystem group. For example, the Administration subsystem.
[2] To get the file with comparison and merging settings for this operation, use the FirstSSLDeployment.epf data processor.
Step 2. Select or clear the check boxes for individual library objects and their properties as described in Table 2.5.
Next, click Actions – Set rule for all and select the Get from file merge rule, then click Execute. In the window with the list of dependent objects, click Continue.
You might want to first save the configured comparison and merging settings to a file in case you have to repeat this step.
Step 3. Once the comparison and merging are complete, the second stage begins: Configuring Library Objects. Depending on the number of subsystems, this step can take from one to several hours.
After you configure the library objects, it is recommended that you validate the integration using the SSLImplementationCheck.erf external report.
Updating Library Version
This section describes the general procedure of updating the library to a later version. The updateSSL.htm document included in the library describes the specifics of updating each library version. Migration between library major versions, minor versions, and revisions (the first, second, and third numbers in the full version number) requires some additional action, while migration between library patch releases (the fourth number) generally requires no additional action. Rarely, additional actions are required even when updating to a patch release. Instructions for these situations are available both in updateSSL.htm and readme.txt (the Important section).
To update library version, click Configuration – Support – Update configuration. In the dialog box, click Select update file, specify the path to the library distribution file, and confirm that you want to update the vendor configuration.
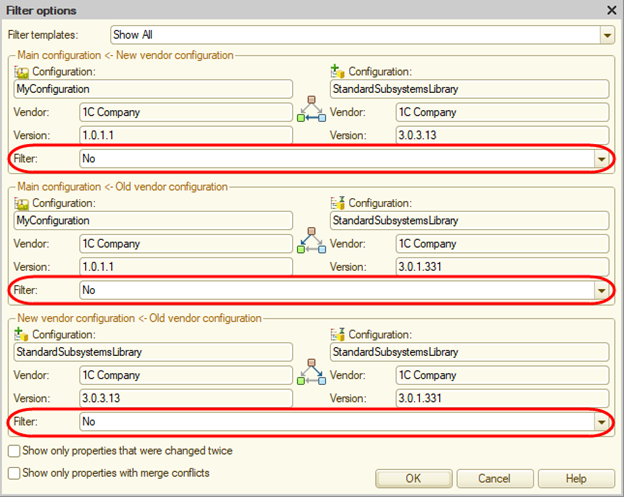
Step 1. Some of the library objects referenced by the objects of your configuration might have been deleted from the new library version. To have these library objects deleted automatically, clear the references to them before the update. To find such objects in the configuration comparison and merging window, clear all the check boxes for metadata objects, then set the comparison and merging filter to Show objects available only in the old vendor configuration in the New vendor configuration – Old vendor configuration group as indicated in the picture.
Next, select the check boxes for all metadata objects, select the Get from new vendor configuration merge rule (Actions – Set rule for all), and click Actions – Find unresolved references to objects to be deleted.
After the operation is completed, you can see the list of configuration objects that contain references to the library objects to be deleted. If there are any application objects in the list, remove the references to the library objects to be deleted from these application objects, and proceed to step 2.
Step 2. Run the Configuration – Support – Update configuration command again. Click Select update file and specify the path to the library distribution file.
In the configuration comparison and merging window, clear all check boxes and then select the objects to be copied using the Actions – Select by new vendor configuration subsystems command. In the StandardSubsystems subsystem group, select the following:[3]
- Required subsystems, as described in Table 2.1.
- Additional subsystems required for SaaS configurations, as described in Table 2.2.
- All previously integrated subsystems and other subsystems that you want to integrate.
- Subsystems required by the selected subsystems, as described in Tables 2.1 to 2.3.
Click Set. Notice.
Ensure that all required subsystems listed in table 2.1 and the related metadata objects are selected. If the configuration is designed to run in SaaS mode, the subsystems listed in Table 2.2 are also required. Otherwise, the configuration will not work.
[3] Do not select subsystems that are not in the StandardSubsystems subsystem group. For example, the Administration subsystem.
If the Administration subsystem was integrated or is planned for integration, in the configuration comparison and merging window, select the check box for this subsystem ("subsystem" metadata object).
Click Actions – Set rule for all and select the Get from new vendor configuration merge rule.
Select or clear the check boxes for individual library objects and their properties as described in Table 2.6. Depending on the number of subsystems to update or install, this step can take from 15 minutes to one hour.
Then mark all obsolete metadata objects in the library for deletion. Set the comparison and merging filter to Show objects available only in the old vendor configuration in the New vendor configuration – Old vendor configuration group as indicated in the picture.

Then select the check boxes for all metadata objects and click Execute. In the window with the list of dependent objects, click Continue.
You might want to first save the configured comparison and merging settings to a file in case you have to repeat this step.
Updating to patch releases can be automated to a greater degree, which saves time during regular (for example, weekly) updates. Library patch releases differ only in the fourth number of the full version number, for example: 2.3.4.1, 2.3.4.2, 2.3.4.3.
For the purpose of updating to patch releases, use the UpdateToCorrectiveVersionSSL.epf external data processor.
Start the data processor in the infobase with the configuration containing the previous library release, click Update to corrective version, and specify the .cf file with the new library version from the distribution package. The configuration will be automatically compared and merged with the new library configuration using the following rules: all built-in library objects will be copied, and objects overridden during integration will be merged prioritizing new vendor configuration (for example, type collections) or skipped (for example, overridable modules). After comparison and merging, the database configuration will not be updated automatically, which allows you to run a comparison with the database configuration and edit the changed objects: overridable modules, local fixes, and enhancements.
After the update, follow the instructions in the Migrating from test versions section or the Migrating from previous versions section of the UpdateSSL file if any.
Alternately, click Generate a settings file to generate a comparison and merging settings file that can be imported into Designer for manual comparison and merging.
When updating to new functional releases (releases with the third number incremented), select the checkboxes in the comparison and merging window in Designer following the instructions above.
Step 3. Once the comparison and merging are complete, the second stage begins: Configuring Library Objects. Pay particular attention to updating overridable modules (see the Common modules section).
After you configure the library objects, it is recommended that you validate the integration using the SSLImplementationCheck.erf external report.
Library Subsystem Dependencies
Table 2.1. Subsystems Required for Integration
| # | Subsystem | Depends On |
|---|---|---|
| 1. | Core | Security Profiles [1] |
| 2. | Infobase Version Update | |
| 3. | Users | Contact Information [2] |
[1] When integrating the Core subsystem without the Security profiles subsystem, follow the additional guidelines in the Special Cases of Integration section in Chapter 3.
[2] When integrating the Users subsystem into a SaaS configuration, the Contact information subsystem is required. In other scenarios the subsystem is optional and can be integrated separately. For integration without this subsystem, see Special Cases of Integration in Chapter 3.
Table 2.2. Additional Subsystems Required for SaaS Configurations
| # | Subsystem | Subordinate Subsystem in the Branch | Depends On |
|---|---|---|---|
| 1. | SaaS | Core SaaS | |
| 2. | SaaS | Infobase Version Update SaaS | User Sessions |
| 3. | SaaS | Users SaaS | |
Table 2.3. Optional Subsystems That Allow Selective Integration
| # | Subsystem | Depends On |
|---|---|---|
| 1. | Surveys | Item Order Attachable Commands |
| 2. | Banks | Online Support Library – Classifier Management [1] [2] Contact Information [1] |
| 3. | Business Processes and Tasks | Email Management [1] Access Management [1] |
| 4. | Currencies | Network Download Online Support Library – Classifiers [1] [2] Formula Editor [1] |
| 5. | Report Options | Formula Editor Email Management [1] Attachable Commands [1] Additional Reports and Data Processors [1] Report Distribution [1] Conversations [1] |
| 6. | Object Versioning | |
| 7. | Business Interactions | Contact Information Item Order Text Messaging Attachable Commands Full-Text Search File Management Email Management Properties [1] |
| 8. | Add-Ins | Online Support Library – Get Add-Ins [1] [2] |
| 9. | Export to Files | File Management [1] Email Management [1] Print [4] Attachable Commands [4] Formula Editor [4] |
| 10. | Barcode Generation | Add-Ins [1] |
| 11. | Work Schedules | Calendar Schedules |
| 12. | Bulk Edit | |
| 13. | Period-End Closing Dates | |
| 14. | Additional Reports and Data Processors | Print Tools [1] Attachable Commands Report Options [1] Bulk Edit [1] [2] |
| 15. | User Sessions | |
| 16. | Import Data from Spreadsheets | Additional Reports and Data Processors [1] Bulk Edit [1] |
| 17. | Notes | |
| 18. | Object Attribute Lock | Duplicate Cleaner [1] |
| 19. | Personal Data Protection | Print Tools Attachable Commands Properties [1] |
| 20. | OData Interface | |
| 21. | Startup Notifications | |
| 22. | Calendar Schedules | |
| 23. | Formula Editor | |
| 24. | Contact Information | Item Order Attachable Commands Online Support Library – Classifiers [1] |
| 25. | Data Integrity | Report Options Attachable Commands To-Do List [1] |
| 26. | National Language Support | |
| 27. | NationalLanguageSupport.TextTranslation | Network Download |
| 28. | User Reminders | Attachable Commands [1] |
| 29. | Item Order | |
| 30. | Application Settings | All Subsystems [1] |
| 31. | Data Exchange | Configuration Update [1] Network Download [1] Object Prefixes [1] Email Management [1] Scheduled Jobs [1] [2] [3] |
| 32. | Configuration Update | User Sessions Email Management [1] Licensed Update Verification [1] |
| 33. | Conversations | |
| 34. | Text Messaging | Network Download |
| 35. | Document Record History | Report Options Attachable Commands |
| 36. | Performance Monitor | |
| 37. | Print Tools | [4] Formula Editor Attachable Commands Email Management [1] File Management [1] Additional Reports and Data Processors [1] |
| 38. | Attachable Commands | Print Tools [1] Report Options [1] Additional Reports and Data Processors [1] |
| 39. | Duplicate Cleaner | |
| 40. | Full-Text Search | |
| 41. | Network Download | |
| 42. | Object Prefixes | |
| 43. | Licensed Update Verification | |
| 44. | Security Profiles | |
| 45. | Email Management | |
| 46. | File Management | Properties [1] Access Management [1] |
| 47. | Report Distribution | Report Options Business Interactions [1] Additional Reports and Data Processors [1] Contact Information Text Messaging [1] Print Tools [1] Attachable Commands [1] Network Download [1] Email Management File Management [1] Access Management [1] Digital Signature [1] Bulk Edit [1] |
| 48. | Scheduled Jobs | |
| 49. | Infobase Backup | User Sessions |
| 50. | Properties | Object Attribute Lock |
| 51. | Declension Tool | Network Download [1] |
| 52. | Hierarchy | |
| 53. | To-Do List | |
| 54. | Marked Object Deletion | |
| 55. | Access Management | [2] |
| 56. | Totals and Aggregates | |
| 57. | Monitoring Center | Performance Monitor [1] |
| 58. | Source Document Tracking | Item Order [1] Attachable Commands [1] Print Tools [1] |
| 59. | Message Templates | Business Interactions [1] Text Messaging [1] Print Tools [1] Email Management [1] |
| 60. | Digital Signature | Contact Information [1] User Reminders [1] Print Tools [1] Network Download [1] |
[1] Optional dependency, meaning that the subsystem can be integrated separately. Chapter 3 can contain additional guidelines on independent integration of the subsystem.
[2] When integrating subsystems into a SaaS configuration, also integrate the subsystem with the same name and
SaaSpostfix from the SaaS parent subsystem. For example, when integrating the Currencies subsystem, integrate the Currencies SaaS subsystem as well.[3] The Data exchange subsystem is required for the development of data exchange in a distributed infobase.
[4] When integrating subsystems into a configuration designed for multiple languages, also integrate the subsystem with the same name from the National language support parent subsystem.
Table 2.4. Optional Subsystems That Can Be Integrated Into SaaS Configurations
| # | Subsystem | Subordinate Subsystem in the Branch | Depends On |
|---|---|---|---|
| 1. | SaaS | Add-Ins SaaS | Add-Ins |
| 2. | SaaS | Additional Reports and Data Processors SaaS | Additional Reports and Data Processors |
| 3. | SaaS | File Management SaaS | File Management |
| 4. | SaaS | Access Management SaaS | Access Management |
Objects and Object Properties to Be Selected or Cleared Before Merging the Configuration with the Library
Table 2.5. Objects and Object Properties to Be Selected or Cleared Before Merging the Configuration with the Library (During the First-Time Integration of the Subsystem)
| # | Subsystem | All Branch Subsystems | Action Required | Note |
|---|---|---|---|---|
| 1. | Core | The Properties item of the root configuration object:
|
Select the check box. | Application module refers to managed and ordinary application modules if they are available in the metadata tree in the configuration comparison and merging window. |
| 2. | Core | The Properties item of the root configuration object:
|
Select the check box. | When integrating the library without the File Management, Configuration Update, and Infobase Backup subsystems, selecting this check box is not required |
| 3. | Core | Other properties of the root configuration object | Clear the check box. | |
| 4. | Application Settings | Subsystem: Administration. | Select the check box. | Only for the subsystem, not for the subsystem content. |
| 5. | Application Settings | Common commands:
|
Clear the check box. | Only when integrating without the Additional Reports and Data Processors subsystem. |
| 6. | Application Settings | Common command: `ReportPanelAdministration`. | Clear the check box. |
|
| 7. | Attachable Commands | Subsystem: `AttachableReportsAndDataProcessors`. | Select the check box (only for the subsystem, not for the subsystem content). |
Table 2.6. Objects and Object Properties to Be Selected or Cleared Before Merging the Configuration with the Library (During the Subsystem Update)
Configuration Properties
| # | Subsystem | Object Name | Action Required |
|---|---|---|---|
| 1. | Core |
|
Clear the check box. |
Subsystems
| # | Subsystem | Object Name | Action Required |
|---|---|---|---|
| 1. | Application Settings |
|
For the Command interface and Content properties, set Merge rule to Merge prioritizing new vendor configuration. |
| 2. | Attachable Commands |
|
For the Command interface and Content properties, set Merge rule to Merge prioritizing new vendor configuration. |
Common Modules
Clear the check box for all overridable common modules:
| # | Subsystem | Common Module |
|---|---|---|
| 1. | Core |
|
| 2. | Banks |
|
| 3. | Business Processes and Tasks |
|
| 4. | Report Options |
|
| 5. | Business Interactions |
|
| 6. | Currencies |
|
| 7. | Bulk Edit |
|
| 8. | Period-End Closing Dates |
|
| 9. | Additional Reports and Data Processors |
|
| 10. | Object Attribute Lock |
|
| 11. | Personal Data Protection |
|
| 12. | Startup Notifications |
|
| 13. | Calendar Schedules |
|
| 14. | Data Integrity |
|
| 15. | National Language Support |
|
| 16. | User Reminders |
|
| 17. | Application Settings |
|
| 18. | Data Exchange |
|
| 19. | Infobase Version Update |
|
| 20. | Text Messaging |
|
| 21. | Print Tools |
|
| 22. | Attachable Commands |
|
| 23. | Duplicate Cleaner |
|
| 24. | Full-Text Search |
|
| 25. | Users |
|
| 26. | Object Prefixes |
|
| 27. | SaaS |
|
| 28. | Email Management |
|
| 29. | File Management |
|
| 30. | Report Distribution |
|
| 31. | Scheduled Jobs |
|
| 32. | Infobase Backup |
|
| 33. | Properties |
|
| 34. | Hierarchy |
|
| 35. | To-Do List |
|
| 36. | Access Management |
|
| 37. | Source Document Tracking |
|
| 38. | Monitoring Center |
|
| 39. | Message Templates |
|
| 40. | Digital Signature |
|
| 41. | DSS Service Digital Signature |
|
Roles
| # | Subsystem | Object Name | Action Required |
|---|---|---|---|
| 1. | Report Options |
|
For the Rights property, set Merge rule to Merge prioritizing new vendor configuration. |
Common Attributes
| # | Subsystem | Object Name | Action Required |
|---|---|---|---|
| 1. | SaaS |
|
Clear the check box. |
Exchange Plans
| # | Subsystem | Object Name | Action Required |
|---|---|---|---|
| 1. | Infobase Version Update |
|
Set Merge rule to Merge prioritizing new vendor configuration. |
Filter Criteria
| # | Subsystem | Object Name | Action Required |
|---|---|---|---|
| 1. | Hierarchy |
|
Clear the check box. |
Functional Options
| # | Subsystem | Object Name | Action Required |
|---|---|---|---|
| 1. | Core |
|
Clear the check box. |
Type Collections
| # | Subsystem | Object Name | Action Required |
|---|---|---|---|
| 1. | Core |
|
Clear the check box. |
| 2. | Surveys |
|
Set Merge rule to Merge prioritizing new vendor configuration. |
| 3. | Core |
|
Set Merge rule to Merge prioritizing new vendor configuration. |
| 4. | Business Processes and Tasks |
|
Set Merge rule to Merge prioritizing new vendor configuration. |
| 5. | Business Interactions |
|
Set Merge rule to Merge prioritizing new vendor configuration. |
| 6. | Object Versioning |
|
Set Merge rule to Merge prioritizing new vendor configuration. |
| 7. | Period-End Closing Dates |
|
Set Merge rule to Merge prioritizing new vendor configuration. |
| 8. | Additional Reports and Data Processors |
|
Set Merge rule to Merge prioritizing new vendor configuration. |
| 9. | Notes |
|
Set Merge rule to Merge prioritizing new vendor configuration. |
| 10. | Personal Data Protection |
|
Set Merge rule to Merge prioritizing new vendor configuration. |
| 11. | Contact Information |
|
Set Merge rule to Merge prioritizing new vendor configuration. |
| 12. | Data Integrity |
|
Set Merge rule to Merge prioritizing new vendor configuration. |
| 13. | Item Order |
|
Set Merge rule to Merge prioritizing new vendor configuration. |
| 14. | User Reminders |
|
Set Merge rule to Merge prioritizing new vendor configuration. |
| 15. | SaaS |
|
Set Merge rule to Merge prioritizing new vendor configuration. |
| 16. | Print Tools |
|
Clear the check box. |
| 17. | Users |
|
Clear the check box. |
| 18. | Users |
|
Set Merge rule to Merge prioritizing new vendor configuration. |
| 19. | File Management |
|
Set Merge rule to Merge prioritizing new vendor configuration. |
| 20. | Report Distribution |
|
Set Merge rule to Merge prioritizing new vendor configuration. |
| 21. | Properties |
|
Set Merge rule to Merge prioritizing new vendor configuration. |
| 22. | Declension Tool |
|
Set Merge rule to Merge prioritizing new vendor configuration. |
| 23. | Access Management |
|
Set Merge rule to Merge prioritizing new vendor configuration. |
| 24. | Access Management |
|
Set Merge rule to Merge prioritizing new vendor configuration.
|
| 25. | Source Document Tracking |
|
Set Merge rule to Merge prioritizing new vendor configuration. |
| 26. | Source Document Tracking |
|
Clear the check box. |
| 27. | Message Templates |
|
|
| 28. | Digital Signature |
|
|
Common Commands
| # | Subsystem | Object Name | Action Required |
|---|---|---|---|
| 1. | Data Exchange | Property: Command parameter type
|
Clear the check box. |
| 2. | Hierarchy |
|
Clear the check box. |
| 3. | Access Management |
|
Clear the check box. |
Languages
| # | Subsystem | Object Name | Action Required | |
|---|---|---|---|---|
| 1. | Core |
|
Select the check box. | If displayed in the metadata tree in the configuration comparison and merging window. |
Catalogs
| # | Subsystem | Object Name | Action Required |
|---|---|---|---|
| 1. | Core |
|
Clear the check box. Once a library is updated, update predefined items using the SSLImplementationCheck.epf report in the Access Management error correction mode. Incorrect predefined items in the MetadataObjectIDs catalog.For your information: internal IDs of predefined items can be changed without consequences (no data loss). For example, you can delete a predefined item and create a new one with the same name. The predefined item will be linked to a data item correctly. If a predefined item name (the full metadata object name without a dot) does not match an existing metadata object, this predefined item will not be linked to a data item and will not cause any issues. |
| 2. | Business Processes and Tasks |
|
Set Merge rule to Merge prioritizing new vendor configuration. |
| 3. | Contact Information |
|
Set Merge rule to Merge prioritizing new vendor configuration. |
| 4. | Users |
|
Clear the check box. |
| 5. | Properties |
|
Set Merge rule to Merge prioritizing new vendor configuration. |
| 6. | Access Management |
|
Set Merge rule to Merge prioritizing new vendor configuration. |
| 7. | Source Document Tracking |
|
Set Merge rule to Merge prioritizing new vendor configuration. |
Enumerations
| # | Subsystem | Object Name | Action Required |
|---|---|---|---|
| 1. | Text Messaging |
|
Clear the check box. |
Data Processors
| # | Subsystem | Object Name | Action Required |
|---|---|---|---|
| 1. | Application Settings |
|
If forms were modified, clear the check box. |
Charts of Characteristic Types
| # | Subsystem | Object Name | Action Required |
|---|---|---|---|
| 1. | Surveys |
|
Set Merge rule to Merge prioritizing new vendor configuration. |
| 2. | Business Processes and Tasks |
|
Set Merge rule to Merge prioritizing new vendor configuration. |
| 3. | Period-End Closing Dates |
|
Set Merge rule to Merge prioritizing new vendor configuration. |
| 4. | Period-End Closing Dates |
|
Clear the check box. |
| 5. | Properties |
|
Set Merge rule to Merge prioritizing new vendor configuration. |
Business Processes
| # | Subsystem | Object Name | Action Required |
|---|---|---|---|
| 1. | Business Processes and Tasks |
|
Clear the check box. |
Configuring Library Objects
Right after the comparison and merging, the metadata objects are copied from the library to the configuration but not yet configured. To configure the copied library objects, follow the instructions in Table 2.7.
If different actions are required for the first-time integration of the library and for the update of an already integrated library, the instructions in Table 2.7 are divided into two sections: First-time integration and Library version update. The root configuration object modules and overridable common modules require special attention because fully automatic update is not available for these modules. General instructions for the first-time setup and update of library objects can be found after Table 2.7.
Table 2.7. Library Objects That Require Additional Actions After Comparing and Merging the Configuration with the Library
Common Objects
| # | Object Name | Action Required |
|---|---|---|
| 1. | Session module | First-time integration: Copy the entire SessionParametersSetting handler. |
| 2. | Application module (managed and ordinary application modules) | During the initial integration into handlers
Migrate the segments of code enclosed in the following comments: // StandardSubsystems… // End StandardSubsystemsMigrate the fragments of code from the region where global variables are defined. When updating the library version, move the code fragments related to the integrated subsystems from the library distribution file to the handlers
// <SubsystemPath> … // End <SubsystemPath> |
| 3. | Property: Version | First-time integration: set the property according to the MAJOR.MINOR.REVISION.BUILD format. Each part of the sequence contains at least 1 digit: MAJOR for major version number. MINOR for minor version number. REVISION for revision number. BUILD for build number. Example: 1.0.1.1. For more information, see [Version numbering](http://its.1c.ru/db/v8std#content:-2145783164:hdoc) (in Russian). Increment the version at each update. |
Common SSL Objects for SaaS Configurations
| # | Subsystem | Object Name | Action Required |
|---|---|---|---|
| 1. | SaaS | Common attribute: DataAreaMainData |
First-time integration:
During each update:
|
| 2. | SaaS | Common attribute: DataAreaAuxiliaryData |
First-time integration:
During each update:
|
| 3. | SaaS | Common command: AddServiceUsers |
Display it in the configuration command interface. |
| 4. | SaaS | Type collection: MessagesQueueEndpoint |
In the Type property, specify the MessagesExchange exchange plan and exclude other data types. |
| 5. | SaaS | Scheduled job: DataSynchronizationWithWebApplication |
First-time integration: define a schedule for scheduled jobs. During each update: do not transfer a schedule from the distribution package. |
Common Modules
It is recommended that you follow the general approach to configuring the overridable common modules:
- During the first-time configuration of an overridable common module, read the documentation for its export procedures. If necessary, implement the logic for the export procedures.
- During each further update of an overridable common module, copy the new export procedures and functions from the library distribution file, delete the obsolete ones, and make sure that comments, the number of parameters, and the parameter names of each procedure match their library equivalents. If necessary, implement the logic for the new export procedures, and update the implementation of existing ones if their purpose or parameters were changed in the new version of the library.
Subsystem help can contain additional instructions on overridable modules.
Roles
| # | Subsystem | Object Name | Action Required |
|---|---|---|---|
| 1. | Core |
|
When integrating with the Properties subsystem but without the Access Management subsystem, follow the instructions in section How to Integrate "Properties" and "Access Management" Subsystems. |
| 2. | Core |
|
Clear the following rights for all metadata objects:
When integrating with the SaaS subsystem, add rights to all objects of theDataAreaMainData common separator attribute to the roles.When integrating without the SaaS subsystem, add rights to all configuration metadata objects, except for the rights listed above, to the roles. |
| 3. | Properties |
|
When integrating without the Access Management subsystem, follow the instructions in section How to Integrate "Properties" and "Access Management" Subsystems. |
| 4. | Personal Data Protection |
|
Implement roles providing access to objects:
See examples of the _DemoAddEditPersonalDataProcessingConsents and _DemoReadPersonalDataProcessingConsents roles.For roles that provide access to personal data subjects, add access to the following objects:
|
Filter Criteria
| # | Subsystem | Object Name | Action Required |
|---|---|---|---|
| 1. | Hierarchy |
|
First-time integration: set the Content property and add the types of parent documents, catalogs, and charts of characteristic types to the Type property. Then define the attributes of child documents, catalogs, and charts of characteristic types that will be used to search for the parent objects. |
Scheduled Jobs
| # | Subsystem | Object Name | Action Required |
|---|---|---|---|
| 1. | Totals and Aggregates |
Property: Schedule |
First-time integration: define a schedule for scheduled jobs. During each update: do not transfer a schedule from the distribution package. |
Type Collections
| # | Subsystem | Object Name | Action Required |
|---|---|---|---|
| 1. | Surveys |
|
First-time integration:
|
| 2. | Surveys |
|
First-time integration:
|
| 3. | Core |
|
First-time integration: if the configuration contains the Companies catalog, add a reference to it to the Type property. |
| 4. | Business Processes and Tasks |
|
First-time integration: in the Type property, specify references to the business processes in the configuration. |
| 5. | Business Processes and Tasks |
|
First-time integration: in the Type property, specify business process objects in the configuration. |
| 6. | Business Processes and Tasks |
|
First-time integration:
|
| 7. | Business Processes and Tasks |
|
First-time integration:
|
| 8. | Business Processes and Tasks |
|
First-time integration:
|
| 9. | Object Versioning |
|
First-time integration: configure the types as described in section Object Versioning. |
| 10. | Business Interactions |
|
First-time and further integrations:
|
| 11. | Business Interactions |
|
First-time and further integrations:
|
| 12. | Period-End Closing Dates |
|
First-time integration:
See the detailed instructions in section Period-End Closing Dates. |
| 13. | Additional Reports and Data Processors |
|
First-time integration:
See the detailed instructions in section Additional Reports and Data Processors. |
| 14. | Notes |
|
See the detailed instructions in section Notes. |
| 15. | Personal Data Protection |
|
First-time integration: specify the types in the PersonalDataSubject type collection. As a type, select an entity being a personal data subject in the configuration. |
| 16. | Contact Information |
|
First-time integration:
See the instructions in section Contact Information. |
| 17. | User Reminders |
|
See the detailed instructions in section User Reminders. |
| 18. | Item Order |
|
First-time integration:
|
| 19. | Print Tools |
|
First-time integration:
|
| 20. | Print Tools |
|
First-time integration:
|
| 21. | Users |
|
First-time integration:
|
| 22. | Users |
|
First-time integration:
|
| 23. | File Management |
|
First-time integration:
See the instructions in section File Management. |
| 24. | Report Distribution |
|
First-time integration:
|
| 25. | Properties |
|
First-time integration:
See the instructions in section Properties. |
| 26. | Message Templates |
|
First-time integration:
See the instructions in section Message Templates. |
| 27. | Access Management |
|
First-time integration: configure as described in section Access Management. During each update: ensure that the types include all built-in types. |
| 28. | Source Document Tracking |
|
First-time integration:
See the instructions in section Source Document Tracking. |
Common Forms
| # | Subsystem | Object Name | Action Required |
|---|---|---|---|
| 1. | Text Messaging |
|
First-time integration: display it in the command interface. |
Common Commands
| # | Subsystem | Object Name | Action Required |
|---|---|---|---|
| 1. | Data Exchange |
|
First-time integration: configure the subsystem as described in section Data Exchange. |
| 2. | Hierarchy |
|
First-time integration: set the Command parameter type property for documents, catalogs, and charts of characteristic types to be displayed in the Hierarchy report. |
| 3. | Access Management |
|
First-time integration: configure as described in section Access Management. During each update: ensure that the types include built-in types. |
| 4. | Source Document Tracking |
|
First-time integration: configure the subsystem as described in section Source Document Tracking. |
Common Templates
| # | Subsystem | Object Name | Action Required |
|---|---|---|---|
| 1. | Infobase Version Update |
|
First-time integration: create and maintain a template as described in section Infobase Version Update. |
Catalogs
| # | Subsystem | Object Name | Action Required |
|---|---|---|---|
| 1. | Business Processes and Tasks |
|
First-time integration: create a set of predefined items for business roles available in the configuration. See the instructions in section Business Processes and Tasks. |
| 2. | Currencies |
|
First-time integration: display the Currencies catalog in the command interface. For more information, see section Currencies. |
| 3. | Contact Information |
|
First-time integration: if necessary, create a set of predefined catalog items. See the instructions in section Contact Information. |
| 4. | Performance Monitor |
|
First-time integration: if predefined items are used, create the required set of predefined items and perform the initial population of attributes from the list form. See the additional instructions in section Performance Monitor. |
| 5. | Users |
|
First-time integration:
|
| 6. | Properties |
|
First-time integration: for each object that will contain additional information, create a predefined item. The predefined item names must have the following format: Type_Name. For example, Catalog_Individuals for the Individuals catalog.See the instructions in section Properties. |
Document Journals
| # | Subsystem | Object Name | Action Required |
|---|---|---|---|
| 1. | Personal Data Protection |
|
|
Reports
| # | Subsystem | Object Name | Action Required |
|---|---|---|---|
| 1. | Personal Data Protection |
|
|
Data Processors
| # | Subsystem | Object Name | Action Required |
|---|---|---|---|
| 1. | Startup Notifications |
|
For data processor templates for first-time integration:
|
| 2. | Application Settings |
|
During each update:
|
| 3. | Performance Monitor |
|
First-time integration: display in the command interface if the Application Settings subsystem is not used in the configuration. |
Charts of Characteristic Types
| # | Subsystem | Object Name | Action Required |
|---|---|---|---|
| 1. | Surveys |
|
First-time integration:
Add the allowed response types to the Value type property. |
| 2. | Business Processes and Tasks |
|
First-time integration:
|
| 3. | Properties |
|
First-time integration: specify the available types of property values. You can add any metadata object available in the configuration to the list of data types. See the instructions in section Properties. |
Business Processes
| # | Subsystem | Object Name | Action Required |
|---|---|---|---|
| 1. | Business Processes and Tasks |
|
First-time integration: in the Base On property, specify references to metadata objects that require creating jobs (task subjects). See the instructions in section Business Processes and Tasks. |
Deleting References to Unused Subsystems
Some library objects are configured to interact with other library subsystems. In such objects, keep only the code blocks related to subsystems that you integrate. A code block related to a subsystem is marked with opening and closing comments:
// <SubsystemPath>
…
// End <SubsystemPath>For example, if you do not integrate the Properties subsystem into your configuration, delete all the code blocks marked with the following comments:
// StandardSubsystems.Properties
…
// End StandardSubsystems.Properties
Likewise, if you do not integrate the Users SaaS subsystem, delete all the code blocks marked with the following comments:
// StandardSubsystems.SaaSOperations.UsersSaaS
…
// End StandardSubsystems.SaaSOperations.UsersSaaS
For batch deletion of such code blocks, use the FirstSSLDeployment.epf data processor. Before running it for the first time, you might need to:
- Comment out the code of the managed application module, the ordinary application module, and the session module (to be able to run the data processor).
- Allow editing library objects in the support options.
Subsystem Integration
The library is designed for selective integration of most subsystems into the configuration. At any convenient time after the initial integration of the library, you can further integrate the required subsystems. To do so, repeat steps 1–3 of the initial integration scenario, mark the missing subsystems using the FirstSSLDeployment.epf data processor, and save the comparison/merge settings file for the Designer. Dependent and previously integrated subsystems will also be automatically flagged (since parts of their code required for the integrated subsystems may have been removed during the initial integration).
Updating to Specific Library Versions
The updateSSL.htm document included in the library describes the specifics of updating each library version. When updating to a version that does not directly follow the integrated one, follow all the steps in this document, starting with the earliest version.
Incrementing Configuration Version Number
After you integrate or update the library, increment the version number of the configuration. It is required for proper execution of all infobase update procedures in the new library version. For more information, see Service Data Update.
Validating Integration and Updates
It is recommended that you perform the following validation procedures:
- Check the configuration with the Perform extended check check box selected (Designer – Configuration – Check configuration).
- Run the configuration in version update mode and in initial population mode (using an empty infobase).
- Use the
SSLImplementationCheck.erfexternal data processor.
These procedures allow you to quickly identify any incompatibility issues related to library objects that were renamed or deleted from the new library version, and to locate human errors that might have occurred during integration or update. The integration wizard also finds inconsistencies between the planned and the actual scope of library integration into the configuration.
Integrating Library Subsystems Into Configuration Objects and Developing Roles
Some subsystems are designed to be integrated directly into consumer configuration objects. See the instructions in the relevant sections of Chapter 3. Setting and Using Subsystems During Configuration Development.
This chapter also provides recommendations for configuring user access rights. Most subsystems include a set of roles for their objects. However, sometimes a configuration developer has to develop a role system and configure roles for built-in library objects.
Developing Master Data for Library Objects
Most library objects do not include master data because its content depends on the consumer configuration specifics. Master data for library objects must be developed directly in the configuration.
Using Subsystems in Configurations
To use most library subsystems, follow the instructions for integration and configuring, display subsystem objects in the command interface, and integrate the subsystem into configuration objects.
Also, the subsystems include an API that you can use in your configuration. For the API description, see the library source code. For the description of additional subsystem features for developers, see How to Use the Subsystem in Development subsections in Chapter 3.
The library source code is distributed under the Attribution 4.0 International (CC BY 4.0) license. The license text is available here. This license allows you to use, distribute, rework, edit, and develop the library for any purposes including commercial ones provided that the authorship of the library is indicated in your software. See also: 1C:Enterprise licensing FAQ (in Russian).
Quick Start of Development "from Scratch"
This section contains a Quick Start Guide for SSL-based configuration development. It only describes the steps required to run an SSL-based configuration for the first time. For the complete list of steps, see Chapter 2.
Preparation
- Select subsystems you want to integrate. In the simplest scenario, all SSL subsystems are integrated. It is recommended that you use the
FirstSSLDeploymentdata processor. It allows you to select subsystems for integration and ensures their reference integrity. - After selecting the subsystems, click Save settings for Designer and specify the settings file name.
- Create an empty infobase.
Comparison and Merging
- Click Configuration – Compare and merge with configuration from file.
- Select the 1Cv8.cf file from the SSL distribution package.
- When prompted to load the full configuration, click No.
- When prompted to enroll for support, click Yes.
- Click Actions – Load settings from file. Select the settings file saved in step 2 of the Preparation stage.
- Then click Execute.
- If a window informing about unsolved references is displayed, skip the messages in this window and click Continue. This window is displayed when you do not integrate all SSL subsystems. See an example in How to Integrate "Data Exchange" Subsystem without "Email Management" Subsystem.
- In the Support rule settings window, click OK.
Actions After Comparison and Merging
-
Type the configuration name in the configuration properties. Example:
MyConfiguration. -
In the configuration properties, set the version number. For example, you can set the version number to 1.0.1.1 when you start developing a configuration.
-
Copy the
InfobaseUpdateSSLcommon module. -
Replace the name of the copied module with the name or abbreviation of the configuration name (for example,
InfobaseUpdateMC). -
Replace the module text with:
 Procedure OnAddSubsystem(LongDesc) Export
     LongDesc.Name = "MyConfiguration";
     LongDesc.Version = "1.0.1.1";

     // Standard Subsystems Library is required.
     LongDesc.RequiredSubsystems1.Add("StandardSubsystems");
 EndProcedure
 Procedure OnAddUpdateHandlers(Handlers) Export

 EndProcedure
 Procedure BeforeUpdateInfobase() Export

 EndProcedure
 Procedure AfterUpdateInfobase(Val PreviousVersion, Val CurrentVersion,
         Val CompletedHandlers, OutputUpdatesDetails, ExclusiveMode) Export

 EndProcedure
 Procedure OnPrepareUpdateDetailsTemplate(Val Template) Export

 EndProcedure
 Procedure OnAddApplicationMigrationHandlers(Handlers) Export

 EndProcedure
 Procedure OnDefineDataUpdateMode(DataUpdateMode, StandardProcessing) Export

 EndProcedure
 Procedure OnCompleteApplicationMigration(Val PreviousConfigurationName, Val PreviousConfigurationVersion, Parameters) Export

 EndProcedure
In the
OnAddSubsystemprocedure, replace the configuration name and version number with the name and number specified in steps 1 and 2. -
Allow editing the
ConfigurationSubsystemsOverridablemodule and add the following line to theOnAddSubsystemsprocedure:SubsystemsModules.Add("InfobaseUpdateMC");In this line, specify the name of the module created in step 4.
-
Run the application for the first time. Ensure there are no errors during the initial population.
Chapter 3. Setting and Using Subsystems During Configuration Development
To ensure backward compatibility in all library subsystems, you can take advantage of API. It includes library metadata objects to be used in the application code:
- Names and parameters of export procedures and functions of common modules, object modules, managers, record sets, and other objects located in the
Publicarea. - Names and parameters of all export procedures and functions of overridable common modules.
- Names of metadata objects (including their attributes, tables, and so on) that can be accessed directly from the application code or from queries.
You can use the library API to minimize costs when migrating to new library versions. There will be no need to revise the application code and adapt metadata objects to new requirements and library features. The application will utilize the previous library features without the need to urgently migrate to the new ones.
In exceptional cases, when backward compatibility is not supported, the UpdateSSL file will contain additional instructions on how to adapt your application to a new library API. Changes in internal library procedures and functions (even if they are export ones) that are not related to the API are not documented. When calling them directly from the application code, note that they can be changed, moved, or deleted in the next library version since they represent its internal implementation.
Event Log Analysis
With the Event log analysis subsystem, you can diagnose the application using the event log data. The subsystem includes the following report options:
- User activity analysis
- Errors and warnings
- Scheduled job runtime
Subsystem Setup
Add the EventLogAnalysis report to the administrator's command interface.
User Access Setup
To manage user access to the subsystem, assign a user the role specified in the table below.
| # | Role Description |
|---|---|
| 1. | FullAccess (the Core subsystem user role)Grants the right to view Event log analysis reports. |
How to Use the Subsystem in Development
Data Exchange Setup
The subsystem does not participate in data exchange.
Surveys
With the Surveys subsystem, you can create questionnaires, conduct surveys, and analyze the results. Use the web client to invite users to take part in online surveys.
To participate in a survey, respondents log in using the authentication mechanism provided by the Users subsystem. An authorized respondent can see the assigned surveys and the archived questionnaires they filled out.
The Surveys subsystem includes reports that collect and analyze the survey data and compare the results across the selected surveys.
Subsystem Setup
If you want to use infobase objects as questionnaire answer options, you need to list their types in the questionnaire properties. For example, you can allow respondents to choose answers from the Products, Partners, and Departments catalogs. Add the required metadata object types to the Type property of the QuestionsForSurvey chart of characteristic types.
Then, select the metadata objects whose instances can be the questionnaire respondents. For example, the Counterparties, Partners, and Individuals catalogs. Add the object types to the Respondent type collection.
Include the respondents to the list of external users. For more information, see Users.
For the Interview mode, select the metadata objects whose instances can be the interviewers. For example, the Users, External users, and Employees catalogs. Add the object types to the Interviewer type collection. To programmatically start a survey in the Interview mode, the code must call the StartInterview export method from the SurveysClient module.
Command Interface Setup
Customize the user interface so that users with different roles could use this subsystem to get their job done.
If the configuration does not contain the Application settings subsystem, add the UseSurvey constant to the Administrator workspace. As an example, see the Organizer form of the SSLAdministrationPanel data processor.
Add the following objects to the command interface of the user who is assigned to create questionnaires:
QuestionsForSurveychart of characteristic typesQuestionnaireTemplatescatalog
Add the following documents to the command interface of the user who is assigned to conduct surveys:
PollPurposeQuestionnaire
Add the following reports to the command interface of the user who is assigned to analyze survey results:
PollStatisticsSurveysAnalyticalReport
Add the default form of the AvailableQuestionnaires data processor to the command interface of the respondent.
User Access Setup
To manage user access to the subsystem, assign a user the roles specified in the table below.
| # | Role Description |
|---|---|
| 1. | ReadQuestionnaireQuestionAnswersGrants the right to read all questionnaires, surveys, and questionnaire responses and analyze answers in reports. |
| 2. | AddEditQuestionnaireQuestionsAnswersGrants the right to participate in surveys as a respondent or interviewer. Users can only access questionnaires where they are an interviewer or respondent. |
| 3. | AddEditQuestionnairesTemplatesGrants the right to create and edit questionnaire templates and questionnaire questions. |
| 4. | AddEditPollsGrants the right to conduct surveys. |
| 5. | FullAccess (the Core subsystem user role)Grants the right to enable and disable the Surveys subsystem, and to permanently delete subsystem objects marked for deletion. |
To grant users access to the data that belongs to other subsystems and might be required to work with the Surveys subsystem, create auxiliary roles or re-use existing suitable roles.
| # | Auxiliary Role Description |
|---|---|
| 1. | <ReadQuestionnaireQuestionAnswersData>Grants the right to read objects whose values can act as responses. |
| 2. | <ReadRespondentsData>Grants the right to read objects whose values can act as respondents. |
The table below illustrates possible user groups and the roles they could be assigned with.
| # | User Group Description | Assigned Roles |
|---|---|---|
| 1. | Administrator |
|
| 2. | Survey result analyst
|
|
| 3. | Questionnaire templates author
|
|
| 4. | Survey manager
|
|
| 5. | Respondent
|
|
How to Use the Subsystem in Development
Data Exchange Setup
For distributed infobases (DIB) and standalone workstations, add to the exchange plans all the subsystem's metadata objects that contain data.
Core
The Core subsystem provides the fundamental mechanics and features essential for other subsystems. Make sure that when you integrate Standard Subsystem Library into an application, you integrate the Core subsystem. The core mechanics and features include application startup and shutdown mechanisms, common procedures and functions, universal data processors, and some standard roles, such as FullAccess and BasicAccessSSL.
Subsystem Setup
Core Data Types
If a configuration has the Companies catalog, do the following:
-
In the
Typeproperty of theOrganizationtype collection, include a reference to the catalog. -
In the
Publicarea of theCompaniescatalog manager module, add the following export functions:// Returns the default company. // If the infobase contains only one company that is not marked for deletion and not predefined, // returns the reference to the company. Otherwise, returns an empty reference. // // Returns: // DefinedType.Organization - a reference to the company. // Function DefaultCompany() Export EndFunction // Returns a number of Companies catalog items. // Does not return items that are predefined and marked for deletion. // // Returns: // Number - a number of companies. // Function NumberOfOrganizations() Export EndFunction
Using Global Variables
Instead of creating global variables in ordinary and managed application modules, use the common ApplicationParameters global variable.
// StandardSubsystems

// Global variable storage.
//
// ApplicationParameters - Map of KeyAndValue:
//   * Key - String - variable name in the format "LibraryName.VariableName".
//   * Value - Arbitrary - variable value.
//
// Initialization example:
//   ParameterName = "StandardSubsystems.MessagesForEventLog";
//   If ApplicationParameters[ParameterName] = Undefined Then
//     ApplicationParameters.Insert(ParameterName, New ValueList);
//   EndIf;
//
// Usage example:
//   ApplicationParameters["StandardSubsystems.MessagesForEventLog"].Add(...);
//   ApplicationParameters["StandardSubsystems.MessagesForEventLog"] = ...;
Var ApplicationParameters Export

// End StandardSubsystems
Implementing Event Handlers of Managed and Ordinary Application Modules
For the BeforeStart, OnStart, CollaborationSystemUsersChoiceFormGetProcessing, and other event handlers, use the respective procedure of the StandardSubsystemsClient common module. In such handlers, the procedure of the StandardSubsystemsClient common module must be called first. Example:
Procedure CollaborationSystemUsersChoiceFormGetProcessing(ChoicePurpose,
            Form, ConversationID, Parameters, SelectedForm, StandardProcessing)

    // StandardSubsystems
    StandardSubsystemsClient.CollaborationSystemUsersChoiceFormGetProcessing(ChoicePurpose,
        Form, ConversationID, Parameters, SelectedForm, StandardProcessing);
    // End StandardSubsystems

EndProcedure
If the CommonClientOverridable common module has an event handler with the same name, insert the code into this event handler instead of the application module event handler.
Procedure OnStart(Parameters) Export

    Parameters.Modules.Add(TMCommonUseClient);
    ...
EndProcedure

// See CommonClientOverridable.OnStart
Procedure BeforeStart(Parameters) Export
    ...
EndProcedure
Insert the code as one string per library in the CommonModuleName.EventProcedureName format with the same parameters as the platform event has. For example:
Procedure ExternEventProcessing(Source, Event, Data)

    EquipmentManagerClient.ExternEventProcessing(Source, Event, Data);

EndProcedure
Session Parameter Initialization
To initialize a session parameter, specify its name and the path to its handler in the OnAddSessionParameterSettingHandlers procedure of the CommonOverridable common module. The initialization hander must take two parameters:
ParameterName- String - The name of the parameter being initialized.SpecifiedParameters- Array - The names of the initialized parameters.
For actions upon the first event call of the SessionParametersSetting (SessionParametersNames = Undefined) session module, use the BeforeStartApplication event handler in the CommonOverridable common module. Write calls to this handler instead of the SessionParametersSetting platform event handler in the session module.
Excluding Object References from Search
When references to objects are not relevant for an operation like object deletion or search for references to an object, you can exclude such objects from the results of a search by reference. To exclude an object, specify it in the OnAddReferenceSearchExceptions function of the CommonOverridable overridable module.
Other subsystems and configuration functions can also access and use the exception list. See also: Marked Object Deletion.
For example, the Common.UsageInstances function ignores objects from the exception list and does not return references to them. We do not recommend that you use the FindByRef method to find references to an object.
Command Interface Setup
On application startup, 1C:Enterprise automatically sets the window title based on the value returned by the Users.AuthorizedUser function and the SystemTitle constant value.
For example:
Acme Corporation / John Doe / Accounting 2.0 / (1C:Enterprise)
If the configuration does not contain the Application settings subsystem, add the SystemTitle constant to the Administrator workspace. To apply the changes, in the CommonClient common module, call the SetArbitraryApplicationTitle procedure. See an example in the CommonSettings form of the SSLAdministrationPanel data processor.
If the configuration does not contain the Application settings subsystem, add the following objects to the Administrator workspace:
Install1CEnterpriseExtensioncommon command- Event log data processor
- Command that calls the
ServerIBAdministrationParametersform
See an example in the SSLAdministrationPanel data processor forms.
In the personal settings form, add a setting to toggle the confirmation before exiting the application, the Install1CEnterpriseExtension common command, and any other settings that may be required. See an example in the _DemoMySettings form of the demo configuration.
If the configuration supports SaaS mode and the visibility of some of its metadata objects depends on the current mode of operation, include those objects in the following functional options:
StandaloneWorkplaceLocalModeSaaSOperations
For more information, see SaaS.
How to Use the Subsystem in Development
See the subsystem API description in the API documentation (in Russian).
Startup Code
Place the code that 1C:Enterprise must execute before the startup, after the startup, and before exiting the application in the following procedures of the CommonClientOverridable common module: BeforeStart, OnStart, and BeforeExit, respectively. Please note that in the SaaS mode, 1C:Enterprise might call these procedures not only when a user authenticates into or exits the application, but also when the infobase administrator interactively signs in to or signs out of a data area.
To reduce server calls upon 1C:Enterprise startup, ensure that the application module and managed application module do not call server procedures and functions directly. To get the parameters the client application requires, call the ClientParametersOnStart function of the StandardSubsystemsClientCached common module. When a configuration calls this function for the first time, it makes a single server call and caches the return value on the client. When the function is called later, it returns the cached value.
If you want to pass a custom parameter on startup, add it to the ClientParametersOnStart function of the CommonOverridable common overridable module. Insert custom parameters after the predefined SSL parameters. For example:
Parameters.Insert("FileInfobase", Common.FileInfobase());We recommend that you use caching of return values whenever possible when developing client/server communication. For more information, see the ClientRunParameters function of the CommonOverridable common overridable module.
Running Server-Side Operations in the Background
To handle user actions that take a long time to process the data (more than 2-3 seconds, such as report generation), follow the Long-running operations on the server standard (in Russian). To tackle this task, use the long-running operations mechanism described in the standard. For the API, refer to the TimeConsumingOperations and TimeConsumingOperationsClient common modules.
Service Data Update
Sometimes, when developing or debugging a configuration, you need to update service data, which affects the application runtime, such as metadata object properties cache and internal information registers.
- To update this data, run the
AuxiliaryDataUpdate.epfexternal data processor. This data processor is bundled with the SSL distribution package. - For the standard update, which covers the modified objects, run the application with the
StartInfobaseUpdatestartup parameter. You can add the parameter in Designer or with the /C command-line option. - When you commit changes, which require a service data update, to a shared repository, increment the configuration version number. By that, the update handlers will run automatically for all your peer developers.
Mention such changes in the subsystem documentation, and prefix the text with Notice.
In other cases, service data is updated automatically during the update or initial data population when the configuration version changes.
Storing References to Metadata Objects
When you need to store the reference to a metadata object, we recommend that you use the Flexible data type and refer to the object by the ID instead of using the String data type and refer by the full metadata object name. For example, a reference to Catalog.Companies should be a Flexible data type value that refers to MetadataObjectIDs and ExtensionObjectIDs catalogs. The use cases include storing catalog and document change history settings and the list of roles in access group profiles, adding reports to command interface sections, and so on.
Referring to metadata objects by their IDs brings the following benefits:
- Faster query processing.
- Reduced database table size.
- Output to user interfaces the reference presentation instead of the metadata object string presentation.
- When metadata objects are modified, there is no necessity to develop update handlers to update the metadata object name presentations.
Notice.
The MetadataObjectIDs and ExtensionObjectIDs catalogs do not support references to metadata objects inside other configurations (for example, when you integrate configurations). To refer to metadata objects inside other configurations, use String attributes and the features that keep their values current.
To get the reference to a metadata object programmatically, use the MetadataObjectID and MetadataObjectIDs functions of the Common common module.
1C:Enterprise populates the MetadataObjectIDs catalog during the initial startup, and updates its values during the configuration version update if the new version has some metadata objects added, removed, or modified. For example, in the new version, the Goods catalog was renamed to Products. During the update, 1C:Enterprise will rename the corresponding item (which keeps the same reference) in the MetadataObjectIDs catalog. The ExtensionObjectIDs catalog is updated automatically when extensions are attached to or detached from the configuration.
Another use case is creating a metadata object copy and renaming the old object version. This is a workaround when you need to restructure data but cannot manipulate the existing metadata object. For example, the Departments catalog's code length must be reduced from 50 symbols to 11 symbols. To do so, you have to rename the existing catalog into ObsoleteDepartments, and create a new 'Departments' catalog with the required code length. The old catalog's ID will be reassigned to the new catalog.
However, this will work only if the new catalog has the old catalog's name. Otherwise, you need to specify that the Departments is renamed, for example, to BusinessUnits. This case is described below.
Renaming Subsystems and Creating Replacements for Metadata Objects
1C:Enterprise does not track the following cases of renaming metadata objects:
- Subsystem renaming [1];
- Subsystem transfer from one parent subsystem to another
- Renaming an existing object and creating a replacement (
Departments→ObsoleteDepartments+ newBusinessUnits)
If a renaming falls within one of the mentioned cases, you must state the renaming in the OnAddMetadataObjectsRenaming procedure of the CommonOverridable common module and increment the configuration version. The below code block illustrates that in version 2.0.1.2 the _DemoSuppliedData subsystem was transferred from _DemoSaaS to _DemoAdministration:
Procedure OnAddMetadataObjectsRenaming(Renaming) Export Common.AddRenaming(Renaming, "2.0.1.2", "Subsystem._DemoSaaS.Subsystem._DemoSuppliedData", "Subsystem._DemoAdministration.Subsystem._DemoSuppliedData"); EndProcedure
[1] For the roles, state the renaming when you need to run an update from the previous configuration versions that include SSL version 3.1.5 or earlier.
1C:Enterprise updates object IDs incrementally on every version. Within one version, it updates the IDs sequentially by rows that contain renaming information records. If you renamed a subsystem, 1C:Enterprise update IDs for all its child subsystems.
If a configuration repository contains two or more master branches with different major versions (for example, when you support configuration version 2.0 and 3.0), renaming roles and subsystems in the previous versions might corrupt the reference integrity. Rename objects only in the latest version being developed.
Incorrect: Rename the StartPage subsystem into HomePage in patch releases for versions 2.4.5 and 3.0.1.
Correct: Rename the StartPage subsystem into HomePage only in patch release for version 3.0.1.
If you have renamed an object in an earlier version, when migrating to the later major version, 1C:Enterprise might introduce both renamings that will corrupt the object reference integrity. This might result in the following:
- Report options that belong to the renamed subsystem will disappear from the report panel.
- Additional reports and data processors that users added to the subsystem section will disappear from the list.
- Users assigned with access group profiles will not be assigned with the renamed roles.
Deleting Metadata Object IDs and Hiding Them in User Interface
When you delete metadata objects from the configuration and delete configuration extensions from the infobase, you no longer need to store the related data. To delete the infobase data related to deleted configuration and extension metadata objects, delete marked objects centrally (see the relevant chapter). We recommend that you separate the deletion of marked objects in time from other data operations, such as writing objects. Otherwise, this might impact the application's performance.
For example, the DataSyncSettings register stores some settings broken down by metadata objects. For this purpose, the register's master dimension has a Flexible data type and contains references to the MetadataObjectIDs and ExtensionObjectIDs catalogs. When you delete a metadata object, 1C:Enterprise marks the MetadataObjectIDs catalog's item that stored the object's ID for deletion. When you run purging objects that are marked for deletion, 1C:Enterprise permanently deletes the records that are associated with the item from the DataSyncSettings register (since the dimension has the Master flag).
In case the references are stored in an object's table or in a non-master register dimension, implement the BeforeDelete event subscription for the MetadataObjectIDs and ExtensionObjectIDs catalogs. Also, add the attributes that store the references to the reference search exception list. Otherwise, they might interrupt the deletion process. As an example, see the event subscription ReportsOptionsBeforeDeleteMetadataObjectID and the procedure ReportsOptions.OnAddReferenceSearchExceptions in the Report options subsystem.
We recommend that you hide interface elements associated with inaccessible metadata objects. An object is considered inaccessible if it was deleted or the extension it belongs to was disabled. Also, we recommend that you adjust data processing algorithms so that they skip such objects. To make 1C:Enterprise skip inaccessible metadata objects without throwing exceptions, set the RaiseException1 parameter to False in the MetadataObjectByID and MetadataObjectsByIDs functions of the Common common module. By this, in the calling code, you will be able to distinguish:
- References to deleted metadata objects
- And references to metadata objects of disabled extensions
- From the references to the existing metadata objects
Forced Update of Metadata Object IDs
Sometimes, you have to modify metadata objects between the releases. In this case, it is acceptable to update the MetadataObjectIDs catalog without incrementing the configuration version number. To force-update the catalog, run the AuxiliaryDataUpdate.epf data processor bundled with the SSL distribution package. For more information, see Service Data Update. This approach is applicable only when 1C:Enterprise can track the metadata object modifications. Do not force-update the catalog if you renamed a role or a subsystem. If you renamed a role or a subsystem, you must increment the version and state the renaming in the CommonOverridable.OnAddMetadataObjectsRenaming procedure.
You may also use the following workaround to resolve metadata object ID conflicts: in the MetadataObjectIDs catalog, open the catalog item, click More actions > Allow editing, and enter the correct full name.
Catalog Items Required for Rls
If a configuration contains the Access management subsystem, you need to create service items in the MetadataObjectIDs and ExtensionObjectIDs catalogs. These items are used in RLS access restriction templates. For item maintenance, schedule to run the SSLImplementationCheck.erf report. For more information, see Scheduling Sslimplementationcheck Report.
API Versioning
If you develop an environment where a number of interactive configurations use web services or messages to exchange data, usually, you should implement an API. As the configurations keep evolving, the APIs require further modifications.
Sometimes, when you modify your API's methods and parameters, the peer configuration's code might fail since its design expects a certain API version.
To avoid API version conflicts, we recommend that you use API versioning.
Terms and definitions:
- API family is a group of interfaces that are designed to aim for the same goal. They are represented by metadata object names postfixed with the version number.
- API family basename is the part of the name all members of an API family have before the postfix.
- A version number consists of four dot-separated digit groups. No other symbols within the groups are allowed. Example: 2.0.1.6.
Incrementation of the version number is conventional. For example, 1.0.2.1, 1.0.2.2 ... 1.0.3.1.
- The interface with the basename has version 1.0.1.1.
Examples of activities on the API provider's (for example, a web service named MessageExchange) side:
- Add a new API with the following naming mask: <Family basename> + "_" + <Underline-separated version number>. Example:
MessageExchange_2_0_1_6. - Assign a name to an API family. Example:
MessageExchange. We recommend that you assign descriptive basenames that would convey the idea of what the API will be used for. - In the
CommonOverridablecommon module, insert the new version number into the body of theOnDefineSupportedInterfaceVersionsprocedure. If the section does not exist, create it.
Examples of activities on the API consumer's side:
- The web service
InterfaceVersion, which is available to users assigned with theRemoteAccessCorerole, maintains the versioning mechanism. By that, only the user assigned with this role can manage versioning. - Before calling an API method, retrieve a list of supported versions by calling the
GetInterfaceVersionsfunction of theCommonmodule. As an example, see the function description. The API family basename is passed to theInterfaceNameparameter. - Based on the retrieved list of supported version numbers, the API consumer calls methods that have the valid parameter structure by addressing the supported APIs of the family.
For use cases, see the code that calls the GetInterfaceVersions function in the demo configuration.
Secure Password Vault
We recommend that you store passwords and other confidential information in the secure vault. To manage the vault, in the Common common module, use:
WriteDataToSecureStorageprocedure to save data to the vault.ReadDataFromSecureStoragefunction to retrieve data from the vault.DeleteDataFromSecureStoragefunction to delete data in the vault.
To add a password entry field to a form:
-
Create a
Stringattribute, and add the Saved data property and a serviceBooleanattribute, which is triggered when the password is changed. For example,PasswordandPasswordChanged. -
On the form, create a field with the property
PasswordMode = Yes, and assign it to the attribute you have created. -
To reduce the risk of the password being compromised, ensure that when the form opens, the password value is not passed to the password attribute or from the server to the client. Instead, add the following code block into the form's event
OnCreateAtServeron the server:SetPrivilegedMode(True); Passwords = Common.ReadDataFromSecureStorage(Object.Ref, "Password, SMTPPassword"); SetPrivilegedMode(False); Password = ?(ValueIsFilled(Passwords.Password), UUID, ""); SMTPPassword = ?(ValueIsFilled(Passwords.SMTPPassword), UUID, ""); -
Add the following code block into the event
OnWriteAtServer:If PasswordChanged Then SetPrivilegedMode(True); Common.WriteDataToSecureStorage(CurrentObject.Ref, Password); SetPrivilegedMode(False); EndIf; If SMTPPasswordChanged Then SetPrivilegedMode(True); Common.WriteDataToSecureStorage(CurrentObject.Ref, SMTPPassword, "SMTPPassword"); SetPrivilegedMode(False); EndIf; -
Add the following code block into the event
BeforeDeletein the object module:SetPrivilegedMode(True); Common.DeleteDataFromSecureStorage(Ref); SetPrivilegedMode(False);
As an example, see the ItemForm form of the EmailAccounts catalog.
Displaying Exceptions to Users
Sometimes, errors may occur in the application due to 1C:Enterprise or the application code using the Raise method. Unhandled errors are logged and displayed in a standard window with tips for the user, including a link to send an error report to the developer, depending on the type of error. To follow this process effectively, consider these recommendations:
-
Return and display errors from long-running operations that are triggered by the functions
ExecuteFunction,ExecuteProcedure,ExecuteFunctionInMultipleThreads,ExecuteProcedureinMultipleThreadsandExecuteInBackgroundof theTimeConsumingOperationscommon module:- If an exception occurs during a long-running operation, the result handler takes the
TimeConsumingOperationsClient.NewResultLongOperationstructure with the specifiedErrorInfoproperty (of theErrorInfotype). To display the error to the user, we recommend calling theStandardSubsystemsClient.OutputErrorInfoprocedure instead of showing warnings or calling the 1C:Enterprise methodShowErrorInfo. This procedure is intended for intercepting exceptions by automated testing software (given that theShowErrorInfomethod does not trigger theErrorDisplayProcessingevent handler in the application module). - Sometimes, users expect some additional details in the long-running operation error messages. For example, "The action failed due to: …". To provide users with the error context, we recommend passing it in the
RefinementErrorsproperty (instead of adding it to the client code) in the parameters of the followingTimeConsumingOperationscommon module functions:FunctionExecutionParameters,ProcedureExecutionParameters, andBackgroundExecutionParameters. Example:ExecutionParameters.RefinementErrors = NStr("en = 'The action failed due to:'");This approach ensures that the error message the user sees repeats the same information that is logged during the exception handling.
- Even if exceptions that occur in a long-running operation procedure are caught and detailed in the event log, we recommend that the exceptions be thrown and displayed using the
ErrorInfoobject as described above.
- If an exception occurs during a long-running operation, the result handler takes the
-
If your application has a custom error UI, we recommend updating it with accordance to the 1C:Enterprise standards:
- Output to the UI the result of the method
ErrorProcessing.ErrorMessageForUser(ErrorInfo)as a formatted string and provide the users with the ability to preview and send the error report by clicking the Generate error report link:ReportToSend = New ErrorReport(ErrorInfo);<p>StandardSubsystemsClient.ShowErrorReport(ReportToSend);</code></pre><p> - To be able to manage the link visibility depending on the error category and application settings, call the procedure
StandardSubsystemsClient.ConfigureVisibilityAndTitleForURLSendErrorReportfrom theOnOpenform module handler. - In the
OnCloseform module handler, call the procedureStandardSubsystemsClient.SendErrorReport(ReportToSend, ErrorInfo), which sends the report if the application settings imply that sending reports is mandatory for this error category. - See the implementation examples in the forms
DataProcessor.ApplicationUpdateResult.Form.FailedUpdateMessage,DataProcessor.ReplaceAndMergeItems.Form.ItemsReplacement, andDataProcessor.ToDoList.Form.Form.
- Output to the UI the result of the method
Disabling Internet Access
Administrators can now disable internet services for the entire application (Administration > Online support and services > Access to web services). This can help improve the application's performance when internet access is blocked by the administrator on the server (or-for file infobases-on the user's computer). The application will not lag when waiting for internet requests and running diagnostics.
- In sections of the code where the common module interface
GetFilesFromInternetand the functionCommon.CreateWSProxyare used to access internet services, no actions are required: if the functional optionAccessToWebServicesAllowedis disabled, they will return an internet access error. In other cases, before connecting to a web service, call theCommon.AccessToWebServicesAllowedprocedure. - It is recommended that you hide unavailable functions and controls from the UI using the
AccessToWebServicesAllowedfunctional option (the constant of the same name). Using the functionCommon.AccessToWebServicesForbiddenMessageText, you can also display a hint explaining why a specific function is unavailable: "Access to web services is forbidden by the administrator (Online support and services > Allow access to web services). - To get and set the setting value, use the function
AccessToWebServicesAllowedand procedureConfigureWorkWithWebServiceof theCommoncommon module.
Standard Roles and Additional Rights
Standard Subsystem Library does not imply any particular approach to role development. Below, you can find two role development approaches with the different levels of atomicity.
- One way is to create duty-driven roles. Each of them grants access to a metadata object set a user requires to perform one's duty. A duty-driven role can be, for example, Accountant or Stockkeeper. A developer or administrator assigns a duty-driven role to a user or a user group and can expand its functionality with additional rights such as Chief accountant operations, Print unposted documents, and Start thin client.
- Another way is to create atomic roles. An atomic role grants access to a metadata object subset that provides the user with a single feature or mechanism. Atomic roles are not supposed to be assigned separately. Instead, we recommend that you group a number of atomic roles into an access group profile, and then assign the profile to a user or a user group. Functionally, access group profiles are similar to duty-driven roles, such as Accountant and Stockkeeper.
The library includes roles that can be used to set up user access to infobase objects in both cases.
Basic Roles
| # | Role Description |
|---|---|
| 1. | FullAccessGrants full access to all application data. However, it does not grant administration rights, which are required for configuration update, running configuration in Designer mode, and other administrator activities. FullAccess grants all access rights except for interactive object deletion.In SaaS mode, it should be assigned to data area administrators and grants full access to all data of the current area. A user assigned with this role can manage users and application settings, delete objects marked for deletion, and perform other administrative activities on the data area. In hosted mode, the role should be assigned to administrators along with the SystemAdministrator role.In basic configuration versions, the FullAccess role grants full access to all data and infobase configuration. |
| 2. | SystemAdministratorGrants administration rights, which are required for configuration update, running configuration in the Designer mode, and other administrator activities. It is assigned along with the FullAccess role.In the SaaS mode, it is assigned to service administrators. The role grants full access to all shared data except for interactive object deletion. SystemAdministrator is not included in basic configuration versions. |
| 3. | AdministrationGrants access rights: Administration, Data administration, and Active users. For more information, see 1C:Enterprise documentation. |
| 4. | BasicAccessSSLGrants minimum rights to the application features that must be accessible to all users. It is assigned to all users. |
| 5. |
Grants minimum rights to the application features that must always be accessible to all external users. |
| 6. | OutputToPrinterFileClipboardGrants the right to print out any data, save it to a computer file, or copy it to the clipboard (the Output right). |
| 7. | StartAutomationGrants the right to connect to the application from other 1C:Enterprise applications or third-party applications using Windows Automation Server technology (the Automation right). |
| 8. | StartWebClientGrants the right to log in to the application using the web client (the Web client right). |
| 9. | StartExternalConnectionGrants the right to connect to the application from other 1C:Enterprise applications or third-party applications using Windows COM technology (the External connection right). |
| 10. | StartMobileClientGrants the right to log in to the application from smartphones, tablets, and other mobile devices using the mobile client (the Mobile client right). This is an obsolete client application type. Therefore, we recommend that you assign the StartThinClient or StartWebClient role instead. |
| 11. | StartThickClientGrants the right to log in to the application using the thick client (the Thick client right). This is an obsolete client application type. Therefore, we recommend that you assign the StartThinClient or StartWebClient role instead. |
| 12. | StartThinClientGrants the right to log in to the application using the thin client (the Thin client right). |
| 13. |
Grants the right to open external reports and data processors (the Open external reports interactively and Open external data processors interactively rights). |
| 14. | UpdateDatabaseConfigurationGrants the right to update the infobase configuration (the Update database configuration right). |
| 15. | ViewEventLogGrants the right to view the Event Log (the Event Log right). |
| 16. | TechnicianModeEnables the "Functions for technician" command and the corresponding settings item of the client application in the "Service and settings" main menu (the Technician mode right). |
| 17. | SaveUserData
|
| 18. |
|
For more information about standard access rights, see 1C:Enterprise documentation.
Approach 1. Duty-Driven Roles and Additional Rights
As it is clear from its name, a duty-driven role grants a user a set of rights that help the user to perform a certain duty in the company, such as Accountant or Stockkeeper. These roles are applicable for configurations where user roles are known in advance and are hardly to be changed over time.
To extend user's capabilities, along with a duty-driven role, you can assign a user additional roles that grant additional rights. Name an additional role so it would describe the activities it provides. For example: Chief accountant activity, Print unposted documents, Start thin client, and Delete objects marked for deletion. When you name an additional access right, omit the word "right" in the name.
Users are not supposed to be assigned only with additional roles. Assign them only to complement a duty-driven role. Example:
- An additional role named CEO activity should be assigned to a user only alone with a duty-driven role CEO.
- An additional role named Chief accountant activity should be assigned to a user only along with a duty-driven role Accountant.
- An additional role named Print unposted documents role can be used together with a custom duty-driven role.
Before introducing a configuration into production, ensure that each user is assigned with at least one duty-driven role. Otherwise, the user will not be able to operate the configuration.
If a configuration does not include the Access management subsystem, we recommend that you keep only essential roles, and delete all other SSL roles to simplify user right management.
If a configuration includes the Access management subsystem, it is acceptable to keep all SSL roles as-is, and add the required standard access group profiles. For more information about access group profile setup, see Access Management.
Approach 2. Atomic Roles
If user responsibilities and duties are out of scope, and are supposed to be defied during the software implementation, you can break possible duty-driven roles into atomic roles. An atomic role allows users only very restricted access to infobase data.
An atomic role is not supposed to be assigned solely. For a user to be able to do one's job in a configuration, you should assign them a set of atomic roles that covers the required business scenarios. A set of atomic roles that gives a user the rights that are enough to do one's job makes an access group profile. For example, the Sales person profile may consist of the atomic roles Add and edit sales orders and Read master data. The Sales manager profile may consist of the atomic roles Add and edit sales orders, Add and edit master data, and Print unposted documents.
When you take the atomic roles approach, neither the software implementation engineer nor the 1C:Enterprise administrator would need to modify the configuration. All necessary roles are already in there, all they need to do is to group them into profiles.
When you create atomic roles, keep in mind that they shape out the user interface. To ensure user interface management flexibility, create atomic roles that grant access to one metadata object.
For metadata objects that act as access restriction criteria-for example, to restrict access to certain companies, warehouses, or counterparties-create atomic roles that give the read right to the objects and that are supposed to complement other roles. By that, you can set up a user profile so the users will not have access to the documents they do not need. For example, a stockkeeper is not supposed to have access to a list of cash accounts. This complies with the principles of interface management.
If you take the atomic roles approach, we recommend that you integrate the Access management subsystem into the configuration. For more information about access group profile setup, see Access Management.
Atomic Role Naming Convention
Start an atomic role name with the action the role provides users with. For example:
- If a role grants the right to read an object, start its name with
Read:ReadSalesOrdersorReadMasterData. - If a role grants the right to add an object, which means that it also grants the right to modify, read, and view the object, start its name with
AddModify:AddModifySalesOrders. - If a role grants the right to programmatically modify an object, start its name with
Modify:ModifyTasks. - If a role grants the right to interactively edit an object, start its name with
Edit:EditTasks. - If a role grants the right to interactively view an object, start its name with
View:ViewPartners. - If a role grants the right to interactively mark an object for deletion, which means that it also grants the right to modify the object, start its name with
Mark, then the object name, and thenForDeletion:MarkBusinessProcessesForDeletion.
If a role grants more than one right, in the synonym, use commas and "and" to list them. For example: Read sales orders, Add and edit master data or Add, edit, and mark sales orders for deletion.
Atomic Roles and User Interface Management
If you need to toggle the visibility of an interface element depending on whether a user has a right, we recommend that you specify visibility in the corresponding atomic role that grants this right. For example, the role Read sales orders should include common commands that open Sales order forms.
However, sometimes you need to create roles specifically to manage the command interface. Usually, such interface roles have unrestricted access to data, and are associated with object attributes, form items, and commands. 1C:Enterprise can programmatically check whether the active user is assigned interface roles.
An interface role name should describe the granted right. For example, View contact information. The roles that grant access to command interface sections are exceptions to this rule. Such roles should start with the word Section. For example: SectionStockAndPurchases, SectionSales, SectionSalesAndTransactions, SectionSalesAndReturns, or SectionSalesRetailSales.
Below you can find examples of interface roles.
| # | Role Description |
|---|---|
| 1. | Section master data The role controls the visibility of the command interface section that contains commands that open master data forms. For example: the Currencies catalog list form or the address classifier. |
| 2. | Section collaboration The role controls the visibility of the command interface section that provides tools for managing tasks and business processes. |
The table below illustrates possible user groups and the roles they could be assigned with.
| # | User Group Description | Assigned Roles |
|---|---|---|
| 1. | Administrator
|
|
| 2. | Master data owner |
|
Extension Roles
To develop extension roles, use the same approach as for configuration roles. To simplify user right management, follow the guidelines in the Extension standard roles section of the Standard roles standard (in Russian).
Reference Update Management
When Duplicate Cleaner, calling the ReplaceReferences procedure of the Common common module, and in other cases when references in documents are updated, 1C:Enterprise does not repost the modified documents to keep the original document sequence. Therefore, the Posting event is not triggered, and the workflow of posting documents into record registers does not start. However, after a reference is updated, there might be cases when you need to start a part of that workflow. To start the workflow, to AdditionalProperties of the events BeforeWrite and OnWrite, pass the following parameters:
ReferenceReplacement–Boolean–True. A flag that shows whether the references have been updated.CompletedReplacements–Array. An array that shows which old references were replaced with new references.Structurethat contains the following fields:DuplicateRef–Arbitrary. The replaced item.OriginalRef–Arbitrary. The replacing item.AttributeKind–String. The kind of the attribute where the replacement was made. Valid values:Attributes,StandardAttributes,TabularSections,StandardTabularSections,RegisterRecords,Sequences,RecordSet.AttributeName–String. The name of the attribute or table.IndexOf–Number,Undefined. The number of the row where the duplicate was replaced. Required if the replaced item belongs to a table.ColumnName–String,Undefined. The name of the column where the duplicate was replaced. Required if the replaced item belongs to a table.
With these parameters, you can find what has been changed and act accordingly. For example, you might create new dimension keys and update keys in the registers.
Actual Date and Accounting Date
In account, it is a common practice to make accounting entries retrospectively, after the business transaction had actually taken place. For example, a supplier might ship you goods prior to sending you the accompanying documents. Usually, it applies to accountants, who enter business transactions that took place in the previous periods.
To make a configuration more flexible in terms of date, you can design documents so that, instead of assigning the current data and time automatically, users could enter the document date manually.
To manage the accounting date and time, the Common common module provides the following code block:
- Procedure
SetUserWorkingDate - Function
UserWorkingDate - Function
CurrentUserDate
As an example, see the _DemoMySettings common form module. Using the control on the form, a user can switch between the actual date and time and any custom date and time. 1C:Enterprise saves the accounting date details to the common infobase settings storage. To have access to the storage, a user must be assigned the SaveUserData role.
To populate the accounting date for new documents, add subscriptions to the Filling and OnCopy events. As a example, see event subscriptions _DemoFillDocumentDateByWorkingDate and _DemoFillDocumentDateByWorkingDateOnCopy.
Please keep in mind that 1C:Enterprise runs the object module's event handlers first, and only then it runs the event subscription handlers. In case the data population mechanism takes the document's date as an input parameter, ensure that the event handler populates the document's date with the accounting date in the beginning of the procedure.
Data Exchange Setup
For distributed infobases (DIB) and standalone workstations, add to the exchange plans all the subsystem's metadata objects except for the following:
- Constant
InfobasePublicationURL - Constant
LocalInfobasePublishingURL - Constant
DeliverServerNotificationsWithoutCollaborationSystem - Constant
MasterNode - Constant
SystemTitle - Constant
InfoBaseID - Constant
UseSeparationByDataAreas - Constant
DoNotUseSeparationByDataAreas - Constant
RegisterServerNotificationsIndicators - Constant
ServerNotificationsSendStatus - Constant
IsStandaloneWorkplace - Catalog
ExtensionsVersions - Catalog
ExtensionObjectIDs - Information register
SafeDataStorage - Information register
SafeDataAreaDataStorage - Information register
RequestsForPermissionsToUseExternalResources - Information register
ExtensionVersionObjectIDs - Information register
ProgramInterfaceCache - Information register
SentServerNotifications - Information register
ExtensionVersionParameters - Information register
PeriodicServerNotifications - Information register
ExtensionProperties
For DIBs and standalone workstations, disable in the exchange plans change registration for the following subsystem's metadata objects (see Creation of Subordinate Node Initial Image):
- Information register
ApplicationRuntimeParameters
Exclude the following metadata objects from the exchange plans used for data synchronization between different applications:
- Constant
DeliverServerNotificationsWithoutCollaborationSystem - Constant
RegisterServerNotificationsIndicators - Constant
ServerNotificationsSendStatus - Catalog
ExtensionsVersions - Catalog
MetadataObjectIDs - Catalog
ExtensionObjectIDs - Information register
ApplicationRuntimeParameters - Information register
ExtensionVersionObjectIDs - Information register
SentServerNotifications - Information register
ExtensionVersionParameters - Information register
PeriodicServerNotifications - Information register
ExtensionProperties
Banks
With the Banks subsystem, you can import, store, and export the bank classifier.
Subsystem Setup
To use the subsystem, add the BankClassifier catalog to the master data owner's interface.
User Access Setup
To manage user access to the subsystem, assign a user the roles specified in the table below.
| # | Role Description |
|---|---|
| 1. | BasicAccessSSL (the Core subsystem user role)Grants the right to read the bank classifier data. |
| 2. | AddEditBanksGrants the right to manage the bank classifier data. Generally, it is assigned along with the role for automatic bank classifier update. |
| 3. | FullAccess, SystemAdministration (the Core subsystem user role)Grants the right to edit bank classifiers and delete bank classifiers marked for deletion. |
Special Cases of Integration
How to Integrate "Banks" Subsystem without "Contact Information" Subsystem
How to Use the Subsystem in Development
Bank classifier data is stored in the BankClassifier catalog. If a user edits bank data manually, its data is stored in the Bank accounts catalog. As an example, see the _DemoBankAccounts catalog in the demo configuration.
To access bank account data when generating a print form, use the approach exemplified in the _DemoCustomerProformaInvoice document. An example of a query to select bank details:
    CASE
            WHEN CounterpartyBankAccount.ManualBankDetailsChange
                THEN CounterpartyBankAccount.BankBIC
            ELSE BankClassifier.Code
        END AS BICBank,
        CASE
            WHEN CounterpartyBankAccount.ManualBankDetailsChange
                THEN CounterpartyBankAccount.BankDescription
            ELSE BankClassifier.Description
        END AS BankDescription,
        CASE
            WHEN CounterpartyBankAccount.ManualBankDetailsChange
                THEN CounterpartyBankAccount.BankCorrAccount
            ELSE BankClassifier.CorrAccount
        END AS BankCorrAccount,
        CASE
            WHEN CounterpartyBankAccount.ManualBankDetailsChange
                THEN CounterpartyBankAccount.BankCity
            ELSE BankClassifier.City
        END AS BankCity,
        CASE
            WHEN CounterpartyBankAccount.TransferBankDetailsManualEdit
                THEN CounterpartyBankAccount.TransferBankBIC
            ELSE ClassifierOfCorrespondentBanks.Code
        END AS TransferBankBIC,
        CASE
            WHEN CounterpartyBankAccount.TransferBankDetailsManualEdit
                THEN CounterpartyBankAccount.TransferBankDescription
            ELSE ClassifierOfCorrespondentBanks.Description
        END AS TransferBankDescription,
        CASE
            WHEN CounterpartyBankAccount.TransferBankDetailsManualEdit
                THEN CounterpartyBankAccount.TransferBankCorrAccount
            ELSE ClassifierOfCorrespondentBanks.CorrAccount
        END AS TransferBankCorrAccount,
        CASE
            WHEN CounterpartyBankAccount.TransferBankDetailsManualEdit
                THEN CounterpartyBankAccount.TransferBankCity
            ELSE ClassifierOfCorrespondentBanks.City
        END AS TransferBankCity,
        CustomerProformaInvoice.Counterparty.DescriptionFull AS RecipientFullName,
        CounterpartyBankAccount.AccountNumber AS RecipientAccountNumber
    FROM
        Document._DemoCustomerProformaInvoice AS CustomerProformaInvoice
            LEFT JOIN Catalog.BankClassifier AS BankClassifier
            ON CustomerProformaInvoice.BankAccount.Bank = BankClassifier.Ref
            LEFT JOIN Catalog.BankClassifier AS ClassifierOfCorrespondentBanks
            ON CustomerProformaInvoice.BankAccount.TransferBank = ClassifierOfCorrespondentBanks.Ref
            LEFT JOIN Catalog._DemoBankAccounts AS CounterpartyBankAccount
            ON CustomerProformaInvoice.BankAccount = CounterpartyBankAccount
An example of code that exports bank details to a spreadsheet document:
    PrintData = New Structure;
    //...
    If IsBlankString(Header.TransferBankBIC) Then
        PrintData.Insert("PayeeBankPresentation", TrimAll(Header.BankDescription) + " " + TrimAll(Header.BankCity));
        PrintData.Insert("SupplierPresentation", TrimAll(Header.RecipientFullName));
        PrintData.Insert("RecipientBankBIC", TrimAll(Header.BICBank));
        PrintData.Insert("RecipientBankAccountPresentation", TrimAll(Header.BankCorrAccount));
        PrintData.Insert("RecipientAccountPresentation", TrimAll(Header.RecipientAccountNumber));
    Else
        PrintData.Insert("PayeeBankPresentation", TrimAll(Header.TransferBankDescription) + " " + TrimAll(Header.TransferBankCity));
        PrintData.Insert("SupplierPresentation", TrimAll(Header.RecipientFullName) + " acc. " + TrimAll(Header.RecipientAccountNumber) + " at " + TrimAll(Header.BankDescription)+ " " + TrimAll(Header.BankCity));
        PrintData.Insert("RecipientBankBIC", TrimAll(Header.TransferBankBIC));
        PrintData.Insert("RecipientBankAccountPresentation", TrimAll(Header.TransferBankCorrAccount));
        PrintData.Insert("RecipientAccountPresentation", TrimAll(Header.BankCorrAccount));
    EndIf;
    //...
    For Each AreaName In ArrayOfLayoutAreas Do
        TemplateArea = Template.GetArea(AreaName);
        //...
            FillPropertyValues(TemplateArea.Parameters, PrintData);
            SpreadsheetDocument.Put(TemplateArea);
        //...
    EndDo;
As an example of using the code, see the _DemoCustomerProformaInvoice document.
Data Exchange Setup
For distributed infobases (DIB) and standalone workstations, add to the exchange plans all the subsystem's metadata objects that contain data.
Business Processes and Tasks
With the Business processes and tasks subsystem, you can manage the task life cycle. In 1C:Enterprise, tasks can be generated as part of a business process flow, or users can create custom tasks interactively. 1C:Enterprise can assign tasks to a certain user or user group (user-based assignment), or to a user role (role-based assignment). The Business processes and tasks subsystem consists of five blocks: Role-based assignment, Task creation, Task execution, Task tracking, and Automated task monitoring.
The subsystem provides you with tools that allow developing custom business processes.
Subsystem Setup
Define Business Roles and Business Objects
The role-based assignment is applicable for configurations that use business processes. The Business processes and tasks subsystem provides business process developers with the tools that allow developing business roles (user roles that can be assigned to business processes). The subsystem also poses some requirements for the business process development.
The PerformerRoles catalog contains the flat list of business roles. For example, CEO, Sales manager, Developer. Each role requires a predefined item with the attributes Name and Description. To set values of other attributes of catalog items, use the infobase update procedure.
By default, the subsystem contains one predefined business role: Task control manager. Automated task monitoring uses this role to get notification recipients. An example of a procedure that updates attributes of the Task control manager:
    AllAddressingObjects = ChartsOfCharacteristicTypes.TaskAddressingObjects.AllAddressingObjects;
    RoleObject1 = Catalogs.PerformerRoles.EmployeeResponsibleForTasksManagement.GetObject();
    RoleObject1.UsedWithoutAddressingObjects = True;
    RoleObject1.UsedByAddressingObjects = True;
    RoleObject1.MainAddressingObjectTypes = AllAddressingObjects;
    RoleObject1.Write();
Sometimes, a business role is not enough to define the list of assignees. To rectify the assignee list, specify the main or additional business objects. Any catalog can act as a business object. For example, Projects or Departments. The TaskAddressingObjects chart of characteristic types contains the list of the valid types of business objects for the roles that are defined in the PerformerRoles catalog. For each business object type in this chart, create a predefined item, and set values for the attributes Name, Description, and Type. For example, if you want that a user who has the role Project manager will have to specify the project from the Projects catalog, do the following:
- Create a predefined item in the
TaskAddressingObjectschart of characteristic types, and add to its types the reference to the Projects catalog. - In the
Project managerrole, set the MainAddressingObjectTypes value to the reference to this predefined item. - In the
Project managerrole, set the UsedWithoutAddressingObjects value toFalseandUsedByAddressingObjectsvalue toTrue.
We do not recommend that you create an item of the TaskAddressingObjects chart of characteristic types that has the flexible data type. Instead, create several individual roles, each of which corresponds to a business object of a certain type. The only exception is the AllAddressingObjects item included in the subsystem. The list of types of the AllAddressingObjects predefined item must match the list of types of the TaskAddressingObjects chart of characteristic types.
Do not create the TaskAddressingObjects predefined item if the configuration contains one business object. Instead, set the description of the AllAddressingObjects item to the presentation of this business object and specify its type.
1C:Enterprise does not support adding new items to and editing the existing items in the TaskAddressingObjects chart of characteristic types in 1C:Enterprise mode.
When you develop business processes that involve external users (for more information, see Users), you need to define the scope of roles which external users are able to choose from. For example, Customer support, Sales manager, and Delivery service. Usually, external users are not supposed to see the employee list. Instead, they choose a business role. The code block below illustrates an update procedure that restricts the assignment of the SalesManager role:
    RoleObject1 = Catalogs.PerformerRoles.SalesManager.GetObject();
    RoleObject1.UsedWithoutAddressingObjects = True;
      RoleAssignment = RoleObject1.Purpose.Add();
      RoleAssignment.UsersType = Catalogs.Partners.EmptyRef();
      RoleAssignment = RoleObject1.Purpose.Add();
      RoleAssignment.UsersType = Catalogs.ContactPersonsForPartners.EmptyRef();
    RoleObject1.Write();
Business Process Deferred Start
The Business processes and tasks subsystem supports deferred start of business processes. Add all business processes that support deferred start to the DeferredBusinessProcess type collection. This type collection includes the default type Job.
To allow users to defer a business process start, add the command that calls the API method BusinessProcessesAndTasksClient.SetUpDeferredStart to the business process form.
1C:Enterprise monitors deferred business processes, and when the start time comes, it triggers the StartDeferredProcesses scheduled job.
Command Interface Setup
If the configuration does not contain the Application settings subsystem, add the following constants to the Administrator workspace:
UseBusinessProcessesAndTasksUseSubordinateBusinessProcessesChangeJobsBackdatedUseDateAndTimeInTaskDeadlinesUseTaskStartDate
As an example, see the Organizer form of the SSLAdministrationPanel data processor.
To use the Role-based assignment mechanism, do the following:
- Add the
RolesAndTaskPerformerscommand of theTaskPerformersinformation register to the Administrator workspace. - Add the references to the business objects to the
AddressingObjecttype collection. The type list in the type collection must match the type list in theTaskAddressingObjectschart of characteristic types.
To use the Task creation mechanism, do the following:
- Define the list of metadata object types that can be task subjects. If an object can be a task subject, it means that users can create tasks linked to this object in the object form. Any catalog, document, chart of characteristic types, or task can be a subject.
- Specify the list of task subjects in:
- Property
Base Onof theJobbusiness process. - Property
Typeof theTaskSubjecttype collection.
- Property
- Specify all business process types in the
Typeproperty of theBusinessProcesstype collection.
To use the Task execution mechanism, do the following:
- Add the
MyTaskscommand of thePerformerTasktask, theTasksreport, and theExpiringTasksOnDatereport to the Assignee's workspace. - Add the
MyTasksForDesktopform of thePerformerTasktask to the application home page.
To use the Task execution mechanism, add the following objects to the command interface:
- Command
MyBusinessProcessesof theBusinessProcessesListinformation register - Command
AllTasksof thePerformerTasktask - Reports
ExpiringTasksOnDate,OverdueTasks,Tasks,HungTasks, andBusinessProcesses
Special Cases of Integration
How to Integrate "Business Processes and Tasks" and "Access Management" Subsystems
User Access Setup
To manage user access to the subsystem, assign a user the roles specified in the table below.
| # | Role Description |
|---|---|
| 1. | AddEditPerformersRolesGrants the right to manage business roles and business objects, change role assignees by business objects, and view subsystem reports. |
| 2. | FullAccess (the Core subsystem user role)Grants the right to toggle the usage of business processes and tasks. permanently delete subsystem objects marked for deletion. |
| 3. | AddEditJobsGrants the right to enter and edit permitted Job business processes and view reports: Due tasks, Overdue tasks, and Tasks. The role includes access restrictions that use the mechanisms of the Access management subsystem. |
| 4. | EditCompleteTaskGrants the right to edit and complete tasks sent to an assignee. Grants the right to view reports: Due tasks and Tasks. The role includes access restrictions that use the mechanisms of the Access management subsystem. |
| 5. | ReadJobsGrants the right to view permitted Job business processes and permitted tasks. Grants the right to view reports: Due tasks, Overdue tasks, and Tasks. The role includes access restrictions that use the mechanisms of the Access management subsystem. |
To grant users access to the data that belongs to other subsystems and might be required to work with the Business processes and tasks subsystem, create auxiliary roles or re-use existing suitable roles.
| # | Auxiliary Role Description |
|---|---|
| 1. | <ReadBusinessProcesses>Grants the right to view business processes. |
| 2. | <AddEditBusinessProcesses>Grants the right to add and edit business processes. |
| 3. | <AddEditRolePerformersByAddressingObjects>Grants the right to change role assignees for permitted business objects and view subsystem reports. As an example, see the role in the demo configuration: _DemoAddEditRolePerformersByAddressingObjects. |
The table below illustrates possible user groups and the roles they could be assigned with.
| # | User Group Description | Assigned Roles |
|---|---|---|
| 1. | Administrator |
|
| 2. | Business role list owner |
|
| 3. | Head of department
|
|
| 4. | Department employee
|
|
How to Use the Subsystem in Development
The subsystem provides the mechanisms for creating custom business processes.
Metadata Requirements
To unify business processes, ensure that their metadata complies with the following requirements:
- Attribute
Numbermust have theStringtype and the fixed length of 11 characters. - The following attributes must have values:
Author–CatalogRef.Users– The user who is responsible for the business process instance. For example, for a business process of the Job type, the author is the user who initiated it. If a business process involves external users, the attributeAuthorcan have the typesCatalogRefandExternalUsers, or the flexible typesCatalogRef.UsersandCatalogRef.ExternalUsers.CompletedOn–Date– The actual date when the business process was completed.Description–String, 250, variable length– The description of the business process instance. For example, the Job business process has the task details as its description.
- Property Task has the
PerformerTaskvalue. - Property Data lock fields includes the standard attribute
MainTask. - If the business process mechanism is supposed to support pausing and resuming business processes, define the
Stateattribute (EnumRef.BusinessProcessStates) in the business process, and add the Pause and Resume commands to the business process form. The same mechanic applies to the Job business process. - If the business process mechanism is supposed to support hierarchy, define the
MainTaskattribute (TaskRef.PerformerTask) in the business process, and add it to the business process form. The same mechanic applies to the Job business process. PropertyData lock fieldscontains the MainTask attribute.
Add the following export procedures and functions to the manager module:
TaskExecutionFormOnForwardTaskDefaultCompletionHandler
For more information, see the Job business process manager module.
Add the business processes that have these procedures and functions in their manager modules to the OnDetermineBusinessProcesses procedure of the BusinessProcessesAndTasksOverridable common module and to the BusinessProcess and BusinessProcessObject type collections.
If a business process is linked to a base object that defines the access restriction to the instances of the business process, add to this business process an attribute with the reference to the base object. For example, the Job business process has the SubjectOf attribute of the flexible type.
To make business process definitions human-readable (for example, "Approve agreement with Acme Corporation as of 4/1/2020 (Duty)"), create event subscriptions for business process managers PresentationFieldsGetProcessing and PresentationGetProcessing. As the subscription handlers, set the following procedures of the BusinessProcessesAndTasksClientServer common module:
BusinessProcessPresentationFieldsGetProcessingBusinessProcessPresentationGetProcessing
As an example, see the event subscriptions GetBusinessProcessPresentationFields and GetBusinessProcessPresentation.
Custom Task Forms
Business processes can replace the default task form from the PerformerTask task with a custom business process form. For a better user experience, we recommend that you use the forms 1C:Enterprise generates in the route points of the business process flowchart.
The task form should have the following layout (top-to-bottom):
- Optionally: A field with the task completion date and outcome. The field is hidden while the task is in progress.
- Fields with the task assignor details (usually, it is the author of the business process) and task details, such as Due date, Importance, and Start date.
- Task description, which might include what the assignee needs to do, the reference to the task subject, and other attributes (the Content group).
- Fields with the task outcome, which includes the assignee name and the actual task completion date. The outcome field can be customized: you can use a plain text field or controls, such as flags, radio buttons, or choice lists. In this group, in the right bottom, add commands that set the task completion state. For example, Completed, Canceled, or Confirmed. When a user clicks the command, the task form closes, and the business process proceeds to the next route point.
As an example, see the Job business process.
To assign task forms, in the business process manager module, define the export handler function TaskExecutionForm. 1C:Enterprise calls the TaskExecutionForm function each time before opening a task form. The function returns a structure with the FormName and FormParameters keys. The key values are used to open the form with the OpenForm context method.
Example of the TaskExecutionForm function:
    Function TaskExecutionForm(TaskRef, RoutePointLink) Export
        Result = New Structure;
        If RoutePointLink = BusinessProcesses.Job.RoutePoints.Execute Then
            Result.Insert("FormParameters", New Structure("Key", TaskRef));
            Result.Insert("FormName", "BusinessProcess.Assignment.Form.Execute");
        EndIf;
        Return Result;
    EndFunction
Best practices on business process form and metadata development:
- Name task forms according to the following template:
Action<RoutePointName>. For example,ActionExecute. - Task forms must contain the
Objectattribute of theTaskObject.PerformerTasktype. Optionally, a task form can contain additional attributes, for example, the attributes of the related business process and metadata objects. - If a task form contains attributes of the related business process or metadata objects, attribute reading and writing must run in the privileged mode. This will allow users, who are not granted the privilege to read or write business process attributes, to manage them in the task form.
Example:

    &AtServer
    Procedure ReadBusinessProcessAttributes()

        TaskObject = FormAttributeToValue("Object");

        SetPrivilegedMode(True);
        JobObject = TaskObject.BusinessProcess.GetObject();
        JobCompleted = JobObject.Completed2;
        JobExecutionResult = JobObject.ExecutionResult;
        JobContent = JobObject.Content;

    EndProcedure
    &AtServer
    Procedure WriteBusinessProcessAttributes(TaskObject)

        SetPrivilegedMode(True);
        JobObject = TaskObject.BusinessProcess.GetObject();
        LockDataForEdit(JobObject.Ref);
        JobObject.Completed2 = JobCompleted;
        JobObject.Write();

    EndProcedure
Data Exchange Setup
For distributed infobases (DIB) and standalone workstations, add to the exchange plans all the subsystem's metadata objects that contain data. Exception:
- Do not add the
NewTasksNotificationDateconstant to the DIB exchange plans if task assignees must be notified independently in the DIB nodes.
Currencies
With the Currencies subsystem, you can import, store, and export the list of currencies and their exchange rates.
Subsystem Setup
To use the subsystem, add the Currencies catalog to the command interface of the BPM consultant customizer.
User Access Setup
To manage user access to the subsystem, assign a user the roles specified in the table below.
| # | Role Description |
|---|---|
| 1. | ReadCurrencyRatesGrants the right to read currencies and exchange rates. |
| 2. | AddEditCurrencyRatesGrants the right to add and edit currencies and exchange rates. Generally, it is assigned along with the role for automatic exchange rate import. |
| 3. | FullAccess (the Core subsystem user role)Grants the right to delete objects marked for deletion. |
How to Use the Subsystem in Development
Currency list and their exchange rates are stored in the Currencies catalog and Exchange rates information register, respectively.
Data Exchange Setup
For distributed infobases (DIB) and standalone workstations, add to the exchange plans all the subsystem's metadata objects that contain data.
Report Options
The Report options subsystem displays all section reports on the report panel, provides shared access to custom report options as well as universal forms to generate and set arbitrary configuration reports.
Predefined report options are those created by a developer. Custom report options are those saved by a user in 1C:Enterprise mode. Predefined report options can be context or non-context:
- Context report options can be used only in the context of an application object (for example, a report on employee, department, and so on). As a rule, such report options are opened from the object and list forms.
- Non-context report options can be opened from any application location (for example, from the report panel) and do not require passing context. As a rule, such report options are opened from the command interface.
Initial settings of predefined report options are read from metadata and can be changed during the subsystem integration. Updating the Reportsoptions Catalog Data to apply the changes in the configuration metadata (such as adding and editing reports and report options) during development and debugging.
You can change report visibility on the report panel when saving the report or from its card. Visibility settings are displayed as a subsystem tree with the usage flag and importance info.
In the section report panel, each user can change settings of visibility and quick access to report options by switching to the setting mode. In the report panel, you can also take advantage of a search by report properties: description, details, descriptions of subsystems (sections and command interface groups), fields, filters, and user settings.
Subsystem Setup
Take the following steps to set up the subsystem:
- Attach a report option storage.
- Attach a report form.
- Attach the subsystem to command interface sections.
- Configure report option settings.
- Attach context reports.
- Configure report form settings.
- Update the
ReportsOptionscatalog data.
Attaching a Report Option Storage
Choose a storage integration option:
- If the configuration was not released earlier (users did not save any report options to their infobases), choose one of the following integration methods:
- Full if you need to attach all configuration reports and all external (additional) reports to the subsystem. To do this, set the
ReportsVariantsStoragesettings storage in the Report options settings storage configuration property. - Partial if you need to attach the subsystem selectively only for some reports. To do this, set the
ReportsVariantsStoragesetting storage in the Report options storage property of each report to be attached to the subsystem storage.
- Full if you need to attach all configuration reports and all external (additional) reports to the subsystem. To do this, set the
- If the configuration was released earlier, and users could save report options to their infobases, use the Partial integration method. In this case, report options saved by users earlier will be moved to the subsystem storage automatically.
Otherwise, if the Full integration method is selected, the subsystem will not be able to automatically move report options saved by users earlier. In this case:- Include an update instruction in the supporting documentation of the configuration. The instruction states that the administrator must run the migration data processor before updating.
- Develop the migration data processor and include it in the distribution package. As an example, see the
TransferReportOptions.epfdata processor in the demo configuration.
Attaching a Report Form
Choose a report form integration option:
- Full if you need to attach all reports without the default form to the subsystem. To do this, specify built-in common forms of the subsystem in the configuration properties:
- Default report form:
ReportForm. - Default report settings form:
ReportSettingsForm. - Default report option form:
ReportVariantForm.
- Default report form:
- Partial if you need to attach the subsystem selectively only for some reports without the default form. To do this, specify built-in common forms of the subsystem in the properties of each report:
- Default Form:
ReportForm. - Settings Main Form:
ReportSettingsForm. - Default option form:
ReportVariantForm.
- Default Form:
Notice.
Attaching a report only to some of the specified forms is not supported. In particular, in case of Full integration, if the DCS report has its own default form, determine its own settings form (or specify the ReportSettingsAuxiliaryForm common form in the report properties). This requirement also applies to additional and external reports used in the configuration with Full integration of the report form.
Attaching the Subsystem to Command Interface Sections
Define command interface sections to add report panels to. It is recommended that you select all sections for which reports are provided.
-
Create a separate common command to open a report panel for each section.
- Specify a command name as follows:
ReportPanel<SectionName>. For example,ReportPanelSales. - Define a command synonym as follows: \<SectionPresentation> reports. For example, Sales reports.
- In the command handler, insert a call as follows:
&AtClient
Procedure CommandProcessing(CommandParameter, ExecutionParameters)
    ReportsOptionsClient.ShowReportBar("<SectionName>", ExecutionParameters);
EndProcedure
To specify the home page in the first \<SectionName> parameter, use the
ReportsOptionsClientServer.HomePageIDfunction:ReportsOptionsClient.ShowReportBar(ReportsOptionsClientServer.HomePageID(), ExecutionParameters);
- Specify a command name as follows:
-
List the selected sections in the
DefineSectionsWithReportOptionsprocedure of theReportsOptionsOverridablecommon module. In section presentations (used as report panel titles), specify synonyms of the commands created on the previous step. -
It is recommended that you hide all reports of the selected sections from the actions panel of the command interface of these sections.
Configuring Report Option Settings
Report option settings are configured in the CustomizeReportsOptions procedure of the ReportsOptionsOverridable common module. You can change report option settings directly in the overridable module (best for small applications) or in the report manager module (best for collaborative development and more consistent with the library approach). To do this, place a call of the report manager module in the CustomizeReportsOptions procedure of the ReportsOptionsOverridable common module as follows:
ReportsOptions.CustomizeReportInManagerModule(Settings, Metadata.Reports.ReportName);Insert the procedure to the report manager module as follows:
#If Server Or ThickClientOrdinaryApplication Or ExternalConnection Then
#Region Public
#Region ForCallsFromOtherSubsystems
// Parameters:
//   Settings - see ReportsOptionsOverridable.CustomizeReportsOptions.Settings.
//   ReportSettings - see ReportsOptions.DescriptionOfReport.
//
Procedure CustomizeReportOptions(Settings, ReportSettings) Export

EndProcedure
#EndRegion
#EndRegion
#EndIf
ReportSettings and OptionSettings objects contain the following properties that can be changed:
Enabled. IfFalse, the report option is not registered in the catalog and not displayed in report panels and other subsystem forms (it is always hidden from users). In this case, the report option remains in the configuration and can be opened when the report form is opened programmatically. For example, you can disable context report options.DefaultVisibility. IfFalse, the report option is hidden from the report panel by default. The hidden report option can be displayed in the report panel to the administrator, for all users at once (via the item form), and to users in their report panel (via the setting mode). For example, you may need to hide less frequent report options.LongDesc. A tooltip in the report panel, which contains report option details. You might want to fill in this property as it is used in the report search.Location. It links report options to configuration subsystems. First-level subsystems are considered to be sections, second-level subsystems are considered to be groups. If a report is included in a section, it will be displayed in the report panel without its group. If required, you can setImportancefor each subsystem:Important. The report option will be highlighted in bold and placed at the top of the group.SeeAlso. The report option will be displayed at the bottom of the report panel, in the See also group.
FunctionalOptions. It is used to hide report options by functional options. It contains an array of strings with functional option names. A report option is enabled if one of the functional options of the report is enabled (if specified) and one of the functional options of the report option is enabled (if specified).SearchSettings. Additional information records to search for the report option. It is a structure with the following properties:FieldDescriptions. Presentations of report option fields.FilterParameterDescriptions. Presentations of report option settings.Keywords. Additional terminology (including special or obsolete one).
- Term separator:
Chars.LF. DefineFormSettings. Enables overriding of report form settings. Notice.
The property is available only for ReportSettings. If True, define the DefineFormSettings procedure in the report object module as follows:
    #If Server Or ThickClientOrdinaryApplication Or ExternalConnection Then
    #Region Public
    #Region ForCallsFromOtherSubsystems
    // Parameters:
    // Form - ClientApplicationForm, Undefined
    // VariantKey - String, Undefined
    // Settings - see ReportsClientServer.DefaultReportSettings
    //
    Procedure DefineFormSettings(Form, VariantKey, Settings) Export

    EndProcedure
    #EndRegion
    #EndRegion
    #EndIf
For more information on changing report form settings, see Configuring Report Form Settings.
Attaching Context Reports to Configuration Objects
Choose which catalogs, documents, and other configuration objects require context reports and in which forms you want to display a submenu with context reports. For example, a command to open register records history can be embedded in all documents that generate register records.
In this case, consider scenarios of attaching commands using configuration extensions and additional reports. This means that even if you do not plan to develop context reports for a particular configuration object, it is still a good idea to attach report commands to it in advance.
To attach context reports to configuration objects:
- List metadata objects that require report commands in the
DefineObjectsWithReportCommandsprocedure of theReportsOptionsOverridablecommon module. - Define empty procedure
AddReportCommandsin the manager module of each object in thePublicarea as follows:#If Server Or ThickClientOrdinaryApplication Or ExternalConnection Then #Region Public #Region ForCallsFromOtherSubsystems // Parameters: // ReportsCommands - see ReportsOptionsOverridable.BeforeAddReportCommands.ReportsCommands // Parameters - see ReportsOptionsOverridable.BeforeAddReportCommands.Parameters // Procedure AddReportCommands(ReportsCommands, Parameters) Export EndProcedure #EndRegion #EndRegion #EndIf
In forms of metadata objects (lists and so on) where you want to output the Reports submenu, integrate the Attachable commands subsystem. To optimize performance, it is recommended that you add a submenu with report commands to the command bar:
- Name:
ReportsSubmenu. - Title:
Reports. - Type:
Submenu. - Representation:
Picture. - Picture:
Report(standard picture).
To display numerous commands (more than 10) in the Reports submenu, add nested button groups with the following suffixes: Important, Standard, and SeeAlso. For example: SubmenuReportsImportant, SubmenuReportsStandard, and SubmenuReportsSeeAlso. Then developers of context report commands will be able to specify these group suffixes in the Importance property of their commands.
For more information about context report commands, see the section below.
Configuring Report Form Settings
To set up a report form, use the DefineFormSettings procedure of the report object module. In the procedure, you can specify values for the following parameters:
-
GenerateImmediately. IfTrue, the report will be generated after opening, selecting user settings, and selecting another report option. By default,False. -
OutputSelectedCellsTotal. IfFalse, the field with a total sum of selected cells calculated automatically will not be displayed in the report. By default,True. -
EditStructureAllowed. IfFalse, theStructuretab will be hidden in the report settings. By default,True. TheStructuretab is shown by default for DSC reports in the extended and simple modes if the check boxes indicating the use of groupings are displayed in user settings. -
EditOptionsAllowed. IfFalse, buttons for changing report options are hidden in the report and settings forms. If a user does not have theSaveUserDataandInsertrights for theReportsOptionscatalog, it is forcibly set toFalse. By default,True. -
Print–Structure. Spreadsheet document print parameters (can be overridden by user):TopMargin–Number. The top margin for printing (in millimeters).LeftMargin–Number. The left margin for printing (in millimeters).BottomMargin–Number. The bottom margin for printing (in millimeters).RightMargin–Number. The right margin for printing (in millimeters).PageOrientation–PageOrientation.PortraitorLandscape.FitToPage–Boolean. Automatically scale to page size.PrintScale–Number. Image scale (percentage).
-
Events–Structure. Events that have handlers defined in the report object module. It is recommended that you define event handlers in thePublicregion after theDefineFormSettingsprocedure:-
OnCreateAtServer. IfTrue, define theOnCreateAtServerprocedure in the report object module as follows:// See ReportsOverridable.OnCreateAtServer. Procedure OnCreateAtServer(Form, Cancel, StandardProcessing) Export EndProcedureYou can use the procedure to output additional commands with the
ReportsServer.OutputCommandprocedure or perform other preliminary operations in the report form. An example of adding a command:Command = Form.Commands.Add("<CommandName>"); Command.Action = "Attachable_Command"; Command.Title = NStr("en = '<Command presentation...>'"); ReportsServer.OutputCommand(Form, Command, "<Compositor>");Note that the command handler must be implemented in the
ReportsClientOverridable.CommandHandlerprocedure. -
BeforeImportSettingsToComposer. IfTrue, define theBeforeImportSettingsToComposerprocedure in the report object module as follows:// Parameters: // Context - Arbitrary // SchemaKey - String // VariantKey - String, Undefined // NewDCSettings - DataCompositionSettings, Undefined // NewDCUserSettings - DataCompositionUserSettings, Undefined // Procedure BeforeImportSettingsToComposer(Context, SchemaKey, VariantKey, NewDCSettings, NewDCUserSettings) Export EndProcedureThe procedure is called before importing new settings and used to change the DCS.
Example 1. The report composer is initialized based on the common template schema:
  If SchemaKey <> "1" Then
      SchemaKey = "1";
      DCSchema = GetCommonTemplate("MyCommonCompositionSchema");
      ReportsServer.AttachSchema(ThisObject, Context, DCSchema, SchemaKey);
  EndIf;
Example 2. The schema depends on the parameter value displayed in the user report settings:
If TypeOf(NewDCUserSettings) = Type("DataCompositionUserSettings") Then FullMetadataObjectName = ""; For Each DCItem In NewDCUserSettings.Items Do If TypeOf(DCItem) = Type("DataCompositionSettingsParameterValue") Then ParameterName = String(DCItem.Parameter); If ParameterName = "MetadataObject" Then FullMetadataObjectName = DCItem.Value; EndIf; EndIf; EndDo; If SchemaKey <> FullMetadataObjectName Then SchemaKey = FullMetadataObjectName; DCSchema = New DataCompositionSchema; // Populating the schema... ReportsServer.AttachSchema(ThisObject, Context, DCSchema, SchemaKey); EndIf; EndIf; -
AfterLoadSettingsInLinker. If True, define theAfterLoadSettingsInLinkerprocedure in the report object module as follows:// Parameters: // * AdditionalParameters - Structure // Procedure AfterLoadSettingsInLinker(AdditionalParameters) Export EndProcedureThe procedure is called after all settings are imported to the composer. It is used to refine, for example, selection parameters that depend on values of imported fixed filters.
-
BeforeLoadVariantAtServer. IfTrue, define theBeforeLoadVariantAtServerprocedure in the report object module as follows:// See ReportsOverridable.BeforeLoadVariantAtServer Procedure BeforeLoadVariantAtServer(Form, NewDCSettings) Export EndProcedureThe procedure is called in the BeforeImportOptionAtServer event handler of a report form and report setup form. For more information, see "Client application form extension for reports.BeforeLoadVariantAtServer" in Syntax Assistant.
-
OnLoadVariantAtServer. IfTrue, define theOnLoadVariantAtServerprocedure in the report object module as follows:// Parameters: // Form - ClientApplicationForm // - ManagedFormExtensionForReport: // * Report - FormDataStructure // - ReportObject // NewDCSettings - DataCompositionSettings // Procedure OnLoadVariantAtServer(Form, NewDCSettings) Export EndProcedureThe procedure is called in the OnLoadVariantAtServer event handler of a report form after executing the form code. For more information, see "Client application form extension for reports.OnLoadVariantAtServer" in Syntax Assistant.
-
OnLoadUserSettingsAtServer. IfTrue, define theOnLoadUserSettingsAtServerprocedure in the report object module as follows:// Parameters: // Form - ClientApplicationForm // NewDCUserSettings - DataCompositionUserSettings // Procedure OnLoadUserSettingsAtServer(Form, NewDCUserSettings) Export EndProcedureThe procedure is called in the OnLoadVariantAtServer event handler of a report form after executing the form code. For more information, see "Client application form extension for reports.OnLoadUserSettingsAtServer" in Syntax Assistant.
-
BeforeFillQuickSettingsBar. IfTrue, define theBeforeFillQuickSettingsBarprocedure in the report object module as follows:// Parameters: // Form - ClientApplicationForm // FillParameters - Structure // Procedure BeforeFillQuickSettingsBar(Form, FillParameters) Export EndProcedureThe procedure is called before repopulating the report form settings panel.
-
AfterQuickSettingsBarFilled. IfTrue, define theAfterQuickSettingsBarFilledprocedure in the report object module as follows:// Parameters: // Form - ClientApplicationForm // FillParameters - Structure // Procedure AfterQuickSettingsBarFilled(Form, FillParameters) Export EndProcedureThe procedure is called after repopulating the report form settings panel.
-
WhenDefiningTheMainFields. IfTrue, define theWhenDefiningTheMainFieldsprocedure in the report object module as follows:// See ReportsOverridable.WhenDefiningTheMainFields. Procedure WhenDefiningTheMainFields(Form, MainField) Export EndProcedureAllows to set a list of frequently used fields displayed in the submenu for context menu commands "Insert field to the left", "Insert grouping below", etc.
-
BeforeFormationReport. IfTrue, define theBeforeFormationReportprocedure in the report object module as follows:// Parameters: // ReportForm - ClientApplicationForm // AdditionalParameters - Structure: // * WarningText - String // * StorageParameterNameWarningDisclaimer - String // Procedure BeforeFormationReport(Form, AdditionalParameters) Export EndProcedureShows a question with the
WarningTexttext and the Continue and Cancel buttons before generating the report. For example, it can warn you that report generation will take a long time and require a lot of memory. Also, it can suggest you to define a more targeted filter. If you also specify theStorageParameterNameWarningDisclaimerproperty, the "Do not show again" option will appear in the question window. -
OnDefineSelectionParameters. IfTrue, define theOnDefineSelectionParametersprocedure in the report object module as follows:// See ReportsOverridable.OnDefineSelectionParameters. Procedure OnDefineSelectionParameters(Form, SettingProperties) Export EndProcedureThe procedure is called in the report form and the report setup form before outputting a setting to specify additional selection parameters. This is a deprecated event. We recommend that you apply the
AfterLoadSettingsInLinkerevent instead.
-
For global overriding of the universal report form behavior, some server events are presented in the ReportsOverridable module.
Procedures for overriding behavior of client events, which arise in the universal report form, are presented in the ReportsClientOverridable module.
The Public area of the ReportsClient and ReportsServer modules has auxiliary procedures that can be called from report form event handlers and when generating a report.
Updating the Reportsoptions Catalog Data
Notice.
Refresh the ReportsOptions catalog data to apply the changes in the configuration metadata (such as adding and editing reports and report options). In most cases, it is updated automatically during the update or initial data population when the configuration version changes. When developing and debugging the configuration, it is recommended that you update it manually. For more information, see Service Data Update.
Special Cases of Integration
How to Integrate "Report Options" Subsystem without "Access Management" Subsystem
User Access Setup
To manage user access to the subsystem, assign a user the roles specified in the table below.
| # | Role Description |
|---|---|
| 1. | FullAccess (the Core subsystem user role)Grants the right to administer report options. |
| 2. | AddEditReportsOptionsGrants the right to administer report options. If a user does not have the SaveUserData access right, all features for saving subsystem settings are disabled. |
| 3. | AddEditPersonalReportsOptionsGrants the right to add and edit custom report options (available to the author only), and view common report options (available to all users). If a user does not have the SaveUserData access right, all features for saving subsystem settings are disabled. |
| 4. | ReadReportOptionsGrants the right to audit report options and view any report options without the right to edit them. |
| 5. |
Grants the right to view common report options (available to all users). |
| 6. |
|
| 7. | AddEditReportsSnapshots.Grants the right to save and view report snapshots and access them offline in mobile client. |
How to Use the Subsystem in Development
Updating the Reportsoptions Catalog Data to apply the changes in the configuration metadata (such as adding and editing reports and report options). In rare cases, you may need to develop your own update handler.
If you need to repopulate predefined report options, you can use the Refresh procedure of the ReportsOptions common module. For example, you may need to do this when changing application settings if some report options differ depending on application settings.
If you need to reset user report settings, use the ResetCustomSettings procedure of the ReportsOptions common module. For example, it might be required to propagate updated report option settings to all users.
When a report option key is changed, specify it in the RegisterChangesOfReportOptionsKeys procedure of the ReportsOptionsOverridable common module.
Describing Tables Used in Report Composition
Some features require information about the tables used for composing a certain report. For example, to:
- Notify users that the report might contain incorrect data as the migration to the new application version is not completed.
- Display information about report rights in the Access rights analysis report.
In most cases, the Report options subsystem extracts this information automatically from a data set of the Query type of the Data Composition System (DCS). However, if you use a data set of the Object type, you will not find information on used tables in the DCS. In this case, add the OnDefineUsedTables event handler to the report object module and list the used report tables there:
// Specify the report form settings.
//
// Parameters:
//   Form - ClientApplicationForm
//         - Undefined
//   VariantKey - String
//                - Undefined
//   Settings - see ReportsClientServer.DefaultReportSettings
//
Procedure DefineFormSettings(Form, VariantKey, Settings) Export
  Settings.Events.OnDefineUsedTables = True;
EndProcedure

// Parameters:
//   VariantKey - String
//                - Undefined -
//       The name of a predefined report option or the UUID of a custom report option.
//       Undefined when called for a drill-down option or without context.
//   TablesToUse - Array Of String
//
Procedure OnDefineUsedTables(VariantKey, TablesToUse) Export
  TablesToUse.Add(Metadata.Documents._DemoSalesOrder.FullName());
EndProcedure
The name of a predefined report option or the UUID of a custom report option is passed to the VariantKey parameter. Undefined is passed when called for a drill-down option or without context.
Developing Context Report Commands
To develop context reports, first configure those objects to which they are attached (catalogs, documents, and so on). See Attaching Context Reports to Configuration Objects.
Report commands displayed in certain catalogs, documents, and other configuration objects are set in the AddReportCommands procedure of this metadata object manager module. Example:
// Defines a report command list.
//
// Parameters:
//   ReportsCommands - see ReportsOptionsOverridable.BeforeAddReportCommands.ReportsCommands
//   Parameters - see ReportsOptionsOverridable.BeforeAddReportCommands.Parameters
//
Procedure AddReportCommands(ReportsCommands, Parameters) Export
    If AccessRight("View", Metadata.Reports.SearchForReferences) Then
        Command = ReportsCommands.Add();
        …
    EndIf;
EndProcedure
Describe context report commands displayed in all (or most) metadata objects in the BeforeAddReportCommands procedure of the ReportsOptionsOverridable common module. Example:
Procedure BeforeAddReportCommands(ReportsCommands, Parameters, StandardProcessing) Export
    If AccessRight("View", Metadata.Reports.SearchForReferences) Then
        Command = ReportsCommands.Add();
        Command.Presentation      = NStr("en = 'Occurrences'");
        Command.MultipleChoice = True;
        Command.FormParameterName  = "Filter.RefSet";
        Command.VariantKey       = "Main";
        Command.Manager           = "Report.SearchForReferences";
    EndIf;
EndProcedure
Besides, report commands can be specified in configuration reports themselves and in configuration extension reports. To do this, include the report in the AttachableReportsAndDataProcessors subsystem and define the OnDefineSettings and AddFillCommands procedures in its manager module in the Public area. For more information, see section Attaching Reports and Data Processors to Configuration Mechanisms of the Attachable Commands subsystem documentation. Example:
#Region Public
// Defines API content for integration with the configuration.
//
// Parameters:
//   Settings - Structure - integration settings for this object.
//       See the return value of function AttachableCommands.AttachableReportsAndDataProcessorsSettings().
//
Procedure OnDefineSettings(Settings) Export
    Settings.Location.Add(Metadata.Documents.DocumentName);
    Settings.AddReportCommands = True;
EndProcedure
// Defines a report command list.
//
// Parameters:
//   ReportsCommands - ValueTable - a table with report commands. For changing.
//       See details of parameter 1 of procedure ReportsOptionsOverridable.BeforeAddReportCommands().
//   Parameters - Structure - secondary parameters. For reading.
//       See details of parameter 2 of procedure ReportsOptionsOverridable.BeforeAddReportCommands().
//
Procedure AddReportCommands(ReportsCommands, Parameters) Export
EndProcedure
#EndRegion
Note.
For report commands added to the AddReportCommands procedure, which is attached using the method specified above, the Manager parameter is not required.
Supplying report commands in configuration reports is recommended when commands serve several objects at once (a set of objects being served is a grouping flag for such commands).
The AddReportCommands procedure for reports attached using this method is called for all metadata objects specified in the Location parameter of the OnDefineSettings procedure.
ReportsCommands Table Columns
| Parameter | Type | Details |
|---|---|---|
Id (optional) |
String |
A command ID used to identify the command and define its name in the form. If not specified, the command name will be defined automatically. |
Presentation (required) |
String |
A command presentation in the form. Example:Command.Presentation = NStr("en = 'Fill in waybill'"); |
Importance (optional) |
String |
A short name (suffix) of a submenu group to display the command. Valid values: Important, Ordinary, and SeeAlso. |
Order (optional) |
Number |
A value from 1 to 100 that indicates the command position among other commands. Commands are sorted first by the Order field and then by presentation.Default value: 50. |
Shortcut (optional) |
Shortcut |
A shortcut for a quick command call. |
ReportsCommands Table Columns. Visibility Settings
| Parameter | Type | Details |
|---|---|---|
ParameterType (optional) |
TypeDescription |
Types of objects the command is intended for. It is used to refine a list of objects a certain command is attached to when a data processor or another command provider is attached to multiple configuration objects. |
VisibilityInForms (optional) |
String |
Comma-delimited names of the forms to add a command to. Used to refine a list of forms a particular command is attached to. If the parameter is not specified, the command will be displayed in all forms. Example:Command.VisibilityInForms = "DocumentForm" |
FunctionalOptions (optional) |
String |
Comma-delimited names of functional options that affect the command visibility. |
VisibilityConditions (optional) |
Array |
Defines the command conditional visibility. To add conditions, use procedure AttachableCommands.AddCommandVisibilityCondition.Use "And" to specify multiple conditions. |
ChangesSelectedObjects (optional) |
Boolean |
Defines the command availability for users who have no right to edit the object. If True, the button will be inactive. By default, False. |
IsNonContextual (optional) |
Boolean |
If set to True, users can do the following: select other options of this report, add it to Favorites, or get a link to it. |
ReportsCommands Table Columns. Execution Settings
| Parameter | Type | Details |
|---|---|---|
MultipleChoice (optional) |
Boolean |
If True, the command supports multiple-choice selection and the first parameter of the command handler passes a reference array.If False, the command supports single-choice selection and the first parameter of the command handler passes a reference. |
WriteMode (optional) |
String |
Settings of additional checks and actions related to object writing and executed before the command handler.
Example: Command.WriteMode = "DoNotWrite"; Before writing or posting the object, users are asked for confirmation. Default value: Write. |
FilesOperationsRequired (optional) |
Boolean |
If True, in the web client, users are prompted to install the file system extension before executing the command. |
ReportsCommands Table Columns. Handler Settings
| Parameter | Type | Details |
|---|---|---|
Manager (optional) |
String |
Full name of the report where the command was indicated. If FormName and Handler are not specified, the default report form opens with parameters matching the context mode of the report (they are not duplicated in the FormParameters structure). |
FormName (required if Handler is not specified) |
String |
Name of the form the command will open or receive. If Handler is not specified, the Open method is called. |
VariantKey (optional) |
String |
Name of the report option the command will open. |
FormParameterName (optional) |
String |
Name of the form parameter to pass a reference or a reference array to. |
FormParameters (optional) |
Structure, Undefined |
Parameters of the form specified in FormName. |
Handler (required if FormName is not specified) |
String |
Name of the procedure that handles the main action of the command. Example 1. A handler is placed in the common module: Command.Handler = "SalesClient.EnterInvoice"; Example 2. A handler is placed in the form module or manager module:Command.Handler = "FillWaybill"; If FormName is filled in, a client procedure is expected in the specified form module as follows:&AtClient Procedure <ProcedureName>(<CommandParameterName>, ExecutionParameters) Export // Command handler code. EndProcedure If FormName is empty, a server procedure is expected in the object manager module specified in Manager:Procedure <ProcedureName>(<CommandParameterName>, ExecutionParameters) Export // Command handler code. EndProcedure It is recommended that you specify the first parameter name of the CommandParameterName command handler according to the types of objects the command is intended for. Keep in mind that the type of this parameter depends on the MultipleChoice setting. If MultipleChoice = True, a reference array is passed. If <code>False</code>, a reference is passed. For example, if the command is to populate the Proforma invoice documents and MultipleChoice is enabled, the parameter can be named ProformaInvoicesArray or ProformaInvoices. If MultipleChoice is disabled, the parameter can be named ProformaInvoice or ProformaInvoiceRef.The second parameter of the ExecutionParameters command handler has the Structure type with the following fields:
|
AdditionalParameters (optional) |
Structure, Undefined |
Additional parameters that can be read in the command handler. |
See an example of implementing a context report command in the Demo: Attachable commands extension report in the demo infobase.
If context reports do not need to be output in report panels and report lists, when setting up options of those reports, set the Enabled property to False.
Enabling Context Report Setup
In reports based on the Data Composition System (DCS), click a column to access the context menu options and column property settings. If the configuration contains a data composition appearance template for these reports, you need to make some changes to enable these features. In the template, set the Quick change column size change mode for grouping and table headers. As an example, see the _DemoReportAppearanceBeige common template and the BeforeLoadVariantAtServer procedure of the ReportsOverridable common module.
Mobile Client Features in Offline Mode
To view report option snapshots offline in the mobile client when there is no connection to the server, set up data export to an offline configuration:
- Create an exchange plan and include it in the offline configuration. Add the
ReportsOptionsandUserscatalogs and theReportsSnapshotsinformation register to the exchange plan. As an example, see the_DemoMobileClientexchange plan in the demo configuration. - Set up the rules for registering these objects in the exchange plan when they are saved. For example, you can use the
OnWriteevent subscription. As an example, see the event subscriptions_DemoRegisterChangesForStandaloneModeand_DemoRegisterChangesForStandaloneModeRegistersin the demo configuration. - Set up the data exchange start in the background with enabling the idle handler at the start of the mobile client session if the main server is available. As an example, see the
OnStartprocedure of theCommonClientOverridablecommon module in the demo configuration. - Add all metadata objects (such as common modules) used in the data export and import algorithms to the offline configuration. As an example, see the
_DemoExchangeMobileClientOfflineServerCallcommon module in the demo configuration. - Add a role that grants full access to the exchange plan to exchange data with the offline configuration. As an example, see the
_DemoExchangeMobileClientrole in the demo configuration. Add access rights for metadata objects involved in the exchange to this role. As an example, see the_DemoExchangePlanNewNodeCodeconstant in the demo configuration. Add this role and theAddEditReportsSnapshotsrole to access group profiles of mobile client users.
SaaS Features
If the configuration is designed for SaaS, some report options can require defining the SettingVariants function in the report manager module. It might happen if a data composition schema contains references to predefined items of catalogs or other tables separated by the DataAreaMainData separator. Since in SaaS information about predefined report options is collected in a session without set separator values, this function is called after an unsuccessful attempt to automatically analyze the data composition schema.
As an example, see the _DemoFilesChangeDynamics report manager module in the demo configuration:
#Region Public
#Region ForCallsFromOtherSubsystems
// StandardSubsystems.ReportsOptions
// Runs in SaaS to get info about predefined report options.
//
// Returns:
// Array - info about report options, Structure with the following properties:
//    * Name           - String - the report option name. For example, "Main";
//    * Presentation - String - the report option name. For example: NStr("en = 'File change dynamics'").
//
Function SettingVariants() Export
    Result = New Array;
    Result.Add(New Structure("Name, Presentation", "Main", NStr("en = 'File change dynamics'")));
    Result.Add(New Structure("Name, Presentation", "Additional1", NStr("en = 'File change dynamics by authors'")));
    Return Result;
EndFunction
// End StandardSubsystems.ReportsOptions
#EndRegion
#EndRegion
Data Exchange Setup
For distributed infobases (DIB) and standalone workstations, add to the exchange plans all the subsystem's metadata objects except for the following:
- Catalog
PredefinedExtensionsReportsOptions - Information register
PredefinedExtensionsVersionsReportsOptions - Information register
ReportsSnapshots.
Exclude them from other exchange plans used to synchronize data between applications.
Object Versioning
With the Object versioning subsystem, you can keep track of object change history (who, when, and what changed). Use it to get reports on all versions or a specific version of an object. Versioned objects can include catalogs, documents, business processes, charts of characteristic types, charts of accounts of the configuration, and charts of calculation types.
Subsystem Setup
To use the subsystem in the configuration:
- If the configuration does not contain the Application settings subsystem, add the
ObjectVersioningSettingsinformation register to the administrator's command interface and place theUseObjectsVersioningconstant in the main constant editing form or any other system administration form. - Create the
WriteDocumentVersionsubscription to theBeforeWriteevent, theObjectsVersioningEvents.WriteDocumentVersionhandler.
To display the subsystem settings in a custom form:
- Create the
StoreChangeHistoryform attribute of theBooleantype to control the settings check box. Locate the check box in the form items. - In the
OnCreateAtServerform event handler, call theStoreHistoryCheckBoxValueprocedure of theObjectsVersioningmodule. - In the
NotificationProcessingform event handler, call theStoreHistoryCheckBoxChangeNotificationProcessingprocedure of theObjectsVersioningClientmodule. - When changing the
StoreChangeHistoryform attribute, call theOnStoreHistoryCheckBoxChangeprocedure of theObjectsVersioningClientmodule.
In the configuration, select reference-type metadata objects that need versioning. Then do the following:
- List all versioned objects in the
Typeproperty of theVersionedDatatype collection (theReftypes, for example,CatalogReforDocumentRef). - List all versioned objects, except for documents, in the
Typeproperty of theVersionedDataObjecttype collection (theObjecttypes, for example,CatalogObjectorBusinessProcessObject). - List all versioned documents in the
Sourceproperty of theWriteDocumentVersionsubscriptions (theDocumentObjecttypes). - Add the following code block to the
OnCreateAtServerhandler in all versioned object and document forms:// StandardSubsystems.ObjectsVersioning ObjectsVersioning.OnCreateAtServer(ThisObject); // End StandardSubsystems.ObjectsVersioning - Add the following code block to all manager modules of objects (items), for which versioning is being added:
// StandardSubsystems.ObjectsVersioning // Defines object settings for the ObjectsVersioning subsystem. // // Parameters: // Settings - Structure - subsystem settings. Procedure OnDefineObjectVersioningSettings(Settings) Export EndProcedure // End StandardSubsystems.ObjectsVersioning - Decide whether you want to hide technical attributes and tables in version reports. To hide attributes and tables, add the following code block to the
OnDefineObjectVersioningSettingsprocedure of the object manager module:
Settings.OnGetInternalAttributes = True;Add the OnGetInternalAttributes procedure to the manager module and list attributes and tables to be hidden:
  //       StandardSubsystems.ObjectsVersioning
  // Defines object settings for the ObjectsVersioning subsystem.
  //
  // Parameters:
  // Settings - Structure - subsystem settings.
  Procedure OnDefineObjectVersioningSettings(Settings) Export
      Settings.OnGetInternalAttributes = True;
  EndProcedure
  // Restricts object attribute visibility in the version report.
  //
  // Parameters:
  // Attributes - Array - a list of object attribute names.
  Procedure OnGetInternalAttributes(Attributes) Export
      Attributes.Add("AttributeName"); // Object attribute
      Attributes.Add("TabularSectionName.*"); // Object table
  EndProcedure
  // End StandardSubsystems.ObjectsVersioning
User Access Setup
To manage user access to the subsystem, assign a user the roles specified in the table below.
| # | Role Description |
|---|---|
| 1. | FullAccess (the Core subsystem user role)Grants the right to enable and disable versioning, read object versions, view version reports, return to previous object versions, change object storage settings, and clear obsolete object versions. |
| 2. | ReadObjectVersionsGrants the right to view object versions and version reports. |
How to Use the Subsystem in Development
Developing Report Templates for a Specific Object Version
The Object versioning subsystem allows using a custom report template for an object version instead of the default one.
To create a report template for a versioned object, use the Print wizard:
- Open the object Print wizard.
- Select Create new command and enter the command name (for example, Print). Make sure there is no procedure with the same name in the metadata object manager module, and then click Next.
- Select the attributes to be displayed in the report and click Next.
- Select the required fields in object tables (if any) and click Next for each table successively.
- Do not select attributes for the document footer, and then click Next.
- In a final group selection dialog box, leave all default values, and then click OK.
- Delete the print command and print data generation procedure created in the previous step (the Print example) from the object manager module.
- Rename the created template into
ObjectTemplateand customize its appearance if needed.
Data Exchange Setup
For distributed infobases (DIB) and standalone workstations, add to the exchange plans all the subsystem's metadata objects that contain data.
Business Interactions
With the Business interactions subsystem, you can plan, register, and organize interactions and handle their results. Interactions include emailing, recording calls and appointments. The subsystem provides filter and creation of new interaction contacts.
Subsystem Setup
If the configuration does not contain the Application settings subsystem, add the following constants to the Administrator workspace:
UseEmailClientSendEmailsInHTMLFormatUseOtherInteractionsUseReviewedFlag
As an example, see the Organizer form of the SSLAdministrationPanel data processor.
Place the DocumentJournal.Interactions.Command.EmailOperationSettings command call in the personal settings form. As an example, see the _DemoMySettings common form in the demo configuration.
Add the users that use the subsystem and the Interactions document journal to the command interface.
Defining Types of Interaction Contacts and Topics
Select metadata objects that can act as interaction contacts. For example, individuals, partners, contact persons of partners, and so on. Add the required contact types to the InteractionContact type collection.
If you plan to create contacts directly from interaction document forms, do the following for forms of metadata objects defined as contacts:
- Add the
NotificationRequiredform attribute of theBooleantype. - Add the
BasisObjectform attribute of theArbitrarytype. - Add the following procedure call to the
OnCreateAtServerevent handler:Interactions.PrepareNotifications(ThisObject, Parameters, False); - Add the following procedure call to the
AfterWriteform event handler:InteractionsClient.ContactAfterWrite(Form, Object, WriteParameters, MessageSenderObjectName);
Select metadata objects that can act as interaction topics. For example, projects, sales orders, purchase orders, and so on. Add the required topic types to the InteractionSubject type collection.
If you plan to create topics based on interaction documents, do the following for forms of metadata objects defined as contacts:
- Add the
NotificationRequiredform attribute of theBoolean type. - Add the
InteractionBasisform attribute of the flexible type including those types of interaction documents on whose basis topics are created. - Add the following procedure call to the
OnCreateAtServerevent handler:Interactions.PrepareNotifications(ThisObject, Parameters, False); - Add the following procedure call to the
AfterWriteform event handler:InteractionsClient.InteractionSubjectAfterWrite(Form, Object, WriteParameters, MessageSenderObjectName);
Setting Up the Topic Manager Module
In the manager module of each metadata object defined as a topic, you must implement the TheTextOfTheRequestForContacts export function, in which you need to generate a query text for topic contacts. For example, references to interaction contacts can be found in the header and table attributes of a topic.
The function takes two optional parameters. The first parameter is TextTempTable of the String type, which can contain a part of the query text used for putting a query result into the temporary table. The second parameter is Union of the Boolean type, which indicates the query generation mode. If this parameter is True, the query generated in the function is a part of other another query and must start with UNION. The return value is a String containing the text of the query for topic contacts.
Also, in the manager module of each metadata object defined as a topic, you must implement the TheTextOfTheRequestForContacts export function, where an array of possible topic contacts will be generated. The function takes the mandatory parameter that is a reference to the object containing contacts. The return value is an Array containing all possible contacts of the interaction document on a topic.
As an example of implementing these functions, see the manager module of the _DemoSalesOrder document in the demo configuration.
For those topics, for which you intend to use the topic activity mechanism and whose current status implies the topic activity, you need to set the topic activity flag to the InteractionsSubjectsStates information register. As an example, see the OnWrite procedure of the _DemoSalesOrder document object module.
Setting Up Overridable Modules
If necessary, implement the logic for the functions of overridable subsystem modules:
InteractionsClientOverridableInteractionsClientServerOverridableInteractionsOverridable
Setting Up Topic List Forms
To be able to set a topic by multiple dragging and dropping in the topic list form, do the following:
- Select the
EnableDragcheck box for the list form item. - Place the following code block in the
DragCheckevent handler of the list form item:InteractionsClient.ListSubjectDragCheck(Item, DragParameters, StandardProcessing, String, Field); - Place the following code block in the
Dragevent handler of the list form item:InteractionsClient.ListSubjectDrag(Item, DragParameters, StandardProcessing, String, Field);
User Access Setup
To manage user access to the subsystem, assign a user the role specified in the table below.
| # | Role Description |
|---|---|
| 1. | AddEditInteractionsGrants the right to read, add, and change interactions. |
The table below illustrates possible user groups and the roles they could be assigned with.
| # | User Group Description | Assigned Roles |
|---|---|---|
| 1. | Interaction manager |
|
Special Cases of Integration
- How to Integrate "Business Interactions" and "Access Management" Subsystems
- How to Integrate "Business Interactions" Subsystem without "Digital Signature" Subsystem
How to Use the Subsystem in Development
Data Exchange Setup
Add all subsystem metadata objects to exchange plans of distributed infobases (DIB) and standalone workstations and to exchange plans used for data synchronization between different applications, except for the following information registers:
AccountsLockedForReceipt(it prevents the duplication of received emails upon competitive operations with shared accounts)EmailFolderStatesInteractionsSubjectsStatesInteractionsContactStates
The last three registers store business interaction document summary: the number of unreviewed business interactions and the date of the last interaction. The information is displayed in the interaction manager's workspace. To make sure that this data is correct, when the exchange is finished, recalculate business interactions using the following procedures:
Interactions.CalculateReviewedByContactsInteractions.CalculateReviewedByFoldersInteractions.CalculateReviewedBySubjects
Add-Ins
Use the Add-ins subsystem to import third party add-ins to the application. With add-ins, you can make your 1C:Enterprise 8 application experience even better. Add-ins allow you to connect point-of-sale equipment, interact with the operating system and third-party applications, and access external data sources.
The list of allowed add-ins and their versions is managed by the administrator. The subsystem centrally manages import, update, installation, and attachment of add-ins. Besides, while installing and applying add-ins, it is checked whether the add-in can be used in the current application (for example, if the add-in is for a thin client, not a web client). 1C:Enterprise can import add-ins automatically from 1C:ITS Portal (requires the Get add-ins subsystem of Online Support Library), or an administrator can load them manually from a file.
For the subsystem to run in SaaS mode, embed the Add-ins SaaS subsystem to the configuration.
Subsystem Setup
If the configuration does not contain the Application settings subsystem, add the AddIns command to the Administrator workspace.
User Access Setup
To manage user access to the subsystem, assign a user the roles specified in the table below.
| # | Role Description |
|---|---|
| 1. | BasicAccessSSL or BasicAccessExternalUserSSL (the Core subsystem user role)Grants the right to get add-ins for installation. |
| 2. | FullAccess (the Core subsystem user role) Grants the right to administer add-ins. |
The table below illustrates possible user groups and the roles they could be assigned with.
| # | User Group Description | Assigned Roles |
|---|---|---|
| 1. | Administrator |
|
| 2. | User |
|
| 3. | External user |
|
How to Use the Subsystem in Development
See the subsystem API description in the API documentation (in Russian).
Access to add-ins directly from the Catalog.AddIns catalog is not provided.
An add-in attachment example for using a barcode scanner:
//     Attaching the add-in
    Notification = New NotifyDescription("AttachAddInSSLCompletion", ThisObject);

    ConnectionParameters = AddInsClient.ConnectionParameters ();
    ConnectionParameters.ExplanationText =
        NStr("en = 'Demo: To use a barcode scanner,
                   |the "1C:Barcode scanners (NativeApi)" add-in is required.'");

    AddInsClient.AttachAddInSSL(Notification, "InputDevice",, ConnectionParameters);
// End Attaching the add-in
// Upon notifying of the attachment
&AtClient
Procedure AttachComponentAfterAttachment(Result, AdditionalParameters) Export

    Attachable_Module = Undefined;

    If Result.Attached Then
        Attachable_Module = Result.Attachable_Module;
    Else
        If Not IsBlankString(Result.ErrorDescription) Then
            ShowMessageBox(, Result.ErrorDescription);
        EndIf;
    EndIf;

    If Attachable_Module <> Undefined Then
        ShowUserNotification(
            NStr("en = 'Demo: Successful attachment'"),,,
            PictureLib.Success32);
    EndIf;

    Attachable_Module = Undefined;

EndProcedure
// End Upon notifying of the attachment
When linking a certain add-in to system settings (for example, the SettingsExchangeWithBanks catalog within the Electronic Document Library or the HardwareDrivers catalog within the Peripheral Equipment Library), make sure you save the Id value that defines the add-in (and Version if a specific version is required). Use the AddInInformation function of the AddInServerCall common module to get information about an add-in. If necessary, in the system setting form, you can import and update an add-in from a local file. As an example, see the _DemoAddInOperations data processor in the demo configuration.
Data Exchange Setup
Exclude all the subsystem's metadata objects from exchange plans of distributed infobases (DIB) and standalone workstations and from exchange plans used for data synchronization between different applications.
Export to Files
The subsystem Object export to files is designed for exporting objects based on customizable export templates. The list of export templates is defined individually for each object in Administration > Print forms, reports, and data processes > Export file templates. A visual editor for table templates in print forms is used to create export templates. A template can include any field or table in any order, and you can specify the format of the generated file: DBF, XML, JSON, HTML, TXT, XLS, XLSX, or MXL. The subsystem is functional only if the Print subsystem is integrated.
Subsystem Setup
Administrators should choose configuration objects (catalogs, documents) that should be exported to files, and they must be connected to the Print subsystem if not already connected (see Attaching Configuration Objects). The export of catalogs and documents does not require any additional command configuration. Export commands are automatically displayed in lists and object cards for which the user has created export templates.
User Access Setup
To manage user access to the Export to files subsystem, assign a user the roles specified in the table below.
| # | Role Description |
|---|---|
| 1. | ChangeExportFileTemplatesAdd and edit export file templates. Intended to be used along with the EditPrintFormTemplates role. |
| 2. | OutputToPrinterFileClipboard (the Core subsystem user role)Grants the right to export files using templates and send them by email. |
The table below illustrates possible user groups and the roles they could be assigned with.
| # | User Group Description | Assigned Roles |
|---|---|---|
| 1. | User responsible for support of export file templates |
|
| 2. | The user who is allowed to generate, save, and mail out export files |
|
Barcode Generation
The subsystem provides an API to generate images of barcodes EAN8, EAN13, EAN128, Code39, Code93, Code128, Code16k, PDF417, ITF14, RSS14, EAN13AddOn2, EAN13AddOn5, QR, GS1DataBarExpandedStacked, and Datamatrix.
To generate a barcode image, an add-in stored in the BarcodePrintingAddIn common template is used. This add-in will be imported and initialized automatically. If the Add-ins subsystem is available, the administrator can update the add-in version using the Add-ins catalog.
User Access Setup
No additional roles are required to configure user access rights.
How to Use the Subsystem in Development
The subsystem API is presented in the BarcodeGeneration common module. An example of generating a barcode image:
BarcodeParameters = BarcodeGeneration.BarcodeGenerationParameters();
BarcodeParameters.Width = TheWidthOfTheBarcode;
BarcodeParameters.Height = TheHeightOfTheBarcode;
BarcodeParameters.CodeType = 1; // EAN13
BarcodeParameters.AngleOfRotation = 0;
BarcodeParameters.Barcode = EnterBarcode;
BarcodeParameters.Transparent = True;
BarcodeParameters.Zoomable = True;
BarcodeParameters.MaintainAspectRatio = True;
BarcodeParameters.VerticalAlignment = VerticalAlignment;
BarcodeParameters.GS1DatabarRowCount = GS1DatabarRowsCount;
BarcodeParameters.InputDataType = 0;  // Input data type (0-Row, 1-Base64)

ResultBarcode = BarcodeGeneration.TheImageOfTheBarcode(BarcodeParameters);
For an example of adding a QR code image to a print form, see the _DemoCustomerProformaInvoice manager module.
Data Exchange Setup
The subsystem does not participate in data exchange.
Work Schedules
With the Work schedules subsystem, you can store the enterprise schedules. You can define which days are workdays for each schedule. Use work schedules to specify activities of the company as a whole or its branches. For example, a work schedule of an issuing warehouse.
Subsystem Setup
Add the Calendars catalog to the master data owner's interface. See an example in the Catalogs section of the demo configuration.
You can also define that a work schedule belongs to a particular object participating in business logic. For example, you can link a work schedule to a specific unit, warehouse, or even a machine tool. To use this feature, include the types of objects that have their own work schedules in the WorkScheduleOwner type collection. Work schedules with the specified owner will be hidden from the general list of schedules.
User Access Setup
To manage user access to the subsystem, assign a user the roles specified in the table below.
| # | Role Description |
|---|---|
| 1. | ReadWorkSchedules (the Core subsystem)Grants the right to view calendars and schedules. |
| 2. | AddEditWorkSchedulesGrants the right to add and edit calendars and schedules. |
| 3. | FullAccess (the Core subsystem user role)Grants the right to delete objects marked for deletion. |
How to Use the Subsystem in Development
The subsystem is used together with the Calendar schedules subsystem.
See the subsystem API description in the API documentation (in Russian).
Data Exchange Setup
For distributed infobases (DIB) and standalone workstations, add to the exchange plans all the subsystem's metadata objects that contain data.
Bulk Edit
The Bulk edit subsystem provides a user interface to edit multiple objects of one type in a single action. Besides editing attributes, you can edit additional attributes and information records (the Properties subsystem) if the objects have them.
The subsystem also considers if objects have attributes locked for editing (the Object attribute lock subsystem).
Subsystem Setup
Placing an Object Edit Command in Lists
Select configuration objects that require a bulk edit command. As a rule, such objects include most configuration objects of a reference type.
When using the Attachable Commands subsystem, you can add the command to lists and journals. To do that, list objects in the OnDefineObjectsWithBatchObjectsModificationCommand procedure of the BatchEditObjectsOverridable common module.
You can also display the bulk edit command in the command bar and in the list form context menu. Recommended values of the command properties:
| Property | Value |
|---|---|
| Name | ChangeSelectedItems |
| Action | ChangeSelectedItems |
| Tooltip | Edit the selected items |
| Modifies saved data | No |
Manage the command visibility on the form depending on the current user rights. Example:
&AtServer
Procedure OnCreateAtServer(Cancel, StandardProcessing)
    CanBeEdited = AccessRight("Edit", Metadata.Catalogs._DemoProducts);
    Items.FormChangeSelectedItems.Visible = CanBeEdited;
EndProcedure
Set the Use always flag for the Ref field of the main form attribute.
Add the handler to the form module:
&AtClient
Procedure ChangeSelectedItems(Command)

    BatchEditObjectsClient.ChangeSelectedItems(Items.List, List);

EndProcedure
Restricting Editing of Object Attributes
Editing some attributes using the bulk modification data processor might not be recommended or might violate the configuration logic. Such attributes must be hidden from the user.
Bulk modification data processor can be called from the list form for the selected objects, or independently followed by the selection of objects to edit in the data processor itself. Therefore, you need to analyze all configuration objects and decide which attributes are to be restricted for bulk editing.
If a metadata object has attributes that can be edited using the bulk modification data processor, declare the AttributesToEditInBatchProcessing export function in the object manager module. The function returns an array of attribute names. The remaining attributes are hidden in the bulk modification data processor. In general, object attributes allowed for editing are described as follows (as an example, see the _DemoJobWithRoleAddressing business process in the demo configuration):
// Returns object attributes that can be edited
// using the bulk attribute modification data processor.
//
// Returns:
//  Array - a list of object attribute names.
Function AttributesToEditInBatchProcessing() Export
    AttributesToEdit = New Array;
    AttributesToEdit.Add("AttributeName"); // Object attribute
    AttributesToEdit.Add("TabularSectionName.AttributeName"); // Object table attribute
    AttributesToEdit.Add("TabularSectionName.*"); // All attributes of the object table
    AttributesToEdit.Add("*"); // All attributes and tables of the object
    Return AttributesToEdit;
EndFunction
If you know names of attributes that must not be edited in the bulk modification data processor, declare the AttributesToSkipInBatchProcessing function in the object manager module. The function returns an array of attribute names similar to the AttributesToEditInBatchProcessing function. As an example, see the _DemoProducts catalog in the demo configuration.
If an object is not intended to be used in bulk editing, hide all its attributes. Notice.
Internal object attributes, such as Ref, Description, DeletionMark, and some tables are hidden by default and require no additional actions. See the list of such attributes and tables in the FilterAttributes_ template of the BatchEditObjects data processor.
If necessary, apply to object modules the object population check and "on write" logic used in form modules.
All metadata objects, where the AttributesToEditInBatchProcessing and AttributesToSkipInBatchProcessing functions are defined, must be listed in the OnDefineObjectsWithEditableAttributes procedure of the BatchEditObjectsOverridable common module.
User Access Setup
| # | Role Description |
|---|---|
| 1. | FullAccessGrants the right to edit any configuration objects (when opening the bulk attribute modification form from the Administration command interface). |
| 2. | Other roles No additional roles are required for bulk attribute modification in object lists. This option is available if a user is authorized to edit the objects. |
Data Exchange Setup
The subsystem does not participate in data exchange.
Period-End Closing Dates
With the Period-end closing dates subsystem, you can lock editing of any infobase data entered before the specified date. The system administrator can set either a common date for the entire infobase, or several dates for specific accounting sections or objects.
Period-end closing dates can be set for all users, or for certain users or user groups (if necessary, for external users and external user groups).
The interface enables you to set no period-end closing or configure restrictions defined during integration but not more than By sections and objects and For specified users (and user groups).
For the period-end closing date, you can specify a custom date or select a relative date (for example, end of last quarter).
Subsystem Setup
- Selecting Types That Require Period-End Closing.
- Selecting Types That Require Data Import Restriction.
- Defining Maximum Capabilities of Period-End Closing (Common Date, by Sections, by Objects, by Sections and Objects).
- Defining Metadata Object Fields to Provide Data Being Checked (Date, Section, Object).
- Defining Cases of Conditional Cancellation of Period-End Closing Check and Cases of Import Restriction Check.
- Enabling Setting of Period-End Closing Dates for External Users and External User Groups.
Selecting Types That Require Period-End Closing
Select types of catalogs, documents, and registers that require period-end closing.
Create event subscriptions and specify the selected types according to the table below.
The BeforeWrite event subscriptions to check period-end closing:
| Name | Source Item Types | Handler |
|---|---|---|
CheckPeriodEndClosingDateBeforeWriteDocument |
DocumentObject |
PeriodClosingDates.CheckPeriodEndClosingDateBeforeWriteDocument |
CheckPeriodEndClosingDateBeforeWrite |
CatalogObject, ChartOfCharacteristicTypesObject, ChartOfAccountsObject, ChartOfCalculationTypesObject, BusinessProcessObject, TaskObject, ExchangePlanObject |
PeriodClosingDates. CheckPeriodEndClosingDateBeforeWrite |
CheckPeriodEndClosingDateBeforeWriteRecordSet |
InformationRegisterRecordSet, AccumulationRegisterRecordSet |
PeriodClosingDates. CheckPeriodEndClosingDateBeforeWriteRecordSet |
CheckPeriodEndClosingDateBeforeWriteAccountingRegisterRecordSet |
AccountingRegisterRecordSet |
PeriodClosingDates. CheckPeriodEndClosingDateBeforeWriteAccountingRegisterRecordSet |
CheckPeriodEndClosingDateBeforeWriteCalculationRegisterRecordSet |
CalculationRegisterRecordSet |
PeriodClosingDates. CheckPeriodEndClosingDateBeforeWriteCalculationRegisterRecordSet |
The BeforeDelete event subscriptions to check period-end closing:
| Name | Source Item Types | Handler |
|---|---|---|
CheckPeriodEndClosingDateBeforeDelete |
CatalogObject, DocumentObject, ChartOfCharacteristicTypesObject, ChartOfAccountsObject, ChartOfCalculationTypesObject, BusinessProcessObject, TaskObject, ExchangePlanObject |
PeriodClosingDates. CheckPeriodEndClosingDateBeforeDelete |
In the form module of the selected metadata objects, in the OnReadAtServer event handler procedure, insert the following call:
PeriodClosingDates.ObjectOnReadAtServer(ThisObject, CurrentObject).During this call, the period-end closing is checked. If it exists, the ReadOnly form property is set to True.
Selecting Types That Require Data Import Restriction
To restrict data import by exchange plan nodes, add the required exchange plan types to the PeriodClosingTarget type collection. If at least one exchange plan type is added to the PeriodClosingTarget type collection, clicking Data import restriction dates will open the Period-end closing dates form in the mode of editing data import restriction dates.
Defining Maximum Capabilities of Period-End Closing (Common Date, by Sections, by Objects, by Sections and Objects)
For various applications, requirements for setting a period-end closing date differ considerably. For a simple single-user application one common date is enough. Corporate applications require multiple period-end closing date dimensions for different areas of planning and accounting. For these purposes, sections are provided. These sections relate to various planning and accounting areas where you can set a period-end closing date. For example, Inventory accounting, Accounting reporting, and Planning. Sections in the subsystem are items of the ChartOfCharacteristicTypes.PeriodClosingDatesSections metadata object. These items are created automatically based on section details specified in the OnFillPeriodClosingDatesSections procedure of the PeriodClosingDatesOverridable common module. They cannot be edited in 1C:Enterprise mode.
If necessary, sections can be refined by an object. For example, the Inventory accounting section can be refined by a warehouse. To do this, set the required type for the section. For example, CatalogRef.Warehouses.
There are the following integration options:
-
Common date. In this option, a list of sections is blank. A user can set a common date for the entire configuration (for all users or for specified users).
-
By sections. In this option, a list of sections consists of two or more sections. The section types are not defined (
ChartOfCharacteristicTypesRef.PeriodClosingDatesSections). Objects are not displayed in the interface and you cannot add them. For example, sections Accounting and Planning. You can set a common date or two dates separately for each section. -
By objects. In this option, a list of sections consists of one section. This section is not displayed in the interface but used when getting data for check. A non-empty object type is set for the section. For example, the Bookkeeping section with the
CatalogRef.Companiestype. You can set a common date or different dates for specific companies. -
By sections and objects. In this option, a list of sections consists of two or more sections. At least one section must contain a type of objects. For example, Accounting by companies and Planning.
 // Populates sections of period-end closing dates used during their setup.
 // If no section is specified, only common period-end closing date setup is available.
 //
 // Parameters:
 // Sections - ValueTable - a table with the following columns:
 // * Name - String - a name used in data source details in the
 // FillDataSourcesForPeriodClosingCheck procedure.
 //
 // * Id - UUID - an item reference ID of a chart of characteristic types.
 // To get the ID, execute the platform method in 1C:Enterprise mode:
 // "ChartsOfCharacteristicTypes.PeriodClosingDatesSections.GetRef().UUID()".
 // Do not specify IDs received in any other way
 // as this may violate their uniqueness.
 //
 // * Presentation - String - presents a section in the period-end closing date form.
 //
 // * ObjectsTypes - Array - types of object references for which you can set period-end closing dates.
 // For example, Type("CatalogRef.Companies"). If no type is specified,
 // period-end closing dates will be set up only up to the section.
 //
 Procedure OnFillPeriodClosingDatesSections(Sections) Export

   Section = Sections.Add();
   Section.Name = "_DemoBank";
   Section.Id = New UUID("4109a54a-f3ea-474c-9079-be08bf335668");
   Section.Presentation = NStr("en = 'Demo: Bank'");
   Section.ObjectsTypes.Add(Type("CatalogRef._DemoBankAccounts"));
   Section = Sections.Add();
   Section.Name = "_DemoPayrollAccrual";
   Section.Id = New UUID("100aba96-ea50-4f82-a06c-2e3fdc39a9f1");
   Section.Presentation = NStr("en = 'Demo: Payroll"");

 EndProcedure
Defining Metadata Object Fields to Provide Data Being Checked (Date, Section, Object)
To prepare data for period-end closing check, define the fields (value sources) for each of the selected metadata objects. To do this, use the FillDataSourcesForPeriodClosingCheck procedure of the overridable module.
// Contains details of tables and object fields to check for period-end closing.
//   Called from the DataChangesDenied procedure of the PeriodClosingDates common module.
//   The procedure is used in the BeforeWrite event subscription to check if
//   there is a period-end closing or cancellation of a prohibited object change.
//
// Parameters:
//  DataSources - ValueTable - a table with the following columns:
//   * Table - String - the full name of a metadata object.
//                   For example, Metadata.Decuments.PurchaseInvoice.FullName().
//   * DateField    - String - the name of an object attribute or a table attribute,
//                   for example, "Date", "Goods.DateOfShipment".
//   * Section      - String - the name of a period-end closing section specified in
//                   the OnFillPeriodClosingDatesSections procedure (see above).
//   * ObjectField - String - the name of an object attribute or a table attribute,
//                   for example, "Company", "Goods.Warehouse".
//
// To add a row, use the AddRow procedure in the PeriodClosingDates common module.
//
Procedure FillDataSourcesForPeriodClosingCheck(DataSources) Export
    PeriodClosingDates.AddRow(DataSources,
        Metadata.Documents._DemoReceivedGoodsRecording.FullName(),
        "Date", "_DemoWarehouseAccounting", "StorageLocation");

    PeriodClosingDates.AddRow(DataSources,
        Metadata.Documents._DemoGoodsWriteOff.FullName()
        "Date", "_DemoWarehouseAccounting", "StorageLocation");

    PeriodClosingDates.AddRow(DataSources,
        Metadata.Documents._DemoDebitingFromAccount.FullName(),
        "BankPostingDate", "_DemoBank", "BankAccount");

EndProcedure
The field can be specified using dot syntax. For example, if the document has a reference to the base document containing the object. The attribute will be set as follows: DocumentBasis.Warehouse where DocumentBasis is an attribute of a document to be checked for period-end closing. You can specify the field using several dots.
You can specify a table field as a field. To do that, use dot syntax, for example, Goods.Warehouse. A table field can be specified only in the document being checked not in a base document.
Keep in mind that using dot syntax requires an additional database call to get the value. The usage of a table field will increase the number of data being checked.
A data object might require several checks. For example, in the InventoryTransfer document, period-end closing needs to be checked for two warehouses. In this case, several strings are used to check one metadata object (see an example above).
Defining Cases of Conditional Cancellation of Period-End Closing Check and Cases of Import Restriction Check
Besides a standard case of not checking a period-end closing and data import restriction when updating the infobase, a developer can skip these checks due to applied reasons.
If you need to skip a period-end closing check, for example, if an order is not closed (or skip an import restriction check in special cases of data exchange), use the BeforeCheckPeriodClosing overridable procedure.
// Supports overriding the period-end closing check by an arbitrary condition.
//
// Parameters:
//  Object       - CatalogObject,
//                 DocumentObject,
//                 ChartOfCharacteristicTypesObject,
//                 ChartOfAccountsObject,
//                 ChartOfCalculationTypesObject,
//                 BusinessProcessObject,
//                 TaskObject,
//                 ExchangePlanObject - a data object (BeforeWrite or OnReadAtServer).
//               - InformationRegisterRecordSet,
//                 AccumulationRegisterRecordSet,
//                 AccountingRegisterRecordSet,
//                 CalculationRegisterRecordSet - a record set (BeforeWrite or OnReadAtServer).
//
//  PeriodClosingCheck    - Boolean - if True, the period closing check is performed.
//                                If False, the check is skipped.
//
//  ImportRestrictionCheckNode - Undefined - the import restriction check is not performed.
//                              - ExchangePlansRef - the import restriction check is performed. If
//                                Undefined, the import restriction check is skipped.
//
//  ObjectVersion               - String - initial value is "". Both object versions are checked.
//                                If set to "OldVersion" or "NewVersion",
//                                either previous or new object version is checked.
//
Procedure BeforeCheckPeriodClosing(Object,
                                         PeriodClosingCheck,
                                         ImportRestrictionCheckNode,
                                         ObjectVersion) Export

    If TypeOf(Object) = Type("DocumentObject._DemoSalesOrder") Then
        OrderStatus = Common.ObjectAttributeValue(Object. Ref, "OrderStatus");
        OrderClosedOldVersion = (OrderStatus        = Enums._DemoCustomerOrderStatuses.Closed);
        OrderClosedNewVersion  = (Object.OrderStatus = Enums._DemoCustomerOrderStatuses.Closed);

        If Not OrderClosedOldVersion And Not OrderClosedNewVersion Then
            PeriodClosingCheck = False;
            ImportRestrictionCheckNode = Undefined;

        ElsIf Not OrderClosedNewVersion Then
            ObjectVersion = "OldVersion"; // Check the old object version only.

        ElsIf Not OrderClosedOldVersion Then
            ObjectVersion = "NewVersion"; // Check the new object version only.
        EndIf;

    ElsIf TypeOf(Object) = Type("DocumentObject._DemoDebitingFromAccount") Then
        // Cancel check considering that BankPostingDate is not specified
        // if the document is not processed by bank. It is specified later after the bank processes it.
        ProcessedByBankNewVersion  = Object.ProcessedByBank;
        ProcessedByBankOldVersion = Common.ObjectAttributeValue(
            Object.Ref, "ProcessedByBank") = True;

        If Not ProcessedByBankNewVersion And Not ProcessedByBankOldVersion Then
            PeriodClosingCheck = False;
            ImportRestrictionCheckNode = Undefined;

        ElsIf Not ProcessedByBankNewVersion Then
            ObjectVersion = "OldVersion"; // Check the old object version only.

        ElsIf Not ProcessedByBankOldVersion Then
            ObjectVersion = "NewVersion"; // Check the new object version only.
        EndIf;
    EndIf;

EndProcedure
Enabling Setting of Period-End Closing Dates for External Users and External User Groups
If you need to set period-end closing dates for external users and external user groups, write the following code block to the InterfaceSetup procedure of the overridable module:
Procedure InterfaceSetup (Val InterfaceSettings5) Export

    InterfaceSettings5.UseExternalUsers = True;

EndProcedure
Command Interface Setup
If the configuration does not contain the Application settings subsystem, add the following metadata objects to the interface of a person responsible for period-end closing dates:
- Command
PeriodEndClosingDatesto view and edit period-end closing dates. - Command
DataImportRestrictionDatesto view and edit data import restriction dates (if import restrictions are not used, the command is not displayed).
To display the commands, include the PeriodClosingDates information register in the interface subsystem (usage of standard commands is disabled for the register).
User Access Setup
To manage user access to the subsystem, assign a user the roles specified in the table below.
| # | Role Description |
|---|---|
| 1. | FullAccess(the Core subsystem user role)Grants the right to view and edit period-end closing dates and data import restriction dates (access to the Period-end closing dates form with reports). |
| 2. | ReadPeriodEndClosingDatesGrants the right to view period-end closing dates (access to the Period-end closing dates form and the Period-end closing dates report). |
| 3. | AddEditPeriodClosingDatesGrants the right to view and edit period-end closing dates (access to the Period-end closing dates form and the Period-end closing dates report). |
| 4. | ReadDataImportRestrictionDatesGrants the right to view import restriction dates (access to the Data import restriction dates form and the Data import restriction dates report). See also Data Exchange. |
| 5. | AddEditDataImportRestrictionDatesGrants the right to view and edit import restriction dates (access to the Data import restriction dates form and the Data import restriction dates report). See also Data Exchange. |
How to Use the Subsystem in Development
When you create a new metadata object, you have to set up the subsystem policies on the new objects.
The DataChangesDenied function of the PeriodClosingDates module is used for additional period-end closing check (out of event subscriptions).
You may need to perform a non-standard programming check of period-end closing. To do that, use the PeriodEndClosingFound function of the PeriodClosingDates module. The function performs the check, returns its result, and sends a standard error message to the user.
For the function to operate, you need to prepare data whose template is easy to get (see the function comment). This function is used in the event subscription before writing. Data received from the data object is passed to the function twice, for previous and new object instances.
// Searches for period-end closing dates by data being checked
// for an authorized user or an exchange plan node.
//
// Parameters:
//  DataToCheck - ValueTable - it is returned by the DataToCheckTemplate function
//                      of the PeriodClosingDates common module.
//
//  DataDetails    - Undefined - period-end closing message text is not generated.
//                    - Structure - with the following properties:
//                      * NewVersion - Boolean - if True, a period-end closing message
//                                   is generated for a new version. If False, for a previous version.
//                      * Data - Ref,Object - a reference or a data object to get
//                                   a presentation that will be used in the period-end closing message.
//                               - RecordSet - a register record set to get
//                                   a presentation that will be used in the period-end closing message.
//                               - Structure - with properties for the period-end closing message:
//                                   * Register - String - a full register name.
//                                   * Filter   - Filter - a record set filter.
//                               - String - a prepared data presentation
//                                 that will be used in the period-end closing message.
//
//  ErrorDescription    - String - (return value) details of period-end closing or data import restriction.
//                      It is not filled in if the DataDetails parameter is not specified.
//                    - Null - in this case, an error message is not prepared,
//                      which speeds up the check when the period-end closing is found.
//
//  ImportRestrictionCheckNode - Undefined - perform period-end closing check.
//                              - ExchangePlansRef.<Exchange plan name> - perform data import restriction
//                                check for the specified node.
//
// Returns:
//  Boolean - if True, at least one period-end closing is detected.
//
Function PeriodEndClosingFound(Val DataToCheck,
                                    DataDetails = Undefined,
                                    ErrorDescription = Null,
                                    ImportRestrictionCheckNode = Undefined) Export
Interaction During Data Exchange
Use the ImportRestricted function of the PeriodClosingDates module for data import restriction check.
If during data exchange you need to write data when the DataExchange.Load flag is not set, but without the period-end closing check, insert the SkipPeriodClosingCheck property to the AdditionalProperties object properties. If you need to skip a period-end closing check for all objects to be written when writing a target object, use the DisablePeriodEndClosingDatesCheck procedure of the PeriodClosingDates common module instead of the SkipPeriodClosingCheck property.
Data Exchange Setup
For distributed infobases (DIB) and standalone workstations, add to the exchange plans all the subsystem's metadata objects except for the following:
- Constant
PeriodClosingDatesVersion - Chart of characteristic types
PeriodClosingDatesSections
Exclude all the subsystem's metadata objects from exchange plans used for data synchronization between different applications.
Additional Reports and Data Processors
With the Additional reports and data processors subsystem, you can attach additional (external) reports and data processors to the infobase in 1C:Enterprise mode.
Depending on their purpose, additional reports and data processors can be global-level if they are used for the entire application, or object-level if they are used with certain types of infobase objects. Object-level data processors are divided into the following types by their functionality: generation data processors, object population data processors, print forms, and reports.
Subsystem Setup
To use the subsystem in the configuration, add the AdditionalReportsAndDataProcessors catalog to the administrator's command interface. Then follow the steps described below.
Setting Up Object-Level Additional Reports and Data Processors
Select metadata objects to which you want to attach additional report and data processor commands. For example, all catalogs and documents of the configuration. Specify these objects in the Type property of the ObjectWithAdditionalCommands type collection.
For each metadata object, make changes to all its object and list forms by adding the Attachable Commands subsystem.
Metadata objects, to which you can attach additional print forms, are defined when integrating the Print Tools subsystem.
Setting Up Global-Level Additional Reports and Data Processors
-
You need to decide where to display commands for global-level reports and data processors in the command interface. We recommend that you display such commands in upper-level subsystems, which form sections of the global-level command interface.
-
For each location of global-level additional data processors, create a common command of the
AdditionalDataProcessors<display_location>kind, include it in theUseAdditionalReportsAndDataProcessorsfunctional option, and add the following code block into it:&AtClient Procedure CommandProcessing(CommandParameter, CommandExecuteParameters) AdditionalReportsAndDataProcessorsClient.OpenAdditionalReportAndDataProcessorCommandsForm( CommandParameter, CommandExecuteParameters, AdditionalReportsAndDataProcessorsClientServer.DataProcessorKindAdditionalDataProcessor(), "<Section name>"); EndProcedurewhere
<Section name>is the name of the command interface section that hosts the command. To get a desktop name, use theDesktopIDfunction of theAdditionalReportsAndDataProcessorsClientServercommon module. As an example, see theAdditionalDataProcessorsAdministrationcommon command in the demo configuration. -
For each location of global-level additional reports, create a common command of the
AdditionalReports<display_location>kind, include it in theUseAdditionalReportsAndDataProcessorsfunctional option, and add the following code block into it:&AtClient Procedure CommandProcessing(CommandParameter, CommandExecuteParameters) AdditionalReportsAndDataProcessorsClient.OpenAdditionalReportAndDataProcessorCommandsForm( CommandParameter, CommandExecuteParameters, AdditionalReportsAndDataProcessorsClientServer.DataProcessorKindAdditionalReport(), "<Section name>"); EndProcedurewhere
<Section name>is the name of the command interface section that hosts the command. To get a desktop name, use theDesktopIDfunction of theAdditionalReportsAndDataProcessorsClientServercommon module. As an example, see theAdditionalReportsAdministrationcommon command in the demo configuration. -
List sections that host common commands created on the previous steps as metadata objects in the
GetSectionsWithAdditionalDataProcessorsandGetSectionsWithAdditionalReportsprocedures of theAdditionalReportsAndDataProcessorsOverridableoverridable module. See an example of the code in the demo configuration.
Configuring Document Posting Before Generating External Print Forms
By default, before generating any print form, 1C:Enterprise checks if document objects being printed are posted. If at least one unposted document is found, the user will be prompted to post it. If the user refuses to do it, printing is canceled.
You can disable this check when integrating the subsystem. To do this, in the BeforeExecuteExternalPrintFormPrintCommand procedure of the AdditionalReportsAndDataProcessorsClientOverridable common module, set the StandardProcessing parameter to False:
    Procedure BeforeExecuteExternalPrintFormPrintCommand(ObjectsToPrint, StandardProcessing) Export

        StandardProcessing = False;

    EndProcedure
Command Interface Setup
If the configuration does not contain the Application settings subsystem, add the following metadata objects to the Administrator workspace:
- Constant
UseAdditionalReportsAndDataProcessors. By switching the constant value, you can manage the usage of the subsystem features in the infobase. If the configuration is adapted for SaaS, you need to display the command in the command setting form only in the hosted mode. In SaaS, the constant value is managed centrally from the service manager. - Command to open a list of the
AdditionalReportsAndDataProcessorscatalog.
As an example, see the PrintFormsReportsAndDataProcessors form of the SSLAdministrationPanel data processor.
User Access Setup
To manage user access to the subsystem, assign a user the roles specified in the table below.
| # | Role Description |
|---|---|
| 1. | AddEditAdditionalReportsAndDataProcessorsGrants the right to add additional data processors and reports to the application, and change publication parameters and related objects of data processors and reports. |
| 2. | ReadAdditionalReportsAndDataProcessorsGrants the right to start allowed additional reports and data processors. To restrict access to separate additional reports and data processors, you can use the AdditionalReportsAndDataProcessors access kind if the Access management subsystem is available. |
To grant users access to the data that belongs to other subsystems and might be required to work with the Additional reports and data processors subsystem, create auxiliary roles or re-use existing suitable roles.
| # | Auxiliary Role Description |
|---|---|
| 1. | New or existing role Role with a granted right to view common commands of access to global-level reports and data processors created on steps 2 and 3 of setting up global-level additional reports and data processors. It is assigned to users along with the ReadAdditionalReportsAndDataProcessors role. |
The table below illustrates possible user groups and the roles they could be assigned with.
| # | User Group Description | Assigned Roles |
|---|---|---|
| 1. | Administrator of additional reports and data processors. Authorized to add new data processors to the configuration, publish them, set related objects, and use external data processors in the configuration. |
|
| 2. | User authorized to run additional reports and data processors. Can start data processors for execution. |
|
Special Cases of Integration
How to Use the Subsystem in Development
Creating Reports or Data Processors
Additional reports and data processors can be either global-level (the AdditionalDataProcessor and AdditionalReport kinds), or object-level (the ObjectFilling, Report, PrintForm, and RelatedObjectsCreation kinds). Global-level commands are located in the global-level command interface. Object-level commands are used together with infobase objects and located in the context of objects they are assigned to. See examples of object-level data processors in the Demo: Counterparties catalog and the Demo: Sales proforma invoices document. For general information about external reports and data processors, see External reports and data processors in the platform documentation.
To create an additional data processor or report:
- Create an additional data processor or report.
- A data processor is registered in the infobase based on the information records supplied by the data processor itself. These information records must be returned as a structure in the
ExternalDataProcessorInfofunction of the data processor module. Structure fields are the following:
| Key | Content |
|---|---|
Kind |
String, data processor kind, one of possible kinds: AdditionalDataProcessor, AdditionalReport, ObjectFilling, Report, PrintForm, or RelatedObjectsCreation. |
Purpose |
An array of strings of metadata object names in the format: MetadataObjectClassName.[*|MetadataObjectName].For example, Document.InvoiceOrder or Catalog.*. Note: the parameter is applicable only for object-level data processors. |
Description |
The data processor description used to fill in the catalog item description, brief details to identify the data processor by the administrator. |
Version |
Data processor version in the <senior number>.<junior number> format is used when importing data processors to the infobase. For example, 1.0. |
SafeMode |
Possible values are True or False depending on whether the safe mode must be enabled or disabled when running a data processor or a report. If it is True, a data processor or a report will be started in safe mode. Correct operation of additional data processors under users without full rights is not guaranteed when the data processor calls an application code that is not designed for the safe mode (including implicitly, when the code of the object module and event subscriptions is triggered when writing data).For more information on the safe mode, see 1C:Enterprise platform documentation. |
Information |
Brief information on the data processor, data processor details. |
Commands |
Commands supplied by the data processor. A value table with the following columns:
|
SSLVersion |
The minimum SSL version for the additional data processor code. The version must not be earlier than 1.2.1.4. SSL version number has the following format: <Major>.<Minor>.<Revision>.<Build>. |
Permissions |
An array of permissions granted to an additional data processor when using API that extends operations available to the developer when running the additional data processor in safe mode. As an example, see the _DemoImportProductsFromPriceListSecurityProfiles data processor. |
DefineFormSettings |
Boolean. It is used for additional reports attached to the Report options subsystem and using the common report form (for more information, see step 3).When it is True, the additional report has API for deep integration with the report form. For example, it can override some form settings and subscribe to its events. In this case, define the procedure in the report object module as follows:// Defining settings of a common report form of the "Report options" subsystem. |
ReportOptionAssignment |
A type of device an additional report is intended for. It is generated when writing an additional report. This parameter is applicable only for additional reports. The ReportOptionPurposes enumeration contains possible values:ForComputersAndTablets. The report option is displayed in report panels in the standard 1C:Enterprise application. If the ReportOptionAssignment parameter is not specified, this value is assigned by default.ForSmartphones. The report option is displayed in report panels in the mobile 1C:Enterprise application.ForAnyDevice. The report option is always displayed regardless of the 1C:Enterprise application type. |
[1] For data processors with print forms based on a spreadsheet document template, it must contain a template list (see details of the
TemplatesNamesparameter of thePrintManagementClient.ExecutePrintCommandprocedure in section Print Tools).
Example of the ExternalDataProcessorInfo function implementation using API:
Function ExternalDataProcessorInfo() Export
RegistrationParameters = AdditionalReportsAndDataProcessors.ExternalDataProcessorInfo("2.2.2.1");
RegistrationParameters.Kind = AdditionalReportsAndDataProcessorsClientServer.DataProcessorKind<...>();
RegistrationParameters.Version = "...";
Command = RegistrationParameters.Commands.Add();
Command.Presentation = NStr("en = '<Command presentation>'");
Command.Id = "<Command name>";
Command.Use = AdditionalReportsAndDataProcessorsClientServer.CommandType<...>();
Command.ShouldShowUserNotification = <True/False>;
Return RegistrationParameters;
EndFunctionThis example also shows that the Description and Information parameters can be populated using metadata of an external data processor (a synonym and a comment are taken, respectively).
The example of the ExternalDataProcessorInfo function implementation with manual defining of parameter structure:
Function ExternalDataProcessorInfo() Export
RegistrationParameters = New Structure;
RegistrationParameters.Insert("Kind", ...);
RegistrationParameters.Insert("Purpose", ...);
RegistrationParameters.Insert("Description", ...);
RegistrationParameters.Insert("Version", ...);
RegistrationParameters.Insert("Information", ...);
RegistrationParameters.Insert("SSLVersion", "1.2.1.4");
Commands = New ValueTable;
Commands.Columns.Add("Presentation", New TypeDescription("String"));
Commands.Columns.Add("Id", New TypeDescription("String"));
Commands.Columns.Add("Use", New TypeDescription("String"));
Commands.Columns.Add("ShouldShowUserNotification", New TypeDescription("Boolean"));
Commands.Columns.Add("Modifier", New TypeDescription("String"));
RegistrationParameters.Insert("Commands", Commands);
Command = RegistrationParameters.Commands.Add();
Command.Presentation = NStr("en = '<Command presentation>'");
Command.Id = "<Command name>";
Command.Use = AdditionalReportsAndDataProcessorsClientServer.CommandType<...>();
Command.ShouldShowUserNotification = <True/False>;
Return RegistrationParameters;
EndFunction- Decide if you want to attach additional reports to the Report options subsystem (if the subsystem is integrated in the configuration).
- For more information about the subsystem, see section Report Options. For example, you can place options of additional reports attached to the Report options subsystem in the report panels.
- To attach the report to the Report options subsystem, in the Options repository property (the Actions menu, the Properties command), select
ReportsVariantsStorage.
If an additional report is attached to the Report options subsystem and usesReportForm,ReportSettingsForm, andReportVariantFormcommon forms, you can activate handlers extending the report form functionality in theExternalDataProcessorInfofunction. SetTruein theRegistrationParameters.DefineFormSettingsproperty and define the procedure in the report object module as follows:
// Defining settings of a common report form of the "Report options" subsystem.
//
// Parameters:
// Form - ClientApplicationForm, Undefined - a report form or a report settings form.
// Undefined when called without a context.
// VariantKey - String, Undefined - the name of a predefined report option
// or the UUID of a custom report option.
// Undefined when called without a context.
// Settings - Structure - see the return value of
// ReportsClientServer.GetDefaultReportSettings().
//
Procedure DefineFormSettings(Form, VariantKey, Settings) Export
// Procedure code.
EndProcedure"Open Form" Start Option
For this start option, you need to create a data processor form that will be opened when executing the command:
- For global-level reports and data processors, no additional actions are required.
- For object-level reports and data processors, add the
RelatedObjectsparameter of theArbitrarytype to the data processor form. This parameter gets an array of references to objects, for which an additional data processor is executed.
Note.
When using the Open form start option, call the NotifyChanged method after changing the objects to show the changes in the user interface.
Two parameters are passed to the form: CommandID and AdditionalDataProcessorRef (a reference to the AdditionalReportsAndDataProcessors catalog item linked to this additional data processor).
"Call Client Method" Start Option
For this start option, you need to create a data processor form and start an export procedure of a certain kind in the data processor form module.
For global reports and data processors, implement the ExecuteCommand export procedure with the CommandID (String) parameter:
&AtClient
Procedure ExecuteCommand(CommandID) Export

  // Implementing a command logic.
  // ...

EndProcedure
For object-level data processors of the PrintForm type, implement the Print export procedure with two parameters: CommandID and RelatedObjectsArray, where CommandID is a string, command ID; RelatedObjectsArray is an array of references to infobase objects for which the additional data processor is executed:
&AtClient
Procedure Print(CommandID, RelatedObjectsArray) Export

  // Implementing a print command logic.
  // ...

EndProcedure
For object-level data processors of the Create related objects type, implement the ExecuteCommand export procedure with the CommandID, RelatedObjectsArray, and CreatedObjects parameters, where CreatedObjects is an array of references to the created objects:
&AtClient
Procedure ExecuteCommand(CommandID, RelatedObjectsArray, CreatedObjects) Export

  // Implementing a logic of related objects creation command.
  // ...

EndProcedure
For object-level data processors of the Populate object and Report types, implement the ExecuteCommand export procedure with the CommandID and RelatedObjectsArray parameters:
&AtClient
Procedure ExecuteCommand(CommandID, RelatedObjectsArray) Export

  // Implementing a logic of object population command.
  // ...

EndProcedure
For all types of additional reports and data processors, the AdditionalDataProcessorRef parameter is passed to the form. It is a reference to the AdditionalReportsAndDataProcessors catalog item linked to this additional data processor or report.
"Call Server Method" Start Option
For this start option, you need to create an export procedure of a certain kind in the data processor module.
For global-level reports and data processors, implement the ExecuteCommand export procedure with the CommandID and CommandExecutionParameters parameters (for more information on the parameters, see the comment to the CommandTypeServerMethodCall function of the AdditionalReportsAndDataProcessorsClientServer module):
Procedure ExecuteCommand(CommandID, CommandExecuteParameters) Export

  // Implementing a command logic.
  If CommandID = ... Then
    ...
  ElsIf ...

EndProcedure
For object-level data processors of the Create related objects type, implement the ExecuteCommand export procedure with the CommandID, RelatedObjects, CreatedObjects, and CommandExecuteParameters parameters:
Procedure ExecuteCommand(CommandID, RelatedObjects, CreatedObjects, CommandExecuteParameters) Export

  // Implementing a logic of related objects creation command.
  If CommandID = ... Then
    ...
  ElsIf ...

EndProcedure
For object-level data processors of the PrintForm type, implement the Print export procedure with the ObjectsArray, PrintFormsCollection, PrintObjects, and OutputParameters parameters. See description of the parameters in section Print Tools. In this case, the OutputParameters structure contains the AdditionalDataProcessorRef property (a reference to the AdditionalReportsAndDataProcessors catalog item linked to this additional data processor).
Procedure Print(ObjectsArray, PrintFormsCollection, PrintObjects, OutputParameters) Export

  // Implementing a print command logic.
  If CommandID = ... Then
    ...
  ElsIf ...

EndProcedure
Example: External Print Form
Data processor with one print form:
Function ExternalDataProcessorInfo() Export

    RegistrationParameters = AdditionalReportsAndDataProcessors.ExternalDataProcessorInfo("2.3.1.73");
    RegistrationParameters.Kind = AdditionalReportsAndDataProcessorsClientServer.DataProcessorKindPrintForm();
    RegistrationParameters.Version = "1.3";

    // Defining the objects to which this data processor is attached.
    RegistrationParameters.Purpose.Add("Document._DemoCustomerProformaInvoice");

    // Adding the "Proforma invoice" print command.
    NewCommand = RegistrationParameters.Commands.Add();
    NewCommand.Presentation = NStr("en = 'Proforma invoice (external print form)'");
    NewCommand.Id = "ProformaInvoice";
    NewCommand.Use =
    AdditionalReportsAndDataProcessorsClientServer.CommandTypeServerMethodCall();
    NewCommand.Modifier = "PrintMXL1";
    …
    Return RegistrationParameters;

EndFunction
Procedure Print(ObjectsArray, PrintFormsCollection, PrintObjects, OutputParameters) Export

    PrintForm = PrintManagement.PrintFormInfo(PrintFormsCollection, "ProformaInvoice");
    If PrintForm <> Undefined Then
        PrintForm.SpreadsheetDocument = GenerateCustomerProformaInvoice(ObjectsArray, PrintObjects);
        PrintForm.TemplateSynonym = NStr("en = 'Proforma invoice'");
    EndIf;
EndProcedure
Function GenerateCustomerProformaInvoice(ObjectsArray, PrintObjects)
    SpreadsheetDocument = New SpreadsheetDocument;
    ....
    Return SpreadsheetDocument;
EndFunction
To replace the built-in print command, specify its ID in the CommandsToReplace parameter:
// Adding the "Proforma invoice" print command.
NewCommand = RegistrationParameters.Commands.Add();
…
NewCommand.CommandsToReplace = "InvoiceOrder";
Usually, the list of available print commands with IDs is located in the AddPrintCommands procedure of the object manager module. If replacement is not required, the parameter can be omitted.
A data processor can contain several print forms:
Function ExternalDataProcessorInfo() Export

    RegistrationParameters = AdditionalReportsAndDataProcessors.ExternalDataProcessorInfo("2.3.1.73");
    RegistrationParameters.Kind = AdditionalReportsAndDataProcessorsClientServer.DataProcessorKindPrintForm();
    RegistrationParameters.Version = "1.3";

    // Defining the objects to which this data processor is attached.
    RegistrationParameters.Purpose.Add("Document._DemoCustomerProformaInvoice");
    // Adding the "Proforma invoice" print command.
     NewCommand = RegistrationParameters.Commands.Add();
     NewCommand.Presentation = NStr("en = 'Proforma invoice (external print form)'");
     NewCommand.Id = "ProformaInvoice";
     NewCommand.Use =
     AdditionalReportsAndDataProcessorsClientServer.CommandTypeServerMethodCall();
     NewCommand.Modifier = "PrintMXL1";
     NewCommand.CommandsToReplace = "InvoiceOrder";
     // Adding the "Sales order" print form.
     NewCommand = RegistrationParameters.Commands.Add();
     NewCommand.Presentation = NStr("en = 'Sales order (external print form)'");
     NewCommand.Id = "BuyerSOrder";
     NewCommand.Use = AdditionalReportsAndDataProcessorsClientServer.CommandTypeServerMethodCall();
     NewCommand.Modifier = "PrintMXL1";
     Return RegistrationParameters;
EndFunction

Procedure Print(ObjectsArray, PrintFormsCollection, PrintObjects, OutputParameters) Export
            PrintForm = PrintManagement.PrintFormInfo(PrintFormsCollection, "ProformaInvoice");
    If PrintForm <> Undefined Then
        PrintForm.SpreadsheetDocument = GenerateCustomerProformaInvoice(ObjectsArray, PrintObjects);
        PrintForm.TemplateSynonym = NStr("en = 'Proforma invoice'");
    EndIf;
            PrintForm = PrintManagement.PrintFormInfo(PrintFormsCollection, "BuyerSOrder");
    If PrintForm <> Undefined Then
        PrintForm.SpreadsheetDocument = GenerateSalesOrder(ObjectsArray, PrintObjects);
        PrintForm.TemplateSynonym = NStr("en = 'Sales order (external print form)'");
    EndIf;
EndProcedure
Function GenerateCustomerProformaInvoice(ObjectsArray, PrintObjects)
    SpreadsheetDocument = New SpreadsheetDocument;
    ....
    Return SpreadsheetDocument;
EndFunction
Function GenerateSalesOrder(ObjectsArray, PrintObjects)
    SpreadsheetDocument = New SpreadsheetDocument;
    ....
    Return SpreadsheetDocument;
EndFunction
A data processor can contain a command to print a set of print forms. Description of the set print command differs from the print command of one print form as the Id parameter contains a list of print form IDs (of this data processor) included in the set:
// Adding the "Document set" print command.
NewCommand = RegistrationParameters.Commands.Add();
NewCommand.Presentation = NStr("en = 'Document set (external print form)'");
NewCommand.Id = "ProformaInvoice,BuyerSOrder,LetterOfGuarantee";
NewCommand.Use = AdditionalReportsAndDataProcessorsClientServer.CommandTypeServerMethodCall();
NewCommand.Modifier = "PrintMXL1";
An example of a data processor with the set print command:
Function ExternalDataProcessorInfo() Export

    RegistrationParameters = AdditionalReportsAndDataProcessors.ExternalDataProcessorInfo("2.3.1.73");
    RegistrationParameters.Kind = AdditionalReportsAndDataProcessorsClientServer.DataProcessorKindPrintForm();
    RegistrationParameters.Version = "1.3";

    // Defining the objects to which this data processor is attached.
    RegistrationParameters.Purpose.Add("Document._DemoCustomerProformaInvoice");

    // Adding the "Document set" print command.
    NewCommand = RegistrationParameters.Commands.Add();
    NewCommand.Presentation = NStr("en = 'Document set (external print form)'");
    NewCommand.Id = "ProformaInvoice,BuyerSOrder,LetterOfGuarantee";

    NewCommand.Use = AdditionalReportsAndDataProcessorsClientServer.CommandTypeServerMethodCall();
    NewCommand.Modifier = "PrintMXL1";

    Return RegistrationParameters;
    …
EndFunction
Procedure Print(ObjectsArray, PrintFormsCollection, PrintObjects, OutputParameters) Export

    PrintForm = PrintManagement.PrintFormInfo(PrintFormsCollection, "ProformaInvoice");
    If PrintForm <> Undefined Then
        PrintForm.SpreadsheetDocument = GenerateCustomerProformaInvoice(ObjectsArray, PrintObjects);
        PrintForm.TemplateSynonym = NStr("en = 'Proforma invoice'");
    EndIf;

    PrintForm = PrintManagement.PrintFormInfo(PrintFormsCollection, "BuyerSOrder");
    If PrintForm <> Undefined Then
        PrintForm.SpreadsheetDocument = GenerateSalesOrder(ObjectsArray, PrintObjects);
        PrintForm.TemplateSynonym = NStr("en = 'Sales order (external print form)'");
    EndIf;

    PrintForm = PrintManagement.PrintFormInfo(PrintFormsCollection, "LetterOfGuarantee");
    If PrintForm <> Undefined Then
        PrintForm.SpreadsheetDocument = GenerateWarrantyLetter(ObjectsArray, PrintObjects);
        PrintForm.TemplateSynonym = NStr("en = 'Letter of Guarantee (external print form)'");
    EndIf;

EndProcedure
Function GenerateCustomerProformaInvoice(ObjectsArray, PrintObjects)
    SpreadsheetDocument = New SpreadsheetDocument;
    …
    Return SpreadsheetDocument;
EndFunction
Function GenerateSalesOrder(ObjectsArray, PrintObjects)
    SpreadsheetDocument = New SpreadsheetDocument;
    …
    Return SpreadsheetDocument;
EndFunction
Function GenerateLetterOfGuarantee(ObjectsArray, PrintObjects)
    SpreadsheetDocument = New SpreadsheetDocument;
    …
    Return SpreadsheetDocument;
EndFunction
For object-level data processors of the Populate object type and other types, implement the ExecuteCommand export procedure with the CommandID, RelatedObjects, and CommandExecuteParameters parameters:
Procedure ExecuteCommand(CommandID, RelatedObjects, CommandExecuteParameters) Export

  // Implementing a logic of object population command.
  If CommandID = ... Then
    ...
  ElsIf
    ...
  EndIf;
  …

EndProcedure
Example: a Data Processor to Populate Form Data without Writing the Object
With data processors of the Populate object type, you can operate form data directly instead of addressing an object reference. By that, you can avoid forced object writing in the form both before and after running the data processor.
An example of the form data population command:
Function ExternalDataProcessorInfo() Export

    RegistrationParameters = AdditionalReportsAndDataProcessors.ExternalDataProcessorInfo("2.2.2.1");

    RegistrationParameters.Kind = AdditionalReportsAndDataProcessorsClientServer.DataProcessorKindObjectFilling();
    RegistrationParameters.Version = "1.2";
    RegistrationParameters.Purpose.Add("Catalog._DemoCounterparties");

    NewCommand = RegistrationParameters.Commands.Add();
    NewCommand.Presentation = NStr('en = 'Populate the "TIN" attribute without saving the object (populate form)'");
    NewCommand.Id = "FillTIN";
    NewCommand.Use = AdditionalReportsAndDataProcessorsClientServer.CommandTypeFormFilling();

    Return RegistrationParameters;
EndFunction
Procedure ExecuteCommand(CommandName, RelatedObjects, ExecutionParameters) Export
    If CommandName = "FillTIN" Then
        Generator = New RandomNumberGenerator;

        ThisForm = ExecutionParameters.ThisForm;
        ThisForm.Object.TIN = Format(Generator.RandomNumber(1, 999999999), "ND=12; NFD=0; NLZ=; NG=");

        ThisForm.Modified = True;

        Message = New UserMessage();
        Message.Field = "Object.TIN";
        Message.Text = NStr("en = 'Field ""TIN"" is successfully populated'");
        Message.Inform();
    EndIf;
EndProcedure
For more information, see the Demo: Population data processor additional data processor in the Additional reports and data processors catalog of the demo configuration.
Example: Additional Data Processor Parameters Being Saved
To set parameters for an additional data processor, you can use the SettingsStorage attribute of the AdditionalReportsAndDataProcessors catalog. For example, to populate the Allocation of other costs document, you need to get prices by a specific kind created for this scenario. This kind of prices can be set using the parameter being saved. Arbitrary parameters of an additional data processor can be saved to the SettingsStorage attribute (for example, as a structure). To access the SettingsStorage attribute, a reference to the AdditionalReportsAndDataProcessors catalog item is passed to the data processor execution command. Reading and writing the settings must be performed using the subsystem’s API as specified below.
An example of code for reading the settings:
SettingsStructure = AdditionalReportsAndDataProcessors.LoadSettings(Parameters.AdditionalDataProcessorRef);For writing:
AdditionalReportsAndDataProcessors.ShouldSaveSettings(AdditionalDataProcessorRef, SettingsStructure);For more information, see the Demo: Import products from price list additional data processors in the Additional reports and data processors catalog.
Background Execution of Long-Running Operations
To start long-running operations of an additional object in the background, start background execution of the command and get the result after its completion.
API, which helps to start long-running operations in the background, is represented by the following procedures:
- In the
AdditionalReportsAndDataProcessorsClientcommon module:ExecuteCommandInBackgroundandCommandExecuteParametersInBackground. - In the
AdditionalReportsAndDataProcessorscommon module:ExecuteCommandFromExternalObjectFormandExecuteCommand.
Let us consider the attachment by steps.
Step 1. In the form of additional data processor, add the key parameters:
AdditionalDataProcessorRefof theCatalogRef.AdditionalReportsAndDataProcessorstype to store a reference of an external object.CommandIDof theStringtype to store an ID of the command being executed.
Step 2. Start a long-running operation using the following code block:
```
CommandParameters = AdditionalReportsAndDataProcessorsClient.CommandExecuteParametersInBackground(Parameters.AdditionalDataProcessorRef);
CommandParameters.AccompanyingText1 = NStr("en = '<Insert a presentation of the command being executed...>'");
Handler = New NotifyDescription("AfterFinishTimeConsumingOperation", ThisObject, AccompanyingText1);
AdditionalReportsAndDataProcessorsClient.ExecuteCommandInBackground(Parameters.CommandID, CommandParameters, Handler);
```
Step 3. Add the procedure to get the result:
```
// Parameters:
//  Result - see TimeConsumingOperationsClient.NewResultLongOperation
//  AccompanyingText1 - String
//
&AtClient
Procedure AfterFinishTimeConsumingOperation(Result, AccompanyingText1) Export

    If Result = Undefined Then // The user canceled the job.
        Return;
    EndIf;

    If Result.Status = "Error" Then
        StandardSubsystemsClient.OutputErrorInfo(Result.ErrorInfo);
        Return;
    EndIf;

    // Process the result (Status = "Completed2").
    ShowUserNotification(NStr("en = 'Successful completion'"), , AccompanyingText1, PictureLib.Success32);

EndProcedure
```
Step 4. In the object module, add a handler of the Call server method command as per the template from "Call Server Method" Start Option.
In the SSL demo infobase, this option is presented in the Demo: Full-text search management, Demo: Import products from price list (security profiles), Demo: Population data processor, and Demo: Create related objects data processors in the Additional reports and data processors catalog.
Saving Data Processor Parameters Between Start Sessions
If you need to save a set of parameters to execute a data processor, use the SettingsStorage attribute (the ValueStorage type) of the AdditionalReportsAndDataProcessors catalog. By using it, for example, in interactive data processors, you can save the last values entered by the user. In the data processors executed according to a scheduled job, the administrator can set default values and various operation parameters.
An example of saving parameters:
AdditionalDataProcessorObject = AdditionalDataProcessorRef.GetObject();
AdditionalDataProcessorObject.SettingsStorage = New ValueStorage(ValueToSave);
AdditionalDataProcessorObject.Write();
An example of importing previously saved parameters:
SettingsStorage = Common.ObjectAttributeValue(AdditionalDataProcessorRef, "SettingsStorage");
Settings = SettingsStorage.Get();
As an example, see the _DemoImportProductsFromPriceListSecurityProfiles data processor form in the demo configuration.
Data Exchange Setup
For distributed infobases (DIB) and standalone workstations, add to the exchange plans all the subsystem's metadata objects that contain data.
For standalone workstations in SaaS, add the UseAdditionalReportsAndDataProcessors constant to exchange plans, but do not add it to event subscriptions that register data upon writing. Usage of additional reports and data processors in a standalone workstation is configured regardless of their usage in a service instance and must be passed only when an initial image is created.
User Sessions
With the User sessions subsystem, you can terminate current infobase connections and lock new connections to the infobase for a specified duration.
Subsystem Setup
If the configuration does not contain the Application settings subsystem, add the ApplicationLock and ActiveUsers data processors to the administrator's command interface.
User Access Setup
To manage user access to the subsystem, assign a user the role specified in the table below.
| # | Role Description |
|---|---|
| 1. | FullAccess (the Core subsystem user role) grants the right to:
|
| 2. | SystemAdministrator (the Core subsystem user role) grants the right to:
|
How to Use the Subsystem in Development
See the subsystem API description in the API documentation (in Russian).
Data Exchange Setup
Do not add the subsystem's objects to exchange plans of distributed infobases and standalone workstations or to exchange plans used for data synchronization between different applications. The subsystem can operate only in one node. So, subsystem data in different nodes must be stored independently.
Import Data from Spreadsheets
The Import data from spreadsheets subsystem provides a user interface and API to import tabular data from files into arbitrary catalogs and tables of documents and catalogs. For example, you can use it to transfer master data when migrating from other applications, and to quickly populate tables when entering documents.
Subsystem Setup
Importing Data to Catalogs
If a configuration contains the Application settings subsystem, add the ImportDataFromFile data processor to the Importing data group of the Data transfer administration panel. As an example, see the DataMigration form of the _DemoAdministrationPanel data processor.
Otherwise, add the ImportDataFromFile data processor to the Administrator workspace.
By default, data import is available for most configuration catalogs. However, it is not always reasonable. We recommend that you restrict importing data to catalogs if:
- They contain internal, technological, or other information whose change can lead to incorrect application operation.
- They have their own automatic update or population functionality. For example,
BankClassifierandWorldCountriesclassifiers. - They are unsafe for batch import (for example,
ExternalUsers,Users, andFileStorageVolumes). - They are technological catalogs not edited by users (for example,
TaskPerformersGroups,MetadataObjectIDs, andJobsQueue).
In such cases, exclude these catalogs in the OnDefineCatalogsForDataImport procedure of the ImportDataFromFileOverridable common module:
Procedure OnDefineCatalogsForDataImport(CatalogsToImport) Export

    // Import to the currency classifier is restricted.
    TableRow = CatalogsToImport.Find(Metadata.Catalogs.Currencies.FullName(), "FullName");
    If TableRow <> Undefined Then
        CatalogsToImport.Delete(TableRow);
    EndIf;

EndProcedure
By default, data import is restricted for catalogs with attributes of the ValuesStorage type (for example, all catalogs with attached files or formatted documents).
This restriction is imposed as the standard import mechanism cannot import data to items of such catalogs. Import of remaining attributes can lead to incorrect results.
If you are sure that skipping these items will not cause any problems in the application, you can allow data import. To do so, insert the following code block to the OnDefineCatalogsForDataImport procedure of the ImportDataFromFileOverridable common module:
Procedure OnDefineCatalogsForDataImport(CatalogsToImport) Export

    InformationRecords = CatalogsToImport.Add();
    InformationRecords.FullName = Metadata.Catalogs._DemoProducts.FullName();
    InformationRecords.Presentation = Metadata.Catalogs._DemoProducts.Presentation();
    InformationRecords.AppliedImport = False;

EndProcedure
Also you can override a standard mechanism of importing data to catalogs. For more information, see Special Cases of Integration.
Importing Data to Document and Catalog Tables
Select tables of objects (documents and catalogs) that require batch data import. For example, the Goods tables of goods receipt and sale documents whose rows are often populated from source documents: Microsoft Excel tables or files of another format.
For objects that must support data import from file to a table, do the following.
Data Import Command
Create a command in the object form and add it to the table's command bar. For example, for the Goods table, create the ImportGoodsFromFile command with the Import from file synonym. Set the Modifies saved data property to True. If an object requires import into multiple tables, create a separate command for each table.
In the object form, implement the command data processor and the procedure of adding data to the table. An example of implementation for the Goods table of the _DemoCustomerProformaInvoice document:
&AtClient
Procedure ImportGoodsFromFile(Command)

    ImportParameters = ImportDataFromFileClient.DataImportParameters();
    ImportParameters.FullTabularSectionName = "_DemoGoodsReceipt.Goods";
    ImportParameters.Title = NStr("en = 'Import goods list from file'");
    AdditionalParameters = New Structure();
    AdditionalParameters.Insert("Counterparty", Object.Counterparty);
    AdditionalParameters.Insert("Organization", Object.Organization);
    ImportParameters.AdditionalParameters = AdditionalParameters;
    Notification = New NotifyDescription("ImportGoodsFromFileCompletion", ThisObject);
    ImportDataFromFileClient.ShowImportForm(ImportParameters, Notification);

EndProcedure
&AtClient
Procedure ImportGoodsFromFileCompletion(ImportedDataAddress, AdditionalParameters) Export

    If ImportedDataAddress = Undefined Then
        Return;
    EndIf;

    UploadProductsFromFileOnServer(ImportedDataAddress);
EndProcedure
&AtServer
Procedure UploadProductsFromFileOnServer(ImportedDataAddress)

    ImportedData = GetFromTempStorage(ImportedDataAddress);

    ProductsAdded_ = False;
    For Each TableRow In ImportedData Do

        If Not ValueIsFilled(TableRow.Products) Then
            Continue;
        EndIf;

        NewLineProducts = Object.Goods.Add();
        NewLineProducts.Products = TableRow.Products;
        NewLineProducts.Price = TableRow.Price;
        NewLineProducts.Count = TableRow.Count;
        NewLineProducts.UnitOfMeasure = TableRow.UnitOfMeasure;
        ProductsAdded_ = True;
    EndDo;

    If ProductsAdded_ Then
        Modified = True;
    EndIf;

EndProcedure
Spreadsheet Template
In the object you want to import data to, create a spreadsheet template named LoadingFromFile. If the object supports importing into multiple tables, add a table name to the template: LoadingFromFile<TabularSectionName>.
In the first row of the template, list column names the way they are given in the file being imported. In the Name cell properties, specify column names of the value table with data being imported.
One table attribute can be associated with several columns of the file being imported. For example, a value of the Products attribute can be populated from one of the following columns: Barcode, Product ID, or Description. In such cases, in the DetailsParameter cell property, specify a name of the table attribute this column is associated with. In the current example, the Products value is specified in the DetailsParameter cell property of the Barcode, Product ID, and Description columns.
We recommend that you add a tooltip that would clarify the column type and purpose to the Note property of each column of the first row. For example, a note for the Product ID column: "Product ID (maximum 20 characters)".
See an example of the data import template in the _DemoCustomerProformaInvoice document.
You can also dynamically create a template with the required column set to import data into object tables. For more information, see Special Cases of Integration.
Procedures in the Document Manager Module
In the document manager module, add the following export procedures:
SetDownloadParametersFromVHFFileto override import parameters. For example, you can change a standard template name if a document supports data import into multiple tables.MatchUploadedDataFromFileto implement the logic of mapping data being imported with infobase data.
// Overrides parameters of data import from a file.
//
// Parameters:
//  Parameters - Structure:
//   * DataStructureTemplateName - String - template description. For example, "LoadingFromFile".
//   * TabularSectionName - String - full table name. For example, "Document._DemoCustomerProformaInvoice.TabularSection.Goods".
//   * RequiredColumns2 - Array of String - descriptions of required columns.
//   * ColumnDataType - Map of KeyAndValue:
//      * Key - String - column name;
//      * Value - TypeDescription - column type.
//   * AdditionalParameters - Structure
//
Procedure SetDownloadParametersFromVHFFile(Parameters) Export

EndProcedure

// Maps data being imported to the FullTabularSectionName table
// with infobase data and populates the AddressOfMappingTable and ConflictsList parameters.
//
// Parameters:
//   AddressOfUploadedData    - String - the address of a temporary storage containing a value table with
//                               data imported from the file. Column list:
//     * Id - Number - row number.
//     * Other columns repeat LoadingFromFile template columns.
//   AddressOfMappingTable - String - the address of a temporary storage containing an empty value table,
//                               that is a copy of the document table.
//                                        The table must be populated with values from the AddressOfUploadedData table.
//   ConflictsList - ValueTable - a list of infobase objects suggested for an ambiguous cell value.
//       * Column       - String - name of the column where an ambiguous value was found.
//       * Id - Number - ID of the row where an ambiguous value was found.
//   FullTabularSectionName   - String - the full name of the recipient table.
//   AdditionalParameters   - AnyType - any additional information.
//
Procedure MapDataToImport(AddressOfUploadedData, AddressOfMappingTable, ConflictsList, FullTabularSectionName, AdditionalParameters) Export
EndProcedure
When mapping data, ambiguities can occur when a cell value in the imported file matches more than one infobase object.This means the infobase object to be assigned to the table row attribute cannot be uniquely identified. To resolve ambiguities, implement the FillInListOfAmbiguities export procedure:
// Returns a list of infobase objects suggested for an ambiguous cell value.
//
// Parameters:
//    FullTabularSectionName  - String - the full name of the recipient table.
//    ColumnName               - String - the name of the column where the ambiguity is detected.
//    ConflictsList    - Array - an array with ambiguous data.
//    LoadedValuesString - String  - import data that caused the ambiguity.
//    AdditionalParameters   - AnyType - any additional information.
//
Procedure FillInListOfAmbiguities(FullTabularSectionName, ConflictsList, ColumnName, LoadedValuesString, AdditionalParameters) Export
EndProcedure
As an example, see the _DemoCustomerProformaInvoice document.
Special Cases of Integration
Custom Data Import Algorithm
If standard tools are not enough for importing catalog items, create your own import algorithm. To do that:
- In the catalog, create a spreadsheet template named
LoadingFromFileand define its columns. For quick creation of the template, start the application in 1C:Enterprise mode and execute the command for importing data into this catalog. At the table filling step, save the template to an MXL file and use it as a draft template. To import contact information and additional information records into a catalog, define the Contact information and Additional information records columns in the template. Columns with the object contact information kinds, additional attributes and properties will be automatically added there. - In the catalog manager module, implement three export procedures:
DefineParametersForLoadingDataFromFile,MatchUploadedDataFromFile, andLoadFromFile. Implement a logic of mapping and importing data to catalog attributes.
    // Sets parameters of data import from file.
    //
    // Parameters:
    //  Parameters - see ImportDataFromFile.ImportFromFileParameters
    //
    Procedure DefineParametersForLoadingDataFromFile(Parameters) Export
    EndProcedure

    // Maps data being imported and infobase data.
    //
    // Parameters:
    //   DataToImport - see ImportDataFromFile.MappingTable
    //
    Procedure MatchUploadedDataFromFile(DataToImport) Export
    EndProcedure

    // Import data from a file.
    //
    // Parameters:
    //  DataToImport - see ImportDataFromFile.DescriptionOfTheUploadedDataForReferenceBooks
    //  ImportParameters - see ImportDataFromFile.DataLoadingSettings
    //  Cancel - Boolean    - abort import. For example, if some data is invalid.
    //                             - Boolean       - abort import.
    Procedure LoadFromFile(DataToImport, ImportParameters, Cancel) Export
    EndProcedure
As an example, see the _DemoProducts catalog of the demo configuration.
Creating a Spreadsheet Template for Data Import to a Table
When the column set in the spreadsheet template is not fixed but generated dynamically (for example, depends on current object attribute values, a document status, functional option values, and so on), you can define the columns programmatically.
To do this, use the following API functions:
GenerateColumnDetailsof theImportDataFromFilecommon module.TemplateColumnDetailsandTemplateColumnof theImportDataFromFileClientServercommon module.
An example of implementation for the Substitutes table of the _DemoProducts document:
&AtClient
Procedure ImportGoodsFromFile(Command)

    ImportParameters = ImportDataFromFileClient.DataImportParameters();
    ImportParameters.FullTabularSectionName = "_DemoProducts.Substitutes";
    ImportParameters.Title = NStr("en = 'Import list of substitutes from file'");

    // Describes columns for a picking import template.
    ImportParameters.TemplateColumns = DetailsOfTemplateColumnsToImportSubstitutes();

    Notification = New NotifyDescription("ImportSubstituteProductsFromFileCompletion", ThisObject);
    ImportDataFromFileClient.ShowImportForm(ImportParameters, Notification);

EndProcedure
&AtServer
Function DetailsOfTemplateColumnsToImportSubstitutes();

    TemplateColumns = ImportDataFromFile.GenerateColumnDetails(Object.Substitutes);
    ImportDataFromFileClientServer.DeleteTemplateColumn("Substitute", TemplateColumns);

    If Object.ProductKind.Description = "OperationService" Then
        // Services have no barcode.
        Column = ImportDataFromFileClientServer.TemplateColumnDetails("BarcodeSKU", Common.StringTypeDetails(20), NStr("en = 'Product ID'"));
    Else
        Column = ImportDataFromFileClientServer.TemplateColumnDetails("BarcodeSKU", Common.StringTypeDetails(20), NStr("en = 'Barcode and Product ID'"));
    EndIf;
    Column.IsRequiredInfo = True;
    Column.Position = 1;
    Column.Group = "Products";
    Column.Parent = "Substitute";
    TemplateColumns.Add(Column);

    Column = ImportDataFromFileClientServer.TemplateColumnDetails("Description", Common.StringTypeDetails(100));
    Column.Group = "Products";
    Column.Parent = "Substitute";
    Column.Position = 2;
    Column.ToolTip = NStr("en='Description of similar goods that are identical
    |by their purpose and technical characteristics.'");
    TemplateColumns.Add(Column);

    Column = ImportDataFromFileClientServer.TemplateColumn("Compatibility", TemplateColumns);
    Column.Position = 3;

    Return TemplateColumns;
EndFunction
See the full implementation example in the _DemoProducts catalog.
Importing Data Into Object with the ID Attribute
If an object contains an attribute with the Id reserved name, the standard data import procedure cannot be used. To import data into this attribute:
- Define a spreadsheet template for data import according to the instructions above.
- In the spreadsheet template, create a column with a different name describing behavior of the
Idcolumn, for example,ItemID. - When mapping data and when placing data into object in the
MatchUploadedDataFromFileandLoadFromFileprocedures, use imported data of theItemIDcolumn of theDataToImporttable.
This restriction is imposed as the import mechanism uses the Id column for internal purposes.
User Access Setup
| # | Role Description |
|---|---|
| 1. | FullAccess (the Core subsystem user role)Grants the right to import data from spreadsheets to catalogs. |
To import data to document tables, no additional roles are required. Import commands are available to users authorized to edit the document itself.
How to Use the Subsystem in Development
Developing Additional Data Processors to Import Data
To take advantage of even more features of importing data to catalogs, you can also use the Additional reports and data processors subsystem.
Create an external data processor according to Additional Reports and Data Processors. Then describe command parameters in the ExternalDataProcessorInfo function of the data processor object module. For example, to add the Demo: Counterparties (Legal entities with contact information) import option:
// Returns info about an external data processor.
Function ExternalDataProcessorInfo() Export

    RegistrationParameters = AdditionalReportsAndDataProcessors.ExternalDataProcessorInfo("2.2.3.1");

    RegistrationParameters.Kind = AdditionalReportsAndDataProcessorsClientServer.DataProcessorKindAdditionalDataProcessor();
    RegistrationParameters.Version = "1.0";

    NewCommand = RegistrationParameters.Commands.Add();
    NewCommand.Presentation = NStr("en = 'Demo: Counterparties (Legal entities with contact information)'");
    NewCommand.Use = AdditionalReportsAndDataProcessorsClientServer.CommandTypeDataImportFromFile();
    NewCommand.Modifier   = Metadata.Catalogs._DemoCounterparties.FullName();
    NewCommand.Id = "CounterpartyLegalEntities";

    Return RegistrationParameters;
EndFunction
In the data processor object module, add the DefineParametersForLoadingDataFromFile export procedure to override the default import settings, and the MatchUploadedDataFromFile and LoadFromFile export procedures to implement the logic of mapping and importing data to catalog attributes:
// Defines parameters of data import from file.
//
// Parameters:
//   CommandID - String - command name given in function ExternalDataProcessorInfo().
//   ImportParameters - Structure - data import settings:
//       * DataStructureTemplateName - String - name of the data import template.
//           Default template is LoadingFromFile.
//       * RequiredTemplateColumns - Array - a list of required column names.
//
Procedure DefineParametersForLoadingDataFromFile(CommandID, ImportParameters) Export
    If CommandID = "CounterpartyLegalEntities" Then
        ImportParameters.DataStructureTemplateName = "ImportFromCounterpartiesFile";
    EndIf;
EndProcedure
// Maps data being imported from file with the infobase data.
//
//   CommandID - String - command ID.
//   DataToImport - ValueTable - a value table with data being imported:
//     * MappedObject - CatalogRef.Ref - a reference to the mapped object. It is populated inside the procedure.
//     * <other columns>    - String - columns repeat the LoadingFromFile template columns.
//
Procedure MatchUploadedDataFromFile(CommandID, DataToImport) Export
EndProcedure
// Imports mapped data rows to the catalog item.
//
//   CommandID - String - command ID.
//   DataToImport - Structure - Key is a column name, Value is cell data.
//     * MappedObject - CatalogRef.Ref - a reference to the mapped object.
//     * <other columns>    - String - rows of the file to import.
//   ImportParameters - Structure - parameters with custom data import settings.
//        * ShouldUpdate - Boolean - indicates whether new objects are to be updated.
//        * Create - Boolean - indicates whether new objects are to be created.
// Cancel                      - Boolean       - abort import.
//
Procedure LoadFromFile(CommandID, DataToImport, ImportParameters, Cancel) Export
EndProcedure
See a data processor example in the demo configuration: Administration – Print forms, reports, and data processors – Additional reports and data processors – Import legal entities (with contact information).
Data Exchange Setup
The subsystem does not participate in data exchange.
Notes
Use the Notes subsystem to store personal notes (unstructured information unavailable to other infobase users). You can differentiate notes by color, move them to the desktop, and unite them into groups.
Subsystem Setup
To use the subsystem:
- Select configuration objects on which users can leave notes. Usually, these objects are most catalogs.
- Mark selected object types in the
Typeproperty of theNotesSubject(references) andNotesSubjectObject(objects) type collections. - Create two subscriptions to the
BeforeWriteevent: SetObjectDeletionMarkChangeStatus. In the Source property, select the required object types (except for documents). In the Handler property, specify theUserNotes.SetObjectDeletionMarkChangeStatusprocedure.SetDocumentDeletionMarkChangeStatus. In the Source property, select the required document types. In the Handler property, specify theUserNotes.SetDocumentDeletionMarkChangeStatusprocedure.- Place the
MyNotesform of theNotescatalog on the home page and theAllNotescommand of theNotescatalog in the user command interface. - If the configuration includes the
AttachableCommandssubsystem, use it to output note commands. To do this, add theAttachableCommandssubsystem to all forms where you want to display note commands.
Optional. To optimize performance when opening the form, it is recommended that you add a submenu to the command bar to output note commands as follows:
- Name:
SubmenuOrganizer. - Title: Organizer.
- Type:
Submenu. - Representation:
Picture. - Picture:
Organizer(picture from configuration).
Note.
If the configuration does not include the AttachableCommands subsystem, use common commands. The CreateSubjectNote and MyNotesOnSubject common commands will not appear in object group forms automatically. If you need them, add these commands to the command interface manually:
Special Cases of Integration
User Access Setup
| # | Role Description |
|---|---|
| 1. | FullAccess (the Core subsystem user role)Grants users the right to create and edit their notes, view notes of other users, and delete notes. |
| 2. | AddEditNotesGrants users the right to create, view and mark for deletion their own notes. |
How to Use the Subsystem in Development
To display information about existing notes in the object list form, add an auxiliary information register to the configuration to programmatically maintain information on the existing notes. All users without restrictions must have access rights to view this register. Compared to the When...Then clause with data selection from the Notes catalog, this approach excludes record-level access restrictions (RLS) and allows users to open the list faster.
To adopt this approach, switch the form attribute with the dynamic list to the Custom query mode and change the query text by adding a field as shown in the example with the list form of the _DemoCounterparties catalog:
    SELECT
        Catalog_DemoCounterparties.Ref,
        Catalog_DemoCounterparties.DeletionMark,
        Catalog_DemoCounterparties.Predefined,
        Catalog_DemoCounterparties.Code,
        Catalog_DemoCounterparties.Description,
        CASE
            WHEN ISNULL(_DemoNotesOnSubjectAvailable.HasNotes, FALSE)
                THEN 0
            ELSE -1
        END AS HasNotes
    FROM
        Catalog._DemoCounterparties AS Catalog_DemoCounterparties
            LEFT JOIN InformationRegister._DemoNotesOnSubjectAvailable AS _DemoNotesOnSubjectAvailable
            ON (Catalog_DemoCounterparties.Ref = _DemoNotesOnSubjectAvailable.SubjectOf
                    AND _DemoNotesOnSubjectAvailable.Author = &User)
Example of a list with the column indicating existing notes:
Example of an auxiliary information register structure:
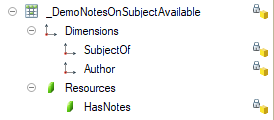
Data Exchange Setup
For distributed infobases (DIB) and standalone workstations, add to the exchange plans all the subsystem's metadata objects that contain data.
Object Attribute Lock
With the Object attribute lock subsystem, you can prevent some object attributes from being edited. These attributes determine the object behavior and can be called key attributes of the object. Generally, key attributes are object attributes that influence behavior of other objects, for example, document posting. Unadvised editing of such attributes might result in conflicts of accounting data.
An example is the Currency attribute of the Cash accounts catalog. It determines the balance currency for the cash account. Another example is the Is service flag of the Products catalog. It affects posting of documents with these products. Once the balance is registered for the cash account or documents related to specific products are registered, these attributes cannot be edited any more.
The subsystem allows programmatic change of key object attributes. In this case, the required checks are performed by the calling code.
Subsystem Setup
To use the subsystem:
-
Select objects, to which the subsystem is applied, and their key attributes (at least one attribute for each object). List these objects in the
OnDefineObjectsWithLockedAttributesprocedure of theObjectAttributesLockOverridablecommon module.// Defining metadata objects, in whose manager modules attribute // editing is prohibited using the GetObjectAttributesToLock export function. // // Function GetObjectAttributesToLock must return a value of type // See ObjectAttributesLock.DescriptionOfAttributeToLock // // The label field linked to an attribute is not locked. To lock it, // specify the label item name in the description of an attribute to lock. // // Parameters: // Objects - Map of KeyAndValue: // * Key - String - the full name of the metadata object attached to the subsystem; // * Value - String - empty string. // // Example: // Objects.Insert(Metadata.Documents.BuyerSOrder.FullName(), ""); // // Add a similar code to the object manager module: // // See ObjectAttributesLockOverridable.OnDefineLockedAttributes.LockedAttributes // Function GetObjectAttributesToLock() Export // AttributesToLock = New Array; // AttributesToLock.Add("Organization"); // AttributesToLock.Add("Partner;Partner"); // Attribute = ObjectAttributesLock.NewAttributeToLock(); // Attribute.Name = "Counterparty"; // Attribute.Warning = NStr("en = 'Do not change the field if there are already entered documents"); // AttributesToLock.Add(Attribute); // ... // Return AttributesToLock; // EndFunction // Procedure OnDefineObjectsWithLockedAttributes(Objects) Export -
Choose metadata objects whose references to this metadata object must not affect editing of its key attributes. Such objects must be included in the exception filter for a search by reference (see Excluding Object References from Search).
Do the following for each metadata object, to which the subsystem is applied:
-
Add the
GetObjectAttributesToLockfunction to the object manager module. In the function, return a list of names of key attributes or tables of the object or form attributes. After the attribute name, enter a semicolon and a comma-separated list of additional form item names related to the attribute, which also need to be locked:// See ObjectAttributesLockOverridable.OnDefineObjectsWithLockedAttributes. Function GetObjectAttributesToLock() Export Result = New Array; Result.Add("Object1AttributeName"); Result.Add("Object1TabularSectionName"); Result.Add("Form1AttributeName"); Result.Add("Object2AttributeName; Form1ItemName, Form2ItemName"); … Return Result; EndFunctionThe label field linked to the attribute is not locked. To lock it, specify the label field item name after the semicolon, as shown above. You can also change the appearance of the
AttributeUnlockingcommon form: specify a text in the form header, add warning texts for each attribute, and display attributes in groups. Example:// See ObjectAttributesLockOverridable.OnDefineObjectsWithLockedAttributes. Function GetObjectAttributesToLock() Export AttributesToLock = New Array; Attribute = ObjectAttributesLock.NewAttributeToLock(); Attribute.Group = "CommonLabel"; Attribute.GroupPresentation = NStr("en = 'Check occurrences before unlocking the attributes.'"); AttributesToLock.Add(Attribute); Attribute = ObjectAttributesLock.NewAttributeToLock(); Attribute.Name = "Code"; Attribute.Warning = NStr("en = 'This is a warning for the Code field'"); AttributesToLock.Add(Attribute); Attribute = ObjectAttributesLock.NewAttributeToLock(); Attribute.Group = "AccountSettings"; Attribute.GroupPresentation = NStr("en = 'Account settings'"); Attribute.Warning = NStr("en = We do not recommend that you change the account settings if the account is already in use.'"); AttributesToLock.Add(Attribute); AttributesToLock.Add("Kind;;AccountSettings"); AttributesToLock.Add("OffBalance;;AccountSettings"); … Return Result; EndFunction -
Add the following procedure to the object form module:
&AtClient Procedure Attachable_AllowObjectAttributeEdit(Command) ObjectAttributesLockClient.AllowObjectAttributeEdit(ThisObject); EndProcedure -
Add the following code block to the
OnCreateAtServerandAfterWriteAtServerevent handlers:// Object attribute lock subsystem handler. ObjectAttributesLock.LockAttributes(ThisObject);
Note
The second function parameter can be a group of the form where the command to allow editing of key attributes will be displayed.
- For key attributes in the objects properties, we recommend that you set the Fill check property to Display error or manually check if the key attributes are filled.
See examples of using the subsystem in the _DemoProducts catalog, the _DemoMain chart of accounts, and the _DemoSalesOrder document.
Overriding the Logic Allowing Editing of Key Attributes
You can set non-standard conditions of allowing changes in key attributes. To do this, create the AttributeUnlocking form in the required object. In this form, allow a user to mark the required attributes. Return the result using the Close method (Array of attribute names to unlock). Example:
&AtClient
Procedure EnableEdit(Command)

    AttributesToUnlock = New Array;
    AttributesToUnlock.Add("<Attribute name>");
    …
    Close(AttributesToUnlock);

EndProcedure
If the configuration contains the Bulk edit subsystem, in the AttributeUnlocking form, implement a call option to unlock attributes upon bulk editing. To do this, specify the following parameters:
BatchEditObjectsof theBooleantypeLockedAttributesof theArbitrarytypeAddressOfRefsToObjectsof theStringtype
The parameters are passed to the form as follows: BatchEditObjects is set to True, LockedAttributes is passed with an attribute name array to unlock, and AddressOfRefsToObjects is passed with an address to a temporary storage with a reference array to check object usage (it can be empty).
If the BatchEditObjects parameter is not defined in the AttributeUnlocking form, the standard AttributeUnlocking common form will be opened instead upon bulk editing.
In some cases, you might need to manually calculate and set values for the ReadOnly or Enabled properties of the respective fields of attributes to unlock. In such cases, the Attachable_AllowObjectAttributeEdit procedure of the object form module is implemented in a different way. Example:
&AtClient
Procedure Attachable_AllowObjectAttributeEdit(Command)
    LockedAttributes = ObjectAttributesLockClient.Attributes(ThisObject);

    If LockedAttributes.Count() > 0 Then
        FormParameters = New Structure;
        FormParameters.Insert("Ref", Object.Ref);
        FormParameters.Insert("LockedAttributes", LockedAttributes);

        OpenForm("Document._DemoSalesOrder.Form.AttributeUnlocking", FormParameters,
            ThisObject,,,, New NotifyDescription("AfterAttributesToUnlockChoice", ThisObject));
    Else
        ObjectAttributesLockClient.ShowAllVisibleAttributesUnlockedWarning();
    EndIf;
EndProcedure

&AtClient
Procedure AfterAttributesToUnlockChoice(AttributesToUnlock, Context) Export

    If TypeOf(AttributesToUnlock) <> Type("Array") Then
        Return;
    EndIf;

    ObjectAttributesLockClient.SetAttributeEditEnabling(ThisObject,
        AttributesToUnlock);

    ... // Code to disable the ReadOnly property and enable the Enabled property for items.

EndProcedure
In the AfterAttributesToUnlockChoice handler, place the ObjectAttributesLockClient.SetAttributeEditEnabling procedure call. The procedure does not lock or unlock attribute fields but only marks attributes as allowed for editing. If some attributes must be considered unavailable for unlocking (for example, if no roles are authorized to edit the form attribute or there are other reasons), you can override the value of the RightToEdit property using the ObjectAttributesLockClient.SetAttributeEditEnabling procedure.
Command Interface Setup
All actions for changing command interface are performed during subsystem integration (see above).
User Access Setup
To manage user access to the subsystem, assign a user the role specified in the table below.
| # | Role Description |
|---|---|
| 1. | EditObjectAttributesGrants the right to edit locked values of object attributes. |
The table below illustrates possible user groups and the roles they could be assigned with.
| # | User Group Description | Assigned Roles |
|---|---|---|
| 1. | User responsible for document management |
|
How to Use the Subsystem in Development
Data Exchange Setup
The subsystem does not participate in data exchange.
OData Interface
The standard OData interface is a REST application interface that can be published on a web server. External applications interact with the infobase using HTTP requests through the OData interface. It allows you to read data, change it, and create and delete data objects. For more information, see 1C:Enterprise 8.3. Developer Guide.
The OData interface subsystem brings the following benefits:
- Developers can restrict the list of objects that can be accessed using the
RemoteODataAccessrole. - Administrators can choose which objects from this list will be available in the application.
Subsystem Setup
If a configuration does not contain the Application settings subsystem, add the StandardODataInterfaceSettings command of the SetUpStandardODataInterface data processor to the Administrator command interface. As an example, see the Organizer form of the SSLAdministrationPanel data processor in the demo configuration.
The RemoteODataAccess role must include the configuration objects that are supposed to be read, edited, and deleted in external applications. We recommend that you include all constants, catalogs, documents, and registers, as well as their related enumerations and session parameters.
Exceptions:
- Internal and technological metadata unavailable for external applications
- Shared metadata objects for SaaS configurations
To automatically check and set up the RemoteODataAccess role, start the SSLImplementationCheck report bundled with the SSL distribution package.
User Access Setup
| # | Role Description |
|---|---|
| 1. | FullAccess (the Core subsystem user role)Grants the right to manage access and set up a list of objects that can be accessed by external applications using standard OData interface. |
| 2. | RemoteODataAccessGrants the right to read, edit, and delete application data from external applications using OData interface. |
How to Use the Subsystem in Development
Data Exchange Setup
Do not add the StandardODataInterfaceUser constant to exchange plans used for data synchronization between different applications or to exchange plans of distributed infobases and standalone workstations. Set a constant value independently in each node.
Startup Notifications
The Startup notifications subsystem displays HTML pages with various information (for example, advertisements) at the application startup. Pages are contained in the InformationOnStart data processor templates. Each template contains a start page and can also contain other pages whose URLs are specified in the start page. A command is automatically created for each template on the command bar of the data processor. When you click the command, you can go to the page with information.
Subsystem Setup
Define a set of pages with information to be displayed at the application startup.
Archive each set of pages so that the start page is in the root of the archive.
Import archives to the InformationOnStart data processor by adding them as templates from binary data.
Describe each template (archive) settings in the Specifier template of the InformationOnStart data processor by specifying the following properties:
- Template name is a template name as it is specified in metadata.
- Section is a submenu where the information call command from the template will be displayed. If the submenu name is not specified, the command will be displayed in the command bar.
- Description is a name of the command that navigates to the page with information.
- Name of start file is a start HTML page name in a ZIP archive. Only the name without slashes and the archive name is specified.
- Display start date is the start date of this line.
- Display end date is the end date of this line.
- Include in display on opening is used to define the start page displayed when the data processor is opened. If "0" or "" (not specified), do not show upon opening. "1" – include first, "2" – include second. Everything else being equal (in case of competition), the page is selected randomly.
- Show in PROF version – if
True, the information will be shown in the hosted mode in the PROF version. - Show in basic version – if
True, the information will be shown in the hosted mode in the basic version. - Show in SaaS – if
True, the information will be shown in SaaS mode.
Notice.
For the changes to take effect in the InformationOnStart data processor templates immediately upon developing and debugging the configuration, update service data. For more information, see Service Data Update.
User Access Setup
To set up access rights, no additional actions are required.
| # | Role Description |
|---|---|
| 1. | BasicAccessSSL or BasicAccessExternalUserSSLGrants the right to view information. |
Data Exchange Setup
Include the InformationPackagesOnStart information register only in the initial image of subordinate nodes of distributed infobases (DIB) and standalone workstations. For more information, see Creation of Subordinate Node Initial Image.
Calendar Schedules
With the Calendar schedules subsystem, you can store enterprise schedules.
The subsystem contains ready-to-use functions that allow you to get information on working days included in the schedule.
Subsystem Setup
To use the subsystem in the configuration, add the BusinessCalendars catalog to the command interface.
User Access Setup
To manage user access to the subsystem, assign a user the roles specified in the table below.
| # | Role Description |
|---|---|
| 1. | BasicAccessSSL (the Core subsystem user role)Grants the right to view calendars and schedules in the application. |
| 2. | AddEditCalendarSchedulesGrants the right to manage calendars and schedules. |
| 3. | FullAccess (the Core subsystem user role)Grants the right to delete objects marked for deletion. |
How to Use the Subsystem in Development
See the subsystem API description in the API documentation (in Russian).
Data Exchange Setup
For distributed infobases (DIB) and standalone workstations, add to the exchange plans all the subsystem's metadata objects that contain data.
Formula Editor
The Formula editor subsystem provides a convenient form for editing formulas that displays available operands and operators. If the National language support subsystem is integrated, the operands and formula operators are displayed in the current interface language.
For example, the currency exchange rate formula (USD + EUR) / 2 stored in data can be displayed as ([US Dollar] + [Euro]) / 2 in the formula editing form.
Subsystem Setup
User Access Setup
To set up access rights, no additional actions are required.
| # | Role Description |
|---|---|
| 1. | BasicAccessSSL (the Core subsystem user role)Grants the right to open the formula editing form. |
How to Use the Subsystem in Development
The subsystem API supports two scenarios:
- Opening the editing form.
- Embedding the list of available formula editor fields in other forms.
Opening the Built-in Editing Form
To open the formula editing form, use the API in the FormulasConstructorClient and FormulasConstructor modules.
To open the formula editing form, for example, from an input field, call the FormulasConstructorClient.StartEditingTheFormula procedure and process the execution result after closing the form.
Example:
&AtClient
Procedure RateCalculationFormulaStartChoice(Item, ChoiceData, StandardProcessing)
  StandardProcessing = False;
  NotifyDescription = New NotifyDescription("WhenFinishedEditingFormulas", ThisObject);
  FormulasConstructorClient.StartEditingTheFormula(FormulaParameters(), NotifyDescription);
EndProcedure

&AtClient
Procedure WhenFinishedEditingFormulas(FormulaDescription, AdditionalParameters) Export
  If FormulaDescription = Undefined Then
    Return;
  EndIf;

  Object.RateCalculationFormula = FormulaDescription.Formula;
  FormulaPresentation = FormulaDescription.FormulaPresentation;
  Modified = True;
EndProcedure
Operators and operands are described uniformly as a value table, a value tree, or a data composition schema. When using a value table and a value tree, you can override attribute pictures and the order of items.
&AtServerWithoutContext
Function OperandsTable()

  OperandsTable = FormulasConstructor.FieldTable();

  For Each CurrencyDescription In Catalogs.Currencies.CurrencyCodes() Do
    Operand = OperandsTable.Add();
    Operand.Id = CurrencyDescription.AlphabeticCode; // "USD"
    Operand.Presentation = CurrencyDescription.Presentation; // "US Dollar"
    Operand.ValueType = New TypeDescription("Number");
  EndDo;

  Return OperandsTable;

EndFunction
To get the presentation of a formula stored in the data, for example, to display it on the form as a hyperlink, use the FormulasConstructor.FormulaPresentation function.
Embedding the List of Available Formula Editor Fields in Other Forms
The formula editing form consists of a formula editing field, a list of operators, and a list of operands. The lists have numerous useful properties: they can display a hierarchy of fields unlimited in terms of levels, automatically pick pictures for fields, and they also have search fields. The subsystem API allows you to place such lists in an arbitrary form. For example, in the field choice form that can be opened from the report settings form (see the SelectReportField form of the ReportsVariantsStorage settings storage).
To add an attachable list of fields to a form, insert the following code block into the form module:
#Region PlugInListOfFields

&AtClient
Procedure Attachable_ListOfFieldsBeforeExpanding(Item, String, Cancel)
  FormulasConstructorClient.ListOfFieldsBeforeExpanding(ThisObject, Item, String, Cancel);
EndProcedure

&AtClient
Procedure Attachable_ExpandTheCurrentFieldListItem()
  FormulasConstructorClient.ExpandTheCurrentFieldListItem(ThisObject);
EndProcedure

&AtClient
Procedure Attachable_FillInTheListOfAvailableFields(FillParameters) Export
  FillInTheListOfAvailableFields(FillParameters);
EndProcedure

&AtServer
Procedure FillInTheListOfAvailableFields(FillParameters)
  FormulasConstructorInternal.FillInTheListOfAvailableFields(ThisObject, FillParameters);
EndProcedure

&AtClient
Procedure Attachable_ListOfFieldsStartDragging(Item, DragParameters, Perform)
  FormulasConstructorClient.ListOfFieldsStartDragging(ThisObject, Item, DragParameters, Perform);
EndProcedure

&AtClient
Procedure Attachable_SearchStringEditTextChange(Item, Text, StandardProcessing)
  FormulasConstructorClient.SearchStringEditTextChange(ThisObject, Item, Text, StandardProcessing);
EndProcedure

&AtClient
Procedure Attachable_PerformASearchInTheListOfFields()
    PerformASearchInTheListOfFields();
EndProcedure

&AtServer
Procedure PerformASearchInTheListOfFields()
    FormulasConstructor.PerformASearchInTheListOfFields(ThisObject);
EndProcedure

&AtClient
Procedure Attachable_SearchStringClearing(Item, StandardProcessing)
    FormulasConstructorClient.SearchStringClearing(ThisObject, Item, StandardProcessing);
EndProcedure

&AtServer
Procedure Attachable_FormulaEditorHandlerServer(Parameter, AdditionalParameters)
    FormulasConstructor.FormulaEditorHandler(ThisObject, Parameter, AdditionalParameters);
EndProcedure

&AtClient
Procedure Attachable_FormulaEditorHandlerClient(Parameter, AdditionalParameters = Undefined) Export
    FormulasConstructorClient.FormulaEditorHandler(ThisObject, Parameter, AdditionalParameters);
    If AdditionalParameters.RunAtServer Then
        Attachable_FormulaEditorHandlerServer(Parameter, AdditionalParameters);
    EndIf;
EndProcedure

&AtClient
Procedure Attachable_StartSearchInFieldsList()
    FormulasConstructorClient.StartSearchInFieldsList(ThisObject);
EndProcedure

#EndRegion
Then, in the OnCreateAtServer form event handler, call FormulasConstructor.AddAListOfFieldsToTheForm. Example:
&AtServer
Procedure OnCreateAtServer(Cancel, StandardProcessing)
  ParametersForAddingAListOfFields = FormulasConstructor.ParametersForAddingAListOfFields();
  ParametersForAddingAListOfFields.ListName = NameOfTheListOfOperands();
  ParametersForAddingAListOfFields.FieldsCollections.Add(ReadTheListOfOperands());
  ParametersForAddingAListOfFields.LocationOfTheList = Items.AvailableFieldsGroup;
  ParametersForAddingAListOfFields.HintForEnteringTheSearchString = NStr("en = 'Find operand...'");
  ParametersForAddingAListOfFields.UseIdentifiersForFormulas = True;
  ParametersForAddingAListOfFields.UseBackgroundSearch = True;
  ParametersForAddingAListOfFields.ListHandlers.Insert("Selection", "PlugInListOfSelectionFields");
  FormulasConstructor.AddAListOfFieldsToTheForm(ThisObject, ParametersForAddingAListOfFields);
EndProcedure
The attachable list of fields can be customized. See details in the FormulasConstructor.ParametersForAddingAListOfFields function.
Data Exchange Setup
The subsystem does not participate in data exchange.
Contact Information
With the Contact information subsystem, you can add attributes with contact details to metadata objects. The subsystem contains predefined attributes, such as Address, Phone number, and Email. You can also create custom attributes, such as a Hotline 24. A catalog that has contact information is the contact information owner.
Subsystem Setup
After you embed the subsystem in a configuration, add the following catalogs to the command interface:
ContactInformationKindsWorldCountries
To set up subsystem objects, create predefined items in the ContactInformationKinds catalog and then, to set their values, run the infobase update handler that uses the SetContactInformationKindProperties procedure of the ContactsManager common module.
- Choose contact information owner objects and the contact information kinds they support. For example, the Contacts catalog supports <strong>Phone number</strong> and <strong>Email</strong>.
- In the
ContactInformationOwnertype collection, add references to all owner objects except for documents. - In the
FillDocumentContactInformationevent subscription, add references to the owner documents. - In the
OnInitialItemsFillingprocedure of theContactsManagerOverridablecommon module, add a description of the contact information kinds.- The first level consists of groups: each object kind (contact information owner) is a member of a group. Specify a group name in the
Catalog<CatalogName>orDocument<DocumentName>format. For example, set the name of a catalog of contacts toCatalogContacts. The example group name is "Contacts" catalog contact information. - The second level consists of contact information kinds defined by the developer. Also, you can add to this label groups with contact information for an object's table. When you name such a group, use the following naming template:
Document<CatalogName><TabularSectionName>. - The third level consists of contact information kinds for object's table. The list of contact information kinds is defined by the business analyst.
- The first level consists of groups: each object kind (contact information owner) is a member of a group. Specify a group name in the
Example:
Procedure AttheInitialFillingoftheTypesofContactInformation(LanguagesCodes, Items, TabularSections) Export

    // "Contacts" catalog contact information.
    Item = Items.Add();
    Item.PredefinedKindName = "CatalogContacts";
    Item.IsFolder = True;
    Item.Description = NStr("en='"Contacts" catalog contact information'", Common.DefaultLanguageCode());

    // Contact person's address.
    Item = Items.Add();
    Item.Parent = "CatalogContacts";
    Item.GroupName = "CatalogContacts";
    Item.Type = Enums.ContactInformationTypes.Address;
    Item.PredefinedKindName = "ContactPersonAddress";
    Item.IDForFormulas = "ContactPersonAddress";
    Item.EditingOption = "InputField";
    Item.IncludeCountryInPresentation = False;
    Item.StoreChangeHistory = False;
    Item.IsAlwaysDisplayed = True;
    Item.Description = NStr("en='Address'", Common.DefaultLanguageCode());

EndProcedure
For multilingual configurations, fill in the standard Description attribute using the FillMultilanguageAttribute procedure of the NationalLanguageSupportServer common module.
NationalLanguageSupportServer.FillMultilanguageAttribute(Item, "Description",
    "en = 'Address'", LanguagesCodes); // @NStr-1
To update attribute values of contact information kinds, use a real-time update handler. As an example, see the UpdateContactInformationKinds handler in the _DemoInfobaseUpdateSSL common module.
Note.
For more information on predefined items, see Initial data population in Infobase version update.
Owner Object Setup
- For each object owner of contact information, create the
ContactInformationtable with the following mandatory attributes:
| Name | Data Type | Tooltip |
|---|---|---|
Type |
EnumRef.ContactInformationTypes |
Contact information type. For example, address or phone number. |
Kind |
CatalogRef.ContactInformationKinds |
Contact information kind. |
Presentation |
String (500) |
Contact information presentation (display value). |
Value |
String (unlimited) |
Internal field with contact information. |
Country |
String (100) |
Country (required for addresses). |
State |
String (50) |
State (required for addresses). |
City |
String (50) |
City (required for addresses). |
EMAddress |
String (100) |
Email address. |
ServerDomainName |
String (100) |
Email or website domain name. |
PhoneNumber |
String (20) |
Full phone number. |
PhoneNumberWithoutCodes |
String (20) |
Phone number without the area code and extension. |
FieldValues |
String (unlimited) |
Internal field with contact information. Required for backward compatibility. |
| Name | Data Type | Tooltip |
|---|---|---|
TabularSectionRowID [1] |
Number (7,0) |
Row ID. |
KindForList [2] |
CatalogRef.ContactInformationKinds |
Contact information kind to display in lists. |
ValidFrom [3] |
Date |
Date the contact information record is effective from. |
[1] If contact information is supposed to be stored in a table. Also, add the same attribute to the table. As an example, see the
_DemoSalesOrderdocument.[2] If contact information is supposed to be displayed in Displaying Contact Information Fields in Lists and Reports.
[3] If contact information changes are supposed to be Storing Contact Information Change History.
- Edit the item form:
- To store contact information for an object, create a group or a page named
ContactInformationGroupin the item form, and set a title. For example, Addresses and Phone numbers. - To store contact information for a table, create a group of columns named
<TabularSectionName>ContactInformationGroupin the table. For example, a contact information group for thePartnerstable isPartnersContactInformationGroup.
- Edit the item form module:
-
Add the code from the corresponding procedures to the
OnCreateAtServer,OnReadAtServer,FillCheckProcessingAtServer, andBeforeWriteAtServerform event handlers. To store contact information for a table, add the code from the corresponding procedure to theAfterWriteAtServerform event handler. Before adding rows, run checks that can abort the event if failed.#Region EventHandlersForm &AtServer Procedure OnCreateAtServer(Cancel, StandardProcessing) // StandardSubsystems.ContactInformation AdditionalParameters = ContactsManager.ContactInformationParameters(); AdditionalParameters.Insert("ItemForPlacementName", "ContactInformationGroup"); ContactsManager.OnCreateAtServer(ThisObject, Object, AdditionalParameters); // End StandardSubsystems.ContactInformation EndProcedure &AtServer Procedure OnReadAtServer(CurrentObject) // StandardSubsystems.ContactInformation ContactsManager.OnReadAtServer(ThisObject, CurrentObject); // End StandardSubsystems.ContactInformation EndProcedure &AtServer Procedure FillCheckProcessingAtServer(Cancel, CheckedAttributes) // StandardSubsystems.ContactInformation ContactsManager.FillCheckProcessingAtServer(ThisObject, Object, Cancel); // End StandardSubsystems.ContactInformation EndProcedure &AtServer Procedure BeforeWriteAtServer(Cancel, CurrentObject, WriteParameters) // StandardSubsystems.ContactInformation ContactsManager.BeforeWriteAtServer(ThisObject, CurrentObject); // End StandardSubsystems.ContactInformation EndProcedure &AtServer Procedure AfterWriteAtServer(CurrentObject, WriteParameters) // StandardSubsystems.ContactInformation ContactsManager.AfterWriteAtServer(ThisObject, CurrentObject); // End StandardSubsystems.ContactInformation EndProcedure #EndRegion
ContactInformationGroup is a reference to a form item (container) that will store items for editing contact information. For example:
  AdditionalParameters = ContactsManager.ContactInformationParameters()
  AdditionalParameters.Insert("ItemForPlacementName", "ContactInformationGroup");
ContactsManager.OnCreateAtServer(ThisObject, Object, AdditionalParameters);- Upon calling the
ContactsManager.OnCreateAtServerprocedure, as the third parameter, specify additional parameters whose list is defined in construction functionContactsManager.ContactInformationParameters.For example, theItemForPlacementNameproperty contains a name of an item that contains input fields, and theCITitleLocationproperty defines the position of information item titles. Title position can be top or left (FormItemTitleLocation.LeftandFormItemTitleLocation.Topvalues respectively). For more information, see theContactInformationParametersprocedure of theContactsManagercommon module.
-
Transfer the block of contact information procedures given below to the form module of the contact information owner object.
// StandardSubsystems.ContactInformation
&AtClient
Procedure Attachable_ContactInformationOnChange(Item)
        ContactsManagerClient.StartChanging(ThisObject, Item);
EndProcedure
&AtClient
Procedure Attachable_ContactInformationStartChoice(Item, ChoiceData, StandardProcessing)
        ContactsManagerClient.StartSelection(ThisObject, Item, , StandardProcessing);
EndProcedure
&AtClient
Procedure Attachable_ContactInformationOnClick(Item, StandardProcessing)
        ContactsManagerClient.StartSelection(ThisObject, Item, , StandardProcessing);
EndProcedure
&AtClient
Procedure Attachable_ContactInformationClearing(Item, StandardProcessing)
        ContactsManagerClient.StartClearing(ThisObject, Item.Name);
EndProcedure
&AtClient
Procedure Attachable_ContactInformationExecuteCommand(Command)
        ContactsManagerClient.StartCommandExecution(ThisObject, Command.Name);
EndProcedure
&AtClient
Procedure Attachable_ContactInformationAutoComplete(Item, Text, ChoiceData, DataGetParameters, Waiting, StandardProcessing)

        ContactsManagerClient.AutoCompleteAddress(Item, Text, ChoiceData, DataGetParameters, Waiting, StandardProcessing);

EndProcedure
&AtClient
Procedure Attachable_ContactInformationChoiceProcessing(Item, ValueSelected, StandardProcessing)

        ContactsManagerClient.ChoiceProcessing(ThisObject, ValueSelected, Item.Name, StandardProcessing);

EndProcedure
&AtClient
Procedure Attachable_ContactInformationURLProcessing(Item, FormattedStringURL, StandardProcessing)
        ContactsManagerClient.StartURLProcessing(ThisObject, Item, FormattedStringURL, StandardProcessing);
EndProcedure
&AtClient
Procedure Attachable_ContinueContactInformationUpdate(Result, AdditionalParameters) Export
    UpdateContactInformation(Result);
EndProcedure
&AtServer
Procedure UpdateContactInformation(Result)
        ContactsManager.UpdateContactInformation(ThisObject, Object, Result);
EndProcedure
// End StandardSubsystems.ContactInformation
User Access Setup
To manage user access to the subsystem, assign a user the roles specified in the table below.
| # | Role Description |
|---|---|
| 1. | BasicAccessSSL (the Core subsystem user role)Grants the right to read a list of countries and contact information kinds. |
| 2. | AddEditContactInfoKindGrants the right to keep a list of countries and contact information kinds. |
| 3. | FullAccess (the Core subsystem user role)Grants the right to keep contact information kinds, a list of countries, and delete subsystem objects marked for deletion. |
To view and edit contact information of specific objects, roles for viewing and editing contact information owner objects are required.
The table below illustrates possible user groups and the roles they could be assigned with.
| # | User Group Description | Assigned Roles |
|---|---|---|
| 1. | Administrator |
|
| 2. | Master data owner: keep contact information kinds, a list of countries, and all other master data |
|
| 3. | Chief procurement officer: keep the list of products and the list of world countries (to enter countries of origin for goods) |
|
Special Cases of Integration
Displaying Contact Information Fields in Lists and Reports
To display contact information in dynamic lists and reports, set up the following. In a contact information owner object, add the KindForList attribute with the CatalogRef.ContactInformationKinds type to the ContactInformation table. In the Additional characteristics of metadata object form, add an additional characteristic:
| Types of Characteristics | Field of Option | Field of Type Selection | Value of Type Selection |
|---|---|---|---|
Catalog.ContactInformationKinds |
Ref |
GroupName |
Name catalog group ContactInformationKinds |
| Characteristic values | Object field | Field of type | Field of value |
Catalog.[Name of object with contact information].TabularSection.ContactInformation |
Ref |
KindForList |
Presentation |
where Predefined group (item) of the ContactInformationKinds catalog is a predefined group or an item created upon generating contact information kinds. To display contact information in the lists, in the list form in the More actions menu, click Change form. In the Form items table, click the Reference attribute, and then click Add fields in the command bar of the form. In the opened field list, select the required fields of contact information to be displayed.
As an example, see the _DemoCounterparties catalog of the demo configuration.
Displaying Icons Next to Contact Information Fields
To display icons to the left of contact information field titles, in the OnDefineSettings procedure of the ContactsManagerOverridable common module, set the ShouldShowIcons parameter to True.
Overriding Contact Information Commands
In some cases, you need to override standard commands in contact information fields that are displayed in catalogs and documents. For example, commands to write an email, send a text message, make a call, and so on. To do this, use the DetailsOfCommands parameter of the OnDefineSettings procedure of the ContactsManagerOverridable common module. The parameter helps you to change and assign a handler, add or delete extra standard commands in contact information fields.
See the example of how to override commands in the OnDefineSettings procedure of the ContactsManagerOverridable common module in the demo configuration.
Creating Static Controls
Creating static attributes of contact information allows you to:
- Add contact information items to various parts of the form. For example, you can add the most important kinds of contact information to the header.
- Change appearance and properties of contact information items without changing the standard configuration.
- Speed up opening a contact information owner object.
To create static items of contact information:
- Select contact information kinds whose controls are to be created manually.
- In the
OnCreateAtServerhandler, list the selected kinds in theItemsPlacedOnFormfield of theAdditionalParametersstructure as the third parameter upon calling theContactsManager.OnCreateAtServerprocedure. - Add the
ContactInformationParametersattribute of an arbitrary type to the form. - Add the
ContactInformationAdditionalAttributesDetailsattribute to the form. The attribute type is a value table with the following columns:AttributeName–StringAttributeNameComment–StringKind–CatalogRef.ContactInformationKindsType–EnumRef.ContactInformationTypesValue–StringPresentation–StringComment–StringIsTabularSectionAttribute–BooleanIsHistoricalContactInformation–BooleanInternationalAddressFormat–BooleanItemForPlacementName–StringFieldValues–ValueList,String
- For each contact information kind, add an attribute with a name in the
ContactInformationField<ContactInformationKindName>format. - For the
Skype,Email,WebPage,Phone, andFaxtypes, add an attribute with a name in theCommentContactInformationField<ContactInformationKindName>format. - Add the following items to the form:
- For each contact information kind, add a group with a name in the
ContactInformationGroupField <ContactInformationKindName>format to the form. Properties:Representation–None,Group–Horizontal,ShowTitle–False. - For the
Skype,Email,WebPage,Phone, andFaxtypes, add a group with a name in theGroupCommentContactInformationField<ContactInformationKindName>format. Properties:Representation–None,Group–Horizontal,ShowTitle–False. - For the
Skype,Email,WebPage,Phone, andFaxtypes, drag the previously created attribute with theCommentContactInformationField<ContactInformationKindName>name to the created group with theGroupCommentContactInformationField<ContactInformationKindName>name, disable the title display, and set the Note input hint. - For the
Skype,Email,WebPage,Phone, andFaxtypes, drag the previously created attribute with theContactInformationField<ContactInformationKindName>name to the created group with theContactInformationGroupField<ContactInformationKindName>name. Set the title display toLeftorTopdepending on the position of the title you pass to theContactsManager.OnCreateAtServerprocedure. - For the
AddressandOthertypes, drag the previously created attribute with theContactInformationField<ContactInformationKindName>name to the created group with theContactInformationGroupField<ContactInformationKindName>name. Set the title display toLeftorTopdepending on the position of the title you pass to theContactsManager.OnCreateAtServerprocedure. - To add an action, create a command with a name in the
CommandContactInformationField<ContactInformationKindName>format and thePicturedisplay. Drag this command to theContactInformationGroupField<ContactInformationKindName>group created earlier. The command picture, its title, and tooltip are set depending on the contact information type:- For the
Addresstype, set theMenuAdditionalFunctionspicture. - For the
WebPagetype, set theContactInformationGoToURLpicture, the Go to title, and the Go to URL tooltip. - For the
Emailtype, set an action only if there is the Email Management subsystem. Set theSendEmailpicture, the Send email title, and the Send email tooltip. - For the
Phonetype, if the Text Messaging subsystem is available, use theMenuAdditionalFunctionspicture, the Make call or send text message title, and the Make call or send text message tooltip. If the Text Messaging subsystem is missing, use theCallpicture, the Call title, and the Make a phone call tooltip. - For the
Skypetype, set theMenuAdditionalFunctionspicture and the Skype title and tooltip.
- For the
- For each contact information kind, add a group with a name in the
Set command pictures, titles, and tooltips according to the implementation of the OnDefineSettings procedure of the ContactsManagerOverridable common module if its implementation is defined.
We recommend that you make contact information kinds added to the form manually unavailable for editing by users. You can do it in the update handler using the SetContactInformationKindProperties procedure from the ContactsManager common module. The DenyEditingByUser property defines whether editing is available to users.
As an example, see the form of the _DemoCounterparties catalog item in the demo configuration.
Deferred Initialization of Contact Information Items
If some contact information items are located on a separate tab and they are not used in the main scenario of working with the form, you can speed up opening the form by transferring creation of contact information items from the moment you open the form to the moment you go to the contact information tab.
Using deferred initialization imposes the following restrictions:
- You cannot drag items from the contact information page.
- In some cases, form "jumps" are possible.
To use deferred initialization:
- Add the
ContactInformationParametersattribute of an arbitrary type to the form. - Add the
ContactInformationAdditionalAttributesDetailsattribute of the value table type to the form. See details of columns and their types in the previous section. - Pass the
DeferredInitializationparameter with theTruevalue as the sixth parameter to theContactsManager.OnCreateAtServerhandler. - For the contact information page, set the
EnableContentChangeproperty toFalse. - For the group of pages containing the contact information page, add the
OnCurrentPageChangehandler, to which you need to add the code:
```
// StandardSubsystems.ContactInformation
If ContactInformationParameters.Property(CurrentPage.Name)
AND NOT ContactInformationParameters[CurrentPage.Name].DeferredInitializationExecuted Then
ContactInformationWhenChangingPages();
EndIf;
// End StandardSubsystems.ContactInformation
```
- Add the following procedure to the block of contact information procedures: ``` &AtServer Procedure ContactInformationWhenChangingPages() ContactsManager.ExecuteDeferredInitialization(ThisObject, Object); EndProcedure ```
- If there are no static items on the contact information page, add a decoration with the
EmptyDecorationContactInformationname.
As an example, see the form of the _DemoCounterparties catalog item in the demo configuration.
Storing Contact Information Change History
If for record-keeping it is important to store not only current values of contact information fields but also their history and get a value as of the specified date, you need to set up storage of the contact information change history:
- Select objects that own contact information and contact information kinds for which the contact information change history is to be stored. For example, for the
Companiescatalog, it can be a legal address. - Add the
ValidFromattribute with theDatetype to theContactInformationtable of these objects. - Develop an update handler that sets a flag indicating that the change history is to be stored for the contact information kind. An example of the handler code:
KindParameters = ContactsManager.ContactInformationKindParameters("Address");
KindParameters.StoreChangeHistory = True;
ContactsManager.SetContactInformationKindProperties(KindParameters);
To get contact information as of a particular date, set the Date parameter in the ObjectContactInformation, ObjectsContactInformation, CreateContactInformationTemporaryTable, and ObjectContactInformationTable procedures (for example, specify a document date in the code of print forms). To write contact information as of a particular date, use the FillObjectsContactInformation and FillObjectContactInformation procedures in the same way. If change history storage is enabled, you cannot enter several contact information values. For more information, see comments to the procedures.
See an example of implementation in the _DemoCompanies catalog of the demo configuration for the Legal address contact information kind.
Filling in and Editing Contact Information of One Object in the Form of Another Object
You can output object contact information in a separate form or a form of another object. This feature allows you to edit object contact information without opening the form of the contact information owner.
For example, if in addition to previously placed contact information of the Demo: Partner contacts catalog item, you need to output contact information of the Individual attribute that references the Demo: Individuals catalog item, do the following:
-
Create an attribute of the
Individualform with theCatalogObject._DemoIndividualstype that contains an owner object of the contact information being edited. -
On the form, create a group or a page with the
ContactInformationIndividualGroupname. It is a container, to which form items will be added to edit individual contact information. -
In the
OnCreateAtServer,OnReadAtServer, andBeforeWriteAtServerform event handlers, add identical calls to fill in and save individual contact information. In these calls, specify theIndividualform attribute and contact information location group as parameters:#Region EventHandlersForm &AtServer Procedure OnCreateAtServer(Cancel, StandardProcessing) // StandardSubsystems.ContactInformation ContactsManager.OnCreateAtServer(ThisObject, Object,, FormItemTitleLocation.Left); ContactsManager.OnCreateAtServer(ThisObject, Individual, "IndividualContactInformationGroup", FormItemTitleLocation.Left); // End StandardSubsystems.ContactInformation EndProcedure &AtServer Procedure OnReadAtServer(CurrentObject) // StandardSubsystems.ContactInformation If ValueIsFilled(CurrentObject.Individual) Then ValueToFormAttribute(CurrentObject.Individual.GetObject(), "Individual"); EndIf; ContactsManager.OnReadAtServer(ThisObject, Individual, "IndividualContactInformationGroup"); ContactsManager.OnReadAtServer(ThisObject, Object); // End StandardSubsystems.ContactInformation EndProcedure &AtServer Procedure BeforeWriteAtServer(Cancel, CurrentObject, WriteParameters) // StandardSubsystems.ContactInformation ContactsManager.BeforeWriteAtServer(ThisObject, CurrentObject); ContactsManager.BeforeWriteAtServer(ThisObject, IndividualObject); // End StandardSubsystems.ContactInformation EndProcedure &AtServer Procedure OnWriteAtServer(Cancel, CurrentObject, WriteParameters) IndividualObject = FormAttributeToValue("Individual"); IndividualObject.Write(); ValueToFormAttribute(IndividualObject, "Individual"); EndProcedure #EndRegion -
Add a code that locks from changing the Demo: Individuals catalog item whose contact information is displayed in the form:
-
To do this, attach the handler that checks whether individual object lock is required to the
OnOpenevent handlers:&AtClient Procedure OnOpen(Cancel) AttachIdleHandler("CheckIfIndividualLockRequired", 1, False); EndProcedure -
Attach the procedure that is called by this handler for an attempt to lock an individual catalog item if the information was changed on the form:
  &AtClient
  Procedure CheckIfIndividualLockRequired()
      If Modified And Not Individual.Ref.IsEmpty() Then
          If LockIndividualOnEditAtServer(Individual.Ref, UUID) Then
              DetachIdleHandler("CheckIfIndividualLockRequired");
          Else
              Read();
              Raise NStr("en = 'Contact person details cannot be saved as personal details of an individual cannot be changed.
              |Perhaps, these contact person details are being edited by another user.'");
          EndIf;
      EndIf;
  EndProcedure

  &AtServerWithoutContext
      Function LockIndividualOnEditAtServer(Individual, FormUUID)
      Try
          LockDataForEdit(Individual, Individual.DataVersion, FormUUID);
      Except
          Return False;
      EndTry;

      Return True;

  EndFunction
-
As an example, see the form of the _DemoPartnersContactPersons catalog item in the demo configuration.
Adding Arbitrary Attributes with Contact Information
You can store values of contact information fields not only in the standard ContactInformation table but also in arbitrary attributes of arbitrary configuration objects. This option is useful to add particular fields with contact information to objects.
For example, you need to store delivery address data in the BuyerSOrder document. In this case, the document form must contain the Delivery address field being edited using the standard address input form and the Delivery date, Metro, and Comment fields. Other subsystem services for creating other contact information kinds are not required in the sales order.
To accomplish this task, do the following:
-
Add main attributes to the
BuyerSOrderdocument:DeliveryAddressof theStringtype of unlimited length. This attribute will store internal values of the delivery address contact information.DeliveryDateof theDatetype to store the delivery date.Metro. A reference to theMetroStationscatalog.
-
To the
BuyerSOrderdocument, add auxiliary attributes whose data will be calculated upon saving the document using theDeliveryAddressattribute data. Use these attributes for quick document search by contact information data, printing data, and so on.DeliveryAddressString. A string 200 characters long.DeliveryAddressCity. A string 100 characters long.
-
To control operations with the address, put the
DeliveryAddressContactInformationKindauxiliary attribute to the form and initialize it upon creating the form:DeliveryAddressContactInformationKind = New Structure; DeliveryAddressContactInformationKind.Insert("Type", Enums.ContactInformationTypes.Address); DeliveryAddressContactInformationKind.Insert("OnlyNationalAddress", False); DeliveryAddressContactInformationKind.Insert("IncludeCountryInPresentation", False); DeliveryAddressContactInformationKind.Insert("HideObsoleteAddresses", False);This structure replaces the matching item of the
ContactInformationKindscatalog. -
Put the
DeliveryAddressPresentationauxiliary string attribute to the document form. Initialize the attribute value upon creating the form:DeliveryAddressPresentation = ContactsManager.ContactInformationPresentation(Object.DeliveryAddress);- Create an input field matching the auxiliary attribute and set the
ChoiceButtonflag toTrue. - Define event handlers for this item:
 &AtClient
 Procedure DeliveryAddressPresentationOnChange(Item)
     Text = Item.EditText;
     If IsBlankString(Text) Then
         DeliveryAddressPresentation = "";
         DeliveryAddressComment = "";
         Object.DeliveryAddress = "";
         Return;
     EndIf;
     DeliveryAddressPresentation = Text;
     Object.DeliveryAddress = ValuesOfContactInformationFieldsServer(Text,
         DeliveryAddressContactInformationKind, DeliveryAddressComment);
 EndProcedure
 &AtClient
 Procedure DeliveryAddressPresentationStartChoice(Item, ChoiceData, StandardProcessing)

     If Item.EditText<>DeliveryAddressPresentation Then
         DeliveryAddressPresentation = Item.EditText;
         Object.DeliveryAddress = "";
     EndIf;

     OpeningParameters = New Structure;
     OpeningParameters.Insert("ContactInformationKind", DeliveryAddressContactInformationKind);
     OpeningParameters.Insert("Value", Object.DeliveryAddress);
     OpeningParameters.Insert("Presentation", DeliveryAddressPresentation);
     OpeningParameters.Insert("Comment", DeliveryAddressComment);
     OpeningParameters.Insert("Title", NStr("en='Delivery address'"));

     ContactsManagerClient.OpenContactInformationForm(OpeningParameters, Item);
 EndProcedure
 &AtClient
 Procedure PresentationOfTheDeliveryAddressCleaning(Item, StandardProcessing)
     DeliveryAddressPresentation = "";
     DeliveryAddressComment = "";
     Object.DeliveryAddress = "";
 EndProcedure
 &AtClient
 Procedure DeliveryAddressPresentationChoiceProcessing(Item, ValueSelected, StandardProcessing)
     StandardProcessing = False;
     If TypeOf(ValueSelected)<>Type("Structure") Then
         // Cancel choice, data is not modified.
         Return;
     EndIf;

     DeliveryAddressPresentation = ValueSelected.Presentation;
     DeliveryAddressComment = ValueSelected.Comment;
     Object.DeliveryAddress = ValueSelected.ContactInformation;
     EndProcedure
If the entering address as a string function is not required, you can bypass this auxiliary input field by replacing it, for example, with a hyperlink. In this case, the hyperlink text will be an address presentation, and a click handler is similar to the
StartChoicehandler. - Create an input field matching the auxiliary attribute and set the
-
To edit a comment that is not included in the main address presentation, put the
DeliveryAddressCommentauxiliary attribute to the form. Initialize it upon creating the form:DeliveryAddressComment = ContactsManager.ContactInformationComment(Object.DeliveryAddress); -
Put the input field to the form and link it to the
DeliveryAddressCommentattribute. Define the following change handlers:&AtClient Procedure DeliveryAddressCommentOnChange(Item) FillDeliveryAddressCommentServer(); EndProcedure &AtServer Procedure FillDeliveryAddressCommentServer() If IsBlankString(Object.DeliveryAddress) Then Object.DeliveryAddress = ValuesOfContactInformationFieldsServer(DeliveryAddressPresentation, DeliveryAddressContactInformationKind, DeliveryAddressComment); Return; EndIf; ContactsManager.ContactInformationComment(Object.DeliveryAddress, DeliveryAddressComment); EndProcedure -
Put input fields linked to the
DeliveryDateandMetroobject attributes to the document form. -
In the document object module, in the
BeforeWriteevent handler, fill in auxiliary attributes:DestinationCity = ContactsManager.ContactInformationCityAddress(DeliveryAddress); DeliveryAddressString = ContactsManager.ContactInformationPresentation(DeliveryAddress); -
SSL provides API for data operations:
- Methods for parsing contact information from a presentation string.
- Methods for generating a contact information presentation.
- Methods for getting and setting values of contact information parts (for example, a comment, an address country, an address city, and so on).
- Methods for comparing contact information objects.
As an example, see the DeliveryAddress attribute of the _DemoSalesOrder document in the demo configuration.
Changing Contact Information Kinds
To change a contact information kind property, get the current parameters of the contact information kind, change the property, and write these parameters. For example, to enable storage of the address change history in the update handler:
Kind = ContactsManager.ContactInformationKindParameters(Catalogs.ContactInformationKinds._DemoPartnerAddress);
Kind.StoreChangeHistory = True;
ContactsManager.SetContactInformationKindProperties(Kind);
Change the parameters of contact information kinds carefully, especially for static controls, as these changes might lead to unexpected behavior or errors.
Disabling Unused Contact Information Kinds
If a contact information owner object is disabled using the functional option, you can disable an unused contact information kind. To do this, you can use the Used property of the contact information kind. When you set the Used property to False, the contact information kind is no longer displayed in the list form and in the form of the contact information owner object. You can set the Used property both for individual contact information kinds and for all contact information of the owner object (group of contact information kinds). To disable an unused contact information kind:
- Write an update handler that disables unused contact information kinds when migrating to a new version. An example of the handler code:
ContactPersonsPartners = ContactsManager.ContactInformationKindParameters(Catalogs.ContactInformationKinds.Catalog_DemoPartnersContactPersons); ContactPersonsPartners.Used = GetFunctionalOption("_DemoUsePartnersContactPersons"); ContactsManager.SetContactInformationKindProperties(ContactPersonsPartners); - Add the identical code to the event upon changing a functional option value. See an example in the
OnWriteevent of the_DemoUsePartnersContactPersonsconstant value manager module.
Adding Attributes of the CatalogRef.WorldCountries Type
Generally, when adding an attribute of the CatalogRef.WorldCountries type, you can select any catalog item. But if the list of world countries to select must be regulated (selection of countries only from the classifier is allowed), in the ChoiceParameters property of the form item or input field, specify the following:
AllowClassifierData–Boolean,True.OnlyClassifierData–Boolean,True.
You can also automatically create new items of the WorldCountries catalog upon automatic selection. To do this, in the ChoiceProcessing event handler of the form module, insert a call as follows:
ContactsManagerClient.WorldCountryChoiceProcessing(Item, ValueSelected, StandardProcessing);As an example, see the form of the _DemoProducts catalog item in the demo configuration.
Combination with Other Subsystems
How to Integrate "Users" Subsystem without "Contact Information" Subsystem
How to Use the Subsystem in Development
When developing or modifying predefined contact information kinds, consider their update using the update handler.
Adding Items to the "Worldcountries" Catalog from the World Countries Classifier Automatically
Users with appropriate rights can add new items to the catalog either manually or by selecting them from the world countries classifier. In this case, new catalog items can be automatically created according to the classifier data upon selecting world countries and picking them automatically in the country input field.
Thus, the WorldCountries catalog contains only countries used in accounting.
Data Exchange Setup
Add all the subsystem's metadata objects that contain data to exchange plans used for data synchronization between different applications and to exchange plans of distributed infobases and standalone workstations.
For exchange plans used for data synchronization between different applications, set up mapping rules for the WorldCountries catalog. First, set up search by reference and then search by the Code and Description composite key.
Setting Up Data Exchange with Previous Versions
- When synchronizing contact information with configurations based on SSL version 2.4 or earlier, set up export rules in the conversion rules to prevent the
Valueattribute of theContactInformationtable from being exported for contact information owner objects. - When synchronizing contact information with configurations based on SSL version 2.1.2 or earlier, to export data to this configuration, convert the
FieldValuesattribute of theContactInformationtable using the call:Value = AddressManager.PreviousContactInformationFormatIsXML(Value, True)When using conversion rules, write the code above in the
OnExporthandler of the property conversion rule (PCR) for theFieldValuesattribute of theContactInformationtable. - When synchronizing contact information with configurations based on SSL version 2.2 or earlier, in the conversion rules, set up rules of export from SSL 2.3.1 to SSL 2.2 to prevent the following from being exported for contact information owner objects:
- The
KindForListattribute of theContactInformationtable. - All rows of the
ContactInformationtable with theSkypecontact information type.
- The
- If the
ContactInformationtable contains theValidFromattribute, when synchronizing contact information with configurations based on SSL version 2.3.1 or earlier, you need to set up exchange rules for contact information kinds with the setStoreChangeHistoryproperty as follows:- When exporting data, if a contact information kind has several records with different dates in the
ValidFromattribute, only a relevant (active) record is included in export. All records from the history are ignored and not included in export. - When importing data, all records of this contact information kind are saved without changes. But if a record being imported differs from the current active record of this contact information kind, a new row with the data being imported is added to the
ContactInformationtable and the current session date is assigned to theValidFromattribute of the new contact information row because this record becomes relevant (active).
- When exporting data, if a contact information kind has several records with different dates in the
See an example of usage in the demo configuration, in the ExchangeRules and CorrespondentExchangeRules templates of the _DemoExchangeWithStandardSubsystemsLibrary225 exchange plan.
Data Integrity
The Data integrity subsystem supports automatic scheduled monitoring of infobase data integrity by arbitrary applied rules. These rules supplement existing checks used when writing documents and other configuration objects (for example, reference integrity violation, negative balance in the accumulation register, or failure in tax invoice numbering). The subsystem also allows you to display found issues for different user categories. For example, if it is a month-end closing operation, the user responsible for month-end closing should perform the check and fix issues. If it is a check for dead references or testing/correction, it should be carried out by the system administrator. The monitoring is performed in the background on schedule or can be initiated by the user.
Subsystem Setup
Select the applied data integrity checks to be performed in addition to the existing checks used when writing objects. For example, these can be complex checks that monitor the state of several related objects and are advisable to perform in the background (not during the user session), or checks that should be performed only at certain stages: during the month-end closing operation, before sending reports, and so on. By default, the subsystem provides system checks that automatically monitor data integrity in the background:
- Search for references to missing files in storage volumes.
- Check for duplicate predefined items.
- Check for empty required attributes.
- Check for missing predefined nodes in exchange plans.
- Check for missing predefined items.
- Check for reference integrity.
- Check for infinite loops.
To add an applied check:
-
Add the check details to the
OnDefineChecksprocedure of theAccountingAuditOverridablecommon module as follows:Validation = Checks.Add(); Validation.GroupID = "SystemChecks"; Validation.Description = NStr("en='Demo: Check if comments in the ""Demo: Goods receipt"" documents are filled in'"); Validation.Reasons = NStr("en='A comment is not entered in the document.'"); Validation.Recommendation = NStr("en='Enter comment in the document.'"); Validation.Id = "CheckCommentInGoodsReceipt"; Validation.CheckHandler = "_DemoStandardSubsystems.CheckCommentInGoodsReceipt"; Validation.CheckStartDate = Date('20140101000000'); Validation.IssuesLimit = 3; Validation.ImportanceChangeDenied = True; Validation.AccountingChecksContext = "SystemChecks"; -
In the
CheckHandlerproperty, specify the full path to the export check handler procedure as follows:<ServerCommonModule>.<ProcedureName>. As an example, see the_DemoStandardSubsystems.CheckCommentInGoodsReceipt. -
For details of check properties, see the comment to the
OnDefineChecksprocedure of theAccountingAuditOverridablecommon module. -
Generally, the check handler format must be the following:
Procedure CheckCommentInGoodsReceipt(Validation, CheckParameters) Export Result = PerformCheck(); While Result.Next() Do Issue1 = ModuleAccountingAudit.IssueDetails(Result.Ref, CheckParameters); Issue1.EmployeeResponsible = Result.EmployeeResponsible; Issue1.IssueSummary = ?(ValueIsFilled(Result.Comment), NStr("en = 'There are spaces or tabs in the comment.'"), NStr("en = 'A comment is not entered in the document.'")); ModuleAccountingAudit.WriteIssue(Issue1, CheckParameters); EndDo; EndProcedure -
Along with the check, the subsystem enables you to implement an algorithm to fix the found issues. Users can proceed to correction from the
AccountingCheckResultsreport:- To open a form (workspace) that supports the correction procedure in the check details, specify the following in the
GoToCorrectionHandlerproperty:Validation.GoToCorrectionHandler = "Report.AccountingCheckResults.Form.InfiniteLoopsCorrection"; - The
CheckIDandCheckKindparameters will be passed to the form. These parameters are used in the form module code to determine the issues the user requested to fix. - Alternatively, you can specify the export handler procedure for the client common module in the
GoToCorrectionHandlerproperty:Validation.GoToCorrectionHandler = "AccountingAuditInternalClient.InfiniteLoopsCorrection"; - In this case, the
CheckIDandCheckKindparameters must be defined in the export client handler:Procedure InfiniteLoopsCorrection(CheckID, CheckKind) Export
Select reference metadata objects (catalogs, documents, and so on) in whose forms and lists you need to display information about the identified issues. These could be all configuration objects or the most critical ones in terms of data integrity. For each of these objects, do the following:
- To open a form (workspace) that supports the correction procedure in the check details, specify the following in the
- In the list form module, add the following snippet to the
OnCreateAtServerprocedure:// StandardSubsystems.AccountingAudit AccountingAudit.OnCreateListFormAtServer(ThisObject, "List"); // End StandardSubsystems.AccountingAudit - Add the
ListOnGetDataAtServerevent handler to the dynamic list:// StandardSubsystems.AccountingAudit AccountingAudit.OnGetDataAtServer(Settings, Rows); // End StandardSubsystems.AccountingAudit -
Add the
Selectionevent handler to the dynamic list:// StandardSubsystems.AccountingAudit &AtClient Procedure ListSelection(Item, RowSelected, Field, StandardProcessing) Export AccountingAuditClient.OpenListedIssuesReport(ThisObject, "List", Field, StandardProcessing); EndProcedure // End StandardSubsystems.AccountingAudit
If the event handler already exists, add a procedure call to it:
  // StandardSubsystems.AccountingAudit
  AccountingAuditClient.OpenListedIssuesReport(ThisObject, "List", Field, StandardProcessing);
// End StandardSubsystems.AccountingAudit-
In the object form module, add the following snippet to the
OnReadAtServerprocedure:// StandardSubsystems.AccountingAudit AccountingAudit.OnReadAtServer(ThisObject, CurrentObject); // End StandardSubsystems.AccountingAudit -
In the object form module, add the following snippet to the
AfterWriteAtServerprocedure:// StandardSubsystems.AccountingAudit AccountingAudit.AfterWriteAtServer(CurrentObject); // End StandardSubsystems.AccountingAudit -
Add the following code block to the
Privateregion of the object form module:// StandardSubsystems.AccountingAudit &AtClient Procedure Attachable_OpenIssuesReport(ItemOrCommand, URL, StandardProcessing) AccountingAuditClient.OpenObjectIssuesReport(ThisObject, Object.Ref, StandardProcessing); EndProcedure // End StandardSubsystems.AccountingAudit
By default, information about the identified issues is displayed in lists as a column with an exclamation mark and in the upper part of the object forms. You can override it by using the AccountingAuditOverridable common module.
If the configuration does not contain the Application settings subsystem, add the AccountingCheckRules command to the Administrator workspace.
If the configuration does not include the To-do list subsystem, you can notify users about the identified issues on the home page by other means, using the OpenIssuesReport, OpenObjectIssuesReport or OpenListedIssuesReport API of the AccountingAuditClient common module.
Special Cases of Integration
When integrating the subsystem, you might need to restrict access to information about identified issues on the record level. For example, if the configuration allows you to configure data access broken down by companies and projects, then access to information about identified issues must be restricted accordingly. To do this:
- Add the attributes to be used for access to the
AccountingCheckResultsregister and include the required data access restrictions in theReadAccountingCheckResultsrole in theReadaccess right. - Populate these attributes when writing issues from the applied checks code. For example, you can move them directly from an object with issues or according to more complex rules. For built-in checks, use the
BeforeWriteIssueprocedure of theAccountingAuditOverridablecommon module and add the population code as follows:If Attributes.Find("Organization") <> Undefined Then Issue1.Insert("_DemoCompany", Common.ObjectAttributeValue(ObjectReference, "Organization")); EndIf;
When using the subsystem, you might need to group checks by an applied feature. For example, you might need to select all the checks that relate to the payroll calculation operation. To do this, add the required metadata type to the AccountingChecksContext type collection. After that, assign the required value to the AccountingChecksContext property in the OnDefineChecks procedure of the AccountingAuditOverridable common module.
Besides, this feature (the check context) can be further refined with one more value. For example, the refinement can be in the form of a question "When to check?" with possible answers: "Before payroll calculation", "During payroll calculation", or "After payroll calculation". If such refinement is needed, add the required metadata type to the AccountingCheckContextClarification type collection and set the check property with the same name, similar to the AccountingChecksContext property.
User Access Setup
To manage user access to the subsystem, assign a user the roles specified in the table below.
| # | Role Description |
|---|---|
| 1. | FullAccess (the Core subsystem user role)Grants the right to enable and disable the Data integrity subsystem. Grants the right to change the check settings. |
| 2. | ReadAccountingCheckResultsGrants the right to view the identified issues and manage the Data integrity report. |
How to Use the Subsystem in Development
The subsystem API is presented in the AccountingAudit and AccountingAuditClient common modules.
To view the identified data integrity issues, the AccountingCheckResults report is used. If you need to display the list of issues in a workspace (for example, display issues that prevent month-end closing in the month-end closing form), use the ExecuteCheck procedure to carry out the required check and the SummaryInformationOnChecksKinds or DetailedInformationOnChecksKinds functions to get the check results. If you need to carry out a series of checks (for example, all checks related to month-end closing), use the ExecuteChecksInContext procedure.
Checks Development Guidelines
When developing custom checks, consider the following:
- Exclude objects currently unavailable by functional options using the
MetadataObjectAvailableByFunctionalOptionsfunction of theCommoncommon module. As an example, see theCheckUnfilledRequiredAttributesprocedure of theAccountingAuditInternalcommon module. - In SaaS, exclude objects unavailable for the
FullAccessrole as well as shared data using theIsSeparatedMetadataObjectfunction of theSaaSOperationscommon module. Besides, it makes no sense to carry out some checks in SaaS. For example, the reference integrity check is disabled in SaaS as such check must be performed centrally by the service administrator, not by the data area administrators.
Preliminary Cleanup of Data Integrity Issues Before Running a New Check
To develop data integrity checks that register issues of several types (for example, issues with a specified counterparty or issues related to a certain period), use the ClearPreviousCheckResults procedure in the AccountingAudit common module. With this procedure, clear previously registered data integrity issues at the beginning of the main algorithm of the check handler. Otherwise, the same issue may be registered multiple times upon several consecutive checks.
For non-parameterized checks, the preliminary cleanup of previous check results is performed automatically so the ClearPreviousCheckResults procedure call is not required in their handlers.
Data Exchange Setup
Since the data integrity check is carried out independently in each node, do not add any subsystem metadata objects with data to exchange plans of distributed infobases (DIB) and standalone workstations and to exchange plans used for data synchronization between different applications.
User Monitoring
With the User monitoring subsystem, you can analyze user activity and perform application diagnostics based on event log data. The subsystem includes the following report options:
- User activity, Summary user activity, and Department activity analysis
- User account change history
- Changes in role rights, Changes in profile roles, Changes in user group membership, Changes in access group membership, and Changes in access group values
- Errors and warnings
- Scheduled job runtime (for hosted configurations only)
The subsystem also provides an interface for auditing data access by setting up the Access.Access log event and the Data access log workspace.
Subsystem Setup
If the configuration does not contain the Application settings subsystem, add the following objects to the administrator's command interface:
- Reports
EventLogAnalysisandUserAccountsChanges. - Commands
RegistrationSettingsForDataAccessEventsandDataAccessLogof theEvent logdata processor.
See an example in the demo configuration:SSLAdministrationPaneldata processor >UsersAndRightsSettingsform > Data access audit group.
User Access Setup
To manage user access to the subsystem, assign a user the role specified in the table below.
| # | Role Description |
|---|---|
| 1. | FullAccess (the Core subsystem user role)Grants the right to view event log reports. |
How to Use the Subsystem in Development
Data Exchange Setup
For distributed infobases (DIB) and standalone workstations, add to the exchange plans all the subsystem's metadata objects except for the following:
- Constant
RegistrationSettingsForDataAccessEvents - Constant
ShouldRegisterChangesInAccessRights
Exclude the following metadata objects from exchange plans used for data synchronization between different applications:
- Constant
RegistrationSettingsForDataAccessEvents - Constant
ShouldRegisterChangesInAccessRights
National Language Support
The National language support subsystem group contains basic functionality required to work with data in multiple languages, as well as a number of subsystems that enhance the functionality of other subsystems with multilingual data (for example, the Print subsystem). When embedding the National language support subsystem, its subordinate subsystems must be integrated together with the matching subsystems of the Standard subsystems group, except for the Translator subsystem, which can be integrated independently if required.
When developing configurations with the support of multiple languages, it might be necessary to enter and store string attribute values in these languages (hereinafter multilingual data). For optimal performance, a maximum of three data input languages are available for multilingual data: the main language (may differ from the main configuration language) and two additional languages. The administrator will be prompted to select them at the first start of the infobase. The languages can be re-selected later in the Administration section.
No matter how many interface languages are used, the Print subsystem of the National language support subsystem group allows you to generate document print forms in an unlimited number of languages. The following integration guide shows you how the application supports multiple interface languages. To enable multiple languages for the attributes used for printing, see Printing Out Documents in Multiple Languages.
To enter and store values of string attributes in different languages, do the following:
- Select string attributes of reference-type objects (catalogs, documents, and so on) and information registers that require entering multilingual data, and create the attributes of additional languages for them. Attributes of additional languages must be named with suffixes
Language1andLanguage2. For example, for string attributeOrderComposition, create string attributesOrderCompositionLanguage1andOrderCompositionLanguage2. - For frequently used attributes
DescriptionandComment, the matching common attributes are already provided in the library, so just add objects with these attributes to them. In other cases, create identical attributes of additional languages for different objects in the form of common attributes and add related objects to them. - Include the added attributes in the
UseAdditionalLanguage1andUseAdditionalLanguage2functional options. - For each object that allows entering multilingual data, in the list form, call the
NationalLanguageSupportServer.OnCreateAtServerprocedure in theOnCreateAtServerevent handler:&AtServer Procedure OnCreateAtServer(Cancel, StandardProcessing) NationalLanguageSupportServer.OnCreateAtServer(ThisObject); EndProcedureFor complex queries in lists, when automatic query adaptation is not applicable, implement the query modification algorithms to display multilingual data in the user's language.
- In the event handlers
OnCreateAtServer,OnReadAtServer,BeforeWriteAtServer, andAfterWriteAtServerof the item form of a document or record, add the respective procedures of theNationalLanguageSupportServercommon module:#Region EventHandlersForm &AtServer Procedure OnCreateAtServer(Cancel, StandardProcessing) NationalLanguageSupportServer.OnCreateAtServer(ThisObject, Object); EndProcedure &AtServer Procedure OnReadAtServer(CurrentObject) NationalLanguageSupportServer.OnReadAtServer(ThisObject, CurrentObject); EndProcedure &AtServer Procedure BeforeWriteAtServer(Cancel, CurrentObject, WriteParameters) NationalLanguageSupportServer.BeforeWriteAtServer(CurrentObject); EndProcedure &AtServer Procedure AfterWriteAtServer(CurrentObject, WriteParameters) NationalLanguageSupportServer.OnReadAtServer(ThisObject, CurrentObject); EndProcedure #EndRegionFor information registers, replace the
Objectvariable withRecordhere and below.Place the following code block into the
FormHeaderItemsEventHandlersregion of the item (document) form module:#Region FormHeaderItemsEventHandlers &AtClient Procedure Attachable_Opening(Item, StandardProcessing) NationalLanguageSupportClient.OnOpen(ThisObject, Object, Item, StandardProcessing); EndProcedure #EndRegion - Add the
OnReadPresentationsAtServerprocedure to the object module:#Region EventsHandlers Procedure OnReadPresentationsAtServer() Export NationalLanguageSupportServer.OnReadPresentationsAtServer(ThisObject); EndProcedure #EndRegion - For reference-type objects (catalogs, documents, and so on), add the
PresentationFieldsGetProcessing,PresentationGetProcessing, andChoiceDataGetProcessinghandlers to the object manager module:#Region EventsHandlers Procedure PresentationFieldsGetProcessing(Fields, StandardProcessing) NationalLanguageSupportClientServer.PresentationFieldsGetProcessing(Fields, StandardProcessing); EndProcedure Procedure PresentationGetProcessing(Data, Presentation, StandardProcessing) NationalLanguageSupportClientServer.PresentationGetProcessing(Data, Presentation, StandardProcessing); EndProcedure Procedure ChoiceDataGetProcessing(ChoiceData, Parameters, StandardProcessing) NationalLanguageSupportServer.ChoiceDataGetProcessing(ChoiceData, Parameters, StandardProcessing, <Metadata.ChartsOfCharacteristicTypes.TaskAddressingObjects>); EndProcedure #EndRegionPass a metadata object as the forth parameter of the
NationalLanguageSupportServer.ChoiceDataGetProcessingprocedure.
See an implementation example in the PerformerRoles catalog and the _DemoStorageLocationsManagers information register in the demo configuration.
Data Exchange Setup
For distributed infobases (DIB) and standalone workstations, add to the exchange plans all the subsystem's metadata objects.
Translator
The National language support subsystem group includes the Translator subsystem which automatically translates texts into another language using Yandex.Cloud and Google Cloud external services. Besides, it supplements the Print subsystem to display print forms in different languages and automatically translates presentations of multilingual attributes.
The subsystem API is given in the TextTranslationTool common module.
User Access Setup
| # | Role Description |
|---|---|
| 1. | FullAccess (the Core subsystem user role)Grants the right to set up the text translation service and translate texts. |
| 2. | BasicAccessSSL (the Core subsystem user role)Grants the right to translate texts. |
Data Exchange Setup
Add all the subsystem's metadata objects to exchange plans of distributed infobases (DIB) and standalone workstations and to exchange plans used for data synchronization between different applications, except for the following objects:
- Constant
UseTextTranslationService - Constant
TextTranslationService - Information register
TranslationCache
This is because the translation service is set up independently in each node or application.
User Reminders
With the User reminders subsystem, you can set up personal reminders of any system object and notify a user at the scheduled time.
Subsystem Setup
To use the subsystem, display the MyReminders form of the UserReminders information register in the user command interface and do the following:
- Select reference-type objects that require reminders. As a rule, such objects include most configuration objects a user deals with.
- Add the selected object types to the
Typeproperty of theReminderSubjectandReminderSubjectObjecttype collections. - If the configuration includes the
AttachableCommandssubsystem, use it to output reminder commands. In this case, integrate the subsystem into the forms where the reminder buttons should be displayed.
Optional. To optimize performance when opening the form, it is recommended that you add a submenu to the command bar to output reminder commands as follows:
- Name:
SubmenuOrganizer. - Title: Organizer.
- Type:
Submenu. - Representation:
Picture. - Picture:
Organizer(picture from configuration).
Note.
If the configuration does not include the AttachableCommands subsystem, use common commands. By default, the Remind common command is invisible in forms of object groups. If required, place this command on the command bar of group forms manually:
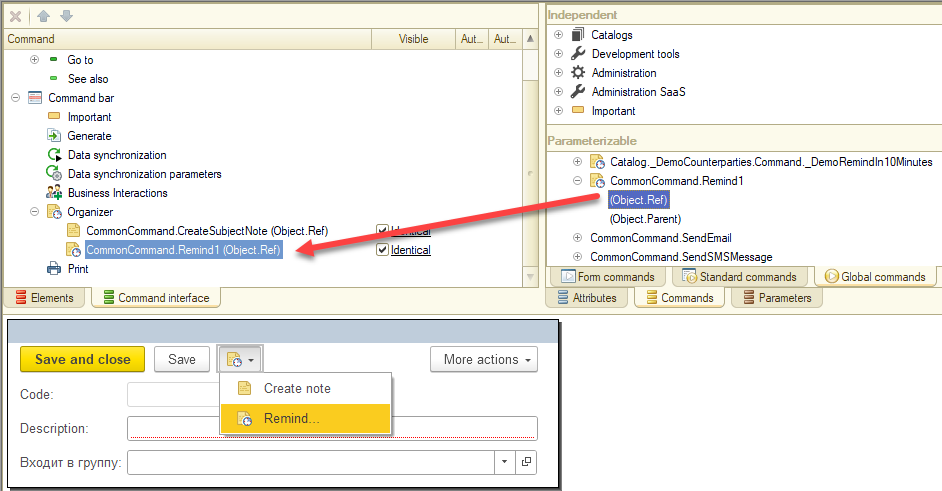
Defining Object Attributes for Relative Reminder Period Setting
By default, users are prompted to set a reminder period relative to any attribute of the Date type. Only the attributes whose date values are in the future are available for selecting in the list. You can override this list, for example, by removing internal attributes from it. To do this, implement your logic in the OnFillSourceAttributesListWithReminderDates procedure of the UserRemindersOverridable module.
Placing Reminder Setting Items in the Object Form
You may need to place the object date reminder settings in the object form. For example, a calendar entry. To simplify it, the subsystem provides automatic placement of reminder setting items in the object form.
To place reminder items on the form, insert the code in the form module as follows:
&AtServer
Procedure OnCreateAtServer(Cancel, StandardProcessing)
    PlacementParameters = UserReminders.PlacementParameters();
    PlacementParameters.Group = Items.GroupPaymentDateWithReminder;
    PlacementParameters.NameOfAttributeWithEventDate = "PayDate";
    UserReminders.OnCreateAtServer(ThisObject, PlacementParameters);
EndProcedure

&AtServer
Procedure OnReadAtServer(CurrentObject)
    UserReminders.OnReadAtServer(ThisObject, CurrentObject);
EndProcedure

&AtServer
Procedure OnWriteAtServer(Cancel, CurrentObject, WriteParameters)
    ReminderText = StringFunctionsClientServer.SubstituteParametersToString(
        NStr(" = 'Check the payment on invoice %1'"), CurrentObject.Number);
    UserReminders.OnWriteAtServer(ThisObject, Cancel, CurrentObject, WriteParameters, ReminderText);
EndProcedure

&AtClient
Procedure NotificationProcessing(EventName, Parameter, Source)
    UserRemindersClient.NotificationProcessing(ThisObject, EventName, Parameter, Source);
EndProcedure

&AtClient
Procedure Attachable_OnChangeReminderSetting(Item)
    UserRemindersClient.OnChangeReminderSettings(Item, ThisObject);
EndProcedure
As an example, see the DocumentForm form of the _DemoCustomerProformaInvoice document in the demo configuration.
Special Cases of Integration
User Access Setup
| # | Role Description |
|---|---|
| 1. | FullAccess (the Core subsystem user role)Grants the right to create, edit, and delete user reminders. |
| 2. | AddEditNotificationsGrants the right to create, view, and delete your reminders. |
How to Use the Subsystem in Development
API for Creating Reminders
To create reminders in a non-interactive manner, use API of the RemindInSpecifiedTime and RemindTillSubjectTime procedures of the UserRemindersClient common module. As an example, see the demo configuration:
- Business processes and tasks – Task execution – My tasks – any task on the command bar – Organizer – Demo: Remind me in 5 minutes.
- Organizer – Notes – Demo: Counterparties – the counterparty profile on the command bar – Organizer – Demo: Remind me in 10 minutes.
The _DemoRemind5MinutesBefore common command, the _DemoCounterparties catalog, and the _DemoRemindIn10Minutes command.
Data Exchange Setup
Do not add the subsystem's objects to exchange plans used for data synchronization between different applications or to exchange plans of distributed infobases and standalone workstations. Use the subsystem in each node independently.
Item Order
With the Item order subsystem, you can reorder items of a catalog, a chart of characteristic types, or a chart of calculation types in dynamic lists. If a catalog is subordinate, items are numbered within an owner. If a catalog or a chart of characteristic types is hierarchical, items are numbered within a parent.
The subsystem imposes some restrictions on dynamic list setup: the list must be ordered by the specific order attribute, it is also not advisable to use groupings. If the list settings do not allow you to move an item, a warning message appears.
Do you use the subsystem in tables with numerous items (more than 100 items), since manual ordering of this number of items is unreasonable and will slow down list sequence number recalculation considerably.
Subsystem Setup
Select catalogs and charts of characteristic types for which item ordering is to be set up, and specify them in the ObjectWithCustomOrder type collection.
For each object with item ordering, do the following:
- Add the
AddlOrderingAttributeattribute.
| Property | Value |
|---|---|
| Data type | Number, the length is 5, the precision is 0 (the length can be changed) |
| Index | Index with additional ordering |
| Synonym | Order |
- Attach the list form to the Attachable Commands subsystem.
- In the list form, set sorting by the
Orderfield for a dynamic list.
If an object has predefined items, rewrite these items in the infobase update procedure in the order in which they are to be displayed in the list. Notice.
In lists with filters and for objects with enabled right restriction on the record level, the subsystem can be used in a limited number of cases. For example, if each list user sees only their items, movement of any item is always correct. In other cases, it might happen that one user moves an item by one position, and for another user this "movement" looks like a "jump" of the item by several positions at once.
User Access Setup
You do not need to set up user access rights to the Item order subsystem data.
How to Use the Subsystem in Development
Data Exchange Setup
The subsystem does not participate in data exchange.
Application Settings
With the Application settings subsystem, you can display settings panels for all SSL subsystems placed in the Administration menu. The settings panels are part of the SSLAdministrationPanel data processor forms.
Subsystem Setup
Place the Administration subsystem latest (most right) in the section bar. To do so, in the configuration properties, click Command interface.
If you did not import the Administration section from SSL, manually add administration panels (you can find them in the SSLAdministrationPanel data processor forms) and frequently used commands to the Administration section. As an example, see the section in the demo SSL configuration.
If a configuration contains no subsystems that are supposed to be displayed on a form (the form is empty), delete the form. For example, if a configuration does not contain the FilesOperations subsystem, delete the FilesOperationSettings form.
You can choose what configuration settings to add and their layout. Consider the following recommendations:
- Form
SupportAndServicecontains commands frequently used by the administrator:- System monitoring
- Backing up and restoring
- Performance optimization
- Other operations
- Form
CommonSettingscontains parameters that affect the entire application, such as the application title bar and full-text search settings. - Form
UsersAndRightsSettingscontains user management settings:- User list management
- Access right management
- User settings management
- Period-end closing date management
- Form
InternetSupportAndServicescontains web service settings:- Importing classifiers
- Online support
- Counterparty eligibility verification
- Form
FilesOperationSettingscontains file management settings. - Form
DataSynchronizationcontains data synchronization settings and distributed infobase management. - Form
Organizercontains settings for emails, notes, reminders, and business processes. - Form
PrintFormsReportsAndDataProcessorscontains settings for print forms, report options, report distribution, and additional reports and data processors.
On settings panels, you can add constants, hyperlinks to other settings forms, labels, and controls.
Constants
Settings forms provide a code block that makes the process of adding constants quick and seamless. To add a constant:
- Drag and drop the constant from the
ConstantsSetform attributes to the settings form items. Give the input field the same name the constant has. - Define the
OnChangeinput field handler. To do so, add the call of theAttachable_OnChangeAttributeprocedure. For example:
&AtClient
Procedure ConstantNameOnChange(Item)
    Attachable_OnChangeAttribute(Item);
EndProcedure
Hyperlinks
To add a hyperlink:
- Add a global command or an object that has commands to the Administration section.
- Hide the command or object from the section. The Administrator can always show it if necessary.
- Drag and drop the command to settings form items. Set the field type to
Hyperlink.
Labels
We recommend that you provide each control, input field, and hyperlink with a label that would explain how it works and what it is for. When you add an extended tooltip, set Tooltip display to Display below, and clear the AutoMaxWidth flag.
Supporting Multi-Modality
If a configuration can run in different modes, ensure that in each mode the subsystem displays the relevant set of settings. For example, a hyperlink that navigates to the Infobase administration parameters form is visible only in client/server mode.
1C:Enterprise automatically hides and shows form items associated with functional options. In case a form item does not hide automatically (for example, a label text that cannot be associated with a functional option), add code that would hide the whole group to the OnCreateAtServer handler.
Built-in settings forms have the WorkMode attribute, which can take the following values: SaaSModel, Local_, File, ClientServer1, LocalFile, and LocalClientServer. For more information, see the description of the SettingsPanelFillWorkMode procedure of the ApplicationSettingsServer common module.
Example:
&AtServer
Procedure OnCreateAtServer(Cancel, StandardProcessing)

    // Visibility settings at startup
    Items.IBAdministrationParametersGroup.Visible = WorkMode.ClientServer1;

EndProcedure
Control Dependencies
Controls support dependencies, for example:
- A hyperlink that navigates to the Object versioning settings is clickable only when the Object versioning check box is selected.
- The Subordinate business processes flag is clickable only when the Business processes and tasks check box is selected.
An interface element that depends on another element must be always visible, only its clickability can change. To change clickability, add the serving code to the SetAvailability procedure. Example:
&AtServer
Procedure SetAvailability(DataPathAttribute = "")

    If DataPathAttribute = "ConstantsSet.UseBusinessProcessesAndTasks" Or DataPathAttribute = "" Then

        Items.OpenRolesAndPerformersForBusinessProcesses.Enabled = ConstantsSet.UseBusinessProcessesAndTasks;

    EndIf;

EndProcedure
Role-Based Visibility
Sometimes, a settings form is supposed to be used by different user roles. For example, in a SaaS application, the settings can be changed by either the service administrator or the service subscriber administrator.
You should set up the interface so that an administrator could see only those settings they have the right to change.
To do this, add a code block that checks the user role before the code block that changes interface item properties in OnCreateAtServer procedures or changes the Enabled property in the SetAvailability procedure. Example:
&AtServer
Procedure SetAvailability(DataPathAttribute = "")
    If WorkMode.IsSystemAdministrator Then
        <Serving code>
    EndIf;
EndProcedure
User Access Setup
To manage user access to the subsystem, assign a user the roles specified in the table below.
| # | Role Description |
|---|---|
| 1. | FullAccess (the Core subsystem user role)Grants access to all application settings. |
| 2. | SystemAdministrator (the Core subsystem user role)Grants access to common application settings for SaaS applications and to administrative settings for hosted applications. |
Special Cases of Integration
Combination with Other Subsystems
How to Use the Subsystem in Development
See the subsystem API description in the API documentation (in Russian).
Data Exchange Setup
The subsystem does not participate in data exchange.
Data Exchange
With the Data exchange subsystem, you can set up data exchange between infobases, which includes the following formats:
- Distributed infobases (DIB).
- Interim Format Data Exchange (IFDE).
- Conversion Rule Data Exchange (CRDE). To create rules, use 1C:Data Conversion.
- Raw Data Exchange (RDE).
The subsystem supports data exchange between SaaS applications and between SaaS and hosted applications. Data exchange can be unilateral or bilateral and can start on schedule or manually. The subsystem supports the following data exchange channels: shared network directories, email messages, FTP, and web services. If you use CRDE or IFDE, you can set up data exchange over an external connection.
Data exchange is not a ready-to-go solution. Before starting data exchange, you first need to develop data exchange plans and adjust some SSL objects.
For a SaaS application, you also need to integrate the Data exchange SaaS subsystem.
A configuration that contains the Data exchange subsystem and the Data exchange SaaS subsystem supports five data exchange scenarios:
- Hosted App-Hosted App data exchange
- Hosted App-SaaS App data exchange
- SaaS App-SaaS App data exchange
- Standalone SaaS data exchange
- DIB data exchange
The figure below illustrates the mentioned scenarios.

The subsystem provides developers with four data exchange formats:
- Data exchange within a distributed infobase (DIB). It is a standard 1C:Enterprise mechanism that allows exchanging data between identical infobases stored in different nodes.
- Interim Format Data Exchange (IFDE). This format uses Exchange Manager, which is a special module that describes how to convert configuration data to the interim format (configuration structure to format structure) and back (format structure to configuration structure).
- Conversion Rule Data Exchange (CRDE). This format uses data exchange rules that describe how to convert data of one configuration to data of another configuration.
- Raw Data Exchange (RDE). This format sends data as is, without conversion. It implies an obvious requirement: the metadata object in the configurations that participate in the exchange must have the same structure.
Setting
Choosing Data Exchange Format
Before integrating the subsystem, analyze and decide what data exchange format suits you best. The table below contains the formats specifics and limitations.
| Characteristic | IFDE | CRDE | RDE | DIB |
|---|---|---|---|---|
| Supported modes | ||||
| Hosted | + | + | + | + |
| SaaS | + | + | + | + |
| Supported channels | ||||
| Local/Network directory | + | + | + | + |
| FTP server | + | + | + | + |
| + | + | + | + | |
| Active web service | + | + | + | + [1] |
| Passive web service | + | - | - | - |
| Direct COM connection | + | + | - | - |
| Requirements | ||||
| Master/Subordinate infobase relationship | - | - | - | + |
| Configurations identical in metadata structure and business logic | - | - | - [2] | + |
| Requires conversion logic development | + | + | - | - |
| Conversion logic does not depend on the peer configuration data structure | + | - | - | - |
| Other features | ||||
| Data routing and restrictions by nodes | + | + | + | + |
| Data preview and metadata object mapping | + | + | - | - |
Note.
[1] Used for standalone SaaS applications.
[2] Applies only to the metadata objects involved in data exchange.
Subsystem integration and setup vary for different data exchange formats.
Hosted Mode Setup
To use the subsystem in the configuration:
- Add the
DataSyncSettingscommon command to the command interface. - Add the
UseDataSynchronizationandDistributedInfobaseNodePrefixconstants to the settings form. - To exchange data via a web service, publish the following services:
ExchangeExchange_2_0_1_6Exchange_3_0_1_1
- To use Interim Format Data Exchange via a passive web service, publish the following services:
EnterpriseDataExchange_1_0_1_1: Supports exchange plans and handshake protocols.EnterpriseDataUpload_1_0_1_1: Does not support exchange plans and handshake protocols.
For illustrations of subsystem objects in the command interface, see the demo configuration.
In the DataExchangeOverridable common module, set a return value of the OnDetermineDefaultInfobasePrefix function. The return value is the prefix string: String, 2. The prefix length must be limited to two characters. This function value will define the default infobase prefix in data exchange settings wizard.
In the OnGetAvailableFormatVersions procedure of the DataExchangeOverridable common module, specify the list of supported EnterpriseData format versions and their handler modules. In FormatVersions, the format version number is the key and the common module that contains the conversion rules is the value.
SaaS Mode Setup
Notice.
To run the subsystem in SaaS mode, you need to integrate the MessagesExchange and JobsQueue subsystems that are part of 1C:Cloud Technology Library (CTL).
- Add the
StandaloneModecommon command to the command interface. - Add the
StandaloneModeSaaScommon command to the command interface. - Add the
DataSyncSettingscommon command to the command interface. - Publish the following web services to an internal shared registry:
RemoteAdministrationOfExchangeRemoteAdministrationOfExchange_2_0_1_6RemoteAdministrationOfExchange_2_1_6_1RemoteAdministrationOfExchange_2_4_5_1
- Publish the following web services to an internal shared registry and external separated registry:
ExchangeExchange_2_0_1_6Exchange_3_0_1_1InterfaceVersion
- To use Interim Format Data Exchange via a passive web service, publish the following services:
EnterpriseDataExchange_1_0_1_1: Supports exchange plans and handshake protocols.EnterpriseDataUpload_1_0_1_1: Does not support exchange plans and handshake protocols.
An example of the Exchange, Exchange_2_0_1_6, and InterfaceVersion web services published in separated mode:
<?xml version="1.0" encoding="UTF-8"?>
<point xmlns="http://v8.1c.ru/8.2/virtual-resource-system"
xmlns:xs="http://www.w3.org/2001/XMLSchema"
xmlns:xsi="http://www.w3.org/2001/XMLSchema-instance"
base="/demo"
ib="Srvr="server1C";Ref="demo";">
<zones>
<zone specify="false" safe="true"/>
<zone specify="true" safe="true"/>
</zones>
<ws>
<point name="Exchange"
alias="exchange.1cws"/>
<point name="Exchange_2_0_1_6"
alias="exchange_2_0_1_6.1cws"/>
<point name="InterfaceVersion"
alias="InterfaceVersion.1cws"/>
</ws>
</point>An example of the RemoteAdministrationOfExchange, RemoteAdministrationOfExchange_2_0_1_6, Exchange, and Exchange_2_0_1_6 web services published in shared mode:
<?xml version="1.0" encoding="UTF-8"?>
<point xmlns="http://v8.1c.ru/8.2/virtual-resource-system"
xmlns:xs="http://www.w3.org/2001/XMLSchema"
xmlns:xsi="http://www.w3.org/2001/XMLSchema-instance"
base="/demo_ws"
ib="Srvr="server1C";Ref="demo";"
enable="false">
<ws>
<point name="Exchange"
alias="exchange.1cws"/>
<point name="Exchange_2_0_1_6"
alias="exchange_2_0_1_6.1cws"/>
<point name="RemoteAdministrationOfExchange"
alias="RemoteAdministrationOfExchange.1cws"/>
<point name="RemoteAdministrationOfExchange_2_0_1_6"
alias="RemoteAdministrationOfExchange_2_0_1_6.1cws"/>
</ws>
</point>Standalone SaaS Mode Setup
One of the data exchange scenarios is running a SaaS application in standalone (offline) mode. In this scenario, the infobase can operate without internet access and exchange data via the internet.
To prepare a configuration for offline operation, do the following:
- Create a DIB exchange plan.
- Add the exchange plan to the
DataAreaMainDataseparator attribute. - Set the Distributed infobase flag for the exchange plan.
- Set the exchange plan code format to
String, 36, Variable length. - In the
OnGetSettingsprocedure of the exchange plan manager module, set theExchangePlanUsedInSaaSproperty of theSettingsstructure toTrue.
Notice.
A configuration must contain no more than one exchange plan intended for operating in offline SaaS mode.
We do not recommend that you add large classifiers to exchange plans. Updating of large classifiers slows down the synchronization and enlarges the data traffic. A better approach is to import large classifiers to standalone workstations from external resources, and only when it is necessary.
Data exchange between a standalone workstation and an external resource implies the following:
- The data about users and user rights goes only downstream (from an external resource to a standalone workstation). 1C:Enterprise ignores all changes made in a standalone workstation and rolls them back to the value in the external resource.
- The classifier data goes only downstream (from an external resource to a standalone workstation). 1C:Enterprise ignores all changes made in a standalone workstation and rolls them back to the value in the external resource.
Exchange Plan Development
Data exchange for hosted applications and for SaaS applications is based on the same technology. Therefore, exchange plan development should comply with the same requirements regardless of the application type. The setup aspects for different application types are described below in this topic.
Exchange plans can contain attributes and tables. An exchange plan content is defined by metadata objects that will participate in data exchange.
Add the exchange plan code block to the GetExchangePlans procedure of the DataExchangeOverridable common module:
Procedure GetExchangePlans(SubsystemExchangePlans) Export

    SubsystemExchangePlans.Add(Metadata.ExchangePlans.<ExchangePlanName>);

EndProcedure
Exchange Plan Attributes and Properties
Name an exchange plan according to 1C:Enterprise Naming Convention. Specify the exchange plan properties according to the table below:
| Property | RDE and CRDE | IFDE | DIB |
|---|---|---|---|
| Name | Exchange<Source><Destination> |
Custom format | Custom format |
| Distributed infobase | False |
False |
True |
| Content | See below | See below | See below |
| Code data type and length | String, 9, variable |
String, 36, variable |
String, 9, variableString, 36, variable [1] |
| Description | String, 150 |
String, 150 |
String, 150 |
| Templates | See below | See below | See below |
Exchange plans support an arbitrary number of attributes and tables. Any of the attributes and tables can participate in node object registration rules. To set up registration rules, use 1C:Data Conversion configuration. Registration rules apply to CRDE and DIB.
Exchange plans support attributes that can toggle export modes (so-called "switch attributes"). For example, you can add a switch attribute that toggles the export mode for the Counterparties and Counterparty contracts catalogs. An exchange plan can have any number of switch attributes. Switch attribute data type is EnumRef.ExchangeObjectExportModes.
For separated exchange plans that are used for data exchange between SaaS applications, create the RegisterChanges attribute with the following properties:
| Name | Type | Index |
|---|---|---|
RegisterChanges |
Boolean |
Yes |
For DIB exchange plans that are used in hosted applications, set the Include configuration extensions property to True. For exchange plans of a standalone workstation, set this property to False.
Notice.
If the Include configuration extensions property is set to True in a DIB exchange plan, users must be notified of the following:
In the active DIB exchanges, at the moment when the Include configuration extensions is selected, the infobases in the master and subordinate nodes must not contain any extensions that can change the data structure. Also, the extensions whose names match the names of extensions in the master node (excluding patches) must be deleted from subordinate infobases. Users can attach extensions after all subordinate infobases are updated.
Exchange Plan Content
For CRDE exchange plans, exclude all metadata objects that belong to the Data exchange and Data exchange SaaS subsystems. An exception is the InfobaseObjectsMaps information register, which you must include to the exchange plan.
Notice.
Set Autoregistration to Disable for all exchange plan items regardless of whether registration rules are included or not.
For DIB exchange plans, exclude all metadata objects that belong to the Data exchange and Data exchange SaaS subsystems. An exception is the AccountPasswordRecoveryAddress constant. Include the AccountPasswordRecoveryAddress constant only into the initial images of subordinate nodes.
For DIB exchange plans with filters, exclude all metadata objects that belong to the Data exchange and Data exchange SaaS subsystems. The exceptions are the DataForDeferredUpdate and the AccountPasswordRecoveryAddress constants. Include the AccountPasswordRecoveryAddress constant only into the initial images of subordinate nodes.
For other exchange plans, exclude all metadata objects that belong to the Data exchange and Data exchange SaaS subsystems.
If you need to narrow down the scope of items that participate in data exchange, create registration rules for their metadata object with the 1C:Data Conversion configuration. If you do not create a registration rule, all metadata object items will participate in data exchange, even if Autoregistration is set to Disable.
For more information about what objects from other 1C:SSL subsystems to include in exchange plans, open the topic about a subsystem, and navigate to How to use the subsystem in development and Data exchange setup.
Exchange Plan Manager Module
For some projects, the data exchange features you can find in 1C:Enterprise out of the box are not enough. The Data exchange subsystem provides advanced features that extend additional properties and exchange plan methods. To use these features, you should define certain procedures and functions in the exchange plan manager module (one of them, described below, is mandatory).
Mandatory Procedure OnGetSettings
Declare the OnGetSettings export procedure in manager modules of all exchange plans declared in the GetExchangePlans procedure of the DataExchangeOverridable common module (see Exchange Plan Development). This procedure is an entry point, which allows the Data exchange subsystem to access the exchange plan properties and methods that are responsible for technological and implementation features of data exchange.
How to declare:
Procedure OnGetSettings(Settings) ExportParameters:
Settings-Structure, whereKeyis a setting name andValueis the setting value:
| Setting (Data Type) | Details |
|---|---|
Algorithms (Structure) |
Manages the availability of exchange plan methods (export procedures and functions) provided by the Data exchange subsystem.Key is a method read-only name.Value (Boolean) indicates whether the method is used. If True, the method is used in the exchange plan. If False, the method is not used.The default value for all methods is False.Method list: Procedure OnGetExchangeSettingsOptions Procedure OnGetSettingOptionDetails Procedure DataTransferLimitsCheckHandler Procedure DefaultValuesCheckHandler Procedure AccountingSettingsCheckHandler Procedure OnConnectToCorrespondent Procedure OnSendSenderData Procedure OnGetSenderData Procedure SetUpInteractiveExport Procedure SetUpInteractiveExportSaaS Function DataTransferRestrictionsDetails Function DefaultValuesDetails Function InteractiveExportFilterPresentation Procedure OnSaveDataSynchronizationSettings Procedure OnDefineSupportedFormatObjects Procedure OnDefineFormatObjectsSupportedByCorrespondent To use the procedure, set True to the respective structure key value. Also, declare the respective export procedure in the exchange plan manager module.See implementation examples in the _DemoDistributedInfobaseExchange and _DemoStandaloneMode exchange plans in the demo configuration. |
ExchangePlanPurpose (String) |
Determines the category to which the exchange plan belongs. It affects how the Data exchange subsystem mechanisms process the exchange plan:
In most cases, use the default values: DIB for DIB exchange plans and SynchronizationWithAnotherApplication for other exchange plans. |
IsXDTOExchangePlan (Boolean) |
Indicates whether the exchange plan is used for IFDE.By default, False. |
ExchangeFormat (String) |
Exchange format name used for this exchange plan. Applicable only for IFDE. For more information, see the IsXDTOExchangePlan property. |
ExchangeFormatExtensions (Map) |
Mapping of a namespace URI of a format extension schema to a format version to extend. Applicable only for IFDE. For more information, see the IsXDTOExchangePlan property. |
ExchangeFormatVersions (Map) |
Mapping of supported data format versions and references to common modules that implement the data exchange logic using format versions. Applicable only for IFDE. For more information, see the IsXDTOExchangePlan property. |
ExchangePlanUsedInSaaS (Boolean) |
Indicates whether the exchange plan is used for SaaS application data exchange. If the flag is set, you can use the exchange plan to set up data exchange for a SaaS application or a standalone SaaS application. If the flag is cleared, you can use the exchange plan for a hosted application. By default, False. |
SourceConfigurationName (String) |
A string ID that identifies this configuration among others that run in SaaS. Applicable only for SaaS exchange plans (see the ExchangePlanUsedInSaaS property).For example, in a configuration named Enterprise Accounting, set the property to EnterpriseAccounting. |
DestinationConfigurationName (Structure) |
Structure elements determine the list of peer configurations this exchange plan supports. The key is the configuration ID. The property value must be identical to the value of the SourceConfigurationName property in the corresponding exchange plan of the peer configuration.Structure item value = Undefined. The property is reserved for further use.For example, if you need to indicate that the exchange plan is used to exchange data with the Enterprise Accounting configuration, add to the structure a key-value pair, where the key is EnterpriseAccounting.The property is required for exchange plans that meet the following requirements:
|
WarnAboutExchangeRuleVersionsMismatch (Boolean) |
Indicates whether to check the conversion rules for version mismatch. 1C:Enterprise runs the check when you import an exchange rule and when data exchange starts. Applicable only for CRDE. |
ExchangePlanNameToMigrateToNewExchange (String) |
Defines the destination exchange plan name when you switch from one exchange plan type to another. For example, from CRDE to IFDE.If you set the flag, this exchange plan type is hidden from the settings form. However, you can view the existing exchange plans of this type in the exchange plan list. By default, empty. |
ExchangeSettingsOptions (ValueTable) |
Defines a set of predefined variants of exchange plan settings. For more information, see Settings Variants. |
RulesForRegisteringInManager (Boolean) |
Indicates whether object registration rules located in the common module are used. Applicable only for IFDE (see the IsXDTOExchangePlan property). |
RegistrationManager (String) |
Name of the common module that contains object registration rules. Used together with RulesForRegisteringInManager. |
Settings Variants
The Data exchange subsystem supports predefined settings variant mechanism. A settings variant is settings that define a data exchange type. One exchange plan can support several data exchange types, that is, several settings variants. Different settings variants have different sets of properties—settings variant properties. A set of properties defines data exchange behavior in the following aspects:
- Data exchange interface
- Data exchange logic
- Features provided by the Data exchange subsystem
Consider implementing several settings variants if you encounter one of the following scenarios:
- A configuration uses a single exchange plan to exchange data with multiple peer configurations or applications. For example, an application uses an IFDE plan to exchange data with Enterprise accounting and Retail management configurations.
- A configuration uses a single exchange plan to exchange data in multiple exchange modes. Users see the modes as different data synchronization options. For example, Send data, Receive data, and Send and receive data. As an example, see the
_DemoExchangeWithStandardSubsystemsLibraryexchange plan in the demo configuration.
For each exchange plan, define at least one settings variant, and choose the default variant. The default variant is used to build a data exchange variant tree.
Define all settings variants in the OnGetExchangeSettingsOptions procedure of the exchange plan manager module.
Properties specific to the settings variant are defined in the OnGetSettingOptionDetails procedure.
Procedure OnGetExchangeSettingsOptions
Contains a list of available exchange settings variants. Provides the flags for choosing a variant for exchange with SaaS and hosted applications.
How to declare:
Procedure OnGetExchangeSettingsOptions(ExchangeSettingsOptions, ContextParameters) ExportParameters:
ExchangeSettingsOptions(ValueTable). To add a variant, add a row and fill in the following columns:
| Column (Data Type) | Details |
|---|---|
SettingID (String) |
The ID of a settings variant, unique within the exchange plan. |
CorrespondentInSaaS (Boolean) |
Indicates whether the exchange plan supports exchange with a peer SaaS configuration. |
CorrespondentInLocalMode (Boolean) |
Indicates whether the exchange plan supports exchange with a peer hosted configuration. |
ContextParameters(Structure) Defines the run mode by run context.Keyis the context parameter,Valueis the parameter value:
| Context Parameter (Data Type) | Details |
|---|---|
CorrespondentName (String, Undefined) |
The ID of a peer configuration or application (see the SourceConfigurationName property of the OnGetSettings method).If the value is empty, the peer configuration or application is unknown. |
CorrespondentVersion (String) |
Peer configuration version number. If the value is empty, the peer configuration or application is unknown. |
CorrespondentInSaaS (Boolean) |
Indicates whether the peer configuration or applications runs in SaaS. |
If the OnGetExchangeSettingsOptions procedure is not defined, the Data exchange subsystem automatically creates a settings variant with the following values:
SettingID. Empty.CorrespondentInSaaS. If the exchange plan supports SaaS, and it runs in SaaS,True. Otherwise,False.CorrespondentInLocalMode.True.
Procedure OnGetSettingOptionDetails
Use the procedure to override properties in a settings variant.
How to declare:
Procedure OnGetSettingOptionDetails(OptionDetails, SettingID, ContextParameters) ExportParameters:
| Column (Data Type) | Details |
|---|---|
OptionDetails (Structure) |
Contains a list of available settings variant properties. For more information, see the table below. |
SettingID (String) |
The ID of a settings variant, unique within the exchange plan. |
ContextParameters (Structure) |
Defines the run mode by run context. Key is the context parameter, value is the parameter value. For more information, see the table below. |
Parameter OptionDetails:
| Property Name (Data Type) | Details |
|---|---|
UseDataExchangeCreationWizard (Boolean) |
Determines whether to run exchange plan creation wizard. By default, True. |
DataSyncSettingsWizardFormName (String) |
Full name of the form where users can configure data exchange rules. By default, empty (the exchange plan node form will open). |
NewDataExchangeCreationCommandTitle (String) |
Command presentation displayed in the interface when a user creates a new data exchange setting. By default, the exchange plan synonym. |
ExchangeCreateWizardTitle (String) |
Presentation of the data exchange creation wizard displayed in the interface. By default, a string generated by the template Synchronization with [Application name] (setting), where [Application name] is the exchange plan synonym. |
ExchangePlanNodeTitle (String) |
Exchange plan node presentation displayed in the interface. By default, the exchange plan synonym. |
CorrespondentConfigurationName (String) |
ID of a peer configuration. Used to group data exchange settings in the tree. Fill it in if you create several data exchange plans to synchronize with one configuration. By default, empty. |
CorrespondentConfigurationDescription (String) |
Peer configuration presentation displayed in the interface. By default, empty. |
BriefExchangeInfo (String) |
Short description of the data exchange scope displayed in the new data synchronization setup wizard. By default, empty. |
DetailedExchangeInformation (String) |
URL or the full path to an internal form. By default, empty. |
SettingsFileNameForDestination (String) |
Name of the default setting file. The file will store exchange settings for the destination infobase. Applicable only for IFDE and CRDE exchange plans.By default, empty. |
PathToRulesSetFileOnUserSite (String) |
Path to an archive with data exchange rules, stored on a website. By default, empty. |
PathToRulesSetFileInTemplateDirectory (String) |
Relative path to a file with data exchange rules, stored in the 1C:Enterprise template directory. By default, empty. |
UsedExchangeMessagesTransports (Array) |
List of message transports used in the date exchange plan. If empty, all valid transports are available. By default, an empty Array. |
InitialImageCreationFormName (String) |
Name of an exchange plan form to create the initial image. Applicable only for DIB exchange plans.By default, empty (the standard form will be used). |
CommonNodeData (String) |
Comma-delimited names of exchange plan attributes and tables that are shared between two syncing configurations. See Shared Node Data. By default, empty. |
Filters (Structure) |
Filters populated from initial data. Applicable only for exchange plans used in standalone SaaS applications. Empty if no filters are required. The settings structure must be identical to header attributes and tables that store the filters. For header attributes, use structure elements with identical key-value pairs. For tables, use structures that contain arrays of table values. By default, an empty Structure.As an example, see the _DemoStandaloneMode exchange plan manager module in the demo configuration. |
DefaultValues (Structure) |
Default values generated from initial data. Applicable only for exchange plans used in standalone SaaS applications. The settings structure must be identical to header attributes that store default values. For header attributes, use structure elements with identical key-value pairs. By default, an empty Structure. |
AccountingSettingsSetupNote (String) |
Description of steps a user needs to follow to configure accounting settings for the infobase. By default, empty. |
FormatExtension (String) |
Format extension name applicable for this setup option. Applicable only for IFDE. For more information, see the IsXDTOExchangePlan property. |
ContextParameters (Structure) Defines the run mode by run context. Key is the context parameter, value is the parameter value:
| Context Parameter (Data Type) | Details |
|---|---|
CorrespondentName (String, Undefined) |
ID of a peer configuration or application. See the SourceConfigurationName property of the OnGetSettings method. |
CorrespondentVersion (String) |
Peer configuration version number. |
Procedure DataTransferLimitsCheckHandler
1C:Enterprise calls the handler procedure before starting to generate an exchange message to send data to a peer infobase. Applicable only for IFDE. The procedure checks if all required parameters have values. For example, the configurations must send Contracts to a peer configuration but it is missing the rule that would generate contracts from Sales orders. If the parameters for sending data are not configured or not fully configured, set the Cancel variable to True in the handler. Optionally, in the ErrorMessage variable, provide the error details for users.
How to declare:
Procedure DataTransferLimitsCheckHandler(Cancel, HandlerParameters, ErrorMessage = "") ExportParameters:
Cancel(Boolean). If at least one of the required parameters is missing, set the variable toTrue.HandlerParameters(Structure). Consists of:Peer(ExchangePlanObject). The exchange plan node where the peer infobase is located.SupportedXDTOObjects(Array). Contains a list of format object IDs (for example,Catalog.Counterparties) that this infobase can send and a peer infobase can receive.
ErrorMessage(String). Description of steps a user needs to follow to configure data send parameters.
Procedure DefaultValuesCheckHandler
1C:Enterprise calls the handler procedure before starting to receive an exchange message from a peer infobase. Applicable only for IFDE. The procedure checks if default values for infobase objects created during data exchange are missing. For more information, see Default Values.
How to declare:
Procedure DefaultValuesCheckHandler(Cancel, HandlerParameters, ErrorMessage = "") ExportParameters:
Cancel(Boolean). If at least one of the default values is missing, set toTrue.HandlerParameters(Structure). Consists of:Peer(ExchangePlanObject). The exchange plan node where the peer infobase is located.SupportedXDTOObjects(Array). Contains a list of format objects that a peer infobase can export and the current infobase can import.
ErrorMessage(String). Description of steps a user needs to follow to configure default values.
Procedure AccountingSettingsCheckHandler
The handler is called by the data exchange settings wizard when users configure data exchange over the internet. It determines the algorithm of the accounting settings check. If at least one of the required parameters is missing, set the variable Cancel to True. Optionally, in the Message variable, specify what settings the user needs to configure.
How to declare:
Procedure AccountingSettingsCheckHandler(Cancel, Recipient, Message) ExportParameters:
Cancel(Boolean). If at least one of the required accounting parameters is missing, set the variable toTrue.Recipient(ExchangePlanRef). Reference to the exchange plan node.Message(String). Description of steps a user needs to follow to configure accounting parameters.
Procedure OnConnectToCorrespondent
Event handler that runs when this infobase connects to a peer infobase. The event triggers when the infobase connects to a peer infobase and receives its configuration version via a direct connection or over the internet. The handler checks the configuration version in the peer infobase. If the version is incompatible, an exception is thrown.
How to declare:
Procedure OnConnectToCorrespondent(CorrespondentVersion) ExportParameters:
CorrespondentVersion(String). Read-only. Peer configuration version. For example,2.1.5.
Procedure OnSendSenderData
1C:Enterprise calls the event handler when the originating node sends data. The event triggers when the originating node sends data from the current infobase to a peer infobase, and before the node data is written to an exchange message. The handler can modify the data that will be sent, or cancel data export.
How to declare:
Procedure OnSendSenderData(Sender, Ignore) ExportParameters:
Sender. The data type depends on the current data exchange state:Structurewhen configuring a new data exchange. Contains node filter settings.ExchangePlanObjectduring data exchange. The originating node.
Ignore(Boolean). Indicates whether the data export is canceled. IfTrue, the node will not send data. By default,False. Not applicable to creating a new data exchange.
Procedure OnGetSenderData
1C:Enterprise calls the event handler when a destination node receives data. The event triggers when the node reads data from an exchange message, and before the data is written to the infobase. The handler can modify the data that will be received, or cancel data import.
How to declare:
Procedure OnGetSenderData(Sender, Ignore) ExportParameters:
Sender. The data type depends on the current data exchange state:Structurewhen configuring a new data exchange. Contains node filter settings.ExchangePlanObjectduring data exchange. The originating node.
Ignore(Boolean). Indicates whether the data export is canceled. IfTrue, the node will not send data. By default,False. Not applicable to creating a new data exchange.
Procedure SetUpInteractiveExport
Applicable to all data exchange modes except for DIB.
The procedure configures parameters of the data exchange wizard when a user interactively complements the set of data to be exported. You can configure the options of how users can add data (Do not add, Add all documents for the period, and Add data with custom filter) and one advanced option for the overridable node scenario. You can disable an option or edit it. If you disable all options, the wizard will skip the step where a user can add data to the dataset.
As an example, see the _DemoExchangeWithStandardSubsystemsLibrary exchange plan manager module in the demo configuration.
How to declare:
Procedure SetUpInteractiveExport(Recipient, Parameters) ExportParameters:
Recipient(ExchangePlanRef). The node you want to configure.Parameters(Structure). The parameters you want to change. Set properties to the desired values.
Procedure SetUpInteractiveExportSaaS
Applicable to SaaS data exchange.
Same as Procedure SetUpInteractiveExport but for SaaS mode.
As an example, see the _DemoExchangeWithStandardSubsystemsLibrary exchange plan manager module in the demo configuration.
How to declare:
Procedure SetUpInteractiveExportSaaS(Recipient, Parameters) ExportParameters: see function SetUpInteractiveExport.
Function DataTransferRestrictionsDetails
Used for data exchange with filters. Applicable only for exchange plans used in standalone SaaS applications.
Returns a string with data transfer restriction details. Ensure that details are human-readable.
How to declare:
Function DataTransferRestrictionsDetails(NodeFiltersSetting, CorrespondentVersion, SettingID) ExportParameters:
NodeFiltersSetting(Structure). For more information on theFiltersproperty, see Procedure OnGetSettingOptionDetails.CorrespondentVersion(String). Peer configuration version number.SettingID(String). Setting ID.
Function DefaultValuesDetails
Used if data exchange contains default values. Applicable only for exchange plans used in SaaS applications.
Returns the string presentation of default values.
How to declare:
Function DefaultValuesDetails(DefaultNodeValues, CorrespondentVersion, SettingID) ExportParameters:
DefaultNodeValues(Structure). For more information, seeDefaultValuesin Procedure OnGetSettingOptionDetails.CorrespondentVersion(String). Peer configuration version number.SettingID(String). Setting ID.
Function InteractiveExportFilterPresentation
Applicable to all data exchange modes except for DIB.
Returns the filter presentation for the option.
How to declare:
Function InteractiveExportFilterPresentation(Recipient, Parameters) ExportParameters:
Recipient(ExchangePlanRef). The node for which a presentation is requested.Parameters(Structure). Describes the current filter parameters. The structure fields repeat fields of theSetUpInteractiveExportprocedure. As an example, see the_DemoExchangeWithStandardSubsystemsLibraryexchange plan manager module in the demo configuration.
Procedure OnSaveDataSynchronizationSettings
Handler that populates data import and export settings. It is called if the API DataExchangeServer.OnStartSaveSynchronizationSettings() from the overridable data synchronization setup wizard is used.
As an example, see the _DemoDistributedInfobaseExchange exchange plan manager module and the DataSynchronizationSettingsWizard form in the demo configuration.
How to declare:
Procedure OnSaveDataSynchronizationSettings(Peer, FillingData) ExportParameters:
Peer(ExchangePlanObject). The exchange plan node where the peer infobase is located.FillingData(Structure). A structure that is passed from the data synchronization setup wizard. Contains data to pass to data export and import parameters.
Procedure OnDefineSupportedFormatObjects
Handler that overrides the set of supported format objects. Applicable only for IFDE. Use it to manage the set of supported objects by infobase settings or by exchange plan node. Prior to creating and getting an exchange message, the XDTO data exchange mechanism calls the handler. Then, the handler filters export and import data. Upon the handler call, the SupportedObjects parameter contains a list of supported objects generated on the basis of types of sources and destinations in data processing rules (DPR) and object conversion rules (OCR).
How to declare:
Procedure OnDefineSupportedFormatObjects(SupportedObjects, Mode, ExchangeNode = Undefined) ExportParameters:
SupportedObjects(ValueTable). Contains a version-wise list of format objects supported by the infobase. Columns:Version(String). Format version. For example, 1.6.Object(String). Format object. For example,Catalog.Products.Send(Boolean).Trueif the infobase supports export of this format object. The column is provided ifModeis set toSendorSendReceive.Receive(Boolean).Trueif the infobase supports import of this format object. The column is provided ifModeis set toReceiveorSendReceive.Mode(String). Type of the requested information. Valid values:Sendto request format objects that support export.Receiveto request format objects that support import.SendReceiveto request all supported format objects.
ExchangeNode(ExchangePlanRef,Undefined). Reference to the exchange plan node of the peer infobase. Use it to manage the set of supported objects by exchange setting variant on the node.
Procedure OnDefineFormatObjectsSupportedByCorrespondent
Handler that overrides the set of format objects supported by the peer infobase. Applicable only for IFDE. Use it to manage the set of objects that can participate in data exchange. Prior to creating and getting an exchange message, the XDTO data exchange mechanism calls the handler. Then, the handler filters export and import data. Upon the handler call, the SupportedObjects parameter contains a list of supported objects imported from a peer infobase.
How to declare:
Procedure OnDefineFormatObjectsSupportedByCorrespondent(ExchangeNode, SupportedObjects, Mode) ExportParameters:
ExchangeNode(ExchangePlanRef). The exchange plan node where the peer infobase is located.SupportedObjects(ValueTable). Contains a version-wise list of format objects supported by the peer infobase. Columns:Version(String). Format version. For example, 1.6.Object(String). Format object. For example,Catalog.Products.Send(Boolean).Trueif the infobase supports export of this format object. The column is provided ifModeis set toSendorSendReceive.Receive(Boolean).Trueif the infobase supports import of this format object. The column is provided ifModeis set toReceiveorSendReceive.
Mode(String). Type of the requested information. Valid values:Sendto request format objects that support export.Receiveto request format objects that support import.SendReceiveto request all supported format objects.
Procedure SwitchToNewExchange
The procedure attempts to migrate from the current exchange setting to a new exchange setting. Applicable only for IFDE. The procedure is called if during data synchronization the infobase receives a message that does not comply with the old exchange format. The procedure describes how to create or update a synchronization setting, migrate data that has been registered but not yet sent, adjust exchange scenarios, and transfer public IDs. If migration is successful, the procedure describes the cleanup of registered data on the old infobase node.
How to declare:
Procedure SwitchToNewExchange(DataSynchronizationSetup, ExchangeOverExternalConnection = False) ExportParameters:
DataSynchronizationSetup(ExchangePlanRef). Exchange plan node used to migrate from.ExchangeOverExternalConnection(Boolean). Flag that indicates whether the data is exchanged via an external connection.
Function SwitchingToSynchronizationViaUniversalFormatExternalConnection
Called upon the initial data exchange with a data synchronization setting that uses IFDE and a COM connection. Applicable only for IFDE. The function is called if during data synchronization the infobase receives a message that does not comply with the old exchange format. The method describes how to create or update a synchronization setting, migrate data that has been registered but not yet sent, adjust exchange scenarios, and transfer public IDs. If migration is successful, the function describes the cleanup of registered data on the old infobase node.
Returns:
ExchangePlanRef,Undefined. ReturnsExchangePlanRefif migration was successful. ReturnsUndefinedif migration was interrupted.
How to declare:
Function SwitchingToSynchronizationViaUniversalFormatExternalConnection(DataSynchronizationSettings_) ExportParameters:
DataSynchronizationSettings_(Structure). Details about the old synchronization setting:Code(String). Setting ID.SettingsMode(String). Data synchronization setting variant that uses IFDE of the peer infobase.Error(Boolean). Error flag.ErrorMessage(String). Error details.
Function SwitchingToSynchronizationViaUniversalInternetFormat
Called upon the initial data exchange with a data synchronization setting that uses IFDE and a WS connection. Applicable for IFDE exchange plans when a peer infobase migrated to IFDE and the current infobase did not.
The method describes how to create or update a synchronization setting, migrate data that has been registered but not yet sent, adjust exchange scenarios, and transfer public IDs. If migration is successful, the function describes the cleanup of registered data on the old infobase node.
Returns:
ExchangePlanRef,Undefined. ReturnsExchangePlanRefif migration was successful. ReturnsUndefinedif migration was interrupted.
How to declare:
Function SwitchingToSynchronizationViaUniversalInternetFormat(NodeCode, Error) ExportParameters:
NodeCode(String). Synchronization setting ID (exchange node ID).Error(Boolean). Error flag.
Crde Compatibility Mode
This mode is intended to maintain backward compatibility for data exchange between configurations that contain 1C:SSL 2.0 and earlier, and configurations that contain 1C:SSL 2.1 and later.
For hosted configurations, make a decision about the compatibility mode.
For SaaS configurations, the compatibility mode is force-disabled and cannot be enabled.
When you create a new data conversion rule, the compatibility mode for 1C:SSL 2.0 and earlier is disabled by default. If necessary, you can set it to SSL version 2.0. For 1C:Data Conversion version 2.1.6 and later, to set the compatibility mode, open conversion properties and click the Additional tab. The value is stored in exchange rules.
For existing conversion rules, the compatibility mode is set to SSL version 2.0 by default.
When a compatibility mode is enabled, Debug Mode and Registration Manager are unavailable.
The table below illustrates data exchange modes.
| Compatibility Mode | Debug Mode | Secure Handler Code Execution |
|---|---|---|
| Disabled [1] | Disabled [1] | Code of export and import handlers is executed from in-app data processors |
| Disabled [1] | Enabled | Code of export and import handlers is executed from external data processors |
| Enabled | Unavailable (Disabled) |
Handler code is executed:
|
Secure Handler Code Execution in Crde
When Update Handler Debugging and compatibility modes are disabled, export and import handler code is executed from in-app data processors. This ensures a higher level of data exchange security, which is most important for SaaS applications.
In the compatibility mode, import handler code is executed from data exchange messages, which is unsafe.
If the compatibility mode is disabled, do the following:
- In 1C:Data Conversion version 2.1.6 or later, do the following:
- Open conversion properties and disable the compatibility mode.
- Save object conversion rules, select the check box to save export handler code to a text document, and specify the path to the file. In this case, generate the import module from the second set of rules).
- In the configuration, do the following:
- Import conversion rules, previously saved with 1C:Data Conversion.
- Create in-app data processors. Recommended data processor names:
<ConfigurationName>ImportHandlersand<ConfigurationName>ExportHandlers. - Add the functions to the exchange plan manager module.
- Copy the text from exported files to the new modules.
Exchange Plan Forms
Node and exchange plan list forms are created at the developer's discretion. If an exchange plan is supposed to support data transfer restriction, allow restriction settings to the node form.
OnClose and OnWriteAtServer handlers must be defined in the node form:
&AtClient
Procedure OnClose()

    Notify("Write_ExchangePlanNode");

EndProcedure
&AtServer
Procedure OnWriteAtServer(Cancel, CurrentObject, WriteParameters)

    DataExchangeServer.NodeFormOnWriteAtServer(CurrentObject, Cancel);

EndProcedure
Optionally, in the form module, define the BeforeWrite handler. Do it if exchange plan node settings are supposed to be regularly changed and a lot of objects are registered. Writing will run in background.
&AtClient
Procedure BeforeWrite(Cancel, WriteParameters)

    DataExchangeClient.BeforeWrite(ThisObject, Cancel, WriteParameters);

EndProcedure
Notice.
To use DataExchangeClient.BeforeWrite, the Object form attribute must contain all required changes and must not be modified in the follow-up handlers, such as BeforeWriteAtServer and OnWrite.
If you plan to use a node form in SaaS, we recommend that you hide the node code and name from users.
Also, develop custom exchange plan forms. Users will use these forms to set up data exchange in the setup wizard.
The table below illustrates what exchange plans support data exchange forms.
| Form Name | CRDE, RDE, IFDE | Standalone Workstation | DIB |
|---|---|---|---|
NodeSettingsForm |
- | + | - |
InitialImageCreationForm |
- | - | + |
DataSyncSettingsWizardForm |
+ | - | + |
Form NodeSettingsForm
For exchange plans designed for standalone SaaS modes, create a custom form named NodeSettingsForm. Data exchange settings wizard calls this form so that the user can restrict data transfer.
Form attributes repeat attributes in the exchange plan header and tables. The form requires the following attributes: NodeFiltersSetting (arbitrary data type) and CorrespondentVersion (String, arbitrary length). For the form visible attributes that indicate whether the form is modified, set the Saved data flag.
The form module requires the following handlers:
&AtServer
Procedure OnCreateAtServer(Cancel, StandardProcessing)

    DataExchangeServer.NodeSettingsFormOnCreateAtServer(ThisObject, "_DemoExchangeWithStandardSubsystemsLibrary");

EndProcedure
&AtClient
Procedure BeforeClose(Cancel, StandardProcessing)

    DataExchangeClient.SetupFormBeforeClose(Cancel, ThisObject);

EndProcedure
&AtClient
Procedure OKCommand(Command)

    DataExchangeClient.NodeSettingsFormCloseFormCommand(ThisObject);

EndProcedure
The second parameter of the NodeSettingsFormOnCreateAtServer procedure is the exchange plan name (String) as it is specified in Designer. In form properties for the OnCreateAtServer and BeforeClose event handlers, specify respective module procedures.
If an exchange plan attribute is required, in node settings form, set the attribute's Required field property to Display error. When a user creates a data exchange, the wizard will prompt the user to specify the attribute value.
As an example, see the form in the _DemoStandaloneMode exchange plan.
Form InitialImageCreationForm
For a DIB exchange plan, you can define a form for creating the initial image of a subordinate node. This form is optional. With it, you can open the initial image creation dialog or override the standard process of initial image creation. Add the form name to the OnGetSettingOptionsDetails procedure of the exchange plan manager module.
Form DataSyncSettingsWizardForm
For CRDE, RDE, IFDE, and DIB exchange plans (except for standalone workstation), you can create a custom form and define it as a default data exchange rule setup wizard. This form is optional. The form name is arbitrary. To use the form for data exchange setup, add its name to the OnGetSettingOptionsDetails procedure of the exchange plan manager module.
When the form opens, it takes ExchangeNode as a required parameter. The parameter has the ExchangePlanRef type and contains the reference to a peer node. Ensure that the form populates and saves data exchange settings.
As an example of the wizard that uses the API DataExchangeServer.OnStartSaveSynchronizationSettings(), see the _DemoDistributedInfobaseExchange exchange plan.
Interactive Data Exchange Wizard (an Additional Setup Form)
With the interactive data exchange wizard, you can set up the data export step. In this wizard, users can choose the dataset they want to export. For example, a user can choose all documents for the last month. Note that node filters automatically apply to the dataset. By default, the wizard prompts three options for how to append a dataset: do not append, add documents filtered by period, add arbitrary data (documents and master data).
To disable, set up, reorder predefined options, and to define custom setup scenarios, use the SetUpInteractiveExport procedure of the exchange plan manager. Change the setting default parameters. Create a form where users will be able to edit dataset filter settings by the node scenario. Specify the full name of this form in the corresponding field.
1C:Enterprise will open this form from the interactive data exchange wizard with the specified parameters of the current filter. The form returns a structure that describes the modified filter.
For examples of opening parameters, selection result details, and setting implementation, see the demo configuration. For an interactive data exchange wizard scenario, see the _DemoExchangeWithStandardSubsystemsLibrary exchange plan manager module. The exchange plan ExportSetting form illustrates the import, processing, and export of the modified filter parameters.
Registration Rules
Registration Rule Template
An exchange plan can contain zero or one registration rule template. We recommend that you provide each exchange plan with a registration rule template (it is not required though). A registration rule template implies that a filter will apply during data exchange.
Registration rules are stored in a text template file. It receives rules from a source XML file. Source files are generated by 1C:Data Conversion 3.1. The files are encoded in UTF-8.
To add new registration rules to a template or update the existing ones, do the following:
- Open an XML file as a text file by clicking File > Open.
- Copy the file content to clipboard.
- Insert the clipboard content to an exchange plan template.
The name of a registration rule template must repeat the RecordRules value.
Registration Manager
For IFDE exchange plans, you can use a registration manager. In this case, the registration rule code is located in the common module, which allows you to avoid using unsafe Execute method. You can run debugging without additional tools and use configuration extensions to customize registration rules.
To use the registration manager, in the OnGetSettings procedure of the exchange plan manager module, specify the RulesForRegisteringInManager and RegistrationManager settings:
An example of specifying the settings:
Procedure OnGetSettings(Settings) Export

    …

    Settings.RulesForRegisteringInManager = True;
    Settings.RegistrationManager = "_DemoUniversalFormatRegistrationManager";

EndProcedure
To create a common module, use 1C:Data Conversion version 3.1.1.6 or later. In the common module, set the Server, External connection, and Client (ordinary application) run contexts.
Exchange Rule Templates for Crde
An exchange plan can contain one or more exchange plan templates. We recommend that you provide each exchange plan with registration rule templates (it is not required though). Exchange rules are stored in a text template file. It receives rules from a source XML file. Source files are generated by 1C:Data Conversion 2.1. The files are encoded in UTF-8.
To add exchange rules to a template, follow the same steps as described in Registration Rule Template.
An exchange rule template name must comply with the following naming convention: ExchangeRules<Destination><DestinationVersion> where Destination is the destination configuration name and DestinationVersion is the destination configuration version.
For example, ExchangeRulesEnterpriseAccounting_1_6_18.
An exchange plan must contain a template named ExchangeRules. Exchange rules from this template are used by default in the setup wizard.
Event Subscriptions
For proper functioning, the subsystem requires event subscriptions. Without event subscriptions, the data change registration mechanism will fail.
Besides maintaining data exchange restriction logic, the mechanism ensures the compliance with the data registration procedure during infobase updates and optimizes the data registration process during data import in CRDE or IFDE.
Each exchange plan has a separate set of event subscriptions. Generally, an exchange plan can have up to six event subscriptions. See subscription parameters in the table below. An event subscription name must comply with the following naming convention: <ExchangePlanName><SubscriptionKind>, where ExchangePlanName is the name of the exchange plan that contains the subscription, and SubscriptionKind is an event subscription type (for available types, see the table below).
Data exchange event subscriptions:
| Subscription Type | Source | Event |
|---|---|---|
DocumentRegistration |
DocumentObject |
Before write |
Registration |
CatalogObject, ChartOfCharacteristicTypesObject, ChartOfAccountsObject, ChartOfCalculationTypesObject, BusinessProcessObject, TaskObject |
Before write |
SetRegistration |
InformationRegisterRecordSet, AccumulationRegisterRecordSet, AccountingRegisterRecordSet |
Before write |
CalculationSetRegistration |
CalculationRegisterRecordSet |
Before write |
ConstantRegistration |
ConstantValueManager |
Before write |
DeletionRegistration |
DocumentObject, CatalogObject, ChartOfCharacteristicTypesObject, ChartOfAccountsObject, ChartOfCalculationTypesObject, BusinessProcessObject, TaskObject |
Before delete |
To assign subscription event handlers, create a common module with the following attributes: Server, External connection, Client (ordinary application), Server call. Their names and the module quantity are arbitrary.
In subscription handling procedures, add a call of registration procedure from the DataExchangeEvents common module. The procedure name and parameter set depend on the subscription type. To choose a proper procedure, see the table below. The first registration procedure parameter is the exchange plan name. Other parameters repeat the parameters of the callable procedure.
| Subscription Type | Event Handler Procedure |
|---|---|
DocumentRegistration |
DataExchangeEvents.ObjectsRegistrationMechanismBeforeWriteDocument("<ExchangePlanName>", Source, Cancel, WriteMode, PostingMode) |
Registration |
DataExchangeEvents.ObjectsRegistrationMechanismBeforeWrite("<ExchangePlanName>", Source, Cancel) |
SetRegistration |
DataExchangeEvents.ObjectsRegistrationMechanismBeforeWriteRegister("<ExchangePlanName>", Source, Cancel, Replacing) |
CalculationSetRegistration |
DataExchangeEvents.ObjectsRegistrationMechanismBeforeWriteRegister("<ExchangePlanName>", Source, Cancel, Replacing) |
ConstantRegistration |
DataExchangeEvents.ObjectsRegistrationMechanismBeforeWriteConstant("<ExchangePlanName>", Source, Cancel) |
DeletionRegistration |
DataExchangeEvents.ObjectsRegistrationMechanismBeforeDelete("<ExchangePlanName>", Source, Cancel) |
Do not specify the following metadata objects as event sources:
- Information register
InfobaseObjectsMaps - Constant
SubordinateDIBNodeSettings
Common Command Setup
When you integrate the subsystem for the first time, add the Command parameter type property to the commands in the table below. Set the property type to "composite" and provide references to exchange plans according to Table 3.62.
| Command Name | IFDE | CRDE | RDE | DIB |
|---|---|---|---|---|
Synchronize |
+ | + | + | + |
SynchronizeWithAdditionalParameters |
+ | + | - | - |
ConnectionSettings |
+ | + | + | + |
ImportObjectConversionRules |
- | + | - | - |
ImportObjectRegistrationRules |
+ | + | + | + |
ImportRulesSet |
- | + | - | - |
SynchronizationScenarios |
+ | + | + | + |
SendingEvents |
+ | + | + | + |
ReceivingEvents |
+ | + | + | + |
GetSynchronizationSettingsForOtherApplication |
+ | + | + | - |
DataToSendComposition |
+ | + | + | + |
DeleteSynchronizationSetting |
+ | + | + | + |
User Access Setup
To manage user access to the subsystem, assign a user the roles specified in the table below.
| # | Role Description |
|---|---|
| 1. | DataSynchronizationInProgress
|
| 2. | FullAccess (the Core subsystem user role)
|
To grant users access to the data that belongs to other subsystems and might be required to work with the Data exchange subsystem, create auxiliary roles or re-use existing suitable roles.
| # | Auxiliary Role Description |
|---|---|
| 1. | ReadExchangePlansNodesRole to read exchange plan nodes. |
The table below illustrates possible user groups and the roles they could be assigned with.
| # | User Group Description | Assigned Roles |
|---|---|---|
| 1. | Data exchange administrator:
|
|
| 2. | Data exchange user:
|
|
When you create and run data exchange via an external connection, in the peer database use the SystemAdministrator and FullAccess roles.
User Access Setup: Integrated "Object Versioning" Subsystem
The Object versioning subsystem is designed to find conflicts and restrict data import by a date. To view them, assign the ReadObjectVersionInfo role.
User Access Setup: SaaS
For SaaS applications, assign the DataSynchronizationInProgress role to data area users. Subscriber administrator sets up data exchange in the Service manager context.
How to Use the Subsystem in Development
Note that during data exchange, when a destination infobase reads an exchange message, 1C:Enterprise must not run any attribute population check. To do it, add the following code block to event handlers BeforeWrite, OnWrite, and BeforeDelete:
If DataExchange.Load Then
   Return;
EndIf;
Add this block at the beginning of BeforeWrite, OnWrite, and BeforeDelete in the object module and in event subscriptions.
Data Exchange Setup
Add subsystem metadata objects to exchange plans as described in Exchange Plan Content.
General Data Exchange Considerations
Data Exchange Topology
The subsystem does not impose restrictions on the exchange topology and the order of exchange settings in heterogeneous systems. Data exchange design must exclude the possibility of syncing loops. A syncing loop is a situation when a change in one infobase triggers infinite changes in peer infobases. It might occur when the data exchange topology has improper settings. Syncing loops tend to increase in syncing infobases.
 Data exchange topology that triggers syncing loops
The figure shows four infobases that exchange data. Each infobase has a unique prefix (A, B, C, and D), which allows to configure a custom exchange topology. The figure illustrates peer-to-peer pairs of infobases (A-B, A-C, and so on). The data exchange streams that may potentially trigger a syncing loop are marked red. Avoid such design when you develop a data exchange topology.
Default Values
Sometimes, you need to append a dataset received from a peer infobase. For example, 1C:Enterprise cannot post a document if a settlement currency is missing. The imported dataset does not include the currency (as designed). Therefore, 1C:Enterprise must append the currency when writing the imported data. As an option, you can save this value in a property of the exchange plan node. Users can set the value during data exchange setup. For CRDE, the default values are used in exchange rule handlers. For example, in the After import handler of the object conversion rule.
We recommend that you design a data exchange so that users do not have to set these values during the setup. Required settings must be set by 1C:Enterprise or should not be used at all. Allow users to set the default values only under exceptional circumstances.
Node Codes
In hosted mode, node codes match the prefixes of the peer infobases. 1C:Enterprise copies the prefix of the current infobase to the predefined node code. Codes are assigned during data exchange setting creation.
In SaaS mode, a node code is the number of data area the node belongs to, prefixed by "S". The prefix "S" is used to separate codes of SaaS nodes from codes of hosted nodes. 1C:Enterprise assigns the predefined node the code that repeats the number of the current data area prefixed by "S". Codes are assigned during data area creation.
Exception: For IFDE version 1.5 and later, 1C:Enterprise assigns nodes with unique IDs unrelated to the infobase prefix or data area number.
Data Exchange Catalog Setup: SaaS
For SaaS infobases, if 1C:Enterprise server runs on Windows, set the DataExchangeMessageDirectoryForWindows constant, and if it runs on Linux, set the DataExchangeMessageDirectoryForLinux constant. If a cluster has servers with different operating systems, set both constants. In this case, the constants must contain the path to the same network directory.
Notice.
If two peer infobases are located in one LAN or on one computer, we recommend that DataExchangeMessageDirectoryForWindows and DataExchangeMessageDirectoryForLinux contain the path to the same exchange directory. It will improve data exchange performance.
If a cluster is located on one physical server, the constants are not required. 1C:Enterprise will use the current user's temporary directory to store exchange messages.
Exchange Rule Update
In the course of configuration development, you might need to modify exchange rules (applicable only for CRDE) and registration rules. Or you might modify exchange rules and registration rules in order to fix bugs. Also, you need to update the rules each time the format changes. To update data exchange rules, update the associated rule templates and data processors in Designer. When a configuration updates, the Infobase version update subsystem updates the data exchange rules automatically. Only standard rules imported from the configuration template can be updated. The subsystem will not update custom rules.
Notice.
Exchange rules are stored in infobase. When you develop exchange rules and do not increase the configuration version, the rules will not be updated automatically. In this case, you need to update rules manually. To do this, open the rules import form (command Open object conversion rules or Open object registration rules) and re-read the rules from a configuration template or from an external file.
On-Request Object Export
For CRDE and IFDE, the subsystem provides on-request exchange scenario. According to this scenario, an object is exported only if objects exported earlier refer to this object. For example, the Products catalog can contain a large number of items. It is reasonable to sync only those included into exported Goods receipts and Goods issue. If a product item has been exported even once, 1C:Enterprise will update the item in peer infobases during each data exchange.
To implement that scenario for a product catalog:
- In the exchange plan, create a header attribute of the
EnumRef.ExchangeObjectExportModestype that will switch the export mode. Name itProductExportMode. - Set the
ProductExportModeattribute toEnums.ExchangeObjectExportModes.ExportIfNecessary. - Create an object registration rule (ORR) for the Products catalog. In the rule, set the switcher field value of
ProductExportMode.
You can use several metadata objects for a single ProductExportMode switcher. For example, when you export products, you can export their measurement units as well. Units will be exported only on demand.
Event Handler "Initial Data Export Change Registration"
IFDE, CRDE, and RDE support the Initial data export change registration event handler. DIB data exchange does not support the handler.
The handler is stored in the DataExchangeOverridable common module and used to override the standard data processor that registers changes during the initial data export. The standard data processor records changes in all data from the exchange plan. If an exchange plan has data filters, this handler improves the initial data export performance (on average, 2 to 4 times).
With the handler, you can register changes taking into account the data filters. If an exchange plan filters data by date or by both date and company,
you can use the universal procedure DataExchangeServer.RegisterDataByExportStartDateAndCompanies. See an example of the handler implementation in the demo configuration.
Event Handler "on Data Export" in Ifde, Crde, and Rde
The handler is located in the DataExchangeOverridable common module and used to override the standard procedure that exports data to an exchange message file. Standard data processor exports data to a file according to the exchange plan type: Conversion Rule Data Exchange or XML serialization. With this handler, you can implement a custom data export logic: prepare a dataset for export, serialize data to a message file, or serialize to a stream. After the handler completed processing, the Data exchange subsystem exports the data to the recipient. The message format is arbitrary.
Event Handler "on Data Import" in Ifde, Crde, and Rde
The handler is located in the DataExchangeOverridable common module and used to override the standard procedure that imports data from an exchange message file. Standard data processor imports data from a file according to the exchange plan type: Conversion Rule Data Exchange or XML serialization. With this handler, you can implement a custom data import logic: check a dataset before import, serialize data from a message file, or serialize from a stream. The message format is arbitrary.
Event Handler "on Getting Available Format Versions"
The handler is located in the DataExchangeOverridable common module. It is intended to override the standard procedure that receives supported versions of the EnterpriseData exchange format. The format versions are later used in the ExportImportEnterpriseData data processor.
Event Handler "on Getting Available Format Extensions"
The handler is located in the DataExchangeOverridable common module. It is intended to override the standard procedure that receives supported extension schemas of the EnterpriseData exchange format. The extension schemas are later used in the ExportImportEnterpriseData data processor.
Shared Node Data
A couple of peer infobases can have shared node data. Shared node data is the attributes that belong to the exchange plans of both infobases and have the same values.
Let's illustrate how you can implement shared node data with a data exchange setting Document export start date. If the attribute that manages this setting is assigned as shared node data in the exchange plan manager module in both configurations, this setting will be synchronized in the peer infobases.
We do not recommend that you assign reference-type attributes as shared node data if metadata objects of this type might have different UUIDs in peer infobases.
Data Change Conflicts
Sometimes, the same piece of data changes in peer infobases at the same time, between two exchange sessions. Then, 1C:Enterprise does not know which is the most current. This is called synchronization collision.
If a synchronization collision occurs, 1C:Enterprise imports the data that has the higher priority. If both data versions have the same priority, 1C:Enterprise will choose the primary version depending on the data exchange type:
- For DIB, the master node has priority over the subordinate node.
- For IFDE, CRDE, and RDE, the peer infobase has priority.
You can override the priority using the DataExchangeOverridable.OnDataChangeConflict procedure. For more information, see the procedure comment.
Note that two peer infobases should have opposite priorities. If one infobase accepts a collision, the other one must reject it.
Dib
Creation of Subordinate Node Initial Image
If you need a metadata object only to create a subordinate node initial image, then add this object to the exchange plan and disable the autoregistration flag. Also remove the object from all subscriptions to events of the Data exchange subsystem.
For example, a product catalog must not be synchronized between DIB nodes. Each node has a unique product catalog. However, a new subordinate node should contain a product catalog filled with the default product items and folders.
Interim Format Data Exchange
Exchange Message Specification
Namespace URI: http://www.1c.ru/SSL/Exchange/Message
| Item | Type | Format | Details |
|---|---|---|---|
<message></message> |
|
|
|
<header></header> |
|
|
|
<format></format> |
|
|
|
<creationdate></creationdate> |
|
|
|
<confirmation></confirmation> |
|
|
|
<exchangeplan></exchangeplan> |
|
|
|
<to></to> |
|
|
|
<from></from> |
|
|
|
<messageno></messageno> |
|
|
|
<receivedno></receivedno> |
|
|
|
|
|
|
|
<availableversion></availableversion> |
|
|
|
<newfrom></newfrom> |
|
|
|
<availableobjecttypes></availableobjecttypes> |
|
|
|
<objecttype></objecttype> |
|
|
|
<name></name> |
|
|
|
<sending></sending> |
|
|
|
<receiving></receiving> |
|
|
|
|
|
|
|
|
|
|
|
<prefix></prefix> |
|
|
|
|
|
|
|
|
|
|
|
|
|
||
Notation:
- Type: M means the item is mandatory, O means the item is optional. M[1..K] is a sequence of items from 1 to K, where K is a non-negative integer more or equal to 1. O[0..n] is a sequence of items from 0 to n, where n is a non-negative integer more or equal to 0. If n is not specified, the sequence is unlimited.
- Format: An item type from the type list specified in http://www.w3.org/2001/XMLSchema. If it is not specified, then it equals to one of the types described in http://www.1c.ru/SSL/Exchange/Message.
Data Exchange in Passive Mode
When you create a passive data exchange over the internet, specify a file with the peer infobase XDTO settings. The file specification matches the specification of the exchange message file with the following alterations:
Specify the basic URI of EnterpriseData packages without versions in Header.Format: http://v8.1c.ru/edi/edi_stnd/EnterpriseData.
- Set
Header.Confirmation.MessageNoandHeader.Confirmation.ReceivedNoto zero (0). - Ensure that item
Bodyis absent.
A settings file example:
<?xml version="1.0" encoding="UTF-8"?>
<Message xmlns:msg="http://www.1c.ru/SSL/Exchange/Message" xmlns:xs="http://www.w3.org/2001/XMLSchema" xmlns:xsi="http://www.w3.org/2001/XMLSchema-instance">
    <msg:Header>
        <msg:Format>http://v8.1c.ru/edi/edi_stnd/EnterpriseData</msg:Format>
        <msg:CreationDate>2018-06-04T14:01:18</msg:CreationDate>
        <msg:Confirmation>
            <msg:ExchangePlan>DataSynchronizationViaUniversalFormat</msg:ExchangePlan>
            <msg:To>31</msg:To>
            <msg:From>30</msg:From>
            <msg:MessageNo>0</msg:MessageNo>
            <msg:ReceivedNo>0</msg:ReceivedNo>
        </msg:Confirmation>
        <msg:AvailableVersion>1.6</msg:AvailableVersion>
        <msg:AvailableVersion>1.5</msg:AvailableVersion>
        <msg:AvailableVersion>1.4</msg:AvailableVersion>
        <msg:AvailableVersion>1.3</msg:AvailableVersion>
        <msg:AvailableVersion>1.2</msg:AvailableVersion>
        <msg:NewFrom>1a8ac3e6-ec58-484f-9257-1e77171ce21d</msg:NewFrom>
        <msg:AvailableObjectTypes>
            <msg:ObjectType>
                <msg:Name>Document.CustomerInvoice</msg:Name>
                <msg:Sending>*</msg:Sending>
                <msg:Receiving>*</msg:Receiving>
            </msg:ObjectType>
            <msg:ObjectType>
                <msg:Name>Document.InventoryWriteOff</msg:Name>
                <msg:Sending>1.3,1.4,1.5,1.6</msg:Sending>
                <msg:Receiving>1.3,1.4,1.5,1.6</msg:Receiving>
            </msg:ObjectType>
            <msg:ObjectType>
                <msg:Name>Document.CustomerProformaInvoice</msg:Name>
                <msg:Sending>1.3,1.4,1.5,1.6</msg:Sending>
                <msg:Receiving>1.3,1.4,1.5,1.6</msg:Receiving>
            </msg:ObjectType>
            <msg:ObjectType>
                <msg:Name>Catalog.BankAccounts</msg:Name>
                <msg:Sending>*</msg:Sending>
                <msg:Receiving>*</msg:Receiving>
            </msg:ObjectType>
            <msg:ObjectType>
                <msg:Name>Catalog.UnitsOfMeasurement</msg:Name>
                <msg:Sending>*</msg:Sending>
                <msg:Receiving/>
            </msg:ObjectType>
            <msg:ObjectType>
                <msg:Name>Catalog.Counterparties</msg:Name>
                <msg:Sending>*</msg:Sending>
                <msg:Receiving>*</msg:Receiving>
            </msg:ObjectType>
            <msg:ObjectType>
                <msg:Name>Catalog.Products</msg:Name>
                <msg:Sending>*</msg:Sending>
                <msg:Receiving>*</msg:Receiving>
            </msg:ObjectType>
            <msg:ObjectType>
                <msg:Name>Catalog.Companies</msg:Name>
                <msg:Sending>*</msg:Sending>
                <msg:Receiving>*</msg:Receiving>
            </msg:ObjectType>
            <msg:ObjectType>
                <msg:Name>Catalog.ResponsiblePersons</msg:Name>
                <msg:Sending>1.3,1.4,1.5,1.6</msg:Sending>
                <msg:Receiving>1.3,1.4,1.5,1.6</msg:Receiving>
            </msg:ObjectType>
        </msg:AvailableObjectTypes>
        <msg:Prefix>30</msg:Prefix>
    </msg:Header>
</Message>
Ifde Manager Module
Procedures and functions that describe rules that convert infobase data to exchange format and back are contained in the common module (IFDE manager module).
You can create this module manually in Designer, or automatically with 1C:Data Conversion 3.0 using the configured exchange rules.
The module structure description includes the following abbreviations:
DPRstands for Data Processing Rule.OCRstands for Object Conversion Rule.PDCRstands for Predefined Data Conversion Rule.PCRstands for Property Conversion Rule.
The module consists of several large sections. A section contains a group of procedures and functions.
Comment. The first string contains a comment with the conversion rule description. The comment helps to identify the module when using the Handler import command in 1C:Data Conversion 3.0.
Conversion procedures. Contains predefined procedures that are executed before conversion, after conversion, and before deferred data population.
Data processing rules (DPR). Contains procedures and functions that describe data processing rules.
Object conversion rules (OCR). Contains procedures and functions that describe object conversion rules and property conversion rules.
Predefined data conversion rule (PDCR). Contains a procedure that populates predefined data conversion rules.
Algorithms. Contains any algorithms that are called from other rules (DPR or OCR).
Parameters. Contains the logic of conversion parameters population.
Common. Contains procedures and functions commonly used by rules and algorithms.
Here are the parameters of procedures and functions used in some types of manager module procedures:
ExchangeComponents (Structure). Contains parameters and exchange rules initialized during an exchange session.
ExchangeDirection (String). Valid values are Send and Receive.
IBData (CatalogObject or DocumentObject).
Conversion Event Procedures
The following predefined procedures are called during data conversion:
BeforeConvert. Called before data synchronization. Contains the logic of initializing conversion parameters, of default value population, and others. Parameters:ExchangeComponents.AfterConvert. Called after a data exchange is completed and before a deferred data population is started. Parameters:ExchangeComponents.BeforeDeferredFilling. Called before deferred data population. Contains the logic of sorting and adjusting the table of objects to be populated. Parameters:ExchangeComponents.
Dpr Procedures
FillInDataProcessingRules. An export procedure that contains the logic of the data processing rule population. Contains calls to other procedures that add a processing rule for an object to the rule table. See the AddDPR procedure below. Parameters: ExchangeDirection, DataProcessingRules (a value table initialized during an exchange session).
AddDPR_<DPRName>. A list of procedures that populate the DPR table with rules for certain objects. The number of these procedures matches the number of data processing rules 1C:Data Conversion 3.0 provided for this data conversion. Parameters: DataProcessingRules (a value table initialized during an exchange session).
DPR_<DPRName>OnProcess. Contains the OnProcess handler for the specified DPR. The handler implements the object-level conversion logic. For example, it might assign an OCR to an object depending on the object's content. Parameters:
IBDataorXDTOData(depending on the exchange direction):- When sending, assigns an object (
CatalogObjectorDocumentObject). - When receiving, assigns a structure with XDTO object details.
- When sending, assigns an object (
UsageOCR(Structure). The key is a string that contains an OCR name. The value isBoolean(ifTrue, OCR is used).ExchangeComponents.
DPR_<DPRName>_DataSelection. The function that contains the OnExport handler. The handler implements a custom algorithm that selects objects to export. Returns an array of objects to be exported. The array can contain references to infobase objects and structures with exportable data. Parameters: ExchangeComponents.
OCR Procedures
FillInObjectConversionRules. An export procedure that contains the OCR population logic. Contains calls to other procedures that add a conversion rule for an object to the rule table. See the AddOCR procedure below. Parameters: ExchangeDirection, ConversionRules (a value table initialized during an exchange session).
AddOCR_<OCRName>. A set of procedures that fill the OCR table with rules dedicated for specific objects. The number of these procedures matches the number of object conversion rules 1C:Data Conversion 3.0 provided for this data conversion. Parameters: ConversionRules (a value table initialized during an exchange session).
OCR_<OCRName>_OnSendData. Contains the OnSend handler for the specified OCR. The handler is used during data export. The handler implements the logic of converting data contained in the infobase object into XDTO object content. Parameters:
IBData(CatalogObjectorDocumentObject). The infobase object being processed.XDTOData(Structure). Intended to access XDTO object data.ExchangeComponents.ExportStack(Array). Contains hierarchical references to exportable objects.
The handler allows to skip data conversion. Set the Undefined value for the XDTOData parameter.
OCR_<OCRName>_OnConvertXDTOData. Contains the OnConvertXDTOData handler for the specified OCR. The handler is used during data import. The handler implements a custom logic of XDTO data conversion. Parameters:
XDTOData(Structure). XDTO object properties that were pre-processed for faster access.ReceivedData(CatalogObjectorDocumentObject). An infobase object created by converting XDTO data. It has not been written to the infobase.ExchangeComponents.
The handler contains instructions for converting properties that have the Conversion algorithm is used flag. An instruction is a structure with the following keys:
OCRName. A conversion rule ID.Value. The key property structure received fromXDTOData, which must be converted into a data object attribute.DeleteObjectsCreatedByKeyProperties. Indicates whether the object created from the key properties must be deleted after importing all data. 1C:Enterprise will delete objects imported by reference. That is, only those objects that exist only in other objects' properties. By default, these objects are not deleted. If an object is imported by reference as an independent object, 1C:Enterprise will ignore the flag and keep the object.
To mark an attribute for converting by the instruction, add the instruction to additional properties of ReceivedData with the key equal to the name of the attribute.
InstructionCounterparty = New Structure("OCRName, Value", "Catalog_Counterparties_Receipt", XDTOData.KeyProperties.Counterparty);
ReceivedData.AdditionalProperties.Insert("Counterparty", InstructionCounterparty);OCR_<OCRName>_BeforeWriteReceivedData. Contains the BeforeWriteReceivedData handler for the specified OCR. The handler is used during data import. The handler implements an additional logic that is executed before writing an object to the infobase. For example, whether to import data as new objects or rewrite existing infobase objects. Parameters:
ReceivedData(CatalogObjectorDocumentObject). A data item created by converting XDTO data.
1C:Enterprise adds it to the infobase if it is a new data item (IBDataisUndefined).
Otherwise,ReceivedDatarewritesIBData(properties fromReceivedDataare copied toIBData).
You can develop a custom synchronization logic. Then, setReceivedDatatoUndefined.IBData(CatalogObjectorDocumentObject). The infobase data item that corresponds to the imported data item. If corresponding data is not found, containsUndefined.PropertiesConversion(Value table). Contains current object's conversion rules initialized during an exchange session.ExchangeComponents.
The handler allows to skip data writing. To do that, set ReceivedData and IBData to Undefined.
Pdcr Procedures
FillInRulesForConvertingPredefinedData. An export procedure that contains the OCR population logic for predefined data. Parameters: ExchangeDirection, ConversionRules (a value table initialized during an exchange session).
Algorithms
With Data Conversion 3.0, you can create custom algorithms that DPR and PDCR handlers will call. The description, parameters, and content of algorithms are determined when developing rules.
Parameters
FillInConversionParameters. The export procedure that populates the structure with conversion parameters. Parameters: ConversionParameters (Structure).
Common Procedures and Functions
ExecuteManagerModuleProcedure. Parameters: ProcedureName (string), Parameters (structure). The export procedure is intended to call the non-export procedure of the module whose name and parameters are received as input. It allows you to call a procedure or function by string without using the Execute method.
PerformManagerModuleFunction. Parameters: ProcedureName (string), Parameters (structure). A function similar to ExecuteManagerModuleProcedure. The difference is that it calls a function and returns its value.
Conversion Rule Data Exchange
Secure Handler Code Execution and UniversalDataExchangeXML Data Processor
For configurations that exchange data with the UniversalDataExchangeXML data processor, to increase security, execute import handlers code in a configuration's data processor. To generate a module with an import handler code:
- Open the source infobase and generate an export file based on the exchange rules.
- Open the destination infobase, start universal data exchange and generate the import handler module code based on the export file.
- Copy the module code to the data processor.
- Run the following code block to attach the data processor:
UDE = DataProcessors.UniversalDataExchangeXML.Create();
UDE.HandlersDebugModeFlag = True;
UDE.EventHandlerExternalDataProcessorFileName = "<DataProcessorName>";
UDE.ExecuteImport();
Debug Mode
In debug mode, you can use Designer to debug handlers that use OCR data exchange. The code of export and import handlers being debugged is executed from external data processors. By that, you can modify the code without restarting the configuration. To start debugging, do the following:
- In 1C:Data Conversion version 2.1.6 and later, do the following:
- Open conversion properties and disable the compatibility mode.
- Save object conversion rules.
- Generate debug modules that contain handlers' code and copy the modules to the external data processor module.
- In the configuration, do the following:
- Import conversion rules saved in 1C:Data Conversion.
- In conversion rule settings, enable debug mode.
- Attach the external data processors generated in 1C:Data Conversion.
- Run data exchange.
- In Designer mode, you can open and debug the attached external data processor and modify its code.
- You can commit all changes made in the data processor to the exchange rules using 1C:Data Conversion version 2.1.6 and later.
For security reasons, SaaS applications do not support debug mode.
Infobase Version Update
The Infobase version update subsystem provides an API for managing the data update handlers and initial data population handlers. After the configuration update, the subsystem provides you with the changelog.
The figure below illustrates the general infobase configuration update flow.
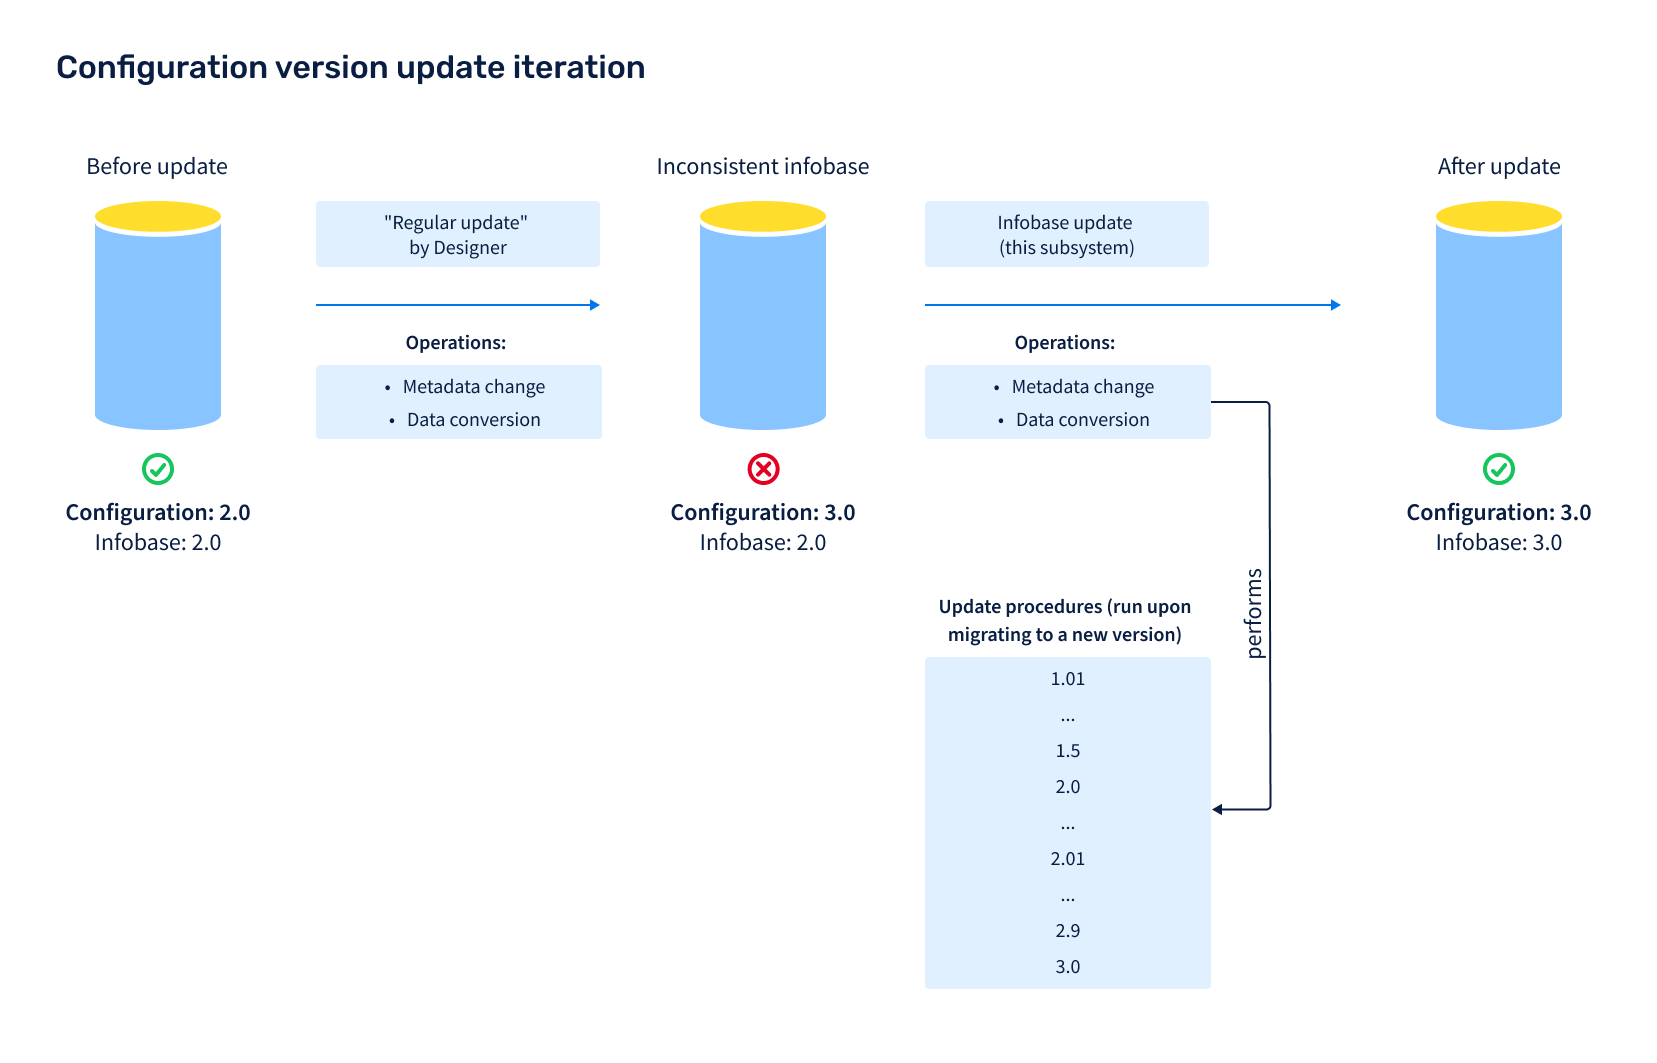
When you start a client application, the Infobase version update subsystem checks if the configuration has been modified. If the infobase version differs from the configuration version, the subsystem updates the infobase when a user starts a session with the administrator privileges. The Infobase version update subsystem updates the infobase incrementally. That is, it runs the update handler that updates the infobase to the next closest configuration version, and repeats this until the infobase version matches the latest configuration version.
After infobase is updated, the subsystem shows the Update details form, which contains new enhancements that went in as part of the new version.
If a user has insufficient rights (does not have the ExclusiveMode and Administration rights) or an error occurs during the update, the system startup is stopped.
For client/server configurations, if a configuration includes deferred update handlers, the subsystem starts the handlers in the background using the Deferred infobase update scheduled job when a user starts a session. For file-based configurations, if a configuration includes deferred update handlers, the subsystem runs them during the update. 1C:Enterprise supports running deferred update handlers in multiple threads concurrently to speed up the update.
Subsystem Setup
Prerequisites
In the library (configuration), create a common module with the name InfobaseUpdate<ShortName>, where ShortName is the brief name of the library (configuration). Example: InfobaseUpdateSSL.
Then add a name of the created module to the OnAddSubsystems procedure of the ConfigurationSubsystemsOverridable common module.
From the InfobaseUpdateSSL common module, copy the first line and the last line of the following procedures, and paste them to the newly created common module:
Procedure OnAddSubsystem(LongDesc) Export

EndProcedure
Procedure OnAddUpdateHandlers(Handlers) Export

EndProcedure
Procedure BeforeUpdateInfobase() Export

EndProcedure
Procedure AfterUpdateInfobase(Val PreviousVersion, Val CurrentVersion,
        Val CompletedHandlers, OutputUpdatesDetails, ExclusiveMode) Export

EndProcedure
Procedure OnPrepareUpdateDetailsTemplate(Val Template) Export

EndProcedure
If you created the module in a configuration, also add the following procedures to the newly created module:
OnAddApplicationMigrationHandlersOnDefineDataUpdateModeOnCompleteApplicationMigration
Procedure OnAddApplicationMigrationHandlers(Handlers) Export

EndProcedure
Procedure OnDefineDataUpdateMode(DataUpdateMode, StandardProcessing) Export

EndProcedure
Procedure OnCompleteApplicationMigration(Val PreviousConfigurationName, Val PreviousConfigurationVersion, Parameters) Export

EndProcedure
As an example, see the _DemoInfobaseUpdateSSL common module in the demo configuration.
Then, add the name and the version of the library (configuration) to the OnAddSubsystem procedure and its dependencies (if any) on other libraries. The dependencies determine the order in which the update handlers should run. If no dependencies are specified, the library handlers run in the same order the libraries are listed in the ConfigurationSubsystemsOverridable common module. Notice: The StandardSubsystems library is always called first, and the library with the name matching the value of the Metadata.Name property is always called last.
// For the procedure description, see the InfobaseUpdateSSL module.
Procedure OnAddSubsystem(LongDesc) Export

    LongDesc.Name = "StandardSubsystemsLibrary_Demo";
    LongDesc.Version = "2.1.3.24";

    // Standard subsystems library is required.
    LongDesc.RequiredSubsystems1.Add("StandardSubsystems");

EndProcedure
Do not get the values of the Metadata.Name and Metadata.Version properties in the OnAddSubsystem procedure explicitly. If you do that, when you need to modify the configuration, you will have to disable the configuration support and make changes in the vendor's update module.
Command Interface Setup
If the configuration does not include the Application settings subsystem, add the following objects to the administrator's command interface:
- Constant
WriteIBUpdateDetailsToEventLog - Common form
ApplicationReleaseNotes - Data processor
ApplicationUpdateResult
As an example, see the Update application version group of the FindAndInstallUpdates form of the SSLAdministrationPanel data processor.
Common Template Systemreleasenotes
With each release, the configuration developers must preparer the release notes and publish them in the spreadsheet template SystemReleaseNotes. The number of sections in the spreadsheet template equals the number of configuration releases.
Each section consists of two parts:
- The header contains the text What's new in version <Major>.<Minor>.<Revision>.<Build>.
- The section body contains the summary of any changes introduced in the release. The body supports subsections and hyperlinks.
Sections are separated by an indent that is determined by the Indent area.
The OnClickUpdateDetailsDocumentHyperlink handler of the InfobaseUpdateClientOverridable common module runs when a user clicks a hyperlink in the template.
As an example, see the SystemReleaseNotes common template in the demo configuration.
Notice.
Create the SystemReleaseNotes template before the first-time use of the configuration in 1C:Enterprise mode.
User Access Setup
To manage user access to the subsystem, assign a user the roles specified in the table below.
| # | Role Description |
|---|---|
| 1. | SystemAdministrator (the Core subsystem user role)Grants the right to start the application for infobase version update. |
| 2. | BasicAccessSSL (the Core subsystem user role)Grants the right to view the release notes. |
How to Use the Subsystem in Development
Initial Data Population
1C:Enterprise can populate the initial data when a user starts an infobase for the first time. The initial data may include classifiers, catalog items, and so on.
First, define the list of metadata objects that you want to populate with the initial data. For example, catalog items, classifier records, and standard operations. Then:
- Add these metadata objects to the
EditedPredefinedAttributescommon attribute. - List them in the
OnDefineSettingsprocedure of theInfobaseUpdateOverridablemodule. Example:
Procedure OnDefineSettings(Parameters) Export

    Parameters.ObjectsWithInitialFilling.Add(Metadata.Catalogs.PerformerRoles);

EndProcedure- In the manager module of each object, define export procedures
OnSetUpInitialItemsFilling,OnInitialItemsFilling, andOnInitialItemFillingas follows:
// Defines the initial data population settings.
//
// Parameters:
//  Settings - Structure - population settings.
//   * OnInitialItemFilling - Boolean - if True, then for each item
//      call the OnInitialItemFilling procedure.
Procedure OnSetUpInitialItemsFilling(Settings) Export

EndProcedure

// Called during catalog initial population.
//
// Parameters:
//  LanguagesCodes - Array - the list of the configuration languages. Applicable to multilingual configurations.
//  Items - ValueTable - the initial data. Each column matches an attribute
//                                 of the PerformerRoles catalog.
//  TabularSections - Structure - description of object tables:
//   * Key - String - the table name.
//   * Value - ValueTable - the value table whose structure
//                                  must be copied before population.
//
Procedure OnInitialItemsFilling(LanguagesCodes, Items, TabularSections) Export

EndProcedure
// Called during object item initial population. If OnInitialItemFilling = True (OnSetUpInitialItemsFilling procedure).
//
// Parameters:
//  Object                  - Arbitrary - object to populate with initial data.
//  Data                  - ValueTableRow - the initial data.
//  AdditionalParameters - Structure - additional parameters.
//
Procedure OnInitialItemFilling(Object, Data, AdditionalParameters) Export

EndProcedure
Note.
If OnInitialItemFilling is set to False in the OnSetUpInitialItemsFilling procedure, do not add the OnInitialItemFilling procedure.
To populate the Items table, add the code block to the OnInitialItemsFilling procedure.
If 1C:Enterprise populates predefined items, for example, business roles in business processes and tasks, in the PredefinedDataName field in the population code, specify a predefined item name as in Designer to link the predefined item with data. An example of the code block to populate the PerformerRoles catalog:
// Called during the PerformerRoles catalog initial population.
//
// Parameters:
//  LanguagesCodes - Array - the list of the configuration languages. Applicable to multilingual configurations.
//  Items - ValueTable - the initial data. Each column matches an attribute
//                                 of the PerformerRoles catalog.
//  TabularSections - Structure - description of object tables:
//   * Key - String - the table name.
//   * Value - ValueTable - the value table whose structure
//                                  must be copied before population.
//
Procedure OnInitialItemsFilling(LanguagesCodes, Items, TabularSections) Export

    Item = Items.Add();
    Item.PredefinedDataName = "EmployeeResponsibleForTasksManagement";
    Item.Description = NStr("en='Task control manager'", Common.InfobaseLanguageCode());
    Item.UsedWithoutAddressingObjects = True;
    Item.UsedByAddressingObjects = True;
    Item.ExternalRole                      = False;
    Item.Code                              = "000000001";
    Item.BriefPresentation             = NStr("en='000000001'");
    Item.MainAddressingObjectTypes = ChartsOfCharacteristicTypes.TaskAddressingObjects.AllAddressingObjects;

EndProcedure
To create new built-in items programmatically, for example, classifier data, sets of additional properties and attributes, standard business transactions, and so on, define a key attribute that identifies an item. Set the attribute name to the KeyAttributeName property in the OnSetUpInitialItemsFilling procedure.
// See also InfobaseUpdateOverridable.OnSetUpInitialItemsFilling
//
// Parameters:
//  Settings - see InfobaseUpdateInternal.ItemsFillingSettings
//
Procedure OnSetUpInitialItemsFilling(Settings) Export

    Settings.KeyAttributeName          = "PredefinedKindName";

EndProcedure
The item population code in the OnInitialItemsFilling procedure is similar to the population code of predefined items. See the implementation example in the ContactInformationKinds catalog manager module in the demo configuration.
In some cases, you need to use a reference UUID as an identifying item. This UUID will be set as an object reference when you save the object. To do this, in the OnSetUpInitialItemsFilling procedure, set the KeyAttributeName property to Ref:
// See also InfobaseUpdateOverridable.OnSetUpInitialItemsFilling
//
// Parameters:
//  Settings - see InfobaseUpdateOverridable.OnSetUpInitialItemsFilling.Settings
//
Procedure OnSetUpInitialItemsFilling(Settings) Export

    Settings.KeyAttributeName          = "Ref";

EndProcedure
In the OnInitialItemsFilling procedure code, specify this UUID and describe how to populate items:

// See PropertyManagerOverridable.OnInitialItemsFilling
//
// Parameters:
//  LanguagesCodes - see InfobaseUpdateOverridable.OnInitialItemsFilling.LanguagesCodes
//  Items   - see InfobaseUpdateOverridable.OnInitialItemsFilling.Items
//  TabularSections - see InfobaseUpdateOverridable.OnInitialItemsFilling.TabularSections
//
Procedure OnInitialItemsFilling(LanguagesCodes, Items, TabularSections) Export

// Demo: Partners catalog sets.
    Set = Items.Add();
    Set.PredefinedSetName = "Catalog__DemoPartners";
    Set.IsFolder = True;
    Set.Used = True;
    Set.Ref = New UUID("2c8d6c08-1d35-43ce-a690-32ccf53b03f2");
    NationalLanguageSupportServer.FillMultilanguageAttribute(Set, "Description",
            "en = 'Demo: Partners'", LanguagesCodes); // @NStr-1

    ChildSet = Items.Add();
    ChildSet.Parent = New UUID("2c8d6c08-1d35-43ce-a690-32ccf53b03f2");
    ChildSet.PredefinedSetName = "Catalog_Partners_Clients";
    ChildSet.Used = True;
    ChildSet.Ref = New UUID("277e1f06-e4f6-4c23-8d31-0d4347e207a2");
    NationalLanguageSupportServer.FillMultilanguageAttribute(ChildSet, "Description",
        "en = 'Client'", LanguagesCodes); // @NStr-1
EndProcedure
See the implementation example in the _DemoProperties common module and the AdditionalAttributesAndInfoSets catalog manager module in the demo configuration.
When you need to extend default master data of metadata objects on support in other libraries or when the common population is used for different catalogs, insert the population code into procedures with the same name of the InfobaseUpdateOverridable common module.
To generate the OnInitialItemsFilling procedure, use the Initial data population tool, which is the DataPopulation.epf external data processor bundled with the Standard Subsystem Library.
When you run the data processor for the first time, do the following:
- Select a metadata object and its attributes that you want to populate.
- Switch to editing in code, and copy the automatically generated code to the OnInitialItemsFilling procedure.
Edit the code:
- Copy the code from the OnInitialItemsFilling procedure to
Initial data population. - Switch to editing in table, and edit the existing rows or add new ones.
- Switch to editing in code, and copy the automatically generated code to the
OnInitialItemsFillingprocedure.
To update predefined data for a configuration that migrates to another version, create a deferred update handler:
- In the item registration procedure, call the
InfobaseUpdate.RegisterPredefinedItemsToUpdateprocedure, and choose what items to update: all items, new and modified, or only modified multilanguage strings. - In the migration data processing procedure, call
InfobaseUpdate.FillItemsWithInitialDatato populate the item with the data specified in theOnInitialItemsFillingprocedure of the object manager module. - Note that the user data in these objects will be replaced with the initial data. To keep the user-entered data, create a custom update handler.
As an example, see the _DemoInfobaseUpdateSSL common module.
Update Handler Development
To attach a custom update handler, add the update handler description to the update module OnAddUpdateHandlers procedure.
To add the update handler description, use the following code template:
Handler = Handlers.Add();
Handler.Version = "<Version number>";
Handler.Procedure = "<Full name of the export procedure>";
Handler.InitialFilling = {True|False};
Handler.ExecutionMode = {"Exclusively"|"Seamless"|"Deferred"};
To generate the update handler description, use the Update handlers details tool in the Functions for technician menu. When it is done, you get the handler description in a text format. You can place it in the specified procedure.
The Handler value table fields depend on the update handler type: exclusive, real-time, or deferred. Below are the properties that are common for update handlers of all types:
Version(String). When the configuration is being updated to this version, 1C:Enterprise will call the update procedure specified inProcedure.- Version number has the following format: <Major>.<Minor >.<Revision>.<Build>.
- If you set this parameter value to asterisk (*), the update handler will be executed at every infobase update.
- If you do not specify this parameter value, set
InitialFillingtoTrue.
Procedure(String). The name of an update procedure. Update procedures must be export and stored in the server common module. For example,IBUpdate.RestoreVersion_1_2_3_4.InitialFilling(Boolean). IfTrue, the update procedure will be called at the initial startup of the empty infobase (version 0.0.0.0). This is a flag for initial population handlers. By default,False.ExecutionMode(String). Valid values:Exclusively,Seamless, andDeferred. If no value is specified, the exclusive mode is selected.
For example, to migrate from version 1.0.0.1 to 1.0.0.5, you need to call export procedures AlwaysExecuteOnVersionChange and RestoreVersion_1_0_0_5 of the _DemoInfobaseUpdateSSL common module. To do so, add the following code block to the OnAddUpdateHandlers procedure:
Procedure OnAddUpdateHandlers(Handlers) Export
// Attach configuration update handler procedures.
Handler = Handlers.Add();
Handler.Version = "1.0.0.0";
Handler.Procedure = "_DemoInfobaseUpdateSSL.RestoreVersion_1_0_0_0";
Handler = Handlers.Add();
Handler.Version = "1.0.0.5";
Handler.Procedure = "_DemoInfobaseUpdateSSL.RestoreVersion_1_0_0_5";
Handler = Handlers.Add();
Handler.Version = "*";
Handler.Procedure = "_DemoInfobaseUpdateSSL.AlwaysExecuteOnVersionChange";
EndProcedure
Exclusive, Real-Time, and Deferred Handlers
In the ExecutionMode property, you can determine how to process the data.
- Exclusive mode (
Exclusively) means that the handler will run in absence of active user sessions, scheduled jobs, external connections, and web service connections. Otherwise, the application update is terminated.Use exclusive handlers to update the data whose update must be completed before users can work in the application. To reduce data process downtime, use deferred update handlers. Examples of when you should choose an exclusive handler: processing a small dataset of the current accounting period or processing the selected product items.
If one update handler runs exclusively, all real-time handlers also run exclusively. - Real-time mode (
Seamless) means that the update handler will run concurrently with active user sessions, scheduled jobs, external connections, and web service connections.Use real-time handlers when it is important to update the infobase as soon as possible, without waiting for all the users to end their sessions. Examples of when you should choose a real-time handler: processing shared data in the SaaS mode or initializing user settings. Usually, real-time update handlers are used in patch releases.
For more information, see On-the-Fly Patch Update. - Deferred mode (
Deferred) means that the update handler will run in the background when exclusive handlers have completed processing and users are allowed to log in to the application.Use deferred handlers when the data update and the user sessions do not interrupt each other. This will allow users to start working with the application earlier, right after the exclusive handlers are done. Examples of when you should choose a deferred handler: processing large data archives of the past accounting periods, processing obsolete product items, or processing data that is disabled by functional options.
For more information, see Deferred Update of Large Data Volumes.
General Guidelines for Update Handlers Development
- Update handlers' code is executed on the server. Therefore, do not implement any logic that requires user interaction.
- To process critical errors, implement an exception. If a critical error occurs during the update, the 1C:Enterprise must raise the exception and terminate the update procedure. If an update is terminated, you will not be able to start the infobase until the error is fixed.
- Ensure that your update handler works correctly for repeated execution. For example, if you run a handler for the second time, it must not duplicate the data.
- A single configuration version supports any number of handlers. For example, you might need to develop different handler for each subsystem. You cannot define the update order sequence.
- 1C:Enterprise runs update orders in a random sequence. Therefore, you must not create dependencies between update handlers. If two update handlers depend on each other, you must merge them into a single handler.
The runtime is essential for update handlers. Therefore, you must exclude any data processing logic that is not necessary for the required data update. For example, in most cases, you can disable the business logic and change registration on exchange plan nodes (so that 1C:Enterprise would not send the processed data to all the nodes). Therefore:
- For distributed infobases (DIB), data must be processed independently in each node.
- For data exchange between peer applications, data updates must not lead to the export of the processed data to the destination infobases.
An exception is when a handler creates reference objects that you need to transfer to other DIB nodes with the same Ref attribute value.
Incorrect update handler code block:
DocumentObject.Write();Correct update handler code block:
DocumentObject.DataExchange.Load = True; // Disable all business logic.
DocumentObject.AdditionalProperties.Insert("DisableObjectChangeRecordMechanism");
DocumentObject.DataExchange.Recipients.AutoFill = False;
DocumentObject.Write();
To make the code concise, use the WriteData procedure of the InfobaseUpdate common module:
InfobaseUpdate.WriteData(DocumentObject);To debug exclusive and real-time update handlers, add the DebugMode start parameter or set the Update in debug mode (no exclusive mode, no background jobs) flag in the IBVersionUpdate data processor.
Deferred Update of Large Data Volumes
When you are out of means to optimize your update handlers, and there is data that can be processed during user sessions, we recommend that you implement that data processing in a deferred update handler.
Deferred update handlers do not prevent users from logging in to the application. By this, you can update large databases, which might take hours and even days, and at the same time let the users access the application and avoid employee downtime. Notice.
Only client/server configurations support deferred update handlers. For file-based configurations, deferred update handlers run before users can log in to the application.
We recommend that you implement deferred update handlers to process data of closed or past periods, obsolete product items, closed contracts, and data disabled by functional options. Also, choose deferred handlers to update documents, registers, business processes, and tasks, which tend to accumulate over time.
1C:Enterprise supports two deferred update handler run modes. You can set up the mode for each library or configuration:
- Sequentially (by default). 1C:Enterprise runs deferred update handlers one-by-one, each time incrementally updating the infobase to the next subsequent version until it is updated to the latest version. In this mode, the next update handler cannot start until the running handler completes data processing. Use this mode when deferred handlers for different versions can update data in the same configuration objects. This mode imposes less strict requirements for data resiliency. Since the update is performed incrementally an update handler "knows" the data structure and status the previous handler has left behind.
- Parallel. After processing a data chunk, the running deferred handler stops, and 1C:Enterprise passes the turn to the next handler. This repeats till the last handler processes a data chunk. Then the cycle repeats till all handlers complete processing all data. In this mode, update handlers update infobase objects of all types simultaneously, unlike the sequential mode where handlers process objects of different types one by one during each update.
The approaches for developing update handler of the two types are quite different. Below, you can find the general requirements for developing deferred update handlers.
To make an update handler deferred, set ExecutionMode to Deferred, specify the UUID, and provide a comment that describes how and what data it processes.
Both types of deferred update handlers have the following common properties:
Comment(String). The comment is required and must be unique. Describe the scope of data processing and what features will be blocked during the update. For example:- Update of report index. Report search is temporarily unavailable.
- Restructuring of additional attributes and information records. Do not change them till the update is over.
- Miscalculating unread emails. During the update, the number of unread email messages will be incorrect.
- Generating records in the new register
Product records. The new version introduces product reports.
Id(UUID). The deferred handler ID. Use to resolve conflicts you rename or move the handler to another module. 1C:Enterprise will find the new path to the handler by the ID.ObjectsToLock(String). Comma-separated names of objects, which will be locked for editing until the data processing is completed. For more information, see Locking Unprocessed Data for Editing.CheckProcedure(String). The name of the function that defines whether data processing procedure is completed for the passed object. If the passed object is processed, returnsTrue. Stored in theCheckObjectProcessedprocedure of theInfobaseUpdatecommon module. For more information, see Locking Unprocessed Data for Editing.Multithreaded(Boolean). Set toTrueif you want the update handler to process data in multiple threads simultaneously. By default,False. For more information, see Multithreaded Update Handlers.Order(Enum.OrderOfUpdateHandlers). Valid values areCrucial,Normal, andNoncritical. For more information, see Execution order of deferred update handlers.
Example:
Handler = Handlers.Add();
Handler.Version = "1.2.3.4";
Handler.Procedure = "Orders.FillSalesOrdersStatus";
Handler.ExecutionMode = "Deferred";
Handler.Id = New UUID("83d5c5dd-1462-4d72-ab98-f8f5dcc0664d");
Handler.Comment = NStr("en = 'Populates new OrderStatus attribute in ""Sales order"" documents of previous periods.'");
Example of a deferred update handler:
Procedure FillSalesOrdersStatuses(Parameters) ExportParameters is a Structure with the following properties:
ProcessingCompleted(Boolean). Set toFalseto re-call the handler to process the next data chunk.SubsystemVersionAtStartUpdates(String). A subsystem version number that the update handler belongs to at the application update start. You can use it to fork the handler execution depending on the version from which you update the application.ExecutionProgress(Structure). To display the data processing progress, specify the following parameters:TotalObjectCount(Number). The total number of objects to be processed.ProcessedObjectsCount1(Number). The number of objects that has been already processed.
DataToUpdate(Structure). The data chunk to pass to the update handler for processing in the current thread. Applicable ifMultithreadedisTrue. Do not get the value table directly. Instead, use theInfobaseUpdate.DataToUpdateInMultithreadHandlerprocedure.
Optionally, you can add a number of properties of any type to the Parameters structure. The parameter values are saved when the handler processed a data chunk. By that, you can keep the context and pass it from one handler call to the next one. For example, you can use it to pass the date the document archive has been processed till. Do not use the parameters to save large data amounts. Save only data of primitive types, such as Date.
Pass the data to deferred update handlers in chunks to avoid server memory outage and reduce the load to the DBMS. By default, a chunk has 1,000 items, such as documents or records. You can increase the chunk for small objects and reduce it for documents with large tables.
We recommend that handlers process the data from the newest to oldest.
Example:
Query = New Query;
Query.Text =
"SELECT FIRST 1000
|    BuyerSOrder.Ref
|FROM
|    Document.BuyerSOrder AS BuyerSOrder
|WHERE
|    BuyerSOrder.OrderStatus = &EmptyRef
|
|ORDER BY
|    BuyerSOrder.Date DESC";
Deferred update handler design must ensure data integrity. Handlers must set an exclusive lock and write data in a transaction.
Example:
BeginTransaction();
Try
    Block = New DataLock;
    LockItem = Block.Add("Document._DemoSalesOrder");
    LockItem.SetValue("Ref", BuyerSOrder.Ref);
    Block.Lock();

    DocumentObject = BuyerSOrder.Ref.GetObject();

    // Ignore the object if it has been deleted or processed in another session.
    If DocumentObject = Undefined Then
        RollbackTransaction();
        Return;
    EndIf;
    If DocumentObject.OrderStatus = Enums._DemoCustomerOrderStatuses.EmptyRef() Then
        RollbackTransaction();
        Return;
    EndIf;

    // Processing the document.
    // ...

    InfobaseUpdate.WriteData(DocumentObject);

    CommitTransaction();
Except
    RollbackTransaction();
    Raise;
EndTry;
If an exception is thrown, it must be passed to the calling code. The Exception—EndTry code block in the example above. Otherwise, the handler will not stop running (if the ProcessingCompleted value is False), and the infobase data will not be updated.
If a handler throws an exception, it is marked failed. 1C:Enterprise will wait and then make two attempts to restart the handler. It might help if another session was locking the data. If the handler keeps throwing exceptions, 1C:Enterprise considers it failed, skips it, and puts it on the queue at the next update. This makes it possible to get the data updated with the next release where this handler is supposed to be fixed.
Often, when a handler needs to process a data table, only part of its data is required for users when they start working with the updated application. The rest of the data can be updated later to reduce the update time. In this case, you can use an exclusive update handler and a deferred update handler.
There are rare cases when the new application version gets a new exclusive or real-time update handler that updates the data that in earlier versions was updated by a deferred handler. In this case, do either of the following:
- Refactor the new handler so it would be a deferred handler.
- Refactor the old handler so it would be an exclusive or real-time handler.
Otherwise, 1C:Enterprise might process the data in the wrong order: the data that was configured for deferred processing might be processed by an exclusive or real-time handler.
Locking Unprocessed Data for Editing
If a deferred handler is supposed to process data of the current period, the handler must lock this data for editing before starting the update to prevent the application from malfunctioning. Also, we recommend that it locks the reports and data processors that use this data.
To do this:
- In the
ObjectsToLockproperty of the deferred update handler, list the metadata objects that the handler will read from or write to, and the reports and data processors associated with these objects. If the configuration contains the Report options subsystem, exclude the reports from the list. The Report options subsystem automatically [1] defines the objects the handler will read from. If the report contains unupdated data, it displays the user message.[1] To define the tables used in the report, you might need to explicitly specify these tables in the report. For more information, see Report Options.
- In the
CheckProcedureproperty, specify the export function that will check whether the object must be locked. Example:
Handler = Handlers.Add();
Handler.Version = "1.2.3.4";
Handler.Id = New UUID("b3be66c5-708d-42c8-a019-818036d09d06");
Handler.Procedure = "Orders.FillSalesOrdersStatuses";
Handler.Comment = NStr("en = 'Populates new attribute ""Order status"" for the ""Demo: Sales order"" documents of previous periods.
    |Until processing is completed, ""Order status"" is displayed incorrectly.'");
Handler.ExecutionMode = "Deferred";
Handler.CheckProcedure = "Orders.SalesOrderProcessed";
Handler.ObjectsToLock = "Document.BuyerSOrder,Report.SalesOrdersStatuses";
For all objects listed in ObjectsToLock, add the call to the InfobaseUpdate.CheckObjectProcessed procedure in the event handler of the OnCreateAtServer object form module and in the event handler of the BeforeWrite object module:
Procedure OnCreateAtServer(Cancel, StandardProcessing)

    InfobaseUpdate.CheckObjectProcessed(Object, ThisObject);
    …
EndProcedure
Procedure BeforeWrite(Cancel, WriteMode, PostingMode)

    If DataExchange.Load Then
        Return;
    EndIf;

    InfobaseUpdate.CheckObjectProcessed(ThisObject);
    …
EndProcedure
The check function specified in the CheckProcedure property returns True if the handler has processed the object, and users can work with it, and returns False if the object must be still locked for editing. The function input parameter is Structure with the following parameter:
Data(AnyRef,RecordSet,Object,FormDataStructure). The object to be checked.ObjectMetadata(MetadataObject). The metadata object that corresponds to theDataparameter value.FullName(String). The full name of the metadata object.Filter(AnyRef,Structure). IfDatais a reference object, it contains the reference value. IfDatais a subordinate register, it contains the recorder filter value. IfDatais an independent information register, it contains the structure that matches filters set for the dimensions.IsNew(Boolean). IfDatais a reference object, indicates if the object is new. For other data types, it isFalse.
The code should be simple enough so that the form opening will not slow down. For example:
Function SalesOrderProcessed(Parameters) Export

    If TypeOf(Parameters.Data) = Type("DocumentRef._DemoSalesOrder") Then
        OrderStatus = Common.ObjectAttributeValue(Parameters.Data, "OrderStatus");
    Else
        OrderStatus = Parameters.Data.OrderStatus;
    EndIf;

    Return OrderStatus <> Enums._DemoCustomerOrderStatuses.EmptyRef();

EndFunction
As an example of a deferred update handler that locks unprocessed data, see the OnAddUpdateHandlers procedure of the _DemoInfobaseUpdateSSL common module in the demo configuration.
Parallel Deferred Update Handlers
To enable the parallel execution of deferred handlers, specify the mode in the OnAddSubsystem procedure of the InfobaseUpdate<ShortName> common module:
LongDesc.DeferredHandlersExecutionMode = "Parallel";To avoid revision of old deferred handlers, you can enable the parallel mode starting from a certain configuration version. Specify the version in the ParallelDeferredUpdateFromVersion property:
LongDesc.ParallelDeferredUpdateFromVersion = "2.3.3.20";Parallel deferred handlers have the following specific properties:
UpdateDataFillingProcedure(String). Contains the procedure that registers data the handler will have to update. Data is registered by theMarkForProcessingandMarkRecordersForProcessingprocedures of theInfobaseUpdatecommon module. Example:Procedure RegisterDataToProcessForMigrationToNewVersion(Parameters) Export Query = New Query; Query.Text = " ... "; Result = Query.Execute().Unload(); ReferencesArrray = Result.UnloadColumn("Ref"); InfobaseUpdate.MarkForProcessing(Parameters, ReferencesArrray); EndProcedureAdd the metadata objects to the
InfobaseUpdateexchange plan.CheckProcedure(String). Always set toInfobaseUpdate.DataUpdatedForNewApplicationVersion.ExecuteInMasterNodeOnly(Boolean). Set toTrueif the update handler must be executed only in the master DIB node. By default,False. Use when you need to generate new reference objects in the infobase. The data the update handler creates will be sent to subordinate nodes.RunAlsoInSubordinateDIBNodeWithFilters(Boolean). Set toTrueif the update handler must be executed only in a subordinate node with filters. By default,False. A subordinate node that receives filtered data might not have all the data an update handler requires. To avoid that, the master node processes the data and then sends it to the subordinate nodes. Before you run an update handler, you need to analyze the data it will read and update.ObjectsToRead(String). A comma-separated list of object names that the update handler will read.ObjectsToChange(String). A comma-separated list of object names that the update handler will modify. With propertiesObjectsToReadandObjectsToChange, you can find possible conflicts between handlers that need to read or modify the same objects.DeferredProcessingQueue(Number). 1C:Enterprise calculates the value automatically.Priorities(ValueTable). Calculated automatically. A table of dependencies between handlers that read or modify the same objects:Order(String). The handler execution order relative to another handler. Valid values:Before,After, orAny.Id(UUID). The ID of the associated procedure.Procedure(String). The full name of the associated procedure.
You can specify eitherProcedureorId.
Example:
Handler.ObjectsToRead = "Document.BuyerSOrder";
Handler.ObjectsToChange = "Document.BuyerSOrder";
Handler.ExecutionPriorities = InfobaseUpdate.HandlerExecutionPriorities();
Priority = Handler.ExecutionPriorities.Add();
Priority.Order = "Before";
Priority.Id = New UUID("b3be66c5-708d-42c8-a019-818036d09d06");
Priority.Procedure = "Documents.BuyerSOrder.ProcessDataForMigrationToNewVersion"
Fill the handler execution priorities only when automatically calculated priorities do not comply with the task you are solving:
- Update data by metadata types as follows:
- Constant
- Catalog
- ChartOfCharacteristicTypes
- ChartOfAccounts
- ChartOfCalculationTypes
- ExchangePlan
- BusinessProcess
- Task
- InformationRegister (independent)
- Document
- DocumentJournal
- InformationRegister (subordinate)
- AccumulationRegister
- CalculationRegister
- AccountingRegister
You can override these priorities in the
InfobaseUpdateOverridable.WhenPrioritizingMetadataTypesprocedure. For a specific metadata object, you can also set its own order different from its type order. - Assign an update order to each update handler. The order must be equal to the minimum update order of all types it modifies. For example, if a handler changes a catalog and a document at the same time, its update order will be equal to the catalog update order.
- Set the execution priorities as follows:
- When there is a reading or writing conflict between two handlers updating different metadata types, the handler that changes data with a smaller update order is executed first. So, it will start processing with constants, catalogs, a chart of characteristic types, and so on.
- When there is a conflict between two handlers updating data of the same type:
- Execute the one that changes readable data first.
- If both handlers modify each other's readable data, the order does not matter as the handlers modify data sets independent of each other. Otherwise, the execution order loops when the first handler waits for the second one, and the second handler waits for the first one.
- If you write the handler again, the order does not matter as you write either different data sets or different attributes in the same object. Otherwise, the handlers must be merged into one.
Example of a parallel deferred update handler:
Handler = Handlers.Add();
Handler.Version = "1.2.3.4";
Handler.Id = New UUID("b3be66c5-708d-42c8-a019-818036d09d06");
Handler.Procedure = "Documents.BuyerSOrder.ProcessDataForMigrationToNewVersion";
Handler.Comment = NStr("en = 'Populates new attribute ""Order status"" for the ""Demo: Sales order"" documents of previous periods.
    |Until processing is completed, ""Order status"" is displayed incorrectly.'");
Handler.ExecutionMode = "Deferred";
Handler.UpdateDataFillingProcedure = "Documents.BuyerSOrder.RegisterDataToProcessForMigrationToNewVersion";
Handler.ObjectsToRead      = "Document.BuyerSOrder";
Handler.ObjectsToChange    = "Document.BuyerSOrder";
Handler.CheckProcedure = "InfobaseUpdate.DataUpdatedForNewApplicationVersion";
Handler.ObjectsToLock   = "Document.BuyerSOrder";
The procedure specified in UpdateDataFillingProcedure takes a parameter of the Structure type that has the following fields:
SelectionParameters(Structure). Parameters used to select data for processing in multithreaded update handlers. Applicable only for multithreaded update handlers.WriteChangesForSubordinateDIBNodeWithFilters(FastInfosetRecord). A service parameter. Do not modify.NameOfChangedFile(String). A service parameter. Do not modify.Queue(Number). A service parameter. Do not modify.ReRegistration(Boolean). A service parameter. Do not modify.
Specify data selection parameters in the procedure specified in the UpdateDataFillingProcedure field. The SelectionParameters (Structure) field has the following structure:
FullNamesOfObjects(String). Comma-separated names of updatable objects.FullRegistersNames(String). Comma-separated names of registers.OrderingFieldsOnUserOperations(Array). Fields that define the handler order when user priority is enabled.OrderingFieldsOnProcessData(Array). Fields that define the handler order when data processing priority is enabled.SelectionMethod(String). The data selection method. Valid values are:InfobaseUpdate.SelectionMethodOfIndependentInfoRegistryMeasurements();InfobaseUpdate.RegisterRecordersSelectionMethod();InfobaseUpdate.RefsSelectionMethod().
OptimizeSelectionByPages(Boolean). If set toTrue, data is selected using multiple queries, same as in a dynamic list, when conditions are not combined with theORstatement. By default,True. If set toFalse, data is selected using a single query that combines all conditions with theORstatement. We recommend that you set the value toFalseonly if the query takes a long time and cannot be further optimized.
Execution Order of Deferred Parallel Update Handlers
Upon the deferred parallel update, all application data is processed evenly. However, some data might be more crucial to start operations. For example, catalogs and registers required to enter new documents are more crucial than archival period data. To speed up essential data processing and unlock the main application functions faster, sort data processing by significance.
To do this, define which handlers update important data. In the update handler description, set the Order property to Crucial, Normal, or Noncritical. If the order is not specified, it is set to Normal by default. Example:
Handler = Handlers.Add();
...
Handler.Order = Enums.OrderOfUpdateHandlers.Crucial;
Update handlers are grouped by the order. Less crucial data will not be processed until more crucial data is processed. For a more even area update in SaaS mode, it will happen when more important data is processed in all areas.
Divide the processing of deferred parallel handlers with the Normal order (for example, documents) into the processing of new data and archival data. New data will be processed along with other standard handlers. Archival data must be processed later. To do this, in the update data registration procedure, specify how to filter new data by filling the UpToDateData property in the Parameters parameter structure:
Procedure RegisterDataToProcessForMigrationToNewVersion(Parameters) Export
    ...
    UpToDateData = Parameters.UpToDateData;
    UpToDateData.FilterField = "Date";
    UpToDateData.ComparisonType = ComparisonType.Greater;
    UpToDateData.Value = Date("20220712");
    ...
EndProcedure
For the UpToDateData property description, see the UpToDateDataSelectionParameters procedure of the InfobaseUpdate common module.
Data that complies with the specified condition will be processed in the Normal order. The remaining data will be processed with the NonCriticalOnes order.
Multithreaded Update Handlers
We recommend that you multithread long-time running deferred parallel update handlers. To do this, specify the following parameters in the OnDefineSettings procedure of the InfobaseUpdateOverridable common module:
MultiThreadUpdate. Set toTrue.DefaultInfobaseUpdateThreadsCount. The number of update handlers that run concurrently. The recommended value must not exceed the probable number of processor cores in the 1C:Enterprise hosting server. Example:
Procedure OnDefineSettings(Parameters) Export

    Parameters.Insert("MultiThreadUpdate", True);
    Parameters.Insert("DefaultInfobaseUpdateThreadsCount", 8);
EndProcedure
If multithreading is enabled, the update handers will compete for server resources along with user sessions and scheduled jobs. That is why we recommend that before releasing a configuration version you first test the update on a life-like infobase that has the minimum supported version and with the number of threads set to 8.
To debug performance issues (timeout, lock timeout, and deadlocks), we recommend that you use the 1C:Enterprise configuration Performance Management Center.
Parallel Deferred Update Handlers for Distributed Infobases with Filters
Sometimes, you need to develop a deferred update handler for a configuration that will work as a distributed infobase (DIB) where the data to synchronize must meet certain criteria. For example, it is associated with a company or a warehouse. Such architecture is called DIB with filters.
In this mode, deferred update handlers are executed only in the master node. A subordinate node that receives filtered data might not have all the data an update handler requires. An exception is the handlers with flag RunAlsoInSubordinateDIBNodeWithFilters. Set this flag only when you are sure that the updatable data is standalone, that is, update handlers can correctly update the data in any of the distributed nodes.
Before the configuration update is pushed to subordinate nodes, users in these nodes might create new data entries. Then, the entries will be sent to the master node, which might lead to data conflicts as some entries have been updated and some have not. To avoid this, make sure that after synchronizing with all subordinate nodes, 1C:Enterprise runs all parallel deferred handlers in the master node to process the data received from subordinate nodes.
Please note that although 1C:Enterprise does not run deferred handlers in subordinate nodes, it runs the procedures that register the updatable data. This ensures that the data that is not yet updated will be locked for editing.
Update Handler Debugging
To debug an exclusive or real-time update handler, do the following:
- If the handler is version-specific:
- Open the
SubsystemsVersionsinformation register in Enterprise mode. To do so, find it in Functions for technician or press Shift+F11 and paste the linke1cib/list/InformationRegister.SubsystemsVersions. - Click More actions > Allow editing, and enter the previous configuration version.
- If the handler is a part of a library, you need to edit the version number for both the configuration and the library.
- Open the
- Open Designer and set a breakpoint in the handler.
- Start the configuration with the
/C DebugModestartup parameter.
Use the same debug workflow for deferred handlers that update file-based infobases. For deferred handlers that update client/server infobases, do the following:
- Follow all the steps mentioned earlier.
- Open Application update result. To do that, go to Administration > Support and service > Application update > Update results and additional data processing. Alternatively, press Shift+F11 and paste the link
e1cib/app/DataProcessor.ApplicationUpdateResult. Then, go to Additional data processing procedures. - Next to the handler, click Run procedure. Or at the form bottom, click Start.
If deferred update handlers complete processing before you click Run procedure, before running the handlers, lock scheduled jobs first.
During the debugging, you can set the update handler version to DebuggingTheHandler:
Handler = Handlers.Add();
Handler.Version = "DebuggingTheHandler";
Handler.ExecutionMode = "Seamless";
Handler.Procedure = "UsersInternal.MoveDesignerPasswordLengthAndComplexitySettings";
If you do so, 1C:Enterprise will run this handler during every update. To debug the handler, start the application with the StartInfobaseUpdate startup parameter. Set the value to DebuggingTheHandler when you do not know the handler version before you push the handler into the master branch.
Note.
Besides setting the SubsystemsVersions information register to an older version, you can set the Version property to a newer version.
For more information about the StartInfobaseUpdate startup parameter, see Appendix 2. Application startup parameters.
Monitoring Data Processing Loop
Deferred update handlers are called repeatedly and select data in portions. If already updated data is selected again due to a query error or the handler loops for another reason, the infobase update stops with the following message:
The maximum number of update attempts is exceeded.
Update handler loop errors are controlled automatically in the following ways:
- Control the maximum number of handler procedure startups.
The maximum number of update handler startups is 10,000. However, it can be automatically increased for multithreaded handlers with a lot of threads. It prevents the handler from trying to process the same data repeatedly. For example, this happens due to a query error of a sequential deferred update handler.
- Control handler nonprocess runs.
After each handler is executed, the application checks whether any data has been processed. If no data has been processed, the number of startup attempts increases. After three nonprocess runs, the handler is considered looped. Its status changes to
Error. The limit of three attempts can be automatically increased if the handler is multithreaded.
You cannot control loops for exclusive and real-time update handlers. They are not executed in portions within a single handler procedure call. If such handlers loop, the infobase update freezes.
On-the-Fly Patch Update
When you develop patch releases, we recommend that they support on-the-fly update. So that 1C:Enterprise would not have to terminate user sessions to install the update. An on-the-fly patch release must comply with the following requirements:
- It introduces minor changes that do not require infobase data restructure.
- Its update handlers do not require to be run in the exclusive mode.
- It introduces changes that do not require mandatory SSL update handlers.
For required update handlers (Version is set to an asterisk (*)), you can programmatically determine that 1C:Enterprise must run a handler exclusively. To do this, set the ExclusiveMode property to True. If you do so, then:
- 1C:Enterprise calls the handler two times, passes the
Parametersparameter (Structuretype) that has theExclusiveModeproperty (Booleantype). - At the first (test) call, the handler's property
ExclusiveModeis set toFalse. During the test runtime, the handler does not modify the infobase data. - If the handler needs to modify the infobase, it changes the value to
Trueand stops. - At the second call, the
ExclusiveModeproperty isTrue. During this runtime, the handler can modify the infobase. Also, it ignores if theExclusiveModeproperty value changes.
Real-time update handler design must ensure data integrity. If more than one piece of data changes, the handlers must set an exclusive lock and write data in a transaction.
As an example of a deferred update handler with the exclusive mode check, see the AlwaysExecuteOnVersionChange procedure of the _DemoInfobaseUpdateSSL common module in the demo configuration.
To ensure that the real-time handler will be able to update the configuration, first dynamically update the database configuration in a 1C:Enterprise session, and then start an administrator session. To do this:
- Install the older version of the configuration.
- Start a user session.
- Open the infobase in Designer and press F7.
- Make sure that Designer prompts you to install a dynamic update. Otherwise, see Issue #1 below.
- Install the dynamic update, and press F5 to start an administrator session.
- Make sure that the session starts without errors and you see the release notes dialog. If errors occur, see Issue #2 below.
Issue #1. Dynamic update failure
To troubleshoot the issue, do the following:
- Terminate the user session started in step 2, and press F7.
- You will see the list of configuration objects that prevent it from the dynamic update.
For advanced troubleshooting, the developers can compare the two configuration versions to find out what leads to the update failure.
Issue 2. Administrator login error
Among others, update handlers can cause the following errors:
- Cannot update the infobase:
- Cannot set exclusive mode.
- Configuration update requires exclusive mode.
This error can be interpreted in one of the following ways:
- Some of the update handlers require the exclusive mode to work correctly.
- Some of the configuration changes need required SSL update handlers (
Versionis set to an asterisk (*)).
For more information about the error, debug the configuration. Alternatively, if the Log update details flag is set, you can find error details in the Event log.
Configuration Upgrade
Besides updates, the subsystem supports configuration upgrades. For example, you can upgrade a configuration to the PRO or CORP version, or to another version that changes the configuration name. If you add new subsystems, exclusive and real-time initial population handles will run automatically.
To upgrade a configuration, define the following handlers in the OnAddApplicationMigrationHandlers procedure (which belongs to the common module specified in the ConfigurationSubsystemsOverridable.OnAddSubsystems):
Handler = Handlers.Add();
Handler.PreviousConfigurationName = "TradeManagement";
Handler.SharedData = False;
Handler.Procedure = "MEMUpdate.FillAccountingPolicy";
To fork the upgrade depending on the source configuration version, use the handler function IBVersion of the InfobaseUpdate common module.
To migrate from another configuration in SaaS mode, set the SharedData = True property to migration handlers for shared data handlers. If the handler updates separated data, do not specify this property.
Aa an example, see the _DemoInfobaseUpdateSSL common module.
Update Handlers in SaaS
The update workflow for SaaS configurations consists of two steps:
- Update shared data. If required, you can lock the infobase (start it in exclusive mode). Update steps:
- Run handlers with
SharedData = True. - Lock all data areas.
- Add update handlers with
SharedData = Falseto the job queue.
- Run handlers with
- Update separated data in all data areas. It is done by the job queue mechanism. Data areas are locked if required. Please consider the following:
- 1C:Enterprise skips the required update handlers (
Versionis set to an asterisk (*)) when it updates the existing data areas. To start these handlers, re-register them in a shared data update handler whose propertyHandlerManagementis set toTrue. - To prepare separated data, 1C:Enterprise always starts the required update handlers.
- 1C:Enterprise skips the required update handlers (
SaaS update handlers have the following specific properties:
SharedData(Boolean). IfTrue, 1C:Enterprise runs the update handler in a shared session before it runs separated data update handler withSharedData = False. Such handler can process only shared data. The property is applicable only for exclusive and real-time handlers.If you set this property toTruefor a deferred handler, an exception will be raised.By default,False.HandlerManagement(Boolean). IfTrue, 1C:Enterprise passes an additional parameter of theStructuretype with theSeparatedHandlersproperty to the update handler. The property contains a table to which you need to add separated data handlers (as well as to the mainHandlerstable). By default,False.
An example of a shared bank classifier update handler:
Handler = Handlers.Add();
Handler.Version = "1.2.3.4";
Handler.Procedure = "BankClassifier.FillTIN";
Handler.SharedData = True;
Update Handlers in Customized Configurations
Sometimes, you need to add custom documents and catalogs to a standard configuration. To update them, you will have to develop custom update handlers. To do that, follow the best practice described below.
Consider the original configuration as a library, which has a version number and built-in update handlers, and the customized configuration as an application with its own versions and a name, and that contains the library.
For example, standard configuration EnterpriseAccountingCORP has configuration details described in the OnAddSubsystems procedure of the ConfigurationSubsystemsOverridable:
SubsystemsModules.Add("InfobaseUpdateEA");The configuration contains the name and version in the OnAddSubsystem procedure of the InfobaseUpdateEA common module:
 LongDesc.Name = "EnterpriseAccountingCORP";
 LongDesc.Version = "3.0.38.31";
In this case, you can safely change the configuration name, synonym, and version numbers to the custom ones. For example, EnterpriseAccountingCORP_CRM. Create a common module and name it in the following format: InfobaseUpdate<ShortName>. For example, InfobaseUpdateCRM. Then, append it to the end of the OnAddSubsystems procedure of the ConfigurationSubsystemsOverridable common module:
SubsystemsModules.Add("InfobaseUpdateCRM");In the OnAddSubsystem procedure of the InfobaseUpdateCRM common module, add the name of the customized configuration, its version, and its dependence on the standard configuration. For example:
LongDesc.Name = "EnterpriseAccountingCORP_CRM";
LongDesc.Version = "1.0.1.1";
LongDesc.RequiredSubsystems1.Add("EnterpriseAccountingCORP");
Add customized configuration update handlers to the module, and adjust their versions to the configuration version numbering: "1.0.0.2", ...
Every time you update the standard configuration, you have to increment the customized configuration version number as well, to make sure that all update handlers will be executed.
For more information about modules ConfigurationSubsystemsOverridable and InfobaseUpdate<ShortName>, see Prerequisites.
Clear Obsolete Data
When you develop configurations, you need to periodically replace obsolete objects (catalogs, documents, and so on) with new ones. According to the Removing obsolete metadata objects from configuration standard, the procedure involves the following steps:
- Adding the
Obsoleteprefix to an obsolete object name and creating an update handler to transfer data from the obsolete object to a new one (version 1). - Creating an obsolete data cleanup handler later (for example, in a year) if the data is not cleared upon the data transfer (version 2).
- Deleting metadata objects from the configuration (version 3).
When you develop data cleanup handlers, consider all registers that include obsolete reference objects to be deleted. For example, these objects may be included in library type collections used in register dimensions. This is required to avoid the Register records are no longer unique restructuring error.
To easily clear any obsolete objects and to clear used registers of records whose dimensions contain obsolete object type values, use the OnPopulateObjectsPlannedForDeletion procedure of the InfobaseUpdateOverridable common module. In this procedure, specify objects with the Obsolete prefix. For example:
Procedure OnPopulateObjectsPlannedForDeletion(Objects) Export
    InfobaseUpdate.AddObjectPlannedForDeletion(Objects,
        "Document.DeleteArbitraryED");
    InfobaseUpdate.AddObjectPlannedForDeletion(Objects,
        "Enum.BusinessTransactions.DeleteWriteOffGoodsTransferredToPartners");
EndProcedure
To reduce the database size, you can clear any table of an obsolete metadata object before migrating to version 3. To do it, specify the third parameter True:
    InfobaseUpdate.AddObjectPlannedForDeletion(Objects,
        "Document.DeleteArbitraryED", True);
Note that quick restructuring cleanup (in version 3) is more efficient for reference objects than per-item deletion. Therefore, we do not recommend that you set this flag for reference objects.
Besides obsolete objects with the Obsolete prefix, you can specify redundant types in register dimensions. This is useful, for example, for libraries. If register records contain references of the specified types, these records will be deleted. For example:
    InfobaseUpdate.AddObjectPlannedForDeletion(Objects,
        "InformationRegister.ObjectsVersions.Object"
        New TypeDescription("DocumentRef.Questionnaire"));
See also an example in the OnPopulateObjectsPlannedForDeletion procedure of the AccessManagementInternal common module.
Note that records of registers subordinate to the recorder are deleted for the entire recorder if at least one of their dimensions contains a reference of the specified redundant type.
The Clear obsolete data scheduled job performs the cleanup. The job starts automatically once the deferred update handlers are completed and stops after the cleanup is finished. The administrator can also perform the cleanup manually using the Clear obsolete data form. To open the form, go to Administration > Support and service > Application update.
To find out how often to release required transition versions, see the Ensuring library compatibility standard.
In required transition versions, deleting obsolete objects is similar to the conveyor system. For example, the first version: the data of obsolete object 1 is transferred to new object 1. The second version: obsolete object 1 is cleared; the data of obsolete object 2 is transferred to new object 2. The third version: obsolete object 1 is deleted; obsolete object 2 is cleared; the data of obsolete object 3 is transferred to new object 3, and so on.
Data Exchange Setup
For distributed infobases (DIB) and standalone workstations, add to the exchange plans all the subsystem's metadata objects except for the following:
- Constant
InfobaseUpdateThreadCount - Information register
SharedDataUpdateHandlers - Information register
UpdateThreads
For DIBs and standalone workstations, disable in the exchange plans change registration for the following subsystem's metadata objects (see Creation of Subordinate Node Initial Image):
- Constant
WriteIBUpdateDetailsToEventLog - Constant
IBUpdateInfo - Constant
DeferredUpdateCompletedSuccessfully - Constant
LockedObjectsInfo - Information register
SubsystemsVersions - Information register
UpdateHandlers - Information register
UpdateProgress
Exclude the following metadata objects from the exchange plans used for data synchronization between different applications:
- Constant
WriteIBUpdateDetailsToEventLog - Constant
InfobaseUpdateThreadCount - Constant
IBUpdateInfo - Information register
SubsystemsVersions - Information register
UpdateHandlers - Information register
SharedDataUpdateHandlers - Information register
UpdateThreads - Information register
UpdateProgress
Configuration Update
With the Configuration update subsystem, you can schedule configuration update and patch installation in 1C:Enterprise mode.
If the configuration has metadata object modification enabled, do not use this subsystem. Instead, update the configuration in Designer mode.
There are two ways you can update a configuration: from the main configuration (it will replace the database configuration) or from a CFU or CF file. For file-based configurations, you can install an update on the go or before exiting the application. For client/server configurations, you can schedule an update and get the update result details by email.
You can install patches while installing an update, or install them separately. If you install patches separately, they come into effect when active users restart the session. When a configuration is updated, 1C:Enterprise deletes obsolete patches automatically.
If the configuration contains the Application update subsystem of Online Support Library, you can search and install updates and patches on the Internet.
To update a configuration, 1C:Enterprise performs the following steps:
- Prevents the start of new user sessions and disconnects the active user sessions.
- Creates a backup. Not applicable to client/server configurations.
- Imports the configuration from the file. Not applicable if the update file is already imported into the main configuration.
- Updates the database configuration.
- Installs the patches.
- Runs the update handlers.
- Compresses infobase tables. Applicable only to file-based configurations.
- Allows new connections.
- Restarts the session. Applicable for the "on-the-go" installation only.
Notice.
The subsystem does not support the web client.
Subsystem Setup
If a configuration contains this subsystem, add the InstallUpdates data processor and InstalledPatches common form to the command interface.
User Access Setup
To manage user access to the subsystem, assign a user the roles specified in the table below.
| # | Role Description |
|---|---|
| 1. | SystemAdministrator (the Core subsystem user role)Grants the right to update the infobase configuration. |
Note.
External users do not have access to this subsystem. For more information, see Users.
Data Exchange Setup
Do not add the subsystem's objects to exchange plans of distributed infobases and standalone workstations or to exchange plans used for data synchronization between different applications. The subsystem can operate only in one node. So, subsystem data in different nodes must be stored independently.
Conversations
With the Conversations subsystem, you can connect and customize 1C:Dialog online service or the local collaboration system server. Users of this subsystem can communicate with each other online, create topic conversations, and correspond on specific documents, such as orders, sales, or counterparties. You can also add chats from messengers and social networks to the application to communicate with customers, counterparties, and other external contact persons in the application. For more information, see the Documentation.
Subsystem Setup
If the configuration does not contain the Application settings subsystem, add the following metadata objects to the administrator's command interface:
- Data processor
EnableDiscussions - Commands
DisableDiscussionsandSettingsOfMessagesFromOtherApplicationsof data processorEnableDiscussions
User Access Setup
To manage user access to the subsystem, assign a user the role specified in the table below.
| # | Role Description |
|---|---|
| 1. | FullAccess (the Core subsystem user role)Grants the right to enable and disable conversations, configure receiving and sending messages from messengers and social networks. |
No additional roles are required for topic conversations. For context conversations about specific objects, you need a role for viewing the objects.
How to Use the Subsystem in Development
Data Exchange Setup
The subsystem does not participate in data exchange. Conversations are stored in 1C:Dialog service or in the local collaboration system server.
Text Messaging
With the Text messaging subsystem, you can send text messages to users via SMS. To send a text message, you need to sign a contract with any service provider supported by the subsystem. The list of supported service providers can be expanded upon integration.
Subsystem Setup
If the configuration does not contain the Application settings subsystem, add the OutboundSMSSettings common form to the administrator's command interface. As an example, see the Organizer form of the SSLAdministrationPanel data processor in the demo configuration.
Expanding the List of Supported Sms Providers
To expand the list of supported providers:
- Add a provider to the
SMSProvidersenumeration. - Implement your logic in the
SendSMSandDeliveryStatusprocedures of theSendSMSMessageOverridablecommon module and in theOnGetProviderInternetAddressprocedure of theSendSMSMessageClientOverridablecommon module.
Example:
Procedure SendSMS(SendOptions, Result) Export
    If SendOptions.Provider = Enums.SMSProviders._DemoAnotherProvider Then
        // Sending a text message via provider _DemoAnotherProvider
        // ...
    EndIf;
EndProcedure
Procedure DeliveryStatus(MessageID, Provider, Login, Password, Result) Export
    If Provider = Enums.SMSProviders._DemoAnotherProvider Then
        // Checking a text message status via provider _DemoAnotherProvider
        // ...
    EndIf;
EndProcedure
Procedure OnGetProviderInternetAddress(Provider, InternetAddress) Export

    If Provider = PredefinedValue("Enum.SMSProviders._DemoAnotherProvider") Then
        InternetAddress = "http://yandex.ru/search/?text=bulk campaign%20sms";
    EndIf;

EndProcedure
User Access Setup
| # | Role Description |
|---|---|
| 1. | FullAccess (the Core subsystem user role)Grants the right to send a text message and request a delivery status. |
| 2. | SendSMSMessageGrants the right to send a text message and request a delivery status. |
How to Use the Subsystem in Development
See the subsystem API description in the API documentation (in Russian).
Data Exchange Setup
For distributed infobases (DIB) and standalone workstations, add to the exchange plans all the subsystem's metadata objects that contain data.
Document Record History
With the Document record history subsystem, you can view records of arbitrary documents. Such documents register events recorded by them in information, accumulation, accounting, and calculation registers upon posting. To use the subsystem, integrate the Report options and Attachable commands subsystems into a configuration.
Subsystem Setup
Select one of the following subsystem integration options: full (recommended) or custom.
For the first option, you only need to integrate the Attachable commands subsystem for all configuration documents at once. The Document register records report will be automatically displayed in the Reports submenu for the documents in whose metadata the Posting collection is filled in. The report will not be displayed for documents that do not generate records.
For the custom integration, choose documents whose records you want to view using the report. Attach the report to all documents in whose metadata the Posting collection is filled in. Then attach the Attachable commands subsystem to the selected documents and add documents to display the report to the BeforeAddReportCommands procedure of the ReportsOptionsOverridable common module:
Procedure BeforeAddReportCommands(ReportsCommands, Parameters, StandardProcessing) Export
    DocumentsWithRecordsReport = New Array;
    DocumentsWithRecordsReport.Add(Metadata.Documents._DemoPayrollAccrual);
    DocumentsWithRecordsReport.Add(Metadata.Documents._DemoGoodsReceipt);
    DocumentsWithRecordsReport.Add(Metadata.Documents._DemoGoodsSales);
    Reports.DocumentRegisterRecords.AddDocumentRecordsReportCommand(ReportsCommands, Parameters,     DocumentsWithRecordsReport);
EndProcedure
User Access Setup
| # | Role Description |
|---|---|
| 1. | FullAccess (the Core subsystem user role)Grants the right to view document record history. |
How to Use the Subsystem in Development
Data Exchange Setup
The subsystem does not participate in data exchange.
Performance Monitor
With the Performance monitor subsystem, you can measure the overall application performance using the APDEX method.
Subsystem Setup
To set up the Performance monitor subsystem to collect samples, select the key operations whose execution time you need to measure and track.
Key operations are the operations during whose execution a user continuously expects a response from the information system. For example, posting a document, recording a catalog, importing data, and so on. Key operations cannot include interactive user actions.
Long-running key operations are key operations whose execution time depends on the quantity of data to process. For example, when it comes to processing several documents. Processing a document can take some time, but processing 1,000 documents will take more time than processing 10 documents. In this case, when performing a key operation you need to pay attention to the processing time of one document, not the processing time of all documents. Sometimes a long-running key operation can be executed in several steps. Some steps might depend on the volume of data being processed. In this case, you need to record the execution time for each step so that you can easily determine exactly where the issue occurred.
Key operations are set by names. The infobase administrator must set up the priority and response time threshold of key operations after the samples are collected in the infobase. Setting the priority and response time threshold of key operations is optional. The setup is required to analyze samples.
To analyze samples, use the PerformanceMonitor report. Since there can be numerous key operations, for analysis purposes it is convenient to combine required key operations into groups using the KeyOperationProfiles catalog. In the same catalog, set up the response time threshold and priority that will be considered to build a report.
You can automatically estimate the response time threshold for a key operation from the list or item form of the KeyOperations catalog. This tool allows you to determine the response time threshold by the known APDEX score. To do this, you must specify a key operation, a period for receiving data, and an estimated APDEX in the selection form of response time threshold.
In the configuration code, in the places where key operations are performed, insert calls to the Performance monitor subsystem to measure their execution time. In this case, the key operation name is specified as a parameter of the procedures for starting or ending a time measurement.
The Performance monitor subsystem supports five time measurement scenarios:
- You can start measurement on the client and automatically stop it on the client. In addition, before the measurement stops, you can programmatically define the key operation name, an error during execution, and the time measurement comment if they were not known yet when the measurement started.
- You can start measurement on the server and explicitly stop it on the server at the developer's discretion.
- You can start measurement on the client and explicitly stop it on the client at the developer's discretion. In addition, before the measurement stops, you can programmatically define the key operation name, an error during execution, and the time measurement comment if they were not known yet when the measurement started.
- You can start the measurement of a long-running key operation on the client and explicitly stop it on the client. In this case, you need to record the execution of each step and specify the data quantity.
- You can start the measurement of a long-running key operation on the server and explicitly stop it on the server. In this case, you need to record the execution of each step and specify the data quantity.
To measure a key operation using scenarios 1 and 3, call the TimeMeasurement(Undefined) function of the PerformanceMonitorClient common module that will return the measurement UUID.
- If the
AutoCompletionfunction parameter =True, the time measurement will be completed automatically. If theAutoCompletionfunction parameter =False, to complete the time measurement, call theStopTimeMeasurement(MeasurementUUID)procedure of thePerformanceMonitorClientcommon module, whereMeasurementUUIDis the UUID returned by theStartTimeMeasurementfunction. - If the
RecordWithErrorfunction parameter =True, the time measurement will be written with theCompletedWithError=Trueflag. It is especially useful ifAutoCompletion=Truewhen you measure the posting time of a document to automatically divide the measurements into correct and wrong. For example, if the document was filled in incorrectly. At the end of such measurement, you need to explicitly clear the error flag by explicitly calling theStopTimeMeasurement(MeasurementUUID, False)procedure or theSetMeasurementErrorFlag(MeasurementUUID, False)procedure. - If
KeyOperation=Undefined, you must set the key operation name before the measurement is automatically completed by calling theSetMeasurementKeyOperation(MeasurementUUID, KeyOperation)procedure of thePerformanceMonitorClientcommon module. - If the developer does not set the key operation name before the automatic measurement is completed, after the automatic completion this measurement will be deleted from the client buffer and will not be written to the information register.
To measure a key operation using scenario 2, call the StartTimeMeasurement function of the PerformanceMonitor common module. To end the time measurement, call the EndTimeMeasurement function of the PerformanceMonitor common module.
To measure a key operation using scenarios 4 and 5, call the StartTimeConsumingOperationMeasurement(KeyOperationName) function of the PerformanceMonitorClient or PerformanceMonitor common module that will return the measurement details containing measurement data.
- To record a step, call the
FixTimeConsumingOperationMeasure(MeasurementDetails, DataVolume, StepName)procedure. If you callFixTimeConsumingOperationMeasureagain with the same step name, the data will be added to the result of the previous step recording. - To complete the measurement, call the
EndTimeConsumingOperationMeasurement(MeasurementDetails, DataVolume, StepName)procedure. This procedure ends the measurement and records the measurement collection: full, specific, and for each step. For specific measurement and measurement of operation steps, time is recorded as the ratio of the time spent on a step to the quantity of processed data. Step names are generated as follows:KeyOperationName.StepName.
An example of time measurement of document posting on the client dividing measurements of correct posting and posting with an exception (scenario 1):
// The _DemoSalesOrder document form module.
&AtClient
Var PostingMeasurementID, PostingMeasurementIDErrorRegistrationNotRequired;
&AtClient
Procedure BeforeWrite(Cancel, WriteParameters)
    If WriteParameters.WriteMode = DocumentWriteMode.Posting Then
        PostingMeasurementID = PerformanceMonitorClient.TimeMeasurement("_DemoDocumentPosting");
        PostingMeasurementIDErrorRegistrationNotRequired = PerformanceMonitorClient.TimeMeasurement();
    EndIf;
    // Followed by the text of the form handler -->>
EndProcedure
&AtClient
Procedure AfterWrite(WriteParameters)

    PerformanceMonitorClient.SetMeasurementErrorFlag(PostingMeasurementID, False);

    PerformanceMonitorClient.SetMeasurementKeyOperation(PostingMeasurementIDErrorRegistrationNotRequired, "_DemoDocumentPostingErrorRegistrationNotRequired");

    // Followed by the text of the form handler -->>

EndProcedure
As an example of scenario 1, see the _DemoPayrollAccrual document form in the demo configuration.
An example of time measurement of a scheduled job (scenario 2):
// Procedure processing the data export scheduled job.
Procedure PerformanceMonitorDataExport(DirectoriesForExport) Export

    StartDate = PerformanceMonitor.StartTimeMeasurement();
    // Followed by the scheduled job execution text -->>

    PerformanceMonitor.EndTimeMeasurement("PerformanceMonitorDataExport", StartDate);

EndProcedure
An example of time measurement of a long-running operation on the client—generating a report in the background job (scenario 3):
&AtClient
Var MeasurementID, BackgroundJobUUID;
&AtClient
Procedure GenerateReport()
    MeasurementID = PerformanceMonitorClient.TimeMeasurement("SalesReport", False, False);
    // Followed by the text to start the report generation on the server in the background job -->>
EndProcedure

&AtClient
Procedure AfterGenerate(Result, GenerationParameters) Export
    // Code with the check result of the background job that generated the report is located here -->>
    PerformanceMonitorClient.StopTimeMeasurement(MeasurementID);
EndProcedure
As an example of scenario 3, see the ReportForm common form in the demo configuration.
An example of the time measurement of a long-running operation on the client—creating catalog items in the background job (scenarios 4 and 5):
Procedure ExecuteAction(Parameters, ResultAddress) Export

    MeasurementDetails = PerformanceMonitor.StartTimeConsumingOperationMeasurement("DemoTimeConsumingOperationMeasurement1");
    CounterpartiesCount = Parameters.CounterpartiesCount;
    CounterpartyBankAccountCount = Parameters.CounterpartyBankAccountCount;
    DeleteCreatedObjects = Parameters.DeleteCreatedObjects;

    NameOfTheCounterparty = NStr("en = 'Counterparty %1'");
    NameOfAccount = NStr("en = 'Bank account of the %1 counterparty'");
    ObjectsArray = New Array;

    BeginTransaction();
    Try
        For CounterpartyCounter = 1 To CounterpartiesCount Do
            CounterpartyObject = Catalogs._DemoCounterparties.CreateElement();

            CounterpartyObject.Description = StringFunctionsClientServer.SubstituteParametersToString(NameOfTheCounterparty, Format(CounterpartyCounter, "NG="));
            CounterpartyObject.Write();
            PerformanceMonitor.FixTimeConsumingOperationMeasure(MeasurementDetails, 1, "CounterpartyRecord");
            ObjectsArray.Add(CounterpartyObject.Ref);
            For AccountCounter = 1 To CounterpartyBankAccountCount Do
                ObjectAccount = Catalogs._DemoBankAccounts.CreateElement();
                ObjectAccount.Owner = CounterpartyObject.Ref;
                ObjectAccount.Description = StringFunctionsClientServer.SubstituteParametersToString(NameOfAccount, Format(CounterpartyCounter, "NG="));
                ObjectAccount.Write();
                PerformanceMonitor.FixTimeConsumingOperationMeasure(MeasurementDetails, 1, "WriteBankAccount");
            EndDo;
        EndDo;
        CommitTransaction();
    Except
        RollbackTransaction();
    EndTry;

    If DeleteCreatedObjects Then
        For Each Item In ObjectsArray Do
            ObjectElement = Item.GetObject();
            ObjectElement.Delete();
        EndDo;
    EndIf;
    PerformanceMonitor.EndTimeConsumingOperationMeasurement(MeasurementDetails, ObjectsArray.Count(), "DeleteCounterparties");

EndProcedure
As an example, see the _DemoTimeConsumingOperationMeasurement data processor manager module in the demo configuration.
Some executed client measurements might be lost upon closing the user session. It happens as client measurements are stored on the client and transferred to the server periodically to minimize client/server calls. The frequency of calls is set by the PerformanceMonitorRecordPeriod constant (by default once per minute).
Command Interface Setup
Add the RunPerformanceMeasurements constant and the PerformanceMonitor data processor to the command interface of a user responsible for the performance monitor. See an example in the Performance monitor group of the SupportAndService form of the SSLAdministrationPanel data processor.
To make the system automatically start collecting samples, set the RunPerformanceMeasurements constant to True in the handler procedure of infobase update and initial population.
User Access Setup
Roles used for the subsystem:
| # | Role Description |
|---|---|
| 1. | PerformanceSetupAndMonitoringGrants the right to analyze the key operation performance measurements in the application. |
How to Use the Subsystem in Development
Data Exchange Setup
Do not add the subsystem's objects to exchange plans used for data synchronization between different applications or to exchange plans of distributed infobases and standalone workstations. In general, equipment configurations and performance requirements are different in each node. Key operation performance measurements are stored independently.
However, if all distributed infobase nodes have the same equipment configurations and performance requirements, include all subsystem objects that contain data in exchange plans.
Print Tools
With the Print tools subsystem, you can generate print forms of objects based on spreadsheet templates (MXL format) or office document templates in the Office Open XML format (docx).
The subsystem allows you to edit spreadsheet templates of print forms and Office Open XML templates (DOCX). In the subsystem, you can display print commands on forms in the Print submenu and preview print forms. The subsystem also provides various service options to save print forms to files, send them by email, and generate QR code images. Also, the subsystem provides an API to generate print forms based on the built-in template.
If a configuration contains the National language support subsystem, users can translate templates and generate print forms in different languages.
Subsystem Setup
Select configuration objects (catalogs, documents, an so on) to be printed and the format of print forms. Create print commands by developing a descriptive part and the print form generation logic. Make changes to the modules of forms where you plan to add print commands.
The descriptive part is placed in the AddPrintCommands procedure. The logic of print form generation depends on the print form format. You can choose either of the following:
- Generate a print form as a spreadsheet document that you can preview or send directly to printer.
- Generate a set of spreadsheet documents that you can preview or send directly to printer.
- Generate print forms with an interactive request of additional parameters from the user.
- Output a spreadsheet document to one of the popular formats (such as Office Open XML, Microsoft Excel, Adobe PDF, HTML, or text document).
- Generate a print form as an office document in Office Open XML format (when spreadsheet template is not enough).
Attaching Configuration Objects
Select configuration objects the print commands are developed for and the forms to display them.
- Specify configuration objects that provide print commands in the
OnDefinePrintSettingsprocedure of thePrintManagementOverridablecommon module. Example:Procedure OnDefinePrintSettings(Settings) Export Settings.PrintObjects.Add(Catalogs._DemoCompanies); Settings.PrintObjects.Add(Documents._DemoCustomerProformaInvoice); EndProcedure - In the manager module of each object, in the
Publicarea, define theOnDefinePrintSettingsandAddPrintCommandsprocedures as follows:
    #Region Public
    // Overrides print settings for an object.
    //
    // Parameters:
    //  Settings - see PrintManagement.ObjectPrintingSettings.
    //
    Procedure OnDefinePrintSettings(Settings) Export
           Settings.OnAddPrintCommands = True;
    EndProcedure

    // Populates a list of print commands.
    //
    // Parameters:
    //   PrintCommands - see PrintManagement.CreatePrintCommandsCollection
    //
    Procedure AddPrintCommands (PrintCommands) Export

    EndProcedure
#EndRegion- In forms of the specified objects where you want to display the submenu with print commands, do the following:
- Add the Attachable Commands subsystem.
- Optional. To optimize performance when opening the form, we recommend adding a submenu with print commands to the command bar as follows:
- Name:
PrintSubmenu. - Title:
Print. - Type:
Submenu. - Representation:
Picture. - Picture:
Print(standard picture).
To display numerous commands (more than 10) in this submenu, add nested button groups with the following suffixes:Important,Standard, andSeeAlso. For example:SubmenuPrintImportant,SubmenuPrintStandard, andSubmenuPrintSeeAlso. These group suffixes are specified in theImportanceproperty of the commands to be displayed in these groups (for more information about this property, see the Print command parameters table below).
In forms of document journals, the Print submenu is automatically populated with commands from documents included in the journal. In cases where print commands need to be specified directly in the document journal manager module, add the following code in the OnGetPrintCommandListSettings procedure of the PrintManagementOverridable common module:
    // Additional settings of a print command list.
    //
    // Parameters:
    //  ListSettings - Structure - print command list modifiers.
    //   * PrintCommandsManager     - ObjectManager - an object manager where a list of print commands is generated.
    //   * AutoFilling - Boolean - populate print commands from the journal objects.
    //                                         By default, True.
    //
    Procedure OnGetPrintCommandListSettings(ListSettings) Export

        If ListSettings.PrintCommandsManager = DocumentJournals._DemoWarehouseDocuments Then
            ListSettings.AutoFilling = False;
        EndIf;

    EndProcedure
Developing Print Commands
Then you need to develop a descriptive part. To do this, list print commands for each object in the AddPrintCommands procedure and specify the presentation, ID, and other parameters. For more information, see the table below. Example:
// Proforma invoice.
PrintCommand = PrintCommands.Add();
PrintCommand.PrintManager = "Document._DemoCustomerProformaInvoice";
PrintCommand.Id = "InvoiceOrder";
PrintCommand.Presentation = NStr("en = 'Proforma invoice'");
PrintCommand.CheckPostingBeforePrint = True;
Print command parameters:
| Parameter | Type | Details |
|---|---|---|
Id (required) |
String or Array |
A print command ID. The print manager uses this ID to determine the print form to generate. For example:PrintCommand.Id = "InvoiceOrder"; To print multiple print forms, specify all their IDs (as a comma-delimited string or an array of strings). For example:PrintCommand.Id = "InvoiceOrder,LetterOfGuarantee"; To make multiple copies of a print form, repeat its ID as many times as the number of copies you need. Note. The order of print forms in a set repeats the order of IDs specified in this parameter. For example, to print 2 proforma invoices and 1 letter of guarantee:PrintCommand.Id = "InvoiceOrder,InvoiceOrder,LetterOfGuarantee"; A print form ID can contain an alternative print manager if it is different from the print manager specified in the PrintManager parameter.For example: PrintCommand.Id = "InvoiceOrder,DataProcessor._DemoPrintForm.LetterOfGuarantee"; In this example, LetterOfGuarantee is generated in print manager DataProcessor._DemoPrintForm, and InvoiceOrder is generated in the print manager specified in the PrintManager parameter.For example: "Document._DemoCustomerProformaInvoice.PF_MXL_ProformaInvoice". For print forms whose print manager is the PrintManagement common module, set the full template path as its ID. |
Presentation (required) |
String |
A command presentation in the Print menu. For example:PrintCommand.Presentation = NStr("en = 'Proforma invoice'"); |
PrintManager (optional) |
String |
Name of the object whose manager module contains the Print procedure that generates spreadsheet documents for this command.For example: PrintCommand.PrintManager = "Document._DemoCustomerProformaInvoice";If the print form is generated automatically from the print data and a template, specify the PrintManagement common module in the parameter. |
PrintObjectsTypes (optional) |
Array |
The list of object types the print command is intended for. The parameter is used for print commands in document journals that require checking the passed object type before calling the print manager. If the list is empty, whenever the list of print commands is automatically generated in a document journal, it is populated with the type of an object the print command was imported from. |
Handler (optional) |
String |
The client command handler to be executed instead of the standard print command handler. It is used, for example, when the print form is generated on the client. The <CommonModuleName><ProcedureName> format is used when the procedure is placed in a common module.The <ProcedureName> format is used when the procedure is placed in the main form module of a report or a data processor specified in PrintManager.For example: PrintCommand.Handler = "_DemoStandardSubsystemsClient.PrintCustomerProformaInvoices";An example of handler in the form module: // Generates the <print form presentation> print form.Remember that the handler is called using the Eval method, so only a function can act as a handler. The function return value is not used by the subsystem. |
Order (optional) |
Number |
A value from 1 to 100 that indicates the command position among other commands. The Print menu commands are sorted first by the Order field, then by a presentation.The default value is 50. |
Picture (optional) |
Picture |
A picture displayed next to the command in the Print menu. For example:PrintCommand.Picture = PictureLib.PDFFormat; |
FormsList (optional) |
String |
Comma-delimited names of the forms to add the command to. If the parameter is not specified, the print command is displayed in all object forms that include the Print tools subsystem. For example: PrintCommand.FormsList = "DocumentForm,ListForm" |
PlacingLocation (optional) |
String |
Name of the form command bar to add the print command to. Use this parameter only when the form has more than one Print submenu. In other cases, specify the print command location in the form module when the PrintManagement.OnCreateAtServer procedure is called. |
FormCaption (optional) |
String |
Arbitrary string overriding the standard title of the Print documents form. For example: PrintCommand.FormCaption = NStr("en = 'Customizable set'"); |
FunctionalOptions (optional) |
String |
Comma-delimited names of functional options that affect the print command availability. |
VisibilityConditions (optional) |
Array |
Defines the command conditional visibility. To add conditions, use procedure AttachableCommands.AddCommandVisibilityCondition().Use "And" to specify multiple conditions. |
CheckPostingBeforePrint (optional) |
Boolean |
Flag indicating whether it is necessary to check if documents are posted before printing. If the parameter is not specified, the posting check is not performed. For example:PrintCommand.CheckPostingBeforePrint = True; |
SkipPreview (optional) |
Boolean |
Flag indicating whether the documents must be sent to a printer without a preview. If the parameter is not specified, the print command opens the Print documents preview form. For example:PrintCommand.SkipPreview = True; |
SaveFormat (optional) |
SpreadsheetDocumentFileType |
It is used for quick saving of a print form to non-MXL formats. If the parameter is not specified, an MXL file is generated. For example:PrintCommand.SaveFormat = SpreadsheetDocumentFileType.PDF; In this example, selecting a print command opens a PDF document. |
OverrideCopiesUserSetting (optional) |
Boolean |
Flag indicating whether to disable saving or restoring the number of print copies selected by a user in the PrintDocuments form. If the parameter is not specified, the option of saving or restoring settings will be active when the PrintDocuments form is opened. For example:PrintCommand.OverrideCopiesUserSetting = True; |
AddExternalPrintFormsToSet (optional) |
Boolean |
Flag indicating whether the document set is to be supplemented with all external print forms attached to the object (the AdditionalReportsAndDataProcessors subsystem). If the parameter is not specified, external print forms are not added to the set. For example:PrintCommand.AddExternalPrintFormsToSet = True; |
FixedSet (optional) |
Boolean |
Flag indicating whether users can change the document set. If the parameter is not specified, the user can remove some print forms from the set in the PrintDocuments form and change the number of copies. For example:PrintCommand.FixedSet = True; |
AdditionalParameters (optional) |
Structure |
Arbitrary parameters to pass to the print manager. |
DontWriteToForm (optional) |
Boolean |
Flag indicating whether to disable object writing before the print command execution. This parameter is used in exceptional cases. If not specified, the object is written when the object form has a modification flag. For example:PrintCommand. DontWriteToForm= True; |
FileSystemExtensionIsRequired (optional) |
Boolean |
Flag indicating whether 1C:Enterprise Extension needs to be attached before executing the command. If not specified, 1C:Enterprise Extension will not be attached. |
DefaultPrintForm (optional) |
Boolean |
The necessity to memoize the name of the generated print form, for example, to display it in reports, reconciliation statements, etc. See the Configuring default print forms below. |
PrintFormDescription (optional) |
String |
The description that will be saved if the flag DefaultPrintForm is raised. If it's unfilled, the value of the Presentation property will be memorized. |
The procedure for developing print commands varies depending on the print form format:
- For automatic print form layout based on a template and object data, see Developing a Print Command for Automatic Print Form Layout Based on a Template and Object Data. Use this layout method as the main one.
- For generation of print forms programmatically, see Developing the Print Procedure. You can use this generation method when the automatic layout method is not suitable for a print form. For example, when a print form requires conditional output of columns, hierarchy, or has a complex structure. You will face restrictions in editing such print form templates. For example, you will have no access to the list of available attributes. You will not be able to create a custom template by copying the built-in one.
- To output a spreadsheet document to one of the popular formats (such as Office Open XML, Microsoft Excel, Adobe PDF, HTML, or text document), see Developing the Print Procedure.
- To generate print forms with an interactive request for additional parameters from a user, see Generating a Print Form in Client Context.
Setting Up Main Print Forms
For some print forms, it may be necessary to memorize their names when printing to display them in reports, reconciliation statements, etc.
List such documents with their print forms in the defined type ObjectWithMainPrintForms and in the AddPrintCommands procedure, supplement the print command description with the DefaultPrintForm property.
If it is necessary to save a name different from the command's Presentation property, the command's PrintFormDescription property must be filled. For example:
PrintCommand = PrintCommands.Add();
PrintCommand.Id = "UTD";
PrintCommand.Presentation = NStr("ru = 'Universal transfer document (UTD)'");
PrintCommand.DefaultPrintForm = True;
PrintCommand.PrintFormDescription = "Universal transfer document";
In the OnDefineKeyAttributesOfDefaultPrintForms procedure of the PrintManagementOverridable common module, ensure that the key attributes Organization and Recipient are filled for each document type, according to the application logic for storing these values in the documents.
Make a decision regarding the configuration objects that represent recipients of main print forms. For example, the Counterparties catalog. Specify them in the defined type RecipientOfPrintForms.
To retrieve the saved names of main print forms, for example, for a reconciliation statement, you can use the DescriptionOfGeneratedDefaultPrintForm and DescriptionsOfGeneratedDefaultPrintForms functions of the PrintManagement common module. See an example of generating document presentations in the CounterpartiesDocuments form of the _DemoCounterparties catalog.
Developing a Print Command for Automatic Print Form Layout Based on a Template and Object Data
Automatic print form layout requires only a template name, its presentation in the Print submenu, and the PrintManagement module as a print manager:
Procedure AddPrintCommands(PrintCommands) Export
  PrintCommand = PrintCommands.Add();
  PrintCommand.PrintManager = "PrintManagement";
  PrintCommand.Id = "Document._DemoCustomerProformaInvoice.PF_MXL_ProformaInvoice";
  PrintCommand.Presentation = NStr("en = 'Proforma invoice (based on DCS)'");
EndProcedure
Besides spreadsheet document templates (MXL), you can use office document templates (DOCX) for printing. Both formats use the same print form preparation mechanisms, including template and print data preparation.
Preparing Print Data for Automatic Print Form Layout
The basic idea behind the automatic layout of print forms is as follows. The Print tools subsystem uses a template created by the developer or user. It then copies the rows of the template into the print form one by one while replacing parameter values. The data source in this process is a data composition schema linked to the object being printed.
In a basic scenario, the schema includes a dataset—a query that selects all attributes and tabular sections of the object (SELECT * FROM Table). When copying the template rows, the mechanism considers specified parameters. If any parameter refers to a tabular section, the row is copied from the template to the print form as many times as there are rows in the tabular section of the object being printed, with parameter values substituted from the corresponding rows.
By following this approach, you can programmatically obtain a list of available object fields for use in the print form. This gives users the flexibility to not only make minor adjustments to existing print form templates but also to create new print forms from scratch. For developers, this simplifies the process of creating a print form since they only need to develop a template without creating a separate procedure to generate a print form from a template.
The list of object fields available for use in the print form template as parameters is taken from the data composition schema associated with the object. As a result, each object can provide its own set of fields for printing, which may differ from the object structure in the metadata. This feature can be particularly useful in cases where certain object fields are located in related tables, such as registers, or if the object contains internal attributes that must be hidden.
The field list is organized hierarchically, similar to the field list in report settings. This means you can use parameters like [Organization.Chief accountant] in the template. However, the process of getting subordinate fields and their values is different. The data composition schema for top-level fields is not used for getting subordinate fields. Each field has its own data composition schema defined, and the list of subordinate fields along with their data is read from there. This means that any field, including simple type fields, can contain subordinate fields. For example, [Counterparty.Description.Character case.ALL UPPERCASE] indicates that the Description field of string type includes a child group of Character case fields.
Using field hierarchies eliminates the need to include nested attribute fields in the data composition schema for each object. You can simply output the object attributes, while accessing other related fields through the hierarchy (using dot notation).
The data composition schema for each reference object is automatically generated by default but can also be explicitly defined in the metadata object as a PrintData template.
For example, you have a proforma invoice print form where you need to output the full names of the CEO and chief accountant. The ProformaInvoice metadata object contains only the Organization attribute (catalog), while information about the CEO and chief accountant is stored in the PersonsResponsibleAndCompanies information register. In this scenario, you can create the PrintData template in the Companies catalog, where you can include additional CEO and ChiefAccountant attributes, and define the logic to populate them. Consequently, in the ProformaInvoice document template, you can access the CEO and chief accountant fields through the Organization field: [Organization.CEO] and [Organization.Chief accountant].
When setting up the data composition schema in Designer, you only need to describe the dataset. In 1C:Enterprise mode, the SettingsComposer.Settings.FilterAvailableFields collection provides the list of available fields in the template editor.
Notice.
The list of DCS fields must include the Ref field for data filtering purposes.
If your dataset contains a table, make sure to include the LineNumber table field.
In some cases, it is more convenient not to override the automatic list of object fields, but to add fields that are stored separately from the object. To do this, add a template with the data composition schema to the metadata object similar to the PrintData template, but name it AdditionalPrintingData. In this case, the automatic list of fields is still generated, but is supplemented from the AdditionalPrintingData template. With this approach, new object attributes do not need to be added to the data composition schema each time. They are added automatically. As an example, see the AdditionalPrintingData template in the _DemoStorageLocations catalog.
If the Object data set is used in the DCS, place the WhenPreparingPrintData procedure in the object manager module. The ExternalDataSets collection is passed to this procedure. The collection is used upon data composition and must be filled.
Example:
// Prepares printable data.
//
// Parameters:
//  DataSources - see PrintManagementOverridable.WhenPreparingPrintData.DataSources
//  ExternalDataSets - see PrintManagementOverridable.WhenPreparingPrintData.ExternalDataSets
//  LanguageCode - see PrintManagementOverridable.WhenPreparingPrintData.LanguageCode
//  AdditionalParameters - see PrintManagementOverridable.WhenPreparingPrintData.AdditionalParameters
//
Procedure WhenPreparingPrintData(DataSources, ExternalDataSets, LanguageCode, AdditionalParameters) Export
  PrintData = PrintData(DataSources, LanguageCode, AdditionalParameters);
  ExternalDataSets.Insert("PrintData", PrintData);
EndProcedure
If the Properties subsystem is available, fields of additional attributes and information records are automatically displayed for reference-type fields. If the Contact information subsystem is available, contact information fields are also displayed. If the National language support subsystem is available, presentation fields in other languages are automatically displayed for multi-language string attributes. For other string attributes, string presentations are displayed in different character case and so on.
To extend the list of nested fields, you can use an API presented as the OnDefinePrintDataSources and WhenPreparingPrintData procedures of the PrintManagementOverridable common module.
Each field of an object, even of non-reference type, can provide its own set of child fields using the field list extension mechanism. For example, the Description field of the Persons catalog can provide a child InitialsAndLastName field, whose data is not physically stored in the infobase. Instead, it is calculated "on the fly" from the description using the IndividualsClientServer.InitialsAndLastName function. In this case, the data composition schema is used to describe the set of child fields, with descriptions (of String type) used as values for the mandatory Ref field. For the examples, see the OnDefinePrintDataSources and WhenPreparingPrintData procedures of the PrintManagementOverridable common module.
Also, see the following examples:
- In the _DemoCustomerProformaInvoice document:
For a spreadsheet document (MXL):- The
PF_MXL_ProformaInvoicetemplate. An example of a template for automatic print form layout. - The
PrintDatatemplate. An example of how to use a data set of the Query type.
For an office document (DOCX): - The
PF_DOC_ProformaInvoiceDCStemplate. An example of a template for automatic print form layout. - The
PrintDatatemplate. An example of how to use a data set of the Query type.
- The
- In the _DemoCompanies catalog: the PrintData template. An example of how to use a data set of the Object type.
Creating a Data Composition Schema Programmatically
The data composition schema can be created either as a template or programmatically from the field list description as a value table or value tree. The PrintManagement module provides the PrintDataFieldTable, PrintDataFieldTree, and SchemaCompositionDataPrint functions for this purpose.
For example, the Products catalog contains the Barcode attribute with the Number type. However, you want your print form to display an image instead of a number. To do this, you can programmatically create a data composition schema describing the BarcodeIcon field and attach it to the OnDefinePrintDataSources and WhenPreparingPrintData procedures of the PrintManagementOverridable common module:
Procedure OnDefinePrintDataSources(Object, PrintDataSources) Export

  If Object = "Catalog.Products.Barcode" Then
    PrintDataSources.Add(SchemaPrintDataBarcodes(), "Barcodes");
  EndIf;

EndProcedure

Procedure WhenPreparingPrintData(DataSources, ExternalDataSets, DataCompositionSchemaId, LanguageCode, AdditionalParameters) Export

  If DataCompositionSchemaId = "Barcodes" Then
    ExternalDataSets.Insert("Data", PrintDataBarcodes(DataSources));
  EndIf;

EndProcedure

Function SchemaPrintDataBarcodes()

  FieldList = PrintManagement.PrintDataFieldTable();

  Field = FieldList.Add();
  Field.Id = "Ref";

  Field = FieldList.Add();
  Field.Id = "BarcodeIcon";
  Field.Presentation = NStr("en = 'Barcode picture'");
  Field.Picture = PictureLib.TypePicture;

  Return PrintManagement.SchemaCompositionDataPrint(FieldList);

EndFunction

Function PrintDataBarcodes(DataSources)
  DataSet = New ValueTable();
  DataSet.Columns.Add("Ref");
  DataSet.Columns.Add("BarcodeIcon");

  For Each DataSource In DataSources Do
    DataFieldsVal = DataSet.Add();
    DataFieldsVal.Ref = DataSource;

    BarcodeParameters = BarcodeGeneration.BarcodeGenerationParameters();
    BarcodeParameters.CodeType = 1;
    BarcodeParameters.Width = 242;
    BarcodeParameters.Height = 127;
    BarcodeParameters.Barcode = DataSource;

    DataFieldsVal.BarcodeIcon = BarcodeGeneration.TheImageOfTheBarcode(BarcodeParameters).Picture;
  EndDo;

  Return DataSet;

EndFunction
Grouping Object Fields
When editing a template, the user works with a list of available object fields. If there are many fields, to simplify navigation in the list, fields can be grouped. Fields are grouped in the data composition schema when describing the dataset fields. Since the data composition schema is used only to retrieve data, groups cannot be used as fields in the template because they contain no values. If you need to group fields and also use the group as a field containing a value, add a field to the dataset, assign it a simple type value, and use it as a grouping.
For example, you have a document with the following fields:
- NameCA
- LastNameCA
You want to combine them into a ChiefAccountant group and display the group by concatenating these fields.
To achieve this, in the DCS, add the ChiefAccountant field and set its value as string. Make the NameCA and LastNameCA fields subordinate to the ChiefAccountant field.
As a result, in the list of available fields in the template editor, the full name fields will be located in the Chief accountant group, and the group itself can also be used in the template.
The same schema with a grouping and subsequent data population can be programmatically created as follows:
//  See PrintManagementOverridable.OnDefinePrintDataSources
Procedure OnDefinePrintDataSources(Object, PrintDataSources) Export

   FieldList = PrintManagement.PrintDataFieldTree();

   Field = FieldList.Rows.Add();
   Field.Id = "Ref";
   Field.Presentation = NStr("en = 'Reference'");
   Field.ValueType = New TypeDescription();

   Group = FieldList.Rows.Add();
   Group.Id = "ChiefAccountant";
   Group.Presentation = NStr("en = 'Chief accountant'");
   Group.ValueType = New TypeDescription("String");

   Field = Group.Rows.Add();
   Field.Id = "NameCA";
   Field.Presentation = NStr("en = 'Name'");
   Field.ValueType = New TypeDescription("String");

   Field = Group.Rows.Add();
   Field.Id = "LastNameCA";
   Field.Presentation = NStr("en = 'Last name'");
   Field.ValueType = New TypeDescription("String");

   SchemaCompositionDataPrint = PrintManagement.SchemaCompositionDataPrint(FieldList);
   PrintDataSources.Add(SchemaCompositionDataPrint, "HierarchyOutputExample");

EndProcedure

// Prepares printable data.
//
// Parameters:
//  DataSources - See PrintManagementOverridable.WhenPreparingPrintData.DataSources
//  ExternalDataSets - See PrintManagementOverridable.WhenPreparingPrintData.ExternalDataSets
//  DataCompositionSchemaId - See PrintManagementOverridable.WhenPreparingPrintData.DataCompositionSchemaId
//  LanguageCode - See PrintManagementOverridable.WhenPreparingPrintData.LanguageCode
//  AdditionalParameters - See PrintManagementOverridable.WhenPreparingPrintData.AdditionalParameters
//
Procedure WhenPreparingPrintData(DataSources, ExternalDataSets, DataCompositionSchemaId, LanguageCode,
   AdditionalParameters) Export

   If DataCompositionSchemaId = "HierarchyOutputExample" Then

       DataSet = New ValueTable();
       DataSet.Columns.Add("Ref");
       DataSet.Columns.Add("ChiefAccountant");
       DataSet.Columns.Add("NameCA");
       DataSet.Columns.Add("LastNameCA");

       For Each DataSource In DataSources Do
           DataFieldsVal = DataSet.Add();
           DataFieldsVal.Ref = DataSource;
           DataFieldsVal.ChiefAccountant = DataSource.NameCA + " " + DataSource.LastNameCA;
           DataFieldsVal.NameCA = DataSource.NameCA;
           DataFieldsVal.LastNameCA = DataSource.LastNameCA;
       EndDo;

       ExternalDataSets.Insert("Data", DataSet);

   EndIf;

EndProcedure
Adding Fields to Existing Tabular Sections
In some cases, you may need to extend an existing or auto-generated list of fields in an object's tabular section. To do this, simply add a new data composition schema to the object with the same-name tabular section containing the required field plus the mandatory field LineNumber. Below you can find an example of programmatically adding the AmountWithoutDiscount field to the Goods tabular section:
//  See PrintManagementOverridable.OnDefinePrintDataSources
Procedure OnDefinePrintDataSources(Object, PrintDataSources) Export

   FieldList = PrintManagement.PrintDataFieldTree();

   Field = FieldList.Rows.Add();
   Field.Id = "Ref"; // Mandatory field.
   Field.Presentation = NStr("en = 'Reference'");
   Field.ValueType = New TypeDescription();

   GoodsTable = FieldList.Rows.Add();
   GoodsTable.Id = "Goods"; // Table to add the field to.
   GoodsTable.Presentation = NStr("en = 'Goods'");
   GoodsTable.Picture = PictureLib.TypeList;
   GoodsTable.Table = True;
   GoodsTable.ValueType = New TypeDescription("ValueTable");

   GoodsField = GoodsTable.Rows.Add();
   GoodsField.Id = "LineNumber"; // Mandatory field.
   GoodsField.Presentation = NStr("en = 'Row number'");
   GoodsField.ValueType = New TypeDescription("Number");

   GoodsField = GoodsTable.Rows.Add();
   GoodsField.Id = "AmountWithoutDiscount"; // Field to add.
   GoodsField.Presentation = NStr("en = 'Amount without discount'");
   GoodsField.ValueType = New TypeDescription("Number");

   SchemaCompositionDataPrint = PrintManagement.SchemaCompositionDataPrint(FieldList);
   PrintDataSources.Add(SchemaCompositionDataPrint, "ProformaInvoiceAmountWithoutDiscount");

EndProcedure

// Prepares printable data.
//
// Parameters:
//  DataSources - See PrintManagementOverridable.WhenPreparingPrintData.DataSources
//  ExternalDataSets - See PrintManagementOverridable.WhenPreparingPrintData.ExternalDataSets
//  DataCompositionSchemaId - See PrintManagementOverridable.WhenPreparingPrintData.DataCompositionSchemaId
//  LanguageCode - See PrintManagementOverridable.WhenPreparingPrintData.LanguageCode
//  AdditionalParameters - See PrintManagementOverridable.WhenPreparingPrintData.AdditionalParameters
//
Procedure WhenPreparingPrintData(DataSources, ExternalDataSets, DataCompositionSchemaId, LanguageCode,
   AdditionalParameters) Export

   If DataCompositionSchemaId = "ProformaInvoiceAmountWithoutDiscount" Then

       DataSet = New ValueTable();
       DataSet.Columns.Add("Ref");
       DataSet.Columns.Add("Goods");

       For Each DataSource In DataSources Do
           GoodsDataSet = New ValueTable();
           GoodsDataSet.Columns.Add("LineNumber", New TypeDescription("Number"));
           GoodsDataSet.Columns.Add("AmountWithoutDiscount", New TypeDescription("Number"));

           NewRow = GoodsDataSet.Add();
           NewRow.LineNumber = 1; // Make sure you specify the row number.
           NewRow.AmountWithoutDiscount = ...; // Fill in according to the logic of the added field.

           // ... Fill in the remaining rows in the tabular section of the data source.

           DataFieldsVal = DataSet.Add();
           DataFieldsVal.Ref = DataSource;
           DataFieldsVal.Goods = GoodsDataSet;
       EndDo;

       ExternalDataSets.Insert("Data", DataSet);

   EndIf;

EndProcedure
Adding a Periodic Attribute to the List of Printable Fields
To describe an object attribute whose value is date-dependent, create a separate data composition schema with an additional Period field.
When calculating the attribute value, 1C:Enterprise considers the Period column and selects a value corresponding to the attribute owner's date.
For example, the StorageLocations catalog has a periodic Manager attribute with a history of values stored in a separate StorageLocationsManagers information register. To add this attribute to the list of printable fields of the StorageLocations catalog, create a separate data composition schema (as a template or programmatically) with the Ref, Manager, and Period fields. When retrieving the storage location manager for any document, 1C:Enterprise takes the current value as of the document date. As an example, see the AdditionalPrintingData template of the _DemoStorageLocations catalog.
Specifics of Developing Spreadsheet Document Templates (Mxl) for Automatic Print Form Layout
For automatic print form layout based on a template and print data, the template is prepared in a special way.
- Do not use the
FillTypeproperty for cells in the template. All cells must have theTextproperty. - Texts in cells are templates for the print form composer. Text fragments in square brackets are considered parameters and replaced with print data.
- Use named row areas in a template only for conditional display of these rows. Do not use these areas in other cases.
- Do not use named template column areas.
- Available fields of the template owner object act as parameters. You can use dot syntax in the fields, for example,
[CounterpartyContract.Date]. - If you specify an object table field as a parameter in the cell text, the entire row will be repeated for each object table row when laying out the print form.
- For a spreadsheet document picture, in the
Details parameterproperty, specify a path to the picture in print data in square brackets. For example,[Goods.Products.PicturesFile]. The specified field must be a link to the attached picture file (the File management subsystem).
To prepare a template, use the template editor in Enterprise mode. You can save the prepared template to a file (More actions > Save to file), then open it in Designer, and copy the content to a metadata template.
Specifics of Developing Office Document Templates (Docx) for Automatic Print Form Layout
For automatic print form layout based on a template and print data, the template is prepared in a special way.
- Text fragments in square brackets are considered parameters and replaced with print data.
- Available fields of the template owner object act as parameters. You can use dot syntax in the fields, for example,
[CounterpartyContract.Date]. - If you specify an object table field as a parameter, the entire area will be repeated for each object table row when laying out the print form.
- Specify a path to the picture in square brackets. For example,
[Goods.Products.PicturesFile]. The specified field must be a link to the attached picture file (the File management subsystem). - To fill the hyperlink in the address field, specify a path to the link address in square brackets. For example,
[Goods.Products.LinkToPage]. - To indicate area output by condition, use the
{v8 Condition ConditionText}constructs. The beginning of a new conditional area is the end of the previous one. The end of the conditional area is{/v8 Condition}.ConditionTextis an expression whose calculation result is of the Boolean type. Write the conditions in the parameter language.
Creating Common Print Forms
Creating a common template for multiple objects is no different than creating a template for a single object. To use a common template, include the same set of fields in the print data of required objects. The fields used in the template that are not included in the object's print data are replaced with blank lines when preparing a print form.
Add the common template to a data processor and include the data processor in the AttachableReportsAndDataProcessors subsystem. Specify the objects to which the print command is attached in the OnDefineSettings procedure of the data processor manager module, and describe the print command in the AddPrintCommands procedure.
An example of attaching the DataProcessor._DemoPrintSalesAgreement.PrintForm_MXL_SalesAgreement template (see the demo configuration):
// Defines the API components to call from the configuration code.
//
// Parameters:
//  InterfaceSettings4 - Structure:
//   * AddPrintCommands - Boolean
//   * Location - Array
//
Procedure OnDefineSettings(InterfaceSettings4) Export

  InterfaceSettings4.Location.Add(Metadata.Documents._DemoCustomerProformaInvoice);
  InterfaceSettings4.Location.Add(Metadata.Documents._DemoGoodsSales);

  InterfaceSettings4.AddPrintCommands = True;

EndProcedure

// Populates a list of print commands.
//
// Parameters:
//  PrintCommands - See PrintManagement.CreatePrintCommandsCollection
//
Procedure AddPrintCommands(PrintCommands) Export

  PrintCommand = PrintCommands.Add();
  PrintCommand.PrintManager = "PrintManagement";
  PrintCommand.Id = "DataProcessor._DemoPrintSalesAgreement.PrintForm_MXL_SalesAgreement";
  PrintCommand.Presentation = NStr("en = 'Sales agreement (common template)'");

EndProcedure
Developing the Print Procedure
-
Add the
Printexport procedure to the manager module specified in thePrintManagerparameter: -
Add a spreadsheet document template to the configuration as per instructions in Adding Print Form Templates to the Configuration.
-
Add a function that generates a print form (a spreadsheet document), for example:
Function PrintingAnOrderInvoice(ObjectsArray, PrintObjects) . . . Return SpreadsheetDocument; EndFunction -
In the
Printprocedure, place the code for identifying the print form and call the function for its generation (created in step 3). Example:PrintForm = PrintManagement.PrintFormInfo(PrintFormsCollection, "InvoiceOrder"); If PrintForm <> Undefined Then PrintForm.SpreadsheetDocument = PrintingAnOrderInvoice(ObjectsArray, PrintObjects); PrintForm.TemplateSynonym = NStr("en = 'Proforma invoice'"); PrintForm.FullTemplatePath = "Document._DemoCustomerProformaInvoice.PF_MXL_OrderInvoice"; EndIf;
  // Generates print forms.
  // Parameters:
  // ObjectsArray - Array - references to objects to be printed.
  // PrintParameters - Structure - additional print settings.
  // PrintFormsCollection - ValueTable - generated spreadsheet documents (output parameter).
  // PrintObjects - ValueList - value is the object reference;
  // presentation is the name of the area where the object was displayed (output parameter).
  // OutputParameters - Structure - additional parameters of generated spreadsheet documents (output parameter).
  //
  Procedure Print(ObjectsArray, PrintParameters, PrintFormsCollection, PrintObjects, OutputParameters) Export
EndProcedureSee the Print procedure parameters and their details in the OnPrint procedure of the PrintManagementOverridable common module.
The Print procedure can generate one or several spreadsheet documents during one call. The procedure can be implemented as follows:
- If required, set
OutputParameters. - If more than one spreadsheet document is generated, we recommend that you get the required data before generating the spreadsheet documents.
- When generating a spreadsheet document for several objects, make sure that these objects are specified in the spreadsheet document in the correct order. An array of objects is passed to the
ObjectsArrayparameter of thePrintprocedure in the order a user selected them. However, the "correct" output order can be different. For example, documents are usually ordered by thePointInTimefield. - If the data for each spreadsheet document is received using different queries, it is advisable that the documents are ordered in the same way.
As the template can be edited by a user in 1C:Enterprise mode and its parameters can be changed or deleted, we recommend that you avoid explicit assignment of parameter values in print areas. This will increase stability of the print form generation code. Instead, use the FillPropertyValues procedure.
Incorrect:
PrintArea.Parameters.Company = PrintData.Company;
PrintArea.Parameters.Counterparty = PrintData.Counterparty;Correct:
FillPropertyValues(PrintArea.Parameters, PrintData); Example of the Print procedure:
Procedure Print(ObjectsArray, PrintParameters, PrintFormsCollection, PrintObjects, OutputParameters) Export
PrintForm = PrintManagement.PrintFormInfo(PrintFormsCollection, "InvoiceOrder");
If PrintForm <> Undefined Then
PrintForm.SpreadsheetDocument = PrintingAnOrderInvoice(ObjectsArray, PrintObjects);
PrintForm.TemplateSynonym = NStr("en = 'Proforma invoice'");
PrintForm.FullTemplatePath = "Document._DemoCustomerProformaInvoice.PF_MXL_OrderInvoice";
EndIf;
EndProcedureExample of the function that generates the spreadsheet document:
Function PrintingAnOrderInvoice(ObjectsArray, PrintObjects)
// Create a spreadsheet document and set the name of print parameters.
SpreadsheetDocument = New SpreadsheetDocument;
SpreadsheetDocument.PrintParametersKey = "PrintParameters_InvoiceOrder";
// Get the required data using a query.
Query = New Query();
Query.Text =
"SELECT
| CustomerProformaInvoice.Ref AS Ref,
......................
|WHERE
| CustomerProformaInvoice.Ref IN(&ObjectsArray)
......................
|";
Query.SetParameter("ObjectsArray", ObjectsArray);
Header = Query.Execute().Select();
FirstDocument = True;
While Header.Next() Do
If Not FirstDocument Then
// All documents must be displayed on separate pages.
SpreadsheetDocument.PutHorizontalPageBreak();
EndIf;
FirstDocument = False;
// Save the number of the row from which the document output started.
RowNumberStart = SpreadsheetDocument.TableHeight + 1;
......................
// In the spreadsheet document, specify the name of the area where
// the object was output. It is required to print document sets.
PrintManagement.SetDocumentPrintArea(SpreadsheetDocument,
RowNumberStart, PrintObjects, Header.Ref);
EndDo;
Return SpreadsheetDocument;
EndFunctionWhen developing a print form, it is possible to restrict its output (to a printer, to the clipboard, saving to a file). To do this, when generating a spreadsheet document, set the required value in the Output property. For example:
SpreadsheetDocument.Output = UseOutput.DisableYou can also display a facsimile signature and a stamp in the print form. To do this:
- In the print form template, add a picture of 40 mm width and the aspect ratio of 1:1 for a stamp, 4:1 for a signature, and set its properties:
- Name: ID of the
SignatureorSealtype, for example,ManagerSignatureorCompanySeal. - Picture: (blank).
- Picture size:
Proportional. - Line:
Dotted.
- Name: ID of the
- Add a code block to get an image for the added picture to the
OnGetSignaturesAndSealsprocedure of thePrintManagementOverridablecommon module.
As an example, see the PF_MXL_OrderInvoice template of the _DemoCustomerProformaInvoice document.
Generating a Print Form in Client Context
Sometimes, client context might be required to generate print forms. For example, to request additional print form parameters from a user immediately before printing. In such cases, place the print form generation mechanism in the client module. When describing the print command in the AddPrintCommands procedure, use the Handler parameter to hand over control to this module.
The approach for creating commands using the client context is slightly different from the main approach. The Print procedure of the object manager module is not called using the subsystem mechanisms, so you do not need to create it for such command.
The process of creating such command is as follows:
- In the
AddPrintCommandsprocedure of the object manager module, add the command details using theHandlerparameter. Example:// Proforma invoice in Microsoft Word PrintCommand = PrintCommands.Add(); PrintCommand.PrintManager = "Document._DemoCustomerProformaInvoice"; PrintCommand.Id = "ProformaInvoice(MSWord)"; PrintCommand.Presentation = NStr("en = 'Proforma invoice in Microsoft Word'"); PrintCommand.Picture = PictureLib.WordFormat2007; PrintCommand.CheckPostingBeforePrint = True; PrintCommand.Handler = "_DemoStandardSubsystemsClient.PrintCustomerProformaInvoices";Note
The print manager can be used to get data for printing (see Using Office Document Templates When Generating Print Forms).
- Add a client export function for generating a print form with a single parameter to which the Print tools subsystem will pass the structure of command parameters. The function name can be arbitrary, for example:
Function PrintCustomerProformaInvoices(PrintParameters) Export . . . EndFunctionNote 1
The
Print toolssubsystem does not expect any result from this function. The function is used instead of the procedure as it is called using theEvalmethod.Note 2
To print the print forms, a user must have the
Outputaccess right. Consider that when developing client print commands.
If the client context includes only a request for additional parameters and a spreadsheet document is generated on the server, follow the instructions for Developing the Print Procedure and hand over control to the PrintManagementClient.ExecutePrintCommand procedure from the client function.
Adding Qr Code Images to Print Forms Based on a Text String
In some cases, it is useful to add a QR code image containing encoded data to the document print form. The common principle of functionality embedding is as follows:
- Place a drawing of the
Picturetype in the print form template. - In the print manager module, call the
PrintManagement.QRCodeDataprocedure and pass a text string to be encoded as a parameter. - Output the received result (binary data) to the drawing of the
Picturetype programmatically.
As an example, see the PrintReceipt procedure in the _DemoCustomerProformaInvoice document manager module and the PF_MXL_Receipt template in the demo configuration.
Other Features
In the OnDefinePrintSettings procedure of the object manager module, you can also specify other subsystem handlers. In the manager module, place a respective procedure with the handler implementation:
| Setting | Procedure Name | Description |
|---|---|---|
Settings.OnAddPrintCommands = True; |
AddPrintCommands |
Describes print commands provided by an object. See Attaching Configuration Objects |
Settings.OnSpecifyingRecipients = True; |
OnSpecifyingRecipients |
Allows you to specify a short list of recipients when sending a print form by email. |
In some cases, when sending print forms by email, you need to pre-fill the email: specify a recipient list, email subject and body. To do it, use the OnSpecifyingRecipients manager procedure. See the implementation example in the _DemoCustomerProformaInvoice document manager module in the demo configuration. Template to insert:
// Adds information to send by email.
//
// Parameters:
// SendOptions - see PrintManagementOverridable.OnPrint.OutputParameters.SendOptions
// ObjectsArray - see PrintManagementOverridable.OnPrint.ObjectsArray
// PrintFormsCollection - see PrintManagementOverridable.OnPrint.PrintFormsCollection
//
Procedure OnSpecifyingRecipients(SendOptions, ObjectsArray, PrintFormsCollection) Export
EndProcedureAdding Print Form Templates to the Configuration
We recommend that you add print form templates to the object where the print form generation logic is implemented. Add a prefix to the template name:
PF_MXLfor spreadsheet document templates.PF_DOCfor Office Open XML templates.
For example, PF_DOC_ProformaInvoice.
To get a template in print form generation procedures, use the PrintManagement.PrintFormTemplate (<Template path>) procedure, where the template path can be as follows:
- For templates in documents:
Document.<Document name>.<Template name>. - For templates in data processors:
DataProcessor.<Data processor name>.<Template name>; - For common templates:
CommonTemplate.<Template name>.
Example:
PrintManagement.PrintFormTemplate("Document.CustomerProformaInvoice.PF_MXL_OrderInvoice");Notice.
When a print form template is added to a data processor or report, a user must have the View right to this metadata object to get the template.
Printing Out Documents in Multiple Languages
Generating print forms in different languages is useful, for example, if you need to provide documents to a foreign counterparty: a price list, a proforma invoice, and so on. To do this, add required languages to the PrintFormsLanguages catalog, translate the print form template and object attribute values displayed in the print form into them, and then, when displaying the print form, switch it to the required language. This feature is available if the National language support subsystem is integrated. It can be used only for print forms with spreadsheet document templates.
Select print forms that you want to display in multiple languages. Then adapt these print forms to ensure the following:
- Entering the required data in multiple languages.
- Translating the print form template content into the required languages.
- Generating the print form in the specified language.
1. Entering the Required Data in Multiple Languages
Select the objects whose string attributes must be displayed in the print form in different languages. For example, names of goods, counterparties, and so on. To set up entering multilingual values for them:
- Create the
Presentationstable in the catalog (document). - Add the
LanguageCodetable attribute (String, 10, Variable). - Copy the attributes to be displayed in the print form to the
Presentationstable. - In the object form module, add the following string to the
OnCreateAtServerprocedure:
NationalLanguageSupportServer.OnCreateAtServer(ThisObject, Object);And add the following procedure to the form module:
&AtClient
Procedure Attachable_Opening(Item, StandardProcessing)
NationalLanguageSupportClient.OnOpen(ThisObject, Object, Item, StandardProcessing);
EndProcedureAs an example, see the _DemoCounterparties and _DemoProducts catalogs.
2. Translating the Print Form Template Content Into the Required Languages
When developing a print form template, make sure to place static titles, labels, and texts in the spreadsheet document template rather than populating them programmatically. This is because the text generated in the code is not available for translation into another language.
Incorrect:
- The
Titlearea of the template contains theTitleTextparameter. - The title text is generated in the code:
TitleText = StrTemplate("Proforma invoice %1 dated %2", Number, Date);
PrintData.Insert("TitleText", TitleText);
TemplateArea = Template.GetArea("Title");
TemplateArea.Parameters.Fill(PrintData);
SpreadsheetDocument.Put(TemplateArea);Correct:
- The
Titlearea contains the<Proforma invoice #[Number] dated [Date]>template. - In the code, insert the template parameters from data:
PrintData.Insert("Number", Number);
PrintData.Insert("Date", Date);
TemplateArea = Template.GetArea("Title");
TemplateArea.Parameters.Fill(PrintData);
SpreadsheetDocument.Put(TemplateArea);As an example of generating a print form, see the PrintingAnOrderInvoice procedure of the _DemoCustomerProformaInvoice document manager module.
3. Generating the Print Form in the Specified Language
In the print manager Print procedure, set the OutputInOtherLanguagesAvailable parameter of the PrintFormsCollection collection item to True. Example:
PrintForm = PrintManagement.PrintFormInfo(PrintFormsCollection, "Account");
If PrintForm <> Undefined Then
PrintForm.SpreadsheetDocument = PrintProformaInvoice(ObjectsArray, PrintObjects, OutputParameters.LanguageCode);
PrintForm.TemplateSynonym = NStr("en = 'Proforma invoice'");
PrintForm.FullTemplatePath = "Document.CustomerProformaInvoice.PF_MXL_ProformaInvoice";
PrintForm.OutputInOtherLanguagesAvailable = True;
EndIf;When printing in another language, the language code is passed in the OutputParameters.LanguageCode parameter of the print manager Print procedure. The language code value must be used when getting a template and data to be displayed in a spreadsheet document.
Getting a Print Form Template
To get a template in the required language, pass LanguageCode to the PrintManagement.PrintFormTemplate function:
Template = PrintManagement.PrintFormTemplate("Document.CustomerProformaInvoice.PF_MXL_ProformaInvoice", LanguageCode);Getting Attribute Values in Other Languages
You can get attribute values in the required language using a query or functions of the Common module: ObjectAttributeValue, ObjectAttributesValues, ObjectsAttributeValue, and ObjectsAttributesValues.
The query option can be used not only for print forms but also for any queries in reports, lists, and other algorithms that display data in the required language.
Add the LEFT JOIN clause to the query to join the Presentations table (created in step 1) with the source table and pass LanguageCode to the query.
The original query:
SELECT
...
CustomerProformaInvoice.Counterparty AS Counterparty,
CustomerProformaInvoice.Counterparty.NameForPrinting AS CounterpartyNameForPrinting
...
FROM
Document.CustomerProformaInvoice AS CustomerProformaInvoiceThe modified query:
SELECT
...
CustomerProformaInvoice.Counterparty AS Counterparty,
IsNull(CounterpartiesPresentations.NameForPrinting, CustomerProformaInvoice.Counterparty.NameForPrinting) AS CounterpartyNameForPrinting
...
FROM
Document.CustomerProformaInvoice AS CustomerProformaInvoice
LEFT JOIN Catalog.Counterparties.Presentations AS CounterpartiesPresentations
ON CustomerProformaInvoice.Counterparty = CounterpartiesPresentations.Ref
AND (CounterpartiesPresentations.LanguageCode = &LanguageCode)Query.SetParameter("LanguageCode", LanguageCode);You can also get attribute values in the required language programmatically using the ObjectAttributeValue, ObjectAttributesValues, ObjectsAttributeValue, and ObjectsAttributesValues functions by passing the LanguageCode parameter:
CounterpartyPresentation = Common.ObjectAttributeValue(Header.Counterparty, "NameForPrinting", , LanguageCode);
PrintData.Insert("CounterpartyPresentation", ?(ValueIsFilled(CounterpartyPresentation), CounterpartyPresentation, Header.CounterpartyPresentation));To optimize performance, it is recommended that you get attribute values in the required language in the main print data query.
Displaying Numbers, Dates, and Values of the Boolean Type
When displaying dates, numbers, and values of the Boolean type, use the Format function with language specification. Example:
PrintData.Insert("Date", Format(Header.Date, "L=" + LanguageCode + "; DLF=DD"));PrintData.Insert("Sum", Format(GoodsTable.Total("Sum"), "L=" + LanguageCode));PrintData.Insert("CourierDelivery", Format(Header.CourierDelivery, "L=" + LanguageCode));Amount in Words
Displaying an amount in words is available for the languages supported by 1C:Enterprise platform. See details for the NumberInWords function in Syntax Assistant. If the configuration contains the Currencies subsystem, specify LanguageCode when calling CurrencyRateOperations.GenerateAmountInWords:
PrintData.Insert("AmountInWords",
CurrencyRateOperations.GenerateAmountInWords(PrintData.TotalAmount_, Header.DocumentCurrency, , LanguageCode));1C:Enterprise will generate result considering the parameters for writing amounts in words entered for a currency in the specified language.
Contact Information
Contact information of the Address type can be transliterated in print forms. To do this, use the ContactInformation function of the ContactsManager common module by setting the LanguageCode property:
Filter = ContactsManager.SelectingContactInformation();
Filter.ContactInformationKinds.Add(ContactsManager.ContactInformationKindByName("LegalAddressOrganization"));
Filter.Date = Date;
Filter.LanguageCode = LanguageCode;
LegalAddress = "";
ContactInformation = ContactsManager.ContactInformation(Company, Filter);
If ContactInformation.Count() > 0 Then
LegalAddress = ContactInformation[0].Presentation;
EndIf;Company Information
If the configuration contains the Companies subsystem, pass the LanguageCode parameter to get attribute values of a company in another language:
CompanyInformation = OrganizationsServer.CompanyInformation (Header.Company, , Header.Date, LanguageCode);Prior to that, in the procedures of the CompaniesOverridable common module, add a code block to get information about the company considering the language passed in the LanguageCode parameter.
Properties
If the configuration contains the Properties subsystem, a user can add custom attributes and information that can be displayed in a print form template. To display attributes and information records added by a user to a print form template in the required language, use the RepresentationsOfPropertyValues function of the PropertyManager common module:
RepresentationsOfPropertyValues = PropertyManager.RepresentationsOfPropertyValues(ObjectsArray, LanguageCode);
For Each Document In PrintData Do
...
TemplateArea = Template.GetArea(...);
TemplateArea.Parameters.Fill(Document);
TemplateArea.Parameters.Fill(RepresentationsOfPropertyValues[Document.Ref]);
SpreadsheetDocument.Put(TemplateArea);
...
EndDo;As an example of generating a print form in different languages, see Demo: Proforma invoice, the Proforma invoice print form, and the Print procedure of the _DemoCustomerProformaInvoice document manager module, the Account print form.
Developing Print Forms Using Office Document Templates (Docx)
Besides spreadsheet document templates (MXL), you can use office document templates (DOCX). You can use these templates in the same way.
Command Interface Setup
To edit print form templates, add the UserPrintTemplates information register to the command interface of the template owner.
User Access Setup
To manage user access to the subsystem, assign a user the roles specified in the table below.
| # | Role Description |
|---|---|
| 1. | EditPrintFormTemplatesGrants the right to add and edit print form templates. |
| 2. | OutputToPrinterFileClipboard (the Core subsystem user role)Grants the right to print out print forms and send them by email. |
| 3. | PrintFormsEditGrants the right to change generated print forms before sending them to a printer, saving them to a file, or sending them by email. |
Additionally, you need to create auxiliary roles or re-use existing suitable roles to provide access to data.
| # | Auxiliary Role Description |
|---|---|
| 1. | <OutputPrintFormToPrinter>Grants the right to view the command that outputs print forms to a printer. |
The table below illustrates possible user groups and the roles they could be assigned with.
| # | User Group Description | Assigned Roles |
|---|---|---|
| 1. | User responsible for support of print form templates |
|
| 2. | User who is allowed to get and generate print forms as well as print them out and use "quick print" commands |
|
| 3. | User who is allowed to get and generate print forms, print them out, and use "quick print" commands, as well as edit, save, and send print forms by email |
|
How to Use the Subsystem in Development
Moving a Template to Another Object
Usually, a print form template is located by the object. If a template is shared by two or more objects, it must be either added to a data processor or included in the configuration as a common template. If this is the case, you need to move the template from one configuration location to another. Remember that users could have changed the template, so these changes stored in the UserPrintTemplates information register also need to be moved to the new address. To do this, write a deferred update handler that uses API of the PrintManagement module:
// Used to move a print form template of a metadata object to another object.
// Intended to be called in the update data population procedure (for the deferred handler).
// Registers a new address of the template to process.
//
// Parameters:
// TemplateName - String - a new name of the template formatted as
// "Document.<DocumentName>.<TemplateName>"
// "DataProcessor.<DataProcessorName>.<TemplateName>"
// "CommonTemplate.<TemplateName>":
// Parameters - Structure - see InfobaseUpdate.MainProcessingMarkParameters.
//
Procedure RegisterNewTemplateName(TemplateName, Parameters) Export
// Used to move a print form template of a metadata object to another object.
// Intended to be called in the deferred update handler.
// Moves user data related to the template to a new address.
//
// Parameters:
// Templates - Map - information about previous and new template names formatted as
// "Document.<DocumentName>.<TemplateName>"
// "DataProcessor.<DataProcessorName>.<TemplateName>"
// "CommonTemplate.<TemplateName>":
// * Key - String - a new template name.
// * Value - String - a previous template name.
//
// Parameters - Structure - parameters passed to the deferred update handler.
//
Procedure TransferUserTemplates(Templates, Parameters) ExportFor example, you need to move a user template (and rename it) from Document._DemoCustomerProformaInvoice.PF_MXL_OrderInvoice to DataProcessor._DemoOrdersPrinting.PF_MXL_InvoiceUniversal:
Procedure OnAddUpdateHandlers(Handlers) Export
Handler = Handlers.Add();
Handler.Version = "2.3.5.51";
Handler.Procedure = "_DemoInfobaseUpdateSSL.TransferUserTemplatesToNewObjects";
Handler.ExecutionMode = "Deferred";
Handler.Comment = NStr("en = 'Changing a storage location of user templates'");
Handler.Id = New UUID("4c580abd-475c-4e93-a8e5-58219102f660");
Handler.CheckProcedure = "InfobaseUpdate.DataUpdatedForNewApplicationVersion";
Handler.ObjectsToLock = "InformationRegister.UserPrintTemplates";
Handler.UpdateDataFillingProcedure = "_DemoInfobaseUpdateSSL.RegisterDataToProcessForMigrationToNewVersion";
Handler.ObjectsToRead = "InformationRegister.UserPrintTemplates";
Handler.ObjectsToChange = "InformationRegister.UserPrintTemplates";
EndProcedure
Procedure RegisterDataToProcessForMigrationToNewVersion(Parameters) Export
PrintManagement.RegisterNewTemplateName("DataProcessor._DemoOrdersPrinting.PF_MXL_InvoiceUniversal", Parameters);
EndProcedure
Procedure TransferUserTemplatesToNewObjects(Parameters) Export
Templates = New Map;
Templates.Insert("DataProcessor._DemoOrdersPrinting.PF_MXL_InvoiceUniversal", "Document._DemoCustomerProformaInvoice.PF_MXL_OrderInvoice");
PrintManagement.TransferUserTemplates(Templates, Parameters);
EndProcedureDeveloping Print Commands in a Configuration Extension
Instead of implementing external print forms as external data processors, we recommend using configuration extensions. To add print commands of external print forms to the configuration extension, do the following:
- Add a data processor to the configuration extension and include it in the
AttachableReportsAndDataProcessorssubsystem. - In the data processor manager module, define the
OnDefineSettingsprocedure as per the instructions for Attaching Reports and Data Processors to Configuration Mechanisms and implement the following print commands:
#Region Public
// Defines API content for integration with the configuration.
//
// Parameters:
// Settings - Structure - integration settings for this object.
// See the return value of function AttachableCommands.AttachableReportsAndDataProcessorsSettings().
//
Procedure OnDefineSettings(Settings) Export
Settings.Location.Add(Metadata.Documents.DocumentName);
Settings.AddPrintCommands = True;
EndProcedure
// Populates a list of print commands.
//
// Parameters:
// PrintCommands - ValueTable - for more information, see PrintManagement.CreatePrintCommandsCollection().
//
Procedure AddPrintCommands (PrintCommands) Export
// Code for adding print commands.
EndProcedure
#EndRegion
// Generates print forms.
//
// Parameters:
// ObjectsArray - Array - references to objects to be printed.
// PrintParameters - Structure - additional print settings.
// PrintFormsCollection - ValueTable - generated spreadsheet documents (output parameter).
// PrintObjects - ValueList - value is the object reference;
// presentation is the name of the area where the object was displayed (output parameter).
// OutputParameters - Structure - additional parameters of generated spreadsheet documents (output parameter).
//
Procedure Print(ObjectsArray, PrintParameters, PrintFormsCollection, PrintObjects, OutputParameters) Export
EndProcedureSimilarly, you can simultaneously include several data processors with external print forms in the configuration extension. Besides, it is possible to develop print commands in reports. This may be required when a print form is generated by the Data Composition System (DCS).
See examples in the demo configuration: the _DemoAttachableCommandsPrintCustomerProformaInvoices data processor in the _DemoAttachableCommands extension and the _DemoPrintCompanyProfile data processor in the configuration.
If necessary, data processors developed this way can also be moved from the configuration extension to the configuration itself without any modifications. Notice.
When a print form template is added to a data processor or report, a user must have the View right to this metadata object to get the template. To do this, add the configuration FullAccess role to the extension. For users without full rights, create a separate role or re-use a suitable role from the configuration. In these roles, add the View right to the data processor or report that contains the template.
Data Exchange Setup
For distributed infobases (DIB) and standalone workstations, add to the exchange plans all the subsystem's metadata objects that contain data except for the following:
- Information register
CommonSuppliedPrintTemplates - Information register
SuppliedPrintTemplates
Attachable Commands
The Attachable commands subsystem provides the API to output various commands in forms, lists, and logs of the application. In particular, its API is used to display commands of the following subsystems: Print Tools, Additional Reports and Data Processors, and Report Options (submenus Print, Reports, Fill, and so on).
Subsystem Setup
Attaching Configuration Object Forms
To attach configuration object forms where you want to display the Print, Reports, or Fill submenu:
-
In the
OnCreateAtServerprocedure (form event handler), insert a call as follows:// StandardSubsystems.AttachableCommands AttachableCommands.OnCreateAtServer(ThisObject); // End StandardSubsystems.AttachableCommands -
Insert procedures (command handlers) in the form module:
// StandardSubsystems.AttachableCommands &AtClient Procedure Attachable_ExecuteCommand(Command) AttachableCommandsClient.StartCommandExecution(ThisObject, Command, <FormObjectOrTable>); EndProcedure &AtClient Procedure Attachable_ContinueCommandExecutionAtServer(ExecutionParameters, AdditionalParameters) Export ExecuteCommandAtServer(ExecutionParameters); EndProcedure &AtServer Procedure ExecuteCommandAtServer(ExecutionParameters) AttachableCommands.ExecuteCommand(ThisObject, ExecutionParameters, <FormObjectOrTable>); EndProcedure &AtClient Procedure Attachable_UpdateCommands() AttachableCommandsClientServer.UpdateCommands(ThisObject, <FormObjectOrTable>); EndProcedure // End StandardSubsystems.AttachableCommands -
If this form is an object form:
- In the
FormObjectOrTableparameter, pass the form attribute of theFormDataStructuretype. Example: - In the
OnReadAtServerhandler of the form, insert a call as follows:&AtServer Procedure OnReadAtServer(CurrentObject) // StandardSubsystems.AttachableCommands AttachableCommandsClientServer.UpdateCommands(ThisObject, <FormObject>); // End StandardSubsystems.AttachableCommands EndProcedure - In the
OnOpenhandler of the form, insert a call as follows:&AtClient Procedure OnOpen(Cancel) // StandardSubsystems.AttachableCommands AttachableCommandsClient.StartCommandUpdate(ThisObject); // End StandardSubsystems.AttachableCommands EndProcedure - In the
AfterWritehandler of the form, insert a call as follows:&AtClient Procedure AfterWrite(WriteParameters) AttachableCommandsClient.AfterWrite(ThisObject, <FormObject>, WriteParameters); EndProcedure - It is also recommended that you call procedures for updating command visibility after changing key attributes (whose values can be used in conditions of command visibility):
AttachableCommandsClient.StartCommandUpdateis for updating command visibility on the client (attaches theAttachable_UpdateCommandsidle handler).AttachableCommandsClientServer.UpdateCommandsis for updating command visibility on the server. It is used if upon the call a server call is made.
- In the
-
If this form is a list form:
-
In the
FormObjectOrTableparameter, pass the form item of theFormTabletype related to the dynamic list. Example:AttachableCommandsClient.ExecuteCommand(ThisObject, Command, Items.List); -
In the
OnActivateRowhandler of the form table, insert a call as follows:&AtClient Procedure <TableName>OnActivateRow(Item) // StandardSubsystems.AttachableCommands AttachableCommandsClient.StartCommandUpdate(ThisObject); // End StandardSubsystems.AttachableCommands EndProcedure
-
Notice:
Make sure the
Referencefield of the dynamic list of the form is available in the command handler. To do this, in properties of theReferencefield nested in the form attribute of theDynamicListtype, select the Use always check box.
- Optional. Add an attribute of the
AttachableCommandsParametersform of an arbitrary type. It allows you to avoid dynamic creation of a form attribute, which speeds up the form opening.
Placing Attachable Commands from Several Sources on a Form
You can place several sets of commands from different sources on the same form. You might need it when you place two or more lists on one form. To do this, call AttachableCommands.OnCreateAtServer for each source. In the second PlacementParameters parameter, specify the source in the CommandsOwner property. Do not specify the Source parameter in the AttachableCommandsClient.StartCommandExecution, AttachableCommands.ExecuteCommand, and AttachableCommandsClientServer.UpdateCommands calls.
Example:
&AtServer
Procedure OnCreateAtServer(Cancel, StandardProcessing)
PlacementParameters = AttachableCommands.PlacementParameters();
PlacementParameters.CommandBar = Items.FormCommands;
PlacementParameters.Sources = Metadata.InformationRegisters._DemoWarehouseDocumentsRegister.Dimensions.Ref.Type;
PlacementParameters.CommandsOwner = Items.List;
AttachableCommands.OnCreateAtServer(ThisObject, PlacementParameters);
PlacementParameters = AttachableCommands.PlacementParameters();
PlacementParameters.CommandBar = Items.CommandBarSalesList;
PlacementParameters.Sources = New TypeDescription("DocumentRef._DemoGoodsSales");
PlacementParameters.CommandsOwner = Items.SalesList;
AttachableCommands.OnCreateAtServer(ThisObject, PlacementParameters);
EndProcedure
&AtClient
Procedure Attachable_ExecuteCommand(Command)
AttachableCommandsClient.StartCommandExecution(ThisObject, Command);
EndProcedure
&AtClient
Procedure Attachable_ContinueCommandExecutionAtServer(ExecutionParameters, AdditionalParameters) Export
ExecuteCommandAtServer(ExecutionParameters);
EndProcedure
&AtServer
Procedure ExecuteCommandAtServer(ExecutionParameters)
AttachableCommands.ExecuteCommand(ThisObject, ExecutionParameters);
EndProcedure
&AtClient
Procedure Attachable_UpdateCommands()
AttachableCommandsClientServer.UpdateCommands(ThisObject);
EndProcedureSee the example in the WarehouseDocumentsRegistry form of the _DemoWarehouseDocumentsRegister information register in the demo configuration.
User Access Setup
To set up access rights, no additional actions are required.
| # | Role Description |
|---|---|
| 1. | BasicAccessSSL or BasicAccessExternalUserSSL (the Core subsystem user role)Grants the right to view information. |
How to Use the Subsystem in Development
Attaching Reports and Data Processors to Configuration Mechanisms
In reports and data processors of the configuration and extensions, you can develop additional commands for configuration objects and display them in the Print, Reports, or Fill submenu. You can also set up report options and override behavior of the common report form. To do this:
- A report or a data processor must be included in the
AttachableReportsAndDataProcessorssubsystem. - In the manager module, the
OnDefineSettingsprocedure must be defined as follows:
#Region Public
#Region ForCallsFromOtherSubsystems
// Defines API content for integration with the configuration.
//
// Parameters:
// Settings - Structure - integration settings for this object.
// See details in AttachableCommandsOverridable.OnDefineAttachableObjectsSettingsComposition.
//
Procedure OnDefineSettings(Settings) Export
EndProcedure
#EndRegion
#EndRegionSettings parameter of the OnDefineSettings procedure of the data processors included in the AttachableReportsAndDataProcessors subsystem:| Setting | Type | Details |
|---|---|---|
Location |
Array of MetadataObject |
Objects to which this object is attached. The AddPrintCommands, AddFillCommands, and AddReportCommands procedures are called from forms of those metadata objects that are specified in this parameter. |
AddPrintCommands |
Boolean |
If True, define the procedure in the manager module as follows:// Populates a list of print commands. |
AddFillCommands |
Boolean |
If True, define the procedure in the manager module as follows:// Defines a list of population commands. |
- Structure of the
Settingsparameter of theOnDefineSettingsprocedure of the reports included in theAttachableReportsAndDataProcessorssubsystem:
| Setting | Type | Details |
|---|---|---|
Location |
Array of MetadataObject |
Objects to which this object is attached. The AddPrintCommands, AddFillCommands, and AddReportCommands procedures are called from forms of those metadata objects that are specified in this parameter. |
AddPrintCommands |
Boolean |
If True, define the procedure in the manager module as follows:// Populates a list of print commands. |
AddFillCommands |
Boolean |
If True, define the procedure in the manager module as follows:// Defines a list of population commands. |
AddReportCommands |
Boolean |
If True, define the procedure in the manager module as follows:// Defines a list of report commands. |
CustomizeReportOptions |
Boolean |
If True, define the procedure in the manager module as follows:// Configures report visibility on the report panel. |
DefineFormSettings |
Boolean |
A report has an API for deep integration with the report form. It can also override some form settings and subscribe to the form events. If True and the report is attached to the ReportForm common form, define the procedure in the report object module as follows:// Settings of a common report form of the "Report options" subsystem. |
For more examples, see the configuration objects and extensions included in the AttachableReportsAndDataProcessors subsystem.
Developing and Attaching Generation Commands
Use generation commands to quickly generate a new document (object) based on data of an existing object. For example, a document can be generated and prepopulated based on a catalog item. Generation commands are defined in the configuration code and extensions and are automatically displayed in the Generate submenu in forms of items, documents, lists and logs of application objects.
As in case of standard generation commands, the command handler is the Filling procedure in the object module. Additional attachable generation commands have the following features:
- The automatically generated Generate submenu is displayed as a picture and is smaller, leaving space for other important commands.
- You do not need to configure visibility check boxes and set up the order of commands in the form in Designer.
- You can manage content, order and presentation of commands from the base object side.
- You can dynamically change the command composition in the submenu depending on the selected items in the list and depending on the object attribute values.
- You can group commands inside the submenu.
- You can use keyboard shortcuts and pictures for generation commands.
To prevent duplicating generation commands added programmatically with default ones from metadata, a hybrid mode is provided. In this mode, platform-generated commands on forms are automatically transferred to the submenu of programmatically created commands. However, to simplify configuration support, it is recommended that only one method be used to add generation commands (either through metadata or programmatically) for all configuration objects.
How to attach:
-
Select objects with generation commands as well as objects from which other objects can be generated. List all of these objects in the
OnDefineObjectsWithCreationBasedOnCommandsprocedure of theGenerateFromOverridablecommon module. Example:Procedure OnDefineObjectsWithCreationBasedOnCommands(Objects) Export Objects.Add(Metadata.Documents._DemoCustomerProformaInvoice); Objects.Add(Metadata.Documents._DemoGoodsSales); Objects.Add(Metadata.Documents._DemoInventoryTransfer); EndProcedure -
In the manager module of each selected object, insert the
AddGenerateCommandfunction and theAddGenerationCommandsprocedure. -
In the
AddGenerateCommandfunction, implement adding a command to create this object. An example for the_DemoGoodsWriteOffdocument:Function AddGenerateCommand(GenerationCommands) Export If AccessRight("Insert", Metadata.Documents._DemoGoodsWriteOff) Then CreateBasedOnCommand = GenerationCommands.Add(); CreateBasedOnCommand.Manager = Metadata.Documents._DemoGoodsWriteOff.FullName(); CreateBasedOnCommand.Presentation = Common.ObjectPresentation(Metadata.Documents._DemoGoodsWriteOff); CreateBasedOnCommand.WriteMode = "Post"; Return CreateBasedOnCommand; EndIf; Return Undefined; EndFunctionIn the simplest scenario, you can use the
GenerateFrom.AddGenerationCommandfunction. Example:Function AddGenerateCommand(GenerationCommands) Export Return GenerateFrom.AddGenerationCommand(GenerationCommands, Metadata.Documents._DemoGoodsWriteOff); EndFunction -
In the
AddGenerationCommandsprocedure, insert the procedure calls for adding commands of objects that can be generated from the object where this procedure is placed. An example for the_DemoCustomerProformaInvoicedocument:Procedure AddGenerationCommands(GenerationCommands, Parameters) Export Documents._DemoGoodsWriteOff.AddGenerateCommand(GenerationCommands); Documents._DemoGoodsSales.AddGenerateCommand(GenerationCommands); Documents._DemoInventoryTransfer.AddGenerateCommand(GenerationCommands); EndProcedure
Generation Command Parameters
| Parameter | Type | Details |
|---|---|---|
Presentation (required) |
String |
A command presentation in the form. Example:Command.Presentation = NStr("en = Fill in waybill'"); |
Id (optional) |
String |
A command ID used to identify the command and define its name in the form. If not specified, the command name will be defined automatically. |
Importance (optional) |
String |
A short name (suffix) of a submenu group to display the command. Valid values: Important, Ordinary, and SeeAlso. |
Order (optional) |
Number |
A value from 1 to 100 that indicates the command position among other commands. Commands are sorted first by the Order field and then by presentation.Default value: 50. |
Shortcut (optional) |
Shortcut |
A shortcut for a quick command call. |
Generation Command Parameters. Visibility and Availability Settings
| Parameter | Type | Details |
|---|---|---|
ParameterType (optional) |
TypeDescription |
Types of objects the command is intended for. It is used to refine a list of objects a certain command is attached to when a data processor or another command provider is attached to multiple configuration objects. |
VisibilityInForms (optional) |
String |
Comma-delimited names of the forms to add a command to. Used to refine a list of forms a particular command is attached to. If the parameter is not specified, the command will be displayed in all forms. Example:Command.VisibilityInForms = "DocumentForm" |
FunctionalOptions (optional) |
String |
Comma-delimited names of functional options that affect the command visibility. |
VisibilityConditions (optional) |
Array |
Defines the command conditional visibility. To add conditions, use procedure AttachableCommands.AddCommandVisibilityCondition.Use "And" to specify multiple conditions. |
Generation Command Parameters. Execution Settings
| Parameter | Type | Details |
|---|---|---|
MultipleChoice (optional) |
Boolean |
If True, the command supports multiple-choice selection and the first parameter of the command handler passes a reference array.If False, the command supports single-choice selection and the first parameter of the command handler passes a reference. |
WriteMode (optional) |
String |
Settings of additional checks and actions related to object writing and executed before the command handler:
Example: Command.WriteMode = "Post"; Before writing or posting the object, users are asked for confirmation. Default value: Write. |
Optional. To optimize performance when opening the form, it is recommended that you add a submenu with generation commands to the command bar:
- Name:
CreateBasedOnSubmenu. - Title: Generate.
- Type:
Submenu. - Representation:
Picture. - Picture:
InputOnBasis(standard picture).
See examples of commands and their handlers in the following documents: _DemoGoodsReceipt, _DemoGoodsSales, and _DemoGoodsWriteOff.
Developing and Attaching Population Commands
Population commands are designed to implement various methods of populating attributes and tables of existing documents (objects). For example, to import data into a document from an external source, to prepopulate a document from a template, and so on. The list of commands is defined in the configuration code and configuration extensions and is automatically grouped in the Fill submenu in the forms of items and documents, in lists and logs of application objects.
How to attach:
- Select objects for which population commands need to be displayed and list them in the
OnDefineObjectsWithFIllingCommandsprocedure of theObjectsFillingOverridablecommon module. - Insert the
AddFillCommandsprocedure in the manager module of each object listed in the previous step as follows:// Defines a list of population commands. // // Parameters: // FillingCommands - ValueTable - a table of population commands. For changing. // See details of parameter 1 of procedure ObjectsFillingOverridable.BeforeAddFillCommands. // Parameters - Structure - secondary parameters. For reading. // See details of parameter 2 of procedure ObjectsFillingOverridable.BeforeAddFillCommands. // Procedure AddFillCommands(FillingCommands, Parameters) Export … EndProcedure - Describe object population commands in the
AddFillCommandsprocedure of the manager module that belongs to this object. Example:// Defines a list of population commands. // // Parameters: // FillingCommands - ValueTable - a table of population commands. For changing. // See details of parameter 1 of procedure ObjectsFillingOverridable.BeforeAddFillCommands. // Parameters - Structure - secondary parameters. For reading. // See details of parameter 2 of procedure ObjectsFillingOverridable.BeforeAddFillCommands. // Procedure AddFillCommands(FillingCommands, Parameters) Export Command = FillingCommands.Add(); … EndProcedure - Describe population commands used in all (or most) metadata objects in the
BeforeAddFillCommandsprocedure of theObjectsFillingOverridablecommon module. Example:Procedure BeforeAddFillCommands(FillingCommands, ObjectSettings, StandardProcessing) Export ... // Universal population command for catalogs. If Metadata.Catalogs.Contains(ObjectSettings.Metadata) Then Command = FillingCommands.Add(); … EndIf; … EndProcedure - Describe population commands used for two or more objects in a separate data processor and include this data processor in the
AttachableReportsAndDataProcessorssubsystem. Add theOnDefineSettingsandAddFillCommandsprocedures to the manager module. For more information, see the template for Attaching Reports and Data Processors to Configuration Mechanisms. Example:#Region Public // Defines API content for integration with the configuration. // // Parameters: // Settings - Structure - integration settings for this object. // See the return value of function AttachableCommands.AttachableReportsAndProcessorsSettings. // Procedure OnDefineSettings(Settings) Export Settings.Location.Add(Metadata.Documents.DocumentName); Settings.AddFillCommands = True; EndProcedure // Defines a list of population commands. // // Parameters: // FillingCommands - ValueTable - a table of population commands. For changing. // See details of parameter 1 of procedure ObjectsFillingOverridable.BeforeAddFillCommands. // Parameters - Structure - secondary parameters. For reading. // See details of parameter 2 of procedure ObjectsFillingOverridable.BeforeAddFillCommands. // Procedure AddFillCommands(FillingCommands, Parameters) Export Command = FillingCommands.Add(); … EndProcedure #EndRegion
The AddFillCommands procedure for data processors attached using this method is called for all metadata objects specified in the Location parameter of the OnDefineSettings procedure.
Object Population Command Parameters
| Parameter | Type | Details |
|---|---|---|
Presentation (required) |
String |
A command presentation in the form. Example:Command.Presentation = NStr("en = Fill in waybill'"); |
Id (optional) |
String |
A command ID used to identify the command and define its name in the form. If not specified, the command name will be defined automatically. |
Importance (optional) |
String |
A short name (suffix) of a submenu group to display the command. Valid values: Important, Ordinary, and SeeAlso. |
Order (optional) |
Number |
A value from 1 to 100 that indicates the command position among other commands. Commands are sorted first by the Order field and then by presentation.Default value: 50. |
Shortcut (optional) |
Shortcut |
A shortcut for a quick command call. |
Object Population Command Parameters. Population Command Handler
| Parameter | Type | Details |
|---|---|---|
Manager (optional) |
String |
Full name of the metadata object where the command was indicated. It is automatically populated with a full name of the object in whose manager module the command is added. |
Handler (required if FormName is not specified) |
String |
Name of the procedure that handles the main action of the command Example 1. A handler is placed in the common module: Command.Handler = "SalesClient.EnterTaxInvoice";Example 2. A handler is placed in the form module or manager module: Command.Handler = "FillWaybill";If FormName is filled in, a client procedure is expected in the specified form module as follows:&AtClientIf FormName is empty, a server procedure is expected in the object manager module specified in Manager:Procedure <ProcedureName>(<CommandParameterName>, ExecutionParameters) ExportIt is recommended that you specify the first parameter name of the CommandParameterName command handler according to the types of objects the command is intended for. Keep in mind that the type of this parameter depends on the MultipleChoice setting. If MultipleChoice = True, a reference array is passed. If <code>False</code>, a reference is passed. For example, if the command is to populate the ProformaInvoices documents and MultipleChoice is enabled, the parameter can be named ProformaInvoicesArray or ProformaInvoices. If MultipleChoice is disabled, the parameter can be named ProformaInvoice or ProformaInvoiceRef.The second parameter of the ExecutionParameters command handler has the Structure type with the following fields:
|
FormName (required if Handler is not specified) |
String |
Name of the form the command will receive. If Handler is not specified, the Open method is called. |
FormParameters (optional) |
Structure, Undefined |
Parameters of the form specified in FormName. |
AdditionalParameters (optional) |
Structure, Undefined |
Additional parameters that can be read in the command handler. |
Object Population Command Parameters. Visibility and Availability Settings
| Parameter | Type | Details |
|---|---|---|
ParameterType (optional) |
TypeDescription |
Types of objects the command is intended for. It is used to refine a list of objects a certain command is attached to when a data processor or another command provider is attached to multiple configuration objects. |
VisibilityInForms (optional) |
String |
Comma-delimited names of the forms to add a command to. Used to refine a list of forms a particular command is attached to. If the parameter is not specified, the command will be displayed in all forms. Example:Command.VisibilityInForms = "DocumentForm" |
FunctionalOptions (optional) |
String |
Comma-delimited names of functional options that affect the command visibility. |
VisibilityConditions (optional) |
Array |
Defines the command conditional visibility. To add conditions, use procedure AttachableCommands.AddCommandVisibilityCondition.Use "And" to specify multiple conditions. |
Object population command parameters. Execution settings
| Parameter | Type | Details |
|---|---|---|
MultipleChoice (optional) |
Boolean |
If True, the command supports multiple-choice selection and the first parameter of the command handler passes a reference array.If False, the command supports single-choice selection and the first parameter of the command handler passes a reference. |
WriteMode (optional) |
String |
Settings of additional checks and actions related to object writing and executed before the command handler:
Example: Command.WriteMode = "DoNotWrite"; Before writing or posting the object, users are asked for confirmation. Default value: Write. |
FilesOperationsRequired (optional) |
Boolean |
If True, in the web client, users are prompted to install 1C:Enterprise Extension before running the command. |
See examples of commands and their handlers in the _DemoAttachableCounterpartiesFillingCommands data processor of the _DemoAttachableCommands extension of the demo configuration.
Optional. To optimize performance when opening the form, it is recommended that you add a submenu with population commands to the command bar:
- Name:
FillSubmenu. - Title: Fill.
- Type:
Submenu. - Representation:
Picture. - Picture:
FillForm(picture from configuration).
Besides the main submenu, an additional submenu can be displayed in the form (for example, to populate tables). The names of these submenus are specified in the Group property of the commands to be output in these submenus. Create names of table population submenus by adding a prefix with a table name, for example, GoodsFillSubmenu.
Adding Custom Kinds of Attachable Commands
In the standard package, the following kinds of attachable commands are available: print forms, reports, generation and population commands. You can also add your own kinds of attachable commands.
To do this, in the AttachableCommandsOverridable module:
- In the
OnDefineAttachableCommandsKindsprocedure, define custom kinds of attachable commands and set default values to display a submenu with commands of these kinds. Example: Procedure OnDefineAttachableCommandsKinds(AttachableCommandsKinds) ExportKind = AttachableCommandsKinds.Add(); Kind.Name = "Motivators"; Kind.SubmenuName = "MotivatorsSubmenu"; Kind.Title = NStr("en = 'Motivators'"); EndProcedure - In the
OnDefineAttachableObjectsSettingsCompositionprocedure, describe a key (for example, of theBooleantype) that will indicate that an object provides commands of this kind. Example:Procedure OnDefineAttachableObjectsSettingsComposition(InterfaceSettings4) Export Setting = InterfaceSettings4.Add(); Setting.Key = "AddMotivators"; Setting.TypeDescription = New TypeDescription("Boolean"); Setting.AttachableObjectsKinds = "DataProcessor"; EndProcedure - In the
OnDefineCommandsAttachedToObjectprocedure, add commands of this kind that match the passed context. Example:Procedure OnDefineCommandsAttachedToObject(FormSettings, Sources, AttachedReportsAndDataProcessors, Commands) Export <SubsystemModule>.OnDefineCommandsAttachedToObject(FormSettings, Sources, AttachedReportsAndDataProcessors, Commands); EndProcedure - Describe how to develop commands of this kind in the documentation.
Data Exchange Setup
The subsystem does not participate in data exchange.
Duplicate Cleaner
With the Duplicate cleaner subsystem, you can find and delete duplicate items (for example, catalog items) by replacing them with the selected item in all occurrences.
Subsystem Setup
If a configuration does not include the Application settings subsystem, add the DuplicateObjectsDetection data processor to the Administrator workspace. As an example, see the Organizer form of the SSLAdministrationPanel data processor.
Merging Duplicates and Searching for List Item Occurrences
Define configuration objects whose lists must have an option for merging duplicates and occurrences of the selected items. These can be catalogs, charts of characteristic types, chart of accounts, or charts of calculation types, which often have duplicates due to manual data input or data synchronization with other applications. These duplicates must be eliminated quickly.
If the Attachable Commands subsystem is integrated, you can display the Merge selected items and Replace selected items commands in forms of lists and journals in More actions > Tools. To do that, list the objects in the OnDefineObjectsWithReferenceReplacementDuplicatesMergeCommands procedure of the DuplicateObjectsDetectionOverridable common module:
Procedure OnDefineObjectsWithReferenceReplacementDuplicatesMergeCommands(Objects) Export
// _Demo example start
Objects.Add(Metadata.Catalogs._DemoProducts);
// _Demo example end
EndProcedureIf the Attachable Commands subsystem is not used, you can add the MergeSelectedItems (Merge selected items) and ShowUsageInstances (Occurrences) commands directly to the forms:
// StandardSubsystems.DuplicateObjectsDetection
&AtClient
Procedure MergeSelectedItems(Command)
DuplicateObjectsDetectionClient.MergeSelectedItems(Items.List);
EndProcedure
&AtClient
Procedure ShowUsageInstances(Command)
DuplicateObjectsDetectionClient.ShowUsageInstances(Items.List);
EndProcedure
// End StandardSubsystems.DuplicateObjectsDetectionWe recommend adding the specified commands to the More actions submenu and to the context menu of the list. As an example, see the _DemoIndividuals catalog.
If the Report Options and Attachable Commands subsystems are integrated, you can automatically output the ShowUsageInstances command (instead of adding it manually) in all forms that have the Reports submenu. To do so, insert a call as follows in the BeforeAddReportCommands procedure of the ReportsOptionsOverridable module:
Procedure BeforeAddReportCommands(ReportsCommands, Parameters, StandardProcessing) Export
Reports.SearchForReferences.AddUsageInstanceCommand(ReportsCommands);
EndProcedureRestrictions on Replacing References, Searching and Deleting Duplicates
When using the ReferenceReplacement data processor and the ReplaceReferences procedure of the Common common module, you can control whether it is possible to replace one reference with another. For this purpose, add the CanReplaceItems function to the manager module of the controlled object (a catalog, a chart of characteristic types, and so on). In the procedure, implement an algorithm that analyzes the offered replacements and returns details of an invalid reference replacement error.
You can also implement a custom logic for duplicate search when calling the FindItemDuplicates function of the DuplicateObjectsDetection common module and when using the DuplicateObjectsDetection data processor. To do so, define two procedures in the manager module of the required object:
- The
DuplicatesSearchParametersprocedure where you can override duplicate search parameters specified by the user or programmatically. - The
OnSearchForDuplicatesprocedure where you need to implement a custom logic of detecting duplicates.
For examples of implementation, description, and use of these functions, see the _DemoProducts catalog manager module. As an example of using the API, see the handler of the form module record of the same catalog.
Replacing Related Subordinate Objects
When using the ReferenceReplacement data processor and the ReplaceReferences procedure of the Common common module, you might need to replace not only references but also related objects. For example, when you replace a counterparty, you need to replace a bank account too. Or, when replacing product items, you need to collapse related dimension keys.
To do this, describe the list of subordinate objects and their links in the OnDefineSubordinateObjectsLinks procedure of the CommonOverridable module:
Procedure OnDefineSubordinateObjects (SubordinateObjects) Export
SubordinateObject = SubordinateObjects.Add();
SubordinateObject.SubordinateObject = Metadata.Catalogs.BankAccounts;
SubordinateObject.LinksFields = "Owner, AccountNumber, BankBIC";
SubordinateObject.OnSearchForReferenceReplacement = "Catalogs.BankAccounts";
SubordinateObject = SubordinateObjects.Add();
SubordinateObject.SubordinateObject = Metadata.Catalogs.ProductDimensionKeys;
SubordinateObject.LinksFields = Catalogs.ProductDimensionKeys.KeyAttributes();
SubordinateObject.OnSearchForReferenceReplacement = "Catalogs.ProductDimensionKeys";
SubordinateObject.RunReferenceReplacementsAutoSearch = True;
EndProcedureLink Parameters of Subordinate Objects
| Parameter | Type | Details |
|---|---|---|
SubordinateObject (required) |
MetadataObject |
Subordinate object metadata. |
LinksFields (required) |
String, Structure, Map. |
The list of subordinate object attributes that contain references to the main objects. |
OnSearchForReferenceReplacement (optional) |
String |
The procedure is called if the automatic search is disabled or the value for the replacement was not found automatically. If the parameter is filled in, the OnSearchForReferenceReplacement procedure is expected as follows:Procedure OnSearchForReferenceReplacement(ReplacementPairs, UnprocessedOriginalsValues) ExportParameters:
_DemoBankAccounts catalog manager module. |
RunReferenceReplacementsAutoSearch (optional) |
Boolean |
If True, an attempt will be made to find a replacement for a subordinate object by matching link fields considering replacements of main objects. |
See an example in the demo configuration.
User Access Setup
To manage user access to the subsystem, assign a user the roles specified in the table below.
| # | Role Description |
|---|---|
| 1. | BasicAccessSSL and BasicAccessExternalUserSSL (the Core subsystem user role)Grants the right to view the Occurrences report and to replace and merge items as permitted by access rights. |
| 2. | FullAccess (the Core subsystem user role)Grants the right to delete duplicates replacing them with the selected item in all occurrences. |
How to Use the Subsystem in Development
Reference Update Management
When replacing references in documents, documents are written without reposting not to break the sequence. Therefore, the Posting event is not triggered, and the workflow of posting documents into record registers does not start. For more information, see Reference Update Management.
Data Exchange Setup
The subsystem does not participate in data exchange.
Full-Text Search
Use the Full-text search subsystem to enable full-text search in the configuration. Data for full-text search can be indexed with the FullTextSearchMergeIndex and FullTextSearchIndexUpdate scheduled jobs.
Subsystem Setup
To use the subsystem in the configuration, assign the SearchForm common form as the main configuration search form. Display the SimplifiedForm form of the FullTextSearchInData data processor on the home page.
Displaying the Subsystem Settings in Custom Forms
If the configuration does not include the Application settings subsystem, to open the full-text search settings in the administrator's interface, add a command that invokes the ShowFullTextSearchAndTextExtractionManagement procedure of the FullTextSearchClient common module.
If the configuration contains the File management subsystem, the FullTextSearchAndTextExtractionControl form of the FullTextSearchInData data processor also allows you to set up automatic extraction of texts from files to include them into the full-text search index.
To display the subsystem settings in a custom form:
- Create the
UseFullTextSearchform attribute of theNumbertype to control the settings check box to be displayed in form items. - In the
OnCreateAtServerform event handler, call theUseSearchFlagValueprocedure of theFullTextSearchServercommon module. - In the
NotificationProcessingform event handler, call theUseSearchFlagChangeNotificationProcessingprocedure of theFullTextSearchClientcommon module. - When changing the
UseFullTextSearchform attribute, call theOnChangeUseSearchFlagprocedure of theFullTextSearchClientcommon module.
User Access Setup
To manage user access to the subsystem, assign a user the roles specified in the table below.
| # | Role Description |
|---|---|
| 1. | BasicAccessSSL (the Core subsystem user role)Grants the right to use full-text search features, update and merge the full-text search index. |
| 2. | FullAccess (the Core subsystem user role)Grants the right to enable and disable full-text search. |
How to Use the Subsystem in Development
Data Exchange Setup
Include the UseFullTextSearch constant only in the initial image of subordinate nodes of distributed infobases (DIB) and standalone workstations. For more information, see Creation of Subordinate Node Initial Image.
Network Download
The Network download subsystem supplements the configuration with an API for downloading files from the Internet via HTTP, HTTPS and FTP and saving the downloaded files to the client, the server, or a temporary storage.
Subsystem Setup
To use the subsystem in the configuration:
- If the configuration does not include the Application settings subsystem, in the Administrator command interface, display a command to open the
ProxyServerParameterscommon form. On this form, configure the proxy server to access the Internet on 1C:Enterprise server. The command code:OpenForm("CommonForm.ProxyServerParameters"); - In the form of personal infobase settings (for an infobase user), display the proxy server configuration command to access the Internet from the client workstation. The command code:
OpenForm("CommonForm.ProxyServerParameters", New Structure("ProxySettingAtClient", True));
User Access Setup
To manage user access to the subsystem, assign a user the roles specified in the table below.
| # | Role Description |
|---|---|
| 1. | BasicAccessSSL (the Core subsystem user role)Grants the right to get files from the Internet and set up proxy server parameters on the client. |
| 2. | SystemAdministrator (the Core subsystem user role)Grants the right to set up proxy server parameters on 1C:Enterprise server. |
The table below illustrates possible user groups and the roles they could be assigned with.
| # | User Group Description | Assigned Roles |
|---|---|---|
| 1. | Administrator
|
|
| 2. | User with limited rights
|
|
How to Use the Subsystem in Development
When creating objects HTTPConnection, FTPConnection, WSDefinitions, and WSProxy, specify proxy server settings returned by the GetFilesFromInternet.GetProxy function.
See the subsystem API description in the API documentation (in Russian).
Data Exchange Setup
Do not add the subsystem's objects to exchange plans used for data synchronization between different applications or to exchange plans of distributed infobases and standalone workstations.
Users
With the Users subsystem, you can manage the list of internal users (items of the Users catalog) and external users (items of the External users catalog). Each item in the catalogs is mapped with an infobase user.
External users are people outside the business entity who use accounting information. In 1C:Enterprise, an external user is represented by a metadata object. For example, a business partner could be an item of the Partners catalog. The Users subsystem provides tools to map external users with infobase objects.
Subsystem Setup
First, define the infobase objects that you need to map with external users. For example, the Partners catalog. Add the infobase objects to the following:
- Type collections
ExternalUser(references) andExternalUserObject(objects). - Property
Typeof theExternalAccesscommand parameter of theExternalUserscatalog. - Type collection
User(references), which includesCatalogRef.Users.
The Users catalog includes the Individual and Department attributes. To allow user input into these attributes, specify the types in the Individual and Department type collections. If user input is not required, leave the type collections empty. Then, these attributes will not appear in the Users catalog item form.
Command Interface Setup
If the configuration does not contain the Application settings subsystem, add the following metadata objects to the administrator's command interface:
Userscatalog:- To allow internal users to view the user list and user properties and to select users.
- To allow administrators and user list owners to manage the user list.
ExternalUserscatalog:- To allow internal users to view the external user list and external user properties and to select external users.
- To allow administrators and user list owners to manage the external user list.
UseExternalUsersflag. To allow administrators to toggle the external user mechanism.UseUserGroupsflag. To allow administrators to toggle the user group and external user group mechanism.
As an example, see the UsersAndRightsSettings form of the SSLAdministrationPanel data processor.
To allow users to manage their personal settings, add the User details command to the personal settings form. As an example, see the Main tab of the _DemoMySettings form.
For the convenience of external users, you can add some forms available to external users to the desktop. For example, the Sales order form so that a partner could place an order.
User Roles
The list of roles available to a user depends on the role assignment scope. For example, internal users do not have access to external user roles. When a user signs in, 1C:Enterprise does a security check of the roles. In SaaS mode, it checks the internal user roles, in the hosted mode, it checks the external user roles. Roles assignment scope is also checked on the access group profile level. For more information, see the Access Management subsystem.
Specify the roles that have a restricted assignment scope in the OnDefineRoleAssignment procedure of the UsersOverridable common module. This is not applicable to other roles. The role assignment is described in the comment to the OnDefineRoleAssignmentprocedure.
// Specifies roles that have a restricted assignment scope. Do not specify other roles here;
// these roles are designed for all users except for external users.
//
// Parameters:
// RolesAssignment - Structure - has the following properties:
// * ForSystemAdministratorsOnly - Array - set of roles that are designed:
// - In the shared data mode, for all users except external users.
// - In the separated data mode, for service administrators. For example:
// Administration, UpdateDataBaseConfiguration, SystemAdministrator.
// And all roles with the following access rights:
// Administration
// Configuration extension administration
// Update database configuration
// Generally, such roles are present only in SSL and are not used in applications.
//
// * ForSystemUsersOnly - Array - set of roles that are designed:
// - In the shared data mode, for all users except external users.
// - In the separated data mode, for technical service and administrators.
// For example:
// AddEditAddressInfo, AddEditBanks.
// And all roles that give the rights to modify shared data and the following rights:
// - Thick client
// - External connection
// - Automation
// - "Functions for technician" mode
// - Interactive open external data processors
// - Interactive open external reports
// Generally, such roles are present in SSL but can be used in applications.
//
// * ForExternalUsersOnly - Array - set of roles designed
// only for external users (roles with a special set of rights). For example:
// AddEditQuestionnaireQuestionsAnswers, BasicAccessExternalUserSSL.
// Such roles are present in SSL and the applications that use external users.
//
// * BothForUsersAndExternalUsers - Array - set of roles designed
// for all users (internal, external, and shared). For example:
// ReadQuestionnaireQuestionAnswers, UsingReportOptions.
// Such roles are present in SSL and the applications that use external users.
//
Procedure OnDefineRoleAssignment(RolesAssignment) Export
// ForExternalUsersOnly.
RolesAssignment.ForExternalUsersOnly.Add(
Metadata.Roles._DemoInvoicesPaymentByExternalUsers.Name);
RolesAssignment.ForExternalUsersOnly.Add(
Metadata.Roles._DemoReadAuthorizationObjectsData.Name);
// BothForUsersAndExternalUsers.
RolesAssignment.BothForUsersAndExternalUsers.Add(
Metadata.Roles._DemoReadDataForAnswersToQuestionnaireQuestions.Name);
EndProcedureNotice.
To apply the changes during development and debugging, update the service data. For more information, see Service Data Update.
External User List
If you need to grant employees and partners external access to an application, add to the catalog list form a column that will indicate the external access privilege. For example, the configuration contains the _DemoPartners catalog that is the authorization object for the ExternalUsers catalog. To indicate that partners have the external access, add the LEFT JOIN clause to the dynamic list query to join the _DemoPartners catalog with the ExternalUsers catalog by the AuthorizationObject column.
The original query:
SELECT ALLOWED
Catalog_DemoPartners.Ref AS Ref,
Catalog_DemoPartners.Description AS Description
FROM
Catalog._DemoPartners AS Catalog_DemoPartnersThe modified query:
SELECT ALLOWED
-1 AS ExternalAccessPicNum,
NOT ExternalUsers.Ref IS NULL
AND NOT ExternalUsers.Invalid
AND NOT ExternalUsers.DeletionMark AS ExternalAccess,
Catalog_DemoPartners.Ref AS Ref,
Catalog_DemoPartners.Description AS Description
FROM
Catalog._DemoPartners AS Catalog_DemoPartners
{LEFT JOIN Catalog.ExternalUsers AS ExternalUsers
ON Catalog_DemoPartners.Ref = ExternalUsers.AuthorizationObject}Also, add the following code block to the OnCreateAtServer event:
ExternalUsers.ShowExternalUsersListView(ThisObject);Insert the following code into the table item event of the OnGetDataAtServer dynamic list:
ExternalUsers.ExternalUserListOnRetrievingDataAtServer(TagName, Settings, Rows);Under the table item of the dynamic list, add the ExternalAccessLegend group with state description.
See the example in the ListForm and ChoiceForm forms of the _DemoPartners and _DemoPartnersContactPersons catalogs in the demo infobase.
Special Cases of Integration
User Access Setup
To manage user access to the subsystem, assign a user the roles specified in the table below.
| # | Role Description |
|---|---|
| 1. | BasicAccessSSL (the Core subsystem user role)Grants the right to read the user list. |
| 2. | AddEditUsers (must be complemented by BasicAccessSSL)Grants the right to add and edit users and user groups. Does not grant the permission to manage user access rights. This is an auxiliary role designed to give the human resource personnel and clerks the right to add new employees, correct typos in user names, update contact information, and create new user groups. The role aims to reduce administrative tasks in large companies. |
| 3. | ReadExternalUsers (must be complemented by ReadAuthorizationObjectsData)Grants the right to read external users and external user groups. |
| 4. | AddEditExternalUsers (must be complemented by ReadAuthorizationObjectsData)Grants the right to add and edit external users and external user groups. Does not grant the permission to manage the external user access rights. This is an auxiliary role designed to give the salespersons and sales assistants, and procurement specialists the right to add prospective customers and vendors and create external user groups. The role aims to reduce administrative tasks in large companies. |
| 5. | FullAccess (the Core subsystem user role)Grants the right to add and edit internal users and user groups, external users and user groups, and user access rights. Grants the right to edit usernames and passwords, and other user properties. Grants the right to toggle the external user mechanism. Grants the right to delete the objects that belong to this subsystem and are marked for deletion. |
To grant users access to the data that belongs to other subsystems and might be required to work with the Users subsystem, create auxiliary roles or re-use existing suitable roles.
| # | Auxiliary Role Description |
|---|---|
| 1. | <ReadAuthorizationObjectsData>Grants the right to view authorization object information. |
The table below illustrates possible user groups and the roles they could be assigned with.
| # | User Group Description | Assigned Roles |
|---|---|---|
| 1. | Administrator |
|
| 2. | User list owner (auxiliary role) |
|
| 3. | Eternal user list owner (auxiliary role) |
|
| 4. | External user specialist (auxiliary role) |
|
| 5. | External user |
|
Special Cases of Integration
- How to Integrate "Users" Subsystem without "Contact Information" Subsystem
- How to Integrate "Users" Subsystem without "Properties" Subsystem
How to Use the Subsystem in Development
When you create a new metadata object, you have to set up the subsystem policies on the new objects. For example, you might need to review and edit the list of authorization objects.
To get the reference to a user who signed in to an infobase, use the AuthorizedUser function of the UsersClientServer common module. This function returns the reference to the item of the Users catalog or the ExternalUsers catalog.
If 1C:Enterprise must execute a piece of code only during an internal user session, use the CurrentUser function of the UsersClientServer common module. This function returns the reference to the item of the Users catalog. If the application tries to call the function during an external user session, 1C:Enterprise throws an exception.
If 1C:Enterprise must execute a piece of code only during an external user session, use the CurrentExternalUser function. This function returns the reference to the item of the ExternalUsers catalog. If the application tries to call the function during an internal user session, 1C:Enterprise throws an exception.
Invalid Users
User forms have the Invalid flag that is associated with the Invalid attribute. The default attribute value is False. When you set the Invalid, 1C:Enterprise hides the user from the user list and user choice list. The user also does not appear in search results. To display invalid and valid users in the user list and user choice list, set the Show invalid users flag.
The Users catalog supports the mechanics out of the box. When you open the user list or user choice list, the Show invalid users flag is cleared by default. When you enter a search string to find a user, the Invalid search query parameter is set to False unless the Invalid attribute's value has already been passed.
You might need to rework the existing mechanics when you:
- Develop a custom user choice list. For example, a form similar to the
SelectBusinessProcessPerformercommon form. - Develop a report that might include invalid users. For example, the application
1:Data Managementhas a report that shows tasks by department. A task is assigned to a user role, and the department is defined by the users that are assigned to the role. Invalid users are hidden from the list, which means that the report will miss the departments they belong to. - Address the catalog with a query or programmatically.
Utility Users
The Users catalog has the IsInternal attribute whose value can be set programmatically to hide the following types of users from the interface:
- Users connecting to the application via HTTP services, web services, external connections, and others.
- Users with special permissions who run scheduled tasks when the default user cannot do this. For example, when you need to access the collaboration system or apply limited permissions.
- Service administrators in data areas of SaaS applications.
If the value of the IsInternal attribute is set to True, 1C:Enterprise hides the user from the user list and user choice list. The user also does not appear in search results. Other user interfaces do not automatically support this behavior, so it should be implemented separately.
Utility users are only created programmatically, and once they are created, the IsInternal flag must not be changed. Make sure to programmatically assign roles to utility users. Keep them updated when migrating to a new version and in other scenarios. When using the Access management subsystem, the role composition for utility users remains unchanged, unlike other users whose roles are calculated and assigned automatically when they are included or excluded from access groups.
For utility users who run scheduled jobs, disable authentication and instead of assigning them administrator roles, enable a privileged mode that only allows them to perform required actions.
External Users
When you develop a form (workspace) intended only for external users, make sure that internal users cannot open the form. To do so, add the Cancel parameter to the IsExternalUserSession function of the UsersClientServer common module when 1C:Enterprise creates the form on the server:
&AtServer
Procedure OnCreateAtServer(Cancel, StandardProcessing)
If Not UsersClientServer.IsExternalUserSession() Then
Cancel = True;
Return;
EndIf;
…
EndProcedureAccess.Access Event Logging Settings
You can use the Access.Access log event to audit access to the data of interest. Avoid writing settings for this event directly using the SetEventLogEventUse platform method. Instead, use the following API:
- Procedure
OnDefineRegistrationSettingsForDataAccessEventsof common moduleUsersOverridable - Function
RegistrationSettingsForDataAccessEventsof common moduleUsers - Procedure
UpdateRegistrationSettingsForDataAccessEventsof common moduleUsers
This allows each mechanism to store its settings separately and apply the common result to the infobase when the settings are changed without the risk of overwriting other mechanisms' settings. To achieve this, place a call to your procedure that adds the required settings to procedure UsersOverridable.OnDefineRegistrationSettingsForDataAccessEvents. To apply the settings, call procedure Users.UpdateRegistrationSettingsForDataAccessEvents, which centrally collects and applies all the settings.
If an error occurs when changing settings, Users.UpdateRegistrationSettingsForDataAccessEvents deletes non-existent field names from the settings, retries applying the settings, and logs the event Users.Error setting up Access.Access event without throwing an exception.
And instead of disabling the logging of the Access.Access event, just disable (that is, do not add) the settings of the required mechanism in UsersOverridable.OnDefineRegistrationSettingsForDataAccessEvents and call Users.UpdateRegistrationSettingsForDataAccessEvents.
Data Exchange Setup
For distributed infobases (DIB) and standalone workstations, add to the exchange plans all the subsystem's metadata objects except for the following:
- Constant
UserAuthorizationSettings - Constant
ShouldRegisterChangesInAccessRights - Information register
UsersInfo
For distributed infobases, disable in the exchange plans change registration for the following subsystem's metadata objects (see Creation of Subordinate Node Initial Image):
- Information register
UserGroupsHierarchy - Information register
UserGroupCompositions
Exclude the following metadata objects from exchange plans used for data synchronization between different applications:
- Constant
UserAuthorizationSettings - Constant
ShouldRegisterChangesInAccessRights - Information register
UserGroupsHierarchy - Information register
UsersInfo - Information register
UserGroupCompositions
Object Prefixes
Use the Object prefixes subsystem to automatically assign prefixes to objects considering application settings. Objects are prefixed broken down by infobases and items of the Companies catalog.
Subsystem Setup
The setup procedure of the Object prefixes subsystem varies depending on whether the configuration contains the Data exchange subsystem and the Companies catalog. To set up the subsystem, create subscriptions to events for setting an object number (or code) and a subscription for clearing the object number.
Creating Subscriptions to Set a Prefix in the Number (Code) of the Object
Create the required number of event subscriptions to set an object number or object code when writing the object if the number or the code is not filled in. Specify the subscription properties according to the table below.
| Property Name | Details |
|---|---|
Name |
The subscription name must be human-readable and must consider restrictions imposed on metadata object names. For example: SetInfobasePrefixAndCompanyPrefixToDocumentNumber. |
Source |
The subscription event sources can only be objects of the following types: Documents, Catalogs, Charts of characteristic types, and Business processes. You can select only one type of objects as a source for a single subscription. |
Event |
OnSetNewCode or OnSetNewNumber |
Handler |
As handler procedures, select export procedures of the ObjectsPrefixesEvents common module. |
Notice.
For Task objects, a number prefix is set by the Business processes and tasks subsystem. Using the Object prefixes subsystem for the Task objects will cause configuration failures.
In the ObjectsPrefixesEvents common module, there are three subscription handler procedures. Each procedure must be used depending on whether the configuration contains the Data exchange subsystem and the Companies catalog:
SetCompanyPrefix. Use this procedure if it is required to prefix objects by companies only.SetInfobasePrefix. Use this procedure if the configuration contains the Data exchange subsystem and it is not required to prefix objects by companies. Such objects are mainly catalogs and charts of characteristic types.SetInfobaseAndCompanyPrefix. Use this procedure if it is required to prefix objects by infobases and companies at the same time. Such objects are mainly documents.
A developer can choose handler procedures depending on the required logic.
If the configuration contains the Companies catalog, create the following metadata objects to be able to prefix objects by companies:
- The
Prefixattribute (String, 2) in theCompaniescatalog - The
Companyfunctional option parameter using theCompaniescatalog - The
CompanyPrefixesfunctional option stored in theCompaniescatalog attribute
Creating Subscriptions to Reassign Object Numbers (Codes)
Create the required number of event subscriptions to reassign an object number (code) when changing the date or the Company attribute value in the object header. A new code or number will be assigned to the object when cleared.
Specify the subscription properties according to the table below.
| Property Name | Details |
|---|---|
Name |
The subscription name must be human-readable and must consider restrictions imposed on metadata object names, for example. For example: CheckDocumentNumberByDateAndCompany. |
Source |
The subscription event sources can only be objects of the following types: Documents, Catalogs, Charts of characteristic types, and Business processes. You can select only one type of objects as a source for a single subscription. |
Event |
BeforeWrite. |
Handler |
As handler procedures, select export procedures of the ObjectsPrefixesEvents common module. |
In the ObjectsPrefixesEvents common module, there are five subscription handler procedures. Each procedure must be used based on the type of subscription source objects and the presence of the Company attribute in the header of these objects:
CheckCatalogCodeByCompany. Use this procedure for catalogs whose codes are numbered by theCompaniescatalog.CheckBusinessProcessNumberByDate. Use this procedure for business processes that are numbered within a specified period.CheckBusinessProcessNumberByDateAndCompany. Use this procedure for business processes that are numbered within a specified period and by theCompaniescatalog.CheckDocumentNumberByDate. Use this procedure for documents that are numbered within a specified period.CheckDocumentNumberByDateAndCompany. Use this procedure for documents that are numbered within a specified period and by theCompaniescatalog.
In most cases, you need to create only three subscriptions: two subscriptions to assign prefixes to catalogs and documents, and one subscription to clear document numbers. The table below illustrates an example of such subscriptions.
| Subscription Name | Handler |
|---|---|
SetInfobasePrefixToCatalogCode |
ObjectsPrefixesEvents.SetInfobasePrefix |
SetInfobasePrefixAndCompanyPrefixToDocumentNumber |
ObjectsPrefixesEvents.SetInfobaseAndCompanyPrefix |
CheckDocumentNumberByDateAndCompany |
ObjectsPrefixesEvents.CheckDocumentNumberByDateAndCompany |
If you need to set a company prefix for an object, the header attributes of this object must include the Company attribute. The required values of attribute properties are shown in the table below.
| Property | Value |
|---|---|
Name |
Company |
Type |
CatalogRef.Companies |
User Access Setup
You do not need to set up user access rights to the Object prefixes subsystem data.
How to Use the Subsystem in Development
Prefix Format and Assignment Logic
A prefix is assigned to an object number or code when an object is first written and if a code or a number was not assigned manually. A prefix is also assigned if an object number or code was cleared before writing it.
The prefix has a fixed length: 3 or 5 characters. Hyphen "-" cannot be used in the prefix. It is used to separate the prefix with a number and added automatically. The prefix is generated according to one of the following templates: COIB- or IB-, where CO are two characters of the Companies catalog prefix, IB are two characters of the infobase prefix, and hyphen "-" is the prefix separator.
For configurations with the Object prefixes subsystem, document numbers and catalog codes must be at least 11 characters.
If the infobase prefix or the company prefix is not specified, it is considered that this prefix is missing. It is replaced with two zeros ("00").
For predefined items of data reference types created in Designer mode, it is recommended that you assign an item code prefix when it is created. Generally, it is required to assign only the infobase prefix to such items. For example, the following code can be assigned to a predefined catalog item in Designer: "TM-00000001". If these actions are not taken, and if the data exchange is configured between different configurations, code uniqueness of these items can be violated for catalogs with predefined items.
API
See the subsystem API description in the API documentation (in Russian).
To interact with the Print subsystem, there is an export function of the common module. The function generates a document number to display in the print form: ObjectsPrefixesEvents.GetNumberToPrint.
The function discards a company prefix, an infobase prefix (optional), custom prefixes (optional), and removes leading zeros from the object number.
Example:
The document has FR0G-A001234 number. Once the company prefix and non-significant zeros are discarded for the number for printing, there is the following value: G-A1234.
In the subsystem, the "On get number for printing" event handler is available. The handler is triggered before standard processing and intended for generation of an object number in a non-standard way. For example, when the document number format differs from the standard one. To specify the handler code, use the ObjectsPrefixesClientServerOverridable.OnGetNumberForPrinting procedure.
Additional Features for Prefix Format Setup
The subsystem allows you to add a random character sequence to the prefix. For example, additional prefix "A" for Tax invoice for advance documents. In the object module, set the Prefix variable value in the OnSetNewNumber handler.
An example of the document number with the set prefix: FR0G-A001234. Document #1234 with the "A" user prefix set for the "FR" company, and created in the "G" infobase.
Overriding Names of Attributes That Contain Company References
The Object prefixes subsystem supports standard processing of company prefix setting. Standard processing means that the company reference value is selected from the header attribute of the object with the Company name. In some objects, the attribute can have a different name (for example, Owner or ParentCompany). If a company reference is contained in the attribute with a name different from the standard Company name, use the GetPrefixGeneratingAttributes handler in the ObjectsPrefixesOverridable overridable module.
Data Exchange Setup
The subsystem does not participate in data exchange.
Licensed Update Verification
With the Licensed update verification subsystem, you can ask the user for confirmation that the update files were obtained legally. The subsystem can be used before updating the infobase (after the update initiation, but before the first application start), or before updating the configuration using the Configuration update subsystem.
Subsystem Setup
To set up the subsystem, no further actions are required.
User Access Setup
To use the subsystem, one role is required:
| # | Role Description |
|---|---|
|
|
FullAccess (the Core subsystem user role)Grants the right to open the form to confirm that an application update was obtained legally. |
How to Use the Subsystem in Development
See the subsystem API description in the API documentation (in Russian).
Data Exchange Setup
The subsystem does not participate in data exchange.
Security Profiles
With the Security profiles subsystem, the administrator can automatically set up infobase security profiles for specific application features based on enabled functional options, data synchronization settings, and so on. For more information on security profiles, see 1C:Enterprise documentation.
How to Use the Subsystem in Development
In client-server infobases, the cluster administrator can prevent the application from performing certain actions to avoid potential disruptions. This can be done by setting up a security profile for the infobase and restricting the high-risk features within the limits of that profile.
The security profile includes permissions for external resources that are necessary for the application to function:
- Internet resources, protocols, and connection ports
- File system directories
- Add-ins and COM classes
- Operating system applications
- Attached extensions
To make it easier to configure security profiles, list the required external resources in the OnRequestPermissionsToUseExternalResources procedure of the SafeModeManagerOverridable common module. These can be either static resources that are essential for the application operation at all times, or dynamic resources that depend on specific functional options, integration settings, etc.
When enabling or disabling features that involve external resources, request the administrator's permission to change access settings. To do this, call the ApplyExternalResourceRequests procedure of the SafeModeManagerClient common module. As an example, see the _DemoImportProductsFromPriceListSecurityProfiles data processor in the demo configuration. This data processor requests a permission to access an Internet resource or network directory to load a price list file onto the 1C:Enterprise server.
The subsystem also includes the ExternalResourcesInUse report, which lists the allowed external resources.
Data Exchange Setup
For distributed infobases (DIB) and standalone workstations, add to the exchange plans all the subsystem's metadata objects except for the following:
- Constant
AutomaticallyConfigurePermissionsInSecurityProfiles - Constant
UseSecurityProfiles - Constant
InfobaseSecurityProfile - Information register
RequestsForPermissionsToUseExternalResources - Information register
PermissionsToUseExternalResources - Information register
ExternalModulesAttachmentModes
SaaS
The SaaS subsystem contains basic functionality required for all SaaS applications. It also includes some subsystems that extend the functionality of other subsystems to run in SaaS (for example, File management SaaS).
Before implementing this subsystem, we recommend that you get familiar with 1C:Technology for developing 1cFresh solutions and chapter Data separation feature in the Developer Guide included in 1C:Enterprise documentation. Notice.
By default, the subsystem contains two common attributes (separators): DataAreaMainData and DataAreaAuxiliaryData. Correct functioning of the library subsystems when adding other separators is generally not supported.
Note
Library objects are not included in the SaaS subsystem directly. They belong to subordinate subsystems in the SaaS branch.
Subsystem Setup
Developing System Setting Forms for the Infobase Administrator and the Data Area Administrator
Unlike the hosted mode, in SaaS system administration functions are divided into two levels:
- Infobase administrator (the
FullAccessandSystemAdministratorroles) sets up and maintains the system in general for all data areas. For example, setup of access to external resources on 1C:Enterprise server (a proxy server, an email, file storage volumes, and so on), any general system parameters that must apply to users of all data areas. - Data area administrator (the
FullAccessrole) sets up system parameters for a certain data area. For example: enables or disables functional options, maintains a list of users, deletes marked objects, and so on.
When developing setting forms, you need to consider that the infobase settings must be visible only to the infobase administrator (the SystemAdministrator role), and the data area settings must be visible to all administrators (the FullAccess role).
If the Application settings subsystem is used, application setting forms are recommended to be developed in the same style, that is, in the form of setting panels that "adapt" to user rights. Your documentation must state that to configure common parameters, the infobase administrator must enter any data area. For more information, see Application Settings.
Otherwise, you need to develop separate setting forms for the infobase administrator and the data area administrator. Setting forms must suit both for setting by two different people in SaaS and for setting by one person in the hosted mode:
- Forms of the settings intended for the infobase administrator must be available only to the
SystemAdministratorrole and be hidden in the hosted mode. To do this, include the form in theUseSeparationByDataAreasfunctional option. - Forms of the settings intended for the data area administrator must contain all the settings (both infobase settings and data area settings), be available for the
FullAccessrole, and run without theSystemAdministratorrole.
Configuring Common Separator Attributes and Metadata Objects
In SaaS, data separation feature must be enabled in the configuration. With this feature, you can separate all stored data and create individual work areas in the application. By default, the library contains two common attributes to separate data:
- The
DataAreaMainDatacommon attribute. Type:Number(7). Usage of split data:Independent. The value of this separator must be set for all infobase users (except for the infobase administrator). - The
DataAreaAuxiliaryDatacommon attribute. Type:Number(7). Usage of split data:Independent and shared. This separator is not used to separate users and authentication.
When integrating the SaaS subsystem in the configuration, it is important to keep the original order of sorting common separator attributes in the metadata tree.
In SaaS, all data stored in the infobase and metadata objects matching this data can be divided into the following types:
- Common (shared) data is data common for all data areas and not separated by common separator attributes. In sessions where separator values are not set common data is available read-only.
- Separated data is data related to a data area. The data is separated by common separator attributes supplied in the SaaS subsystem:
- Main data is applied area data. Metadata objects matching common data are separated by the
DataAreaMainDataseparator. - Auxiliary data is data that is logically a part of the area data but available from shared sessions. Such data is separated by the
DataAreaAuxiliaryDataseparator.
- Main data is applied area data. Metadata objects matching common data are separated by the
By default, most metadata objects must be included in the DataAreaMainData common attribute, that is, they must be separated. As the DataAreaMainData common attribute has the Auto-use property set to Use, you do not need to do anything for newly created configuration objects.
The following objects must be removed from the DataAreaMainData separator:
- All scheduled jobs.
- Metadata objects designed to store infobase settings (common to all data areas). These are mainly constants, for example:
MinimalARADPScheduledJobIntervalSaaS. - Various classifiers common for all data areas, such as a currency classifier, an address classifier, and so on.
The DataAreaAuxiliaryData separator must include internal data only (not valuable for the subscriber). The Auto-use property is set to Do not use, so newly created metadata objects will not be included into this separator.
All metadata objects related to common (shared) data must be included in any of the event subscriptions, for which one of the following procedures is assigned as a handler (depending on the metadata object type):
SaaSOperationsSSL.CheckSharedObjectsOnWriteSaaSOperationsSSL.CheckSharedRecordsSetsOnWrite
For example, these can be the following event subscriptions included in the CoreSaaS subsystem:
CheckSharedObjectsOnWriteCheckSharedRecordsSetsOnWrite
User Access Setup
To manage user access to the subsystem, assign a user the roles specified in the table below.
| # | Role Description |
|---|---|
|
|
FullAccess (the Core subsystem user role)Grants the right to perform the data area administrator's functions: system parameters configuration for a specific data area and unrestricted access to all separated data. |
The table below illustrates possible user groups and the roles they could be assigned with.
| # | User Group Description | Assigned Roles |
|---|---|---|
| 1. | Data area administrator |
|
| 2. | Master data owner (in SaaS) |
|
How to Use the Subsystem in Development
Operating with Conditionally Disabled Separation
No matter whether the configuration is designed to operate in the hosted mode, its code must run with conditionally disabled separation (in a normal mode as if there is no separation). That is why if the configuration contains a code specific for SaaS, you must check if the separation is enabled before the code is executed.
Use the DataSeparationEnabled function of the Common common module to check whether data separation is enabled.
Displaying a User List
To display a user list, use forms of the Users catalog. If you cannot do that, hide shared users from the list when the data separation is enabled. See the implementation example in the Users catalog list form.
Roles of Separated Users
When developing roles to be used by separated users, consider the following:
- For all metadata objects that are not included in the
DataAreaMainDataandDataAreaAuxiliaryDataseparators, theInsert,Update, andDeleterights must be revoked. - The following rights to the configuration must be revoked:
- Administration
- Update database configuration
- Exclusive mode
- Thick client
- External connection
- Automation
- Interactive open external data processors
- Interactive open external reports
- Functions for technician mode
When operating in a separated mode, roles that do not meet the requirements listed above will be deleted from the access group profile automatically and will be unavailable for assignment to users. If a user with such roles tries to log in to the application, an error occurs and the session is terminated.
Data Exchange Setup
For distributed infobases (DIB) and standalone workstations, add to the exchange plans all the subsystem's metadata objects except for the following:
- Constant
InternalServiceManagerURL - Constant
BackUpDataArea - Constant
LastClientSessionStartDate - Constant
AdditionalReportAndDataProcessorFolderUsageSaaS - Constant
FileExchangeDirectorySaaS - Constant
FileExchangeDirectorySaaSLinux - Constant
DataAreaKey - Constant
ServiceManagerEndpoint - Constant
CopyDataAreasFromPrototype - Constant
MaxActiveBackgroundJobExecutionTime - Constant
MaxActiveBackgroundJobCount - Constant
AdditionalReportsAndDataProcessorsScheduledJobMinIntervalSaaS - Constant
IndependentUsageOfAdditionalReportsAndDataProcessorsSaaS - Constant
BackupSupported - Constant
DataAreaPresentation - Constant
DataAreaPrefix - Constant
DataAreasUpdatePriority - Constant
FileTransferBlockSize - Constant
AllowUseAdditionalReportsAndDataProcessorsByScheduledJobsInSaaSMode - Constant
InfobaseUsageMode - Constant
LockMessageOnConfigurationUpdate - Constant
DataAreaTimeZone - Catalog
JobsQueue - Catalog
DataAreaJobQueue - Catalog
SuppliedData - Catalog
SuppliedAdditionalReportsAndDataProcessors - Catalog
DataAreaMessages - Catalog
QueueJobTemplates - Information register
DataAreasSubsystemsVersions - Information register
UseSuppliedAdditionalReportsAndProcessorsInDataAreas - Information register
UseAdditionalReportsAndServiceProcessorsAtStandaloneWorkstation - Information register
DataAreas - Information register
AreasRequiringDataProcessing - Information register
TextExtractionQueue - Information register
SuppliedAdditionalReportAndDataProcessorInstallationQueueInDataArea - Information register
SuppliedDataRequiringProcessing - Information register
DataAreaActivityRating - Information register
DeleteDataAreaActivityRating
Email Management
The Email management subsystem provides an API for sending emails and a user interface for supporting email accounts.
Subsystem Setup
If the configuration does not contain the Application settings subsystem, add the EmailAccounts catalog and the SystemEmailAccountSetup common command to the Administrator workspace. As an example, see the Organizer form of the SSLAdministrationPanel data processor.
Special Cases of Integration
User Access Setup
To manage user access to the subsystem, assign a user the roles specified in the table below.
| # | Role Description |
|---|---|
| 1. | ReadEmailAccounts
|
| 2. | AddEditEmailAccounts
|
| 3. | FullAccess (the Core subsystem user role)Grants the right to add and edit email accounts. Grants the right to permanently delete subsystem objects marked for deletion. |
The table below illustrates possible user groups and the roles they could be assigned with.
| # | User Group Description | Assigned Roles |
|---|---|---|
| 1. | User
|
|
| 2. | Administrator
|
|
How to Use the Subsystem in Development
See the subsystem API description in the API documentation (in Russian).
Data Exchange Setup
For distributed infobases (DIB) and standalone workstations, add to the exchange plans all the subsystem's metadata objects that contain data.
File Management
With the File management subsystem, you can manage files of various formats in bulk. Files can be stored either in the infobase or in a storage volume. Also, you can keep track of file changes.
The File management subsystem allows you to save files from the file system to the infobase, create files from templates, digitally sign, encrypt, and bulk-change files, and search file content.
Also, you can attach files to reference-type configuration objects.
Notice.
Web client limitation: When a user opens the application in Google Chrome or Mozilla Firefox, the subsystem does not require 1C:Enterprise Extension.
Subsystem Setup
Command Interface Setup
If the configuration does not contain the Application settings subsystem, add the following constants to the Administrator workspace:
DenyUploadFilesByExtensionExtractTextFilesOnServerMaxFileSizeDeniedExtensionsListTextFilesExtensionsListFilesExtensionsListOpenDocumentStoreFilesInVolumesOnHardDrive
As an example, see the FilesOperationSettings form of the SSLAdministrationPanel data processor.
Add the following metadata objects to the administrator's command interface:
- Catalog
FileStorageVolumes - Data processor
AutoTextExtraction
To get the access to the files in the storage volume, in the FilesInVolume filter criteria, set the flag Include in the command interface.
Add the following commands of the Files catalog to the administrator's command interface:
- Files (command name:
FilesFolders). Opens the directory tree. - All files. Shows all the catalog's files.
- Locked files (command name:
LockedFiles). Shows all the catalog's files that are locked for editing.
As an example, see the File management menu item in the Organizer menu (the _DemoFilesOperations subsystem of the _DemoOrganizer subsystem).
To allow users to change the personal file management settings, create a settings form and add to it the following items:
- Action on file selection
- Prompt opening mode on file selection
- Show tooltips when editing files (web client only)
- Show locked files before exit
- Show file size in the lists
- Compare versions using
- Set up primary working directory
- Scanner settings
- Install 1C:Enterprise Extension
As an example, see the File management tab on the _DemoMySettings common form.
File Attachment Setup
First, you need to define the list of configuration objects that can have attachments. Usually, these are catalogs and documents. For example, the Goods catalog can have product specification sheets and certificates as attachments, and the Job positions can have duty descriptions and job requirements.
Depending on whether the configuration uses record-level security (see Access Management), choose where to store the attachments:
- The more common approach is to create a separate attachment catalog for each attachment owner. This is applicable if attachment owners have different access rights.
- For example, if the
Partnerscatalog and theProjectscatalog have different RLS settings, you can configure RLS so that a user could access only those files that are attached to the partners (thePartnersAttachedFilescatalog) and projects (theProjectsAttachedFilescatalog) the user has access to. - If a configuration does not use RLS, when a user is granted access to an attachment owner, the user is also granted access to its attachment catalog.
- For example, if the
- You can create an attachment catalog that stores attachments for multiple attachment owners. This is applicable to configurations that contain up to 10 attachment owners with the same RLS that are not supposed to be changed in the future.
- For example, one attachment catalog can store files attached to a number of sales-related documents that have the same RLS, such as Sales invoice and Sales order. To ensure the correct access restriction by the attachment owner type, add the
ReadRight1andEditRightto the RLS settings. The rights are used together with the Access management subsystem.
- For example, one attachment catalog can store files attached to a number of sales-related documents that have the same RLS, such as Sales invoice and Sales order. To ensure the correct access restriction by the attachment owner type, add the
- If a configuration does not use RLS, or attachment owners use access value sets, you can store attachments in the built-in
Filescatalog.- In the first case, users have unlimited access to the
Filescatalog and the attachment owners. Note: If the configuration contains the Access management subsystem, it applies restrictions by the attachment owner type. - In the second case, to grant users access to the Files catalog depending on the access to the attachment owners, use standard template
#ByValuesAndSetsAdvanced. For more information, see Access Management.
- In the first case, users have unlimited access to the
Setup Aspects of "One File Owner — One Attachment Catalog" Approach
For each attachment owner that needs a dedicated attachment catalog, do the following:
- Create a catalog that will store the attachments. To do this, copy the
_DemoProjectsAttachedFilescatalog from the demo configuration to your configuration. Rename the catalog according to the naming template<Prefix>AttachedFiles,
wherePrefixis the name of the metadata object the files will be attached to. For example, for theProductscatalog, the attachment catalog is namedProductsAttachedFiles. Enter a synonym. For example, Attachments (Products). - Set the attachment owner in the
FileOwnerattribute. For example,CatalogRef.Products. - Choose whether to allow users to create folders in attachment lists. To enable folders, in the catalog properties, set the
Hierarchicalflag and set Hierarchy Type to Folder and item hierarchy. Change theUseproperties: set For folder and item for attributesAuthor,FileOwner,UniversalModificationDate,CreationDate,ChangedBy,PictureIndex, andLongDesc. - Optional. If the attachment catalog stores service files that should be hidden from users, add the
BooleanattributeIsInternalto the catalog. - Add the catalog created in step 1 to type collections
AttachedFile(references) andAttachedFileObject(objects). For example,ProductsAttachedFiles. - Add the catalog created in step 1 to exchange plan
InfobaseUpdate. - Add the catalog created in step 1 to event subscription's
Sourceproperty. For example,CatalogManager.ProductsAttachedFiles:
| Subscription | Event | Handler |
|---|---|---|
DetermineAttachedFileForm |
FormGetProcessing |
FilesOperationsClientServer.DetermineAttachedFileForm |
SetAttachedDocumentFilesDeletionMark |
BeforeWrite |
FilesOperations.SetAttachedDocumentFilesDeletionMark |
As an example, see event subscriptions _DemoDetermineAttachedFileForm and _DemoSetDeletionMarkForAttachedDocumentFiles.
Setup Aspects of "Many File Owners — Files Catalog" Approach
For each attachment owner whose attachments will be stored in the Files catalog, add the attachment owner to the FilesOwner type collection (references). For example, DocumentRef.BuyerSOrder.
For proper RLS, ensure that the attachment owner and the Files catalog have the same access group.
For example, if access rights to the BuyerSOrder document are granted by the access group Add and edit sales orders, but access rights to the Files catalog are granted by the access group Add and edit folders and files, users will not be able to view files attached to the BuyerSOrder document.
To fix this, you need to create a new access group that grants the right to view the BuyerSOrder document and includes the right Add and edit folders and files.
Setup Aspects Required for Both Approaches
For each attachment owner do the following:
- Add the attachment owner type to type collections
AttachedFilesOwner(references) andAttachedFilesOwnerObject(all objects except for documents). For example,CatalogRef.Products,DocumentRef.CustomerProformaInvoice, andDocumentRef.BuyerSOrder. - If the attachment owner is a document, add the document type to the
Sourceproperty of theSetAttachedDocumentFilesDeletionMarksubscription. For example,DocumentObject.CustomerProformaInvoiceandDocumentObject.BuyerSOrder. - If you need that when a user copies a attachment owner, 1C:Enterprise copies its attachments, do the following:
- Pass the third parameter in the
OnCreateAtServerprocedure in the form module when calling theOnCreateAtServerprocedure of theFilesOperationscommon module:
SettingsOfFileManagementInForm = FilesOperations.SettingsOfFileManagementInForm(); SettingsOfFileManagementInForm.DuplicateAttachedFiles = True; FilesOperations.OnCreateAtServer(ThisObject, ItemsToAdd1, SettingsOfFileManagementInForm);- In the object form module, add the following code block to the
OnWriteAtServerprocedure:
FilesOperations.OnWriteAtServer(Cancel, CurrentObject, WriteParameters, ThisObject); - Pass the third parameter in the
- If you want 1C:Enterprise to check if the user has locked any attachments before closing the attachment owner form, do the following:
- In the object form, add the
BooleanattributeCanCloseFormWithFiles. - In the form hander
BeforeClose, add the call of procedureShowConfirmationForClosingFormWithFilesof theFilesOperationsClientcommon module:&AtClient Procedure BeforeClose(Cancel, Exit, WarningText, StandardProcessing) FilesOperationsClient.ShowConfirmationForClosingFormWithFiles(ThisObject, Cancel, Exit, Object.Ref); EndProcedure - The code in the
BeforeClosehandler must be executed after the procedure call and after checking theCancelparameter value. Example:&AtClient Procedure BeforeClose(Cancel, Exit, WarningText, StandardProcessing) FilesOperationsClient.ShowConfirmationForClosingFormWithFiles(ThisObject, Cancel, Exit, Object.Ref); If Cancel Then Return; EndIf; <Executable code...> EndProcedure
- In the object form, add the
Special Cases of Integration
- How to Integrate "File Management" and "Access Management" Subsystems
- How to Integrate "File Management" Subsystem without "Properties" Subsystem
User Access Setup
To manage user access to the subsystem, assign a user the roles specified in the table below.
| # | Role Description |
|---|---|
| 1. | FullAccess (the Core subsystem)Grants the right to set up the subsystem, create volumes to store files, and delete files marked for deletion. |
| 2. | BasicAccessSSLGrants the right to view common forms. |
| 3. | AddEditFoldersAndFilesGrants the right to view, add, and edit files in permitted folders (the Files and File folders catalogs). You need to set up access to each file folder in the application. |
| 4. | AddEditFoldersAndFilesByExternalUsersGrants the right to view, add, and edit files in permitted folders for external users (the Files and File folders catalogs). You need to set up access to each file folder in the application. |
Additionally, you need to create auxiliary roles or re-use existing suitable roles to add, edit, and view attachment owners. Setup of access to the attachment catalog is identical to the access to the attachment owner.
| # | Auxiliary Role Description |
|---|---|
| 1. | <AddEditItems>Grants the right to keep an attachment owner list, add and edit attached files, sign and encrypt files. |
| 2. | <ReadItems>Grants the right to view attachment owners and attached files, and open files in an external application. |
The table below illustrates possible user groups and the roles they could be assigned with.
| # | User Group Description | Assigned Roles |
|---|---|---|
| 1. | Administrator Administer the configuration. |
|
| 2. | Manager Add and edit attachment owners and attachments. Edit, sign, encrypt files and update files with data from other files. |
|
| 3. | User View file lists, open file cards, and open files as read-only. |
|
How to Use the Subsystem in Development
Creating Attachment-Type Attributes
You can add an attribute of the CatalogRef.Files type to any reference-type object. Instead of the library Files catalog, you can use a custom attachment catalog. For example, you can add attributes AttachedFile or Photo to the Individuals catalog. Here is how you can use them:
- Add to the object form a clickable hyperlink, which opens the file or the file card.
- Add a clickable picture field, which opens the file card.
Managing Attachments from Attachment Owner Form
Attachment owner forms support interface controls that allow users to manage attachments. The following standard controls are available:
- A hyperlink that opens the attachment list. You can choose the hyperlink title and location. The attachment list supports files upload.
- An attachment-type attribute field. The field allows you to access an attachment interactively without opening the file card.
To add the controls to the form:
- In the object form module, add the following code block to the
OnCreateAtServerprocedure:- To display a hyperlink:
// StandardSubsystems.FilesOperations HyperlinkParameters = FilesOperations.FilesHyperlink(); FilesOperations.OnCreateAtServer(ThisObject, HyperlinkParameters); // End StandardSubsystems.FilesOperations - To display an attribute field:
// StandardSubsystems.FilesOperations FieldParameters = FilesOperations.FileField(); FilesOperations.OnCreateAtServer(ThisObject, FieldParameters); // End StandardSubsystems.FilesOperations - If you want to add multiple controls, merge them into an array:
// StandardSubsystems.FilesOperations HyperlinkParameters = FilesOperations.FilesHyperlink(); FieldParameters = FilesOperations.FileField(); ItemsToAdd1 = New Array; ItemsToAdd1.Add(HyperlinkParameters); ItemsToAdd1.Add(FieldParameters); FilesOperations.OnCreateAtServer(ThisObject, ItemsToAdd1); // End StandardSubsystems.FilesOperations
- To display a hyperlink:
- To accelerate the form load time, prior to adding the controls, create internal attributes and the form group that will contain the controls:
FilesOperationsParameters—Arbitrary.ImageOnForm(String). Places an image field on the form. Specify the attribute name explicitly:// StandardSubsystems.FilesOperations FieldParameters = FilesOperations.FileField(); FieldParameters.PathToPictureData = "ImageOnForm"; FilesOperations.OnCreateAtServer(ThisObject, FieldParameters); // End StandardSubsystems.FilesOperationsPlacementGroup(FormGroup). Displays the controls on the form. Specify the group name explicitly:// StandardSubsystems.FilesOperations HyperlinkParameters = FilesOperations.FilesHyperlink(); HyperlinkParameters.Location = "PlacementGroup"; FilesOperations.OnCreateAtServer(ThisObject, HyperlinkParameters); // End StandardSubsystems.FilesOperations
Otherwise, the attributes and form items will be created programmatically, which will slow down the load of the form.
- In the object form module, add the following code block to the
OnOpenprocedure:// StandardSubsystems.FilesOperations FilesOperationsClient.OnOpen(ThisObject, Cancel); // End StandardSubsystems.FilesOperations - In the object form module, add the following code block to the
NotificationProcessingprocedure:// StandardSubsystems.FilesOperations FilesOperationsClient.NotificationProcessing(ThisObject, EventName); // End StandardSubsystems.FilesOperations - In the object form module, add the following code block to the
FormHeaderItemsEventHandlersregion:// StandardSubsystems.FilesOperations &AtClient Procedure Attachable_PreviewFieldClick(Item, StandardProcessing) FilesOperationsClient.PreviewFieldClick(ThisObject, Item, StandardProcessing); EndProcedure &AtClient Procedure Attachable_PreviewFieldDrag(Item, DragParameters, StandardProcessing) FilesOperationsClient.PreviewFieldDrag(ThisObject, Item, DragParameters, StandardProcessing); EndProcedure &AtClient Procedure Attachable_PreviewFieldCheckDragging(Item, DragParameters, StandardProcessing) FilesOperationsClient.PreviewFieldCheckDragging(ThisObject, Item, DragParameters, StandardProcessing); EndProcedure // End StandardSubsystems.FilesOperations
- In the object form module, add the following code block to the
FormCommandHandlersregion:// StandardSubsystems.FilesOperations &AtClient Procedure Attachable_AttachedFilesPanelCommand(Command) FilesOperationsClient.AttachmentsControlCommand(ThisObject, Command); EndProcedure // End StandardSubsystems.FilesOperations
Attachment Flag in Lists
Attachment owner lists support displaying the flag that indicates that the metadata object has attachments. To enable the flags, in the dynamic list query, add LEFT JOIN with the FilesExist information register by the ObjectWithFiles dimension.
Below is an example of the query from the _DemoProjects catalog list form:
SELECT
Catalog_DemoProjects.Ref,
Catalog_DemoProjects.DeletionMark,
Catalog_DemoProjects.Predefined,
Catalog_DemoProjects.Code,
Catalog_DemoProjects.Description,
Catalog_DemoProjects.AddlOrderingAttribute,
CASE
WHEN FilesExist.HasFiles IS NULL THEN
0
WHEN FilesExist.HasFiles THEN
1
ELSE
0
END AS HasFiles
FROM
Catalog._DemoProjects AS Catalog_DemoProjects
LEFT JOIN InformationRegister.FilesExist AS FilesExist
ON Catalog_DemoProjects.Ref = FilesExist.ObjectWithFilesExample of a list of objects with attachments:

Scanning Documents and Photos
With the subsystem API, you can scan documents and photos on a client computer. You can also merge images into multipage TIFF and PDF documents. You can save the scanning result as an attachment, binary data, or a file. See the AddFromScanner and ScanCommandAvailable procedures and the ScanAvailable function of the FilesOperationsClient common module.
You can scan on any device that supports SANE, WIA, or TWAIN drivers and runs on Microsoft Windows or Linux. For more information about operating system versions, see 1C:Enterprise system requirements.
An example of scanning images using the Scan command in the Scanning data processor:
&AtClient
Procedure CommandProcessing(CommandParameter, CommandExecuteParameters)
If FilesOperationsClient.ScanAvailable() Then
AddingFromScannerParameters = FilesOperationsClient.AddingFromScannerParameters();
AddingFromScannerParameters.OwnerForm1 = ThisObject;
AddingFromScannerParameters.ResultHandler = New NotifyDescription("ScanSheetCompletion", ThisObject);
AddingFromScannerParameters.ResultType = FilesOperationsClient.ConversionResultTypeFileName();
AddingFromScannerParameters.OneFileOnly = True;
FilesOperationsClient.AddFromScanner(AddingFromScannerParameters);
EndIf;
EndProcedure
&AtClient
Procedure ScanSheetCompletion(Result, Context) Export
If Result <> Undefined Then
FileSystemClient.OpenFile(Result.FileName);
EndIf;
EndProcedureFor an example of how to generate a multipage PDF file with product images, see catalog Demo: Products, command PDF image album:
&AtClient
Procedure ImageAlbumToPDF(Command)
Pictures = AttachedImages(Object.Ref);
NotifyDescription = New NotifyDescription("ImageAlbumToPDFCompletion", ThisObject);
GraphicDocumentConversionParameters = FilesOperationsClient.GraphicDocumentConversionParameters();
FilesOperationsClient.CombineToMultipageFile(NotifyDescription, Pictures, GraphicDocumentConversionParameters);
EndProcedure
&AtClient
Procedure ImageAlbumToPDFCompletion(Result, AdditionalParameters) Export
If Result.Success Then
FileSystemClient.OpenFile(Result.ResultFileName);
EndIf;
EndProcedureData Exchange Setup
For distributed infobases (DIB) and standalone workstations, add to the exchange plans all the subsystem's metadata objects except for the following:
- Constant
ExtractTextFilesOnServer - Constant
ParametersOfFilesStorageInIB - Constant
VolumePathIgnoreRegionalSettings - Constant
FilesCleanupMode - Constant
SynchronizeFiles - Constant
CreateSubdirectoriesWithOwnersNames - Constant
FilesStorageMethod - Constant
StoreFilesInVolumesOnHardDrive - Catalog
FileStorageVolumes - Catalog
FileSynchronizationAccounts - Information register
FileSynchronizationSettings - Information register
ScannedFilesNumbers - Information register
FileWorkingDirectories - Information register
FilesSynchronizationWithCloudServiceStatuses - Information register
FilesInWorkingDirectory
For distributed infobases, include the BinaryDataStorage catalog and the FileRepository and DeleteFilesBinaryData information registers only into the initial images of subordinate nodes (see Creation of Subordinate Node Initial Image).
If you use the subsystem with the Data exchange subsystem, do the following to create a correct initial image with files stored in volumes on the computer:
- In the exchange plan manager module (distributed infobase), in the
OnGetSettingOptionDetailsexport procedure, specify a value of theInitialImageCreationFormNameproperty:
Procedure OnGetSettingOptionDetails(OptionDetails, SettingID, ContextParameters) Export
...
OptionDetails.InitialImageCreationFormName = "CommonForm.CreateInitialImageWithFiles";
...
EndProcedure- Specify the exchange plan (distributed infobase) in the parameter type of the
CreateInitialImageWithFilescommon command. As an example, see the_DemoDistributedInfobaseExchangeexchange plan.
// StandardSubsystems.FilesOperations
&AtClient
Procedure Attachable_AttachedFilesPanelCommand(Command)
FilesOperationsClient.AttachmentsControlCommand(ThisObject, Command);
EndProcedure
// End StandardSubsystems.FilesOperationsAs an example, see catalogs _DemoProducts and _DemoIndividuals.
Attachment Flag in Lists
Attachment owner lists support displaying the flag that indicates that the metadata object has attachments. To enable the flags, in the dynamic list query, add LEFT JOIN with the FilesExist information register by the ObjectWithFiles dimension.
Below is an example of the query from the _DemoProjects catalog list form:
SELECT
Catalog_DemoProjects.Ref,
Catalog_DemoProjects.DeletionMark,
Catalog_DemoProjects.Predefined,
Catalog_DemoProjects.Code,
Catalog_DemoProjects.Description,
Catalog_DemoProjects.AddlOrderingAttribute,
CASE
WHEN FilesExist.HasFiles IS NULL THEN
0
WHEN FilesExist.HasFiles THEN
1
ELSE
0
END AS HasFiles
FROM
Catalog._DemoProjects AS Catalog_DemoProjects
LEFT JOIN InformationRegister.FilesExist AS FilesExist
ON Catalog_DemoProjects.Ref = FilesExist.ObjectWithFilesExample of a list of objects with attachments:
Scanning Documents and Photos
With the subsystem API, you can scan documents and photos on a client computer. You can also merge images into multipage TIFF and PDF documents. You can save the scanning result as an attachment, binary data, or a file. See the AddFromScanner and ScanCommandAvailable procedures and the ScanAvailable function of the FilesOperationsClient common module.
You can scan on any device whose drivers support SANE, WIA, or TWAIN on Microsoft Windows x86 and x64 operating systems. For more information about operating system versions, see 1C:Enterprise system requirements.
An example of scanning images using the Scan command in the Scanning data processor:
&AtClient
Procedure CommandProcessing(CommandParameter, CommandExecuteParameters)
If FilesOperationsClient.ScanAvailable() Then
AddingFromScannerParameters = FilesOperationsClient.AddingFromScannerParameters();
AddingFromScannerParameters.OwnerForm1 = ThisObject;
AddingFromScannerParameters.ResultHandler = New NotifyDescription("ScanSheetCompletion", ThisObject);
AddingFromScannerParameters.ResultType = FilesOperationsClient.ConversionResultTypeFileName();
AddingFromScannerParameters.OneFileOnly = True;
FilesOperationsClient.AddFromScanner(AddingFromScannerParameters);
EndIf;
EndProcedure
&AtClient
Procedure ScanSheetCompletion(Result, Context) Export
If Result <> Undefined Then
FileSystemClient.OpenFile(Result.FileName);
EndIf;
EndProcedureFor an example of how to generate a multipage PDF file with product images, see catalog Demo: Products, command PDF image album:
&AtClient
Procedure ImageAlbumToPDF(Command)
Pictures = AttachedImages(Object.Ref);
NotifyDescription = New NotifyDescription("ImageAlbumToPDFCompletion", ThisObject);
GraphicDocumentConversionParameters = FilesOperationsClient.GraphicDocumentConversionParameters();
FilesOperationsClient.CombineToMultipageFile(NotifyDescription, Pictures, GraphicDocumentConversionParameters);
EndProcedure
&AtClient
Procedure ImageAlbumToPDFCompletion(Result, AdditionalParameters) Export
If Result.Success Then
FileSystemClient.OpenFile(Result.ResultFileName);
EndIf;
EndProcedureData Exchange Setup
For distributed infobases (DIB) and standalone workstations, add to the exchange plans all the subsystem's metadata objects except for the following:
- Constant
ExtractTextFilesOnServer - Constant
ParametersOfFilesStorageInIB - Constant
VolumePathIgnoreRegionalSettings - Constant
FilesCleanupMode - Constant
SynchronizeFiles - Constant
CreateSubdirectoriesWithOwnersNames - Constant
FilesStorageMethod - Constant
StoreFilesInVolumesOnHardDrive - Catalog
FileStorageVolumes - Catalog
FileSynchronizationAccounts - Information register
FileSynchronizationSettings - Information register
ScannedFilesNumbers - Information register
FileWorkingDirectories - Information register
FilesSynchronizationWithCloudServiceStatuses - Information register
FilesInWorkingDirectory
For distributed infobases, include the BinaryDataStorage catalog and the FileRepository and DeleteFilesBinaryData information registers only into the initial images of subordinate nodes (see Creation of Subordinate Node Initial Image).
If you use the subsystem with the Data exchange subsystem, do the following to create a correct initial image with files stored in volumes on the computer:
- In the exchange plan manager module (distributed infobase), in the
OnGetSettingOptionDetailsexport procedure, specify a value of theInitialImageCreationFormNameproperty:
Procedure OnGetSettingOptionDetails(OptionDetails, SettingID, ContextParameters) Export
...
OptionDetails.InitialImageCreationFormName = "CommonForm.CreateInitialImageWithFiles";
...
EndProcedure- Specify the exchange plan (distributed infobase) in the parameter type of the
CreateInitialImageWithFilescommon command. As an example, see the_DemoDistributedInfobaseExchangeexchange plan.
Report Distribution
With the Report distribution subsystem, you can set up distributions of report options and reports of the Additional reports and data processors subsystem. Distributions can be delivered at the scheduled time or on demand.
Subsystem Setup
After you embed the subsystem in a configuration, do the following:
- Set up recipient types.
- Extend supported file formats.
- Add objects to the command interface.
Setting Up Recipient Types
Various database objects can act as recipients with one general rule: contact information with email addresses must be available for these objects. When setting up a distribution, a user selects a recipient type and a contact information kind (by default, the Users and User groups catalogs).
To enable additional recipient types:
- Add the recipient types to the
Typeproperty of theBulkEmailRecipienttype collection. - In the
ReportMailingOverridablemodule: - Optional. Specify the following settings for each type using the
OverrideRecipientsTypesTableprocedure: a presentation, a main contact information kind (Email type), a path to the choice form, and an additional type that supplements items of the main type. If not specified, the default settings will be used. - Optional. Write the code (or change the query) for generating the list of recipients in the
BeforeGenerateMailingRecipientsListprocedure. This procedure is called just before executing the recipient query. It may be required only if a non-standard hierarchy is used (for example, as in the linking of theUsersandUserGroupscatalogs).
Extending Supported File Formats
To extend the list of formats supported by the ReportMailing subsystem, do the following:
- Add new formats to the
ReportSaveFormatsenumeration. - In the
ReportMailingOverridablemodule: - Define format parameters in the
OverrideFormatsParametersprocedure. - Specify a handler for saving in new formats in the
BeforeSaveSpreadsheetDocumentToFormatprocedure.
Command Interface Setup
To use the subsystem, add the following metadata object to the command interface of users responsible for report distributions:
- The
ReportMailingscatalog, which is used for setup and interactive execution of distributions.
If the configuration does not contain the Application settings subsystem, add the ReportMailings command to the Administrator workspace.
Attaching Non-Standard Reports
To be included in a distribution, reports must use a standard format for storing and displaying settings (only by DCS means) and be generated by the ComposeResult method. See details of the OnComposeResult event in Syntax Assistant.
Find all reports with their own default form and analyze how they are generated and how their settings are configured.
If a report does not use a standard format for storing and displaying settings, consider switching it to regular tools:
- Generation in the
OnComposeResultevent using theComposeResultmethod. - Setup using the DCS (see also Attaching a Report Form).
Report distribution also allows you to override the existing mechanics when selecting some DCS parameters. For this purpose, the following procedures are defined in the ReportMailingClientOverridable module:
OnActivateRowSettingsallows you to prohibit direct editing of the setting value. For example, if the setting contains a presentation only and its actual value is stored in additional properties of DCS user settings.OnSettingChoiceStartallows you to open your own form for editing a setting value.OnSettingsClearallows you to define the behavior when the clear button is available for a setting.
If switching to regular tools is impossible, add the report to the DetermineReportsToExclude procedure of the ReportMailingOverridable common module.
Special Cases of Integration
User Access Setup
To manage user access to the subsystem, assign a user the roles specified in the table below.
| # | Role Description |
|---|---|
| 1. | AddEditReportBulkEmailsGrants the right to set up and execute personal and permitted report distributions. Includes the Output right.Used along with the AddEditEmailAccounts role (the Email management subsystem). |
| 2. | ReadReportBulkEmailsGrants the right to view personal and permitted report distributions. |
| 3. | FullAccess (the Core subsystem user role)Grants the right to change a distribution author, set up and execute report distributions. |
The table below illustrates possible user groups and the roles they could be assigned with.
| # | User Group Description | Assigned Roles |
|---|---|---|
| 1. | Administrator
|
|
| 2. | User responsible for report distributions
|
|
How to Use the Subsystem in Development
Overriding the "Reportisblank" Check Box
If you use a custom logic to generate reports (the StandardProcessing property in OnComposeResult is set to False), in the OnComposeResult procedure, set the ReportIsBlank flag in additional properties of user settings:
SettingsComposer.UserSettings.AdditionalProperties.Insert("ReportIsBlank", <True if the report does not contain data>);Example 1. Setting the ReportIsBlank check box in a report that displays data from a value table:
ReportIsBlank = ValueTable.Count() = 0;
SettingsComposer.UserSettings.AdditionalProperties.Insert("ReportIsBlank", ReportIsBlank);Example 2. Setting the ReportIsBlank check box in a DCS report that displays data from queries:
ReportIsBlank = ReportsServer.ReportIsBlank(ThisObject, DCProcessor);
SettingsComposer.UserSettings.AdditionalProperties.Insert("ReportIsBlank", ReportIsBlank);This ensures that users have the Send blank reports check box that allows them to disable sending blank reports. To determine that a report is not blank, the report distribution uses standard DCS tools, which in some cases do not work or work with errors.
You can also use this flag in other cases when you need to override the standard logic or when the distribution cannot accurately determine that a report is blank. For example, if a report contains charts, it is always considered that the report is not blank.
Adding New Email Subject and Text Parameters
Sometimes besides the standard parameters of an email subject and text, you might need additional parameters, for example, First name, Last name, and other. To specify them, you can use the ReportMailingOverridable common module:
- Specify new parameters in the
OnDefineEmailTextParametersprocedure. - Set values for new parameters in the
OnReceiveEmailTextParametersprocedure.
See an example in the demo configuration.
Data Exchange Setup
Do not add the subsystem's objects to exchange plans of distributed infobases and standalone workstations or to exchange plans used for data synchronization between different applications. The subsystem can operate only in one node. So, subsystem data in different nodes must be stored independently.
Scheduled Jobs
With the Scheduled jobs subsystem, you can change a set of scheduled jobs and their schedule, view the execution history of scheduled and background jobs, and analyze errors.
Subsystem Setup
The subsystem does not require special setup.
Command Interface Setup
To use the subsystem, add the DataProcessor.ScheduledAndBackgroundJobs metadata object to the administrator's command interface. That way you will be able to view background and scheduled jobs and manually perform scheduled jobs (settings for processing scheduled jobs in the file infobase).
Setting Up Dependencies of Scheduled Jobs
You can make predefined scheduled jobs dependent on various settings:
- One or more enabled functional options.
- Current operating mode: a standalone workstation, a subordinate node of a distributed infobase, or a separated infobase.
- Operations with external resources.
For more details on all available settings, see comments to procedure ScheduledJobsOverridable.OnDefineScheduledJobSettings.
When execution of a predefined scheduled job depends on factors mentioned above, you need to programmatically control the Use flag. Otherwise, the scheduled job will start a session occupying computing resources of 1C:Enterprise server. To configure dependencies of a scheduled job on functional options:
- In the
FunctionalOptionsStoragetype collection, add constants matching functional options that are used to manage scheduled jobs. - In the
OnDefineScheduledJobSettingsprocedure of theScheduledJobsOverridablecommon module, insert the required code. For example:Dependence = Dependencies.Add(); Dependence.ScheduledJob = Metadata.ScheduledJobs.SMSDeliveryStatusUpdate; Dependence.FunctionalOption = Metadata.FunctionalOptions.UseEmailClient; - At the beginning of the scheduled job processing procedure, add the following code:
Common.OnStartExecuteScheduledJob(Metadata.ScheduledJobs.<ScheduledJobName>);
User Access Setup
To manage user access to the subsystem, assign a user the role specified in the table below.
| # | Role Description |
|---|---|
| 1. | FullAccess (the Core subsystem user role)Grants the right to add and edit scheduled jobs. set up processing of scheduled jobs, and view background jobs. |
How to Use the Subsystem in Development
No further actions are required when developing the configuration.
Data Exchange Setup
Do not add the subsystem's objects to exchange plans of distributed infobases and standalone workstations or to exchange plans used for data synchronization between different applications. The subsystem can operate only in one node. So, subsystem data in different nodes must be stored independently.
Infobase Backup
With the Infobase backup subsystem, you can back up the infobase in 1C:Enterprise mode on demand or according to the configured schedule. Using this subsystem, you can also restore the infobase from a backup. Notice.
The subsystem does not support the web client.
Subsystem Setup
To use the subsystem, add the Infobase backup and Backup setup data processors to the administrator's command interface.
User Access Setup
To manage user access to the subsystem, assign a user the roles specified in the table below.
| # | Role Description |
|---|---|
| 1. | SystemAdministrator (the Core subsystem user role)Grants the right to set up, back up and restore the infobase. |
How to Use the Subsystem in Development
No further actions are required when developing the configuration.
Data Exchange Setup
Do not add the subsystem's objects to exchange plans of distributed infobases and standalone workstations or to exchange plans used for data synchronization between different applications. The subsystem can operate only in one node. So, subsystem data in different nodes must be stored independently.
Properties
With the Properties subsystem, you can create and edit additional properties of arbitrary configuration objects in 1C:Enterprise mode without making changes to the configuration itself. Additional properties can be displayed in application lists and reports similarly to ordinary object attributes. Any reference-type objects can serve as objects with properties.
There are three kinds of additional object properties:
- Additional attributes are properties stored in the object (in the special table). Additional attributes are an integral part of an object. They are entered while editing the object. They are available for editing to the same users who can access the object with properties. For example, such attributes as
Weight,Size, andColorof theGoodscatalog. - Labels are properties stored in the object (in the table of additional attributes) and displayed in forms as multi-colored label icons.
- Additional information records are not integral object properties. Usually, they are available for editing to users who do not have access to the object itself. When integrating the <strong>Properties</strong> subsystem together with the Access management subsystem, you can restrict user access to particular additional information records. For example, a date of the nearest goods delivery.
Subsystem Setup
Before integrating the subsystem into the application, you need to decide which application objects users will be able to extend with additional properties. In this list, include the objects whose properties are more likely to be defined by a user. Usually, catalogs that are too universal belong to such objects. For example, a goods catalog, for which the need for such properties as weight, size, and color will be clear only upon integration.
Then, select which kinds of additional properties are required in selected objects:
- Additional attributes
- Additional information records
- Labels
- Or all of the above
After that, you need to decide which value types of additional properties will be available to a user for selection. Add them to the Type property of the AdditionalAttributesAndInfo chart of characteristic types. The user will be able to create additional properties of such types for all objects with the integrated Properties subsystem. Usually, this list includes some catalogs and enumerations. Do not include such objects as documents, tasks, and business processes into types of additional properties. Also, we do not recommend adding too many value types of additional properties as this complicates the system setup for users.
Setting Up Objects with Additional Attributes
- Create the
AdditionalAttributestabular section with the following attributes:
| Name | Type | Tooltip |
|---|---|---|
Property |
ChartOfCharacteristicTypesRef.AdditionalAttributesAndInfo |
An additional attribute |
Value |
Characteristic.AdditionalAttributesAndInfo |
Additional attribute's value |
TextString |
String (unlimited) |
Text of the additional String attribute |
For the Value attribute in the Filter by reference property set up the link: Filter.Owner (AdditionalAttributes.Property).
- In the object form, create a group of fields or a page named
GroupAdditionalAttributesto place controls that edit object properties. - In the
OnCreateAtServerevent handler of the object form, execute the following call:// StandardSubsystems.Properties AdditionalParameters = New Structure; AdditionalParameters.Insert("ItemForPlacementName", "GroupAdditionalAttributes"); PropertyManager.OnCreateAtServer(ThisObject, AdditionalParameters); // End StandardSubsystems.PropertiesWhere
GroupAdditionalAttributesis the name of the form group created on step 2 that will host form fields used to edit additional attributes. If this parameter is not specified, controls for editing properties will be placed at the bottom of the form.
In some cases, it might be necessary to display additional attributes in different places of the form. For example, when a different set of properties is displayed on each page of the multi-page form. In this case, you need to pass a list of values to theItemForPlacementNameparameter, where a value is a reference to a predefined property set and a presentation is the name of the form group where its attributes are to be displayed. Example:GroupsForPlacement = New ValueList; GroupsForPlacement.Add(PropertyManager.PropertiesSetByName("Catalog_DemoCounterpartiesMain"), Items.MainGroup3.Name); GroupsForPlacement.Add("AllOther", Items.OthersGroup.Name); AdditionalParameters = New Structure; AdditionalParameters.Insert("ItemForPlacementName", GroupsForPlacement); PropertyManager.OnCreateAtServer(ThisObject, AdditionalParameters);The
AllOthervalue in groups for placement indicates where to display additional attributes of sets that are not specified in this list. - When using the form for working with different objects, you need to pass the
ArbitraryObjectparameter set toTrueand then call theUpdateAdditionalAttributesItemsprocedure for different objects. - In the form module of each object with properties, add the following procedure:
#Region FormCommandHandlers // StandardSubsystems.Properties &AtClient Procedure Attachable_PropertiesExecuteCommand(ItemOrCommand, URL = Undefined, StandardProcessing = Undefined) PropertyManagerClient.ExecuteCommand(ThisObject, ItemOrCommand, StandardProcessing); EndProcedure // End StandardSubsystems.Properties #EndRegion - Add the following code block to the
OnOpenevent handler:// StandardSubsystems.Properties PropertyManagerClient.AfterImportAdditionalAttributes(ThisObject); // End StandardSubsystems.Properties - Add the following code block to the
NotificationProcessingevent handler:// StandardSubsystems.Properties If PropertyManagerClient.ProcessNotifications(ThisObject, EventName, Parameter) Then UpdateAdditionalAttributesItems(); PropertyManagerClient.AfterImportAdditionalAttributes(ThisObject); EndIf; // End StandardSubsystems.Properties - Add auxiliary procedures:
#Region Private // StandardSubsystems.Properties &AtServer Procedure UpdateAdditionalAttributesItems() PropertyManager.UpdateAdditionalAttributesItems(ThisObject); EndProcedure &AtClient Procedure UpdateAdditionalAttributesDependencies() PropertyManagerClient.UpdateAdditionalAttributesDependencies(ThisObject); EndProcedure &AtClient Procedure Attachable_OnChangeAdditionalAttribute(Item) PropertyManagerClient.UpdateAdditionalAttributesDependencies(ThisObject); EndProcedure // End StandardSubsystems.Properties #EndRegion - Add the following code block to the
OnReadAtServerevent handler:// StandardSubsystems.Properties PropertyManager.OnReadAtServer(ThisObject, CurrentObject); // End StandardSubsystems.Properties - Add the following code block to the
FillCheckProcessingAtServerevent handler:// StandardSubsystems.Properties PropertyManager.FillCheckProcessing(ThisObject, Cancel, CheckedAttributes); // End StandardSubsystems.Properties - Add the following code block to the
BeforeWriteAtServerevent handler:// StandardSubsystems.Properties PropertyManager.BeforeWriteAtServer(ThisObject, CurrentObject); // End StandardSubsystems.Properties
Setting Up Objects with Labels in Object Form
- If no additional attributes were attached to an object, create the
AdditionalAttributestable to store labels. To do this, follow instructions in step 1 of the Setting up objects with additional attributes section above. - Add types of objects with labels to the
LabelsOwnertype collection. These can be documents, catalogs, charts of characteristic types, charts of accounts, charts of calculation types, and business processes or tasks. - Create a group named
GroupLabelsin the object form to place controls that edit object properties. - Call the
PropertyManager.LabelsDisplayParametersfunction to specify label display parameters in theOnCreateAtServerevent handler of the object form. Example:
LabelsDisplayParameters = PropertyManager.LabelsDisplayParameters();
LabelsDisplayParameters.LabelsDestinationElementName = "GroupLabels";
LabelsDisplayParameters.MaxLabelsOnForm = 3;
LabelsDisplayParameters.LabelsDisplayOption = Enums.LabelsDisplayOptions.Picture;
AdditionalParameters.Insert("LabelsDisplayParameters", LabelsDisplayParameters);
PropertyManager.OnCreateAtServer(ThisObject, AdditionalParameters);where:
LabelsDestinationElementNameis a name of the form group to host labels. If not specified, labels are displayed at the bottom of the form.MaxLabelsOnFormis the maximum number of labels displayed on the form. By default, all labels are displayed.LabelsDisplayOptionis an option to display labels on the form. These can be small color pictures for forms with little free space or labels with a colored background to quickly view label text. By default,Enums.LabelsDisplayOptions.Picture.
- Add the following code block to the
NotificationProcessingevent handler:// StandardSubsystems.Properties If PropertyManagerClient.ProcessNotifications(ThisObject, EventName, Parameter) Then UpdateAdditionalAttributesItems(); EndIf; // End StandardSubsystems.Properties - Add the auxiliary procedure:
#Region Private // StandardSubsystems.Properties &AtServer Procedure UpdateAdditionalAttributesItems() PropertyManager.UpdateAdditionalAttributesItems(ThisObject); EndProcedure // End StandardSubsystems.Properties #EndRegion
For examples, see the _DemoProducts, _DemoCounterparties, and _DemoPartners catalogs.
Setting Up Objects with Labels in List Form
To display labels in a dynamic list:
- Create a column group named
GroupLabelsin the list form. - Specify the number of label columns displayed in the list form and modify the dynamic list query.
An example for three columns:
...
0 AS Label1,
0 AS Label2,
0 AS Label3
FROM
...- Include new fields in the column group.
- Add the
ListOnGetDataAtServerevent handler to the dynamic list:
// StandardSubsystems.Properties
PropertyManager.OnGetDataAtServer(Settings, Rows);
// End StandardSubsystems.PropertiesYou can pass the name of the attribute to be used when receiving labels to the OwnerName parameter. By default, row key labels are displayed.
For examples, see the _DemoProducts and _DemoCounterparties catalogs.
To display labels when list rows are activated:
- Create a group named
GroupLabelsin the list form. - Call the
PropertyManager.LabelsDisplayParameters()function to specify the label display parameters in theOnCreateAtServerevent handler of the list form. Example:
LabelsDisplayParameters = PropertyManager.LabelsDisplayParameters();
LabelsDisplayParameters.LabelsDestinationElementName = "GroupLabels";
LabelsDisplayParameters.LabelsDisplayOption = Enums.LabelsDisplayOptions.Label;
AdditionalParameters.Insert("LabelsDisplayParameters", LabelsDisplayParameters);
AdditionalParameters.Insert("ArbitraryObject", True);
PropertyManager.OnCreateAtServer(ThisObject, AdditionalParameters);where:
LabelsDestinationElementNameis a name of the form group to host labels. If not specified, labels are displayed at the bottom of the form.LabelsDisplayOptionis an option to display labels on the form. These can be small color pictures for forms with little free space or labels with a colored background to quickly view label text. By default,Enums.LabelsDisplayOptions.Picture.
- Pass the
ArbitraryObjectparameter with theTruevalue toAdditionalParametersof theOnCreateAtServerprocedure. - Add the auxiliary procedure:
#Region Private
&AtServer
Procedure PopulateLabelsOnForm()
If ValueIsFilled(ObjectReference) Then
PropertyManager.FillObjectLabels(
ThisObject, ObjectReference.GetObject(), True);
EndIf;
EndProcedure
#EndRegion- Add the
ListOnActivateRowevent handler with calling the auxiliary procedure from step 4 to the dynamic list.
See an example in the _DemoPartners catalog.
To display the label legend:
- Create a group named
GroupLegendLabels. - Call the
PropertyManager.LabelsDisplayParametersfunction to specify the label legend display parameters in theOnCreateAtServerevent handler of the object form:
LabelsDisplayParameters = PropertyManager.LabelsDisplayParameters();
LabelsDisplayParameters.LabelsLegendDestinationElementName = "GroupLegendLabels";
LabelsDisplayParameters.LabelsSelection = True;
LabelsDisplayParameters.ObjectsKind = Metadata.Catalogs._DemoProducts.FullName();LabelsLegendDestinationElementName is a name of the form group to host the label legend. If not specified, the label legend is not displayed in the form.
LabelsSelection is an option to filter list objects by labels.
ObjectsKind is a full name of the metadata object to display the label legend in the list form.
- Add a new
LabelsDisplayParametersparameter to the structure:
AdditionalParameters.Insert("LabelsDisplayParameters", LabelsDisplayParameters);- Add auxiliary procedures to set the label legend visibility:
// StandardSubsystems.Properties
...
&AtClient
Procedure Attachable_SetLabelsLegendVisibility(Command)
SetLabelsLegendVisibility();
EndProcedure
&AtServer
Procedure SetLabelsLegendVisibility()
PropertyManager.SetLabelsLegendVisibility(ThisObject);
EndProcedure
...
// End StandardSubsystems.Properties- Add an auxiliary procedure to set filters by labels:
// StandardSubsystems.Properties
...
&AtClient
Procedure Attachable_FilterByLabelsHandler(Command)
PropertyManagerClient.ApplyFilterByLabel(ThisObject, Command.Name);
EndProcedure
...
// End StandardSubsystems.PropertiesTo set filters by labels, select the Property field from the AdditionalAttributes table in the dynamic list query.
For examples, see the _DemoProducts, _DemoCounterparties, and _DemoPartners catalogs.
Setting Up Deferred Initialization of Additional Attributes
Additional attributes located on a separate page or tab of the form are to be imported in a deferred way. This allows you to open forms significantly faster. Notice.
Upon deferred initialization, you will not be able to move additional attributes from the group where they are located using the Change form command.
- In the
OnCreateAtServerevent handler of the object form, in the code block:// StandardSubsystems.Properties AdditionalParameters = New Structure; AdditionalParameters.Insert("ItemForPlacementName", "GroupAdditionalAttributes"); PropertyManager.OnCreateAtServer(ThisObject, AdditionalParameters); // End StandardSubsystems.Propertiesadd the
DeferredInitializationparameter to the structure:AdditionalParameters.Insert("DeferredInitialization", True); - In the
OnCurrentPageChangehandler of the page group that displays additional attributes, add the following code block:// StandardSubsystems.Properties If PropertiesParameters.Property(CurrentPage.Name) And Not PropertiesParameters.DeferredInitializationExecuted Then PropertiesExecuteDeferredInitialization(); PropertyManagerClient.AfterImportAdditionalAttributes(ThisObject); EndIf; // End StandardSubsystems.Properties - Add the auxiliary procedure:
#Region Private &AtServer Procedure PropertiesExecuteDeferredInitialization() PropertyManager.FillAdditionalAttributesInForm(ThisObject); EndProcedure #EndRegion
Setting Up Objects with Additional Information Records
Add types of objects with additional information records to the DetailedInfoOwner type collection. Supported object types: documents, catalogs, charts of characteristic types, charts of accounts, charts of calculation types, business processes, and tasks.
Setting Up Dynamic Lists
To be able to display additional attributes and information records in list forms of objects with properties, add the Ref field from the dynamic list query to the table of the form related to this dynamic list. The added Ref field must be hidden from users by default. To do this, clear the Visibility check box in the User visibility property.
Setting Up Object Property Sets
In most cases, one property set is enough for a metadata object. For example, all items of the goods catalog must have such properties as weight, size, color, and so on. To do this:
- In the
OnGetPredefinedPropertiesSetsprocedure of thePropertyManagerOverridablecommon module, describe a predefined property set and specify an UUID. The predefined property set name must comply with the following naming convention:Catalog_<ObjectName>(if the object is a catalog),Document_<ObjectName>(if the object is a document), and so on. For example,Catalog_Employees,Document_ExpenseReport, orBusinessProcess_Sale. The UUID format is Random UUID (Version 4). To get an ID, you need to calculate the New UUID platform constructor value in1C:Enterprisemode or use an online generator (for example, https://www.uuidgenerator.net/version4). Example:Set = Sets.Rows.Add(); Set.Name = "Catalog_ExternalUsers"; Set.Id = New UUID("<UUID>");
Special Cases of Property Set Setup
Transferring Property Sets from Predefined Items of the AdditionalAttributesAndInfoSets Catalog
If a set of properties is set by a predefined item of the AdditionalAttributesAndInfoSets catalog, transfer its description to the OnGetPredefinedPropertiesSets procedure. Add the "Delete" prefix to the predefined item. For example, DeleteCatalog_ExternalUsers.
In this case, a new property set will be created. All additional attributes and information records will be transferred to the set. In object forms with properties, custom settings for the form appearance, such as window size and field location, might be lost. To prevent it, add an update handler and call the PropertyManager.RestoreSettingsOfFormsWithAdditionalAttributes procedure.
Setting Up Objects with Different Property Sets for Different Object Groups
In some cases, a more flexible setup might be necessary. For example, goods can have unique characteristics depending on their kind: printer cartridges require the Printer type property, and furniture requires the Material property.
When using this approach, a property set applied to a particular object instance is determined by an object group containing a reference to the property set. This option is exemplified in the _DemoProducts catalog of the demo configuration. Depending on the product kind or object group, a specific property set is applied to a catalog item. The _DemoProducts catalog has the ProductKind attribute. Depending on its value, a catalog item gets one or another set of additional properties, the reference to which is retrieved in the _DemoProductsKinds catalog object. To configure it:
- Create a catalog whose values match property sets of an object with properties. For example, for the
_DemoProductscatalog of the demo configuration, it is the_DemoProductsKindscatalog. - In this catalog, add the
PropertiesSetattribute of theCatalogRef.AdditionalAttributesAndInfoSetstype. Include the attribute in theUseAdditionalAttributesAndInfo<Configuration name>functional option. If it is missing, create it. If the catalog groups objects of more than one type, you can add two or more attributes with suitable names, for example,ErrorsPropertiesSetorTasksProppertiesSet. - In the
BeforeWritehandler of the object module of this catalog, callPropertyManager.BeforeWriteObjectKindand pass the object to be written and the property set name as parameters. Example:// StandardSubsystems.Properties PropertyManager.BeforeWriteObjectKind(ThisObject, "Catalog_DemoProducts"); // End StandardSubsystems.PropertiesIf the catalog groups objects of more than one type, make two or more calls specifying the names of used attributes. Example:
// StandardSubsystems.Properties PropertyManager.BeforeWriteObjectKind(ThisObject, "Catalog_DemoErrors","ErrorsPropertiesSet"); PropertyManager.BeforeWriteObjectKind(ThisObject, "Catalog_DemoTasks","TasksPropertiesSet"); // End StandardSubsystems.Properties - Call the
PropertyManager.BeforeDeleteObjectKindprocedure in theBeforeDeletehandler of the catalog object module and pass the object to be written as a parameter. Example:// StandardSubsystems.Properties PropertyManager.BeforeDeleteObjectKind(ThisObject); // End StandardSubsystems.PropertiesIf the catalog groups objects of more than one type, make two or more calls specifying the names of used attributes. Example:
// StandardSubsystems.Properties PropertyManager.BeforeDeleteObjectKind(ThisObject, "ErrorsPropertiesSet"); PropertyManager.BeforeDeleteObjectKind(ThisObject, "TasksProppertiesSet"); // End StandardSubsystems.Properties - In the property owner object, create an attribute whose values define usage of a particular property set for a specific object instance. For the
_DemoProductscatalog, it is theProductKindattribute of theCatalogRef._DemoProductsKindstype. - In the object form module, implement the
OnChangehandler for the form item that edits this attribute. For the_DemoProductscatalog, it is the following handler:&AtClient Procedure ProductKindOnChange(Item) UpdateAdditionalAttributesItems(); EndProcedure - In the
FillObjectPropertiesSetsprocedure of thePropertyManagerOverridablecommon module, insert a condition that populates a property set for a specific object. For example, for_DemoProducts, the condition is as follows:Procedure FillObjectPropertiesSets(Object, RefType, PropertiesSets, StandardProcessing, AssignmentKey) Export ... If RefType = Type("CatalogRef._DemoProducts") Then FillPropertiesSetByProductKind(Object, RefType, PropertiesSets); EndIf; ... EndProcedure Procedure FillPropertiesSetByProductKind(Products, RefType, PropertiesSets) If TypeOf(Products) = RefType Then Products = Common.ObjectAttributesValues(Products, "IsFolder, ProductKind"); EndIf; If Products.IsFolder = False Then String = PropertiesSets.Add(); String.Set = Common.ObjectAttributeValue( Products.ProductKind, "PropertiesSet"); EndIf; EndProcedureIf the catalog groups objects of more than one type, include several types in the condition, for example:
If RefType = Type("CatalogRef._DemoErrors") OR RefType = Type("CatalogRef._DemoTasks") Then FillPropertiesSetByProject(Object, RefType, PropertiesSets); EndIf; - In the
OnGetPredefinedPropertiesSetsprocedure of thePropertyManagerOverridablecommon module, describe a predefined group named `Catalog_ObjectName` if the object is a catalog or `Document_ObjectName` if the object is a document, and so on. For example, theCatalog_Productspredefined group is created for theProductscatalog:Set = Sets.Rows.Add(); Set.Name = "Catalog_Products"; Set.IsFolder = True; Set.Id = New UUID("c7cd91d8-6f8a-4d10-82bf-c6fba8475a98");
Setting Up Objects with Multiple Property Sets Being Combined
Property sets are to be combined depending on particular object attributes. For example, in the Partners catalog, you can add clients, vendors, competitors, and partners with other relations. One partner can be a client, a vendor, and a competitor at the same time. Additional properties to be dynamically displayed for the partner depend on which types the partner belongs to.
This option is exemplified in the _DemoPartners catalog of the demo configuration. It contains the Client, Vendor, Competitor, and OtherRelations attributes of the Boolean type. These attributes define usage of one or several property sets.
With this approach, the catalog has one predefined property set for all object instances, as well as several predefined property sets that can be applied to instances of this object under certain conditions.
The sequence of setting up such object is as follows:
- Make a decision about object property sets. For example, for the
_DemoPartnerscatalog, these property sets are the following attributes:Client,Vendor,Competitor, andOtherRelations. - Identify the object attributes whose values define usage of a particular property set for a specific object instance. For example, for the
_DemoPartnerscatalog, these are attributesClient,Vendor,Competitor, andOtherRelations. - In the
OnGetPredefinedPropertiesSetsprocedure of thePropertyManagerOverridablecommon module, describe a predefined group namedCatalog_<ObjectName>if the object is a catalog orDocument_<ObjectName>if the object is a document, and so on. For example,Catalog__DemoPartners. In this predefined group, for each property set, describe a predefined item namedCatalog_<ObjectName>_<PropertySetName>. For example,Catalog_Partners_Clients.Set = Sets.Rows.Add(); Set.Name = "Catalog__DemoPartners"; Set.IsFolder = True; Set.Id = New UUID("2c8d6c08-1d35-43ce-a690-32ccf53b03f2"); ChildSet = Set.Rows.Add(); ChildSet.Name = "Catalog_Partners_Clients"; ChildSet.Id = New UUID("277e1f06-e4f6-4c23-8d31-0d4347e207a2"); </li> - The description of child property sets (
Catalog_Partners_Clientsand so on) must be specified in theOnGetPropertiesSetsDescriptionsprocedure of thePropertyManagerOverridablecommon module as follows:Descriptions["Catalog_Partners_Clients"] = NStr("en='Client';", LanguageCode); Descriptions["Catalog_Partners_Competitors"] = NStr("en='Competitor';", LanguageCode); Descriptions["Catalog_Partners_Common"] = NStr("en='Common';", LanguageCode); Descriptions["Catalog_Partners_Suppliers"] = NStr("en='Supplier';", LanguageCode); Descriptions["Catalog_Partners_Other"] = NStr("ru='en='Other';", LanguageCode); </li> <li>In this predefined group, also create a predefined item with name `Catalog_<ObjectName>_Common` and description <code>Common</code>. This item will contain common properties for all objects. </li> <li>In the <code>FillObjectPropertiesSets</code> procedure of the <code>PropertyManagerOverridable</code> common module, enter a condition for this type of objects. For the <code>_DemoPartners</code> catalog, it is the following code: Procedure FillObjectPropertiesSets(Object, RefType, PropertiesSets, StandardProcessing) Export ... If RefType = Type("CatalogRef._DemoPartners") Then FillPartnerPropertiesSets(Object, RefType, PropertiesSets); EndIf; ... EndProcedure Procedure FillPartnerPropertiesSets(Partner, RefType, PropertiesSets) If TypeOf(Partner) = RefType Then Object = Common.ObjectAttributesValues(Partner, "Client, Competitor, Vendor, OtherRelations, IsFolder"); Else Object = Partner; EndIf; If Object.IsFolder = False Then String = PropertiesSets.Add(); String.Set = PropertyManager.PropertiesSetByName("Catalog_Partners_Common"); String.Representation = UsualGroupRepresentation.Line; String.ShowTitle = True; String.Title = NStr("en = 'For all partners'"); If Object.Client Then String = PropertiesSets.Add(); String.Set = PropertyManager.PropertiesSetByName("Catalog_Partners_Clients"); String.Representation = UsualGroupRepresentation.Line; String.ShowTitle = True; String.Title = NStr("en = 'For customers'"); EndIf; … EndProcedureIn the given example, 1C:Enterprise checks values of the
Client,Vendor,Competitor, andOtherRelationscatalog attributes and adds property sets to thePropertiesSetstable. In theSetfield, a reference to a property set is specified. Remaining fields can be filled in with values of the set from the form. - In the object form, you need to implement the
OnChangehandlers for those attributes that determine the property sets used for this object instance. For example, for the_DemoPartnerscatalog form, these are the following handlers:&AtClient Procedure ClientOnChange(Item) // StandardSubsystems.Properties UpdateAdditionalAttributesItems(); // End StandardSubsystems.Properties EndProcedure </li>
Setting Up Additional Metadata Object Characteristics
For each configuration object with properties, you need to open and fill in the dialog box for editing additional characteristics.
If additional attributes are configured for the object:
| Types of Characteristics | Field of Option | Field of Type Selection | Value of Type Selection |
|---|---|---|---|
Catalog.AdditionalAttributesAndInfoSets.TabularSection.AdditionalAttributes |
Property |
PredefinedSetName |
Name of the predefined item described in the OnGetPredefinedPropertiesSets procedure of the PropertyManagerOverridable module. |
| Characteristic Values | Object Field | Field of Type | Field of Value |
|---|---|---|---|
Catalog.<Name of the object with properties>.TabularSection.AdditionalAttributes |
Ref |
Property |
Value |
If additional information records are configured for the object:
| Types of Characteristics | Field of Option | Field of Type Selection | Value of Type Selection |
|---|---|---|---|
Catalog.AdditionalAttributesAndInfoSets.TabularSection.AdditionalInfo |
Property |
PredefinedSetName |
Name of the predefined item described in the OnGetPredefinedPropertiesSets procedure of the PropertyManagerOverridable module. |
| Characteristic Values | Object Field | Field of Type | Field of Value |
|---|---|---|---|
InformationRegister.AdditionalInfo |
Object |
Property |
Value |
where Predefined item (group) of the AdditionalAttributesAndInfoSets catalog is a predefined item or group created in the previous step.
Disabling Unused Property Sets
If an object using a property set is disabled by a functional option, it is possible to disable an unused property set. To do this, use the Used property of the property set. If you set the Used property value to False, the property set will no longer be displayed in the list form and the properties will no longer be displayed in the form of an owner object. To disable an unused property set:
- Set the
Usedproperty value for the required property set in theOnGetPredefinedPropertiesSetsprocedure of thePropertyManagerOverridablecommon module:Set = Sets.Rows.Add(); Set.Name = "Catalog_ExternalUsers"; Set.Id = New UUID("d9c30d48-a72a-498a-9faa-c078bf652776"); Set.Used = GetFunctionalOption("UseExternalUsers"); - Add code to switch the use of a property set to an event when changing a constant value.
SetParameters = PropertyManager.PropertySetParametersStructure(); SetParameters.Used = Value; PropertyManager.SetPropertySetParameters("Catalog_ExternalUsers", SetParameters);
Command Interface Setup
To use the subsystem, add the following metadata object to the command interface:
- Catalog
AdditionalAttributesAndInfoSets, which is used to view and edit properties (by the property content editor and administrator).
If the configuration does not contain the Application settings subsystem, add the following constants to the Administrator workspace:
UseAdditionalAttributesAndInfo, which is used to enable and disable the subsystem.
See an example in the CommonSettings form of the SSLAdministrationPanel data processor.
User Access Setup
To manage user access to the subsystem, assign a user the roles specified in the table below.
| # | Role Description |
|---|---|
| 1. | BasicAccessSSLGrants the right to view property sets, additional properties, and object property values. |
| 2. | ReadAdditionalInfoGrants the right to view permitted additional information records. When using together with the Access management subsystem, you can restrict user access to particular additional information records. For more information, see Special Cases of Integration. |
| 3. | EditAdditionalInfoGrants the right to add and edit permitted additional information records. When using together with the Access management subsystem, you can restrict user access to particular additional information records. For more information, see Special Cases of Integration. |
| 4. | AddEditAdditionalAttributesAndInfoGrants the right to add and edit properties, property sets, and object property values. |
| 5. | FullAccess (the Core subsystem user role)Grants the right to enable and disable properties. permanently delete subsystem objects marked for deletion. |
Viewing and editing additional attributes and labels require roles to view and edit their owner objects.
The table below illustrates possible user groups and the roles they could be assigned with.
| # | User Group Description | Assigned Roles |
|---|---|---|
| 1. | User assigned to set up additional properties |
|
| 2. | Viewing additional information record values of infobase objects |
|
| 3. | Editing additional information record values of infobase objects |
|
Property Operations in the Application
Each property has the Name attribute required to access it programmatically using the PropertiesValues, PropertyValue, RepresentationOfThePropertyValue, and RepresentationsOfPropertyValues functions of the PropertyManager common module. Its value is unique, set automatically, and can be changed by the developer in the property card.
You can also populate the print form parameters whose names match the names of additional attributes, as follows:
Template = PrintManagement.PrintFormTemplate("Document._DemoCustomerProformaInvoice.PF_MXL_WarrantyLetter", LanguageCode);
RepresentationsOfPropertyValues = PropertyManager.RepresentationsOfPropertyValues(ObjectsArray, LanguageCode);
For Each Document In PrintData Do
...
TemplateArea = Template.GetArea("EmailText");
...
TemplateArea.Parameters.Fill(RepresentationsOfPropertyValues[Document.Ref]);
SpreadsheetDocument.Put(TemplateArea);
...
EndDo;See the full list of available functions in Chapter 4 "API documentation".
Special Cases of Integration
How to Integrate "Properties" Subsystem without "Business Interactions" Subsystem
How to Integrate "Properties" Subsystem without "File Management" Subsystem
How to Integrate "Properties" and "Access Management" Subsystems
How to Use the Subsystem in Development
When you create a new metadata object, you have to set up the subsystem policies on the new objects.
Data Exchange Setup
For distributed infobases (DIB) and standalone workstations, add to the exchange plans all the subsystem's metadata objects that contain data.
Hierarchy
With the Hierarchy subsystem, you can output a report that shows the relationship between specific parent and child documents. Using this report, you can view chains of related documents for orders, contracts, and so on.
Subsystem Setup
Select documents, catalogs, and charts of characteristic types (hereinafter "documents") that need the Related documents report. For example, orders, contracts, and so on.
- If the Attachable commands subsystem is integrated into the application, first integrate this subsystem into the required document.
- If the configuration includes the Attachable commands subsystem and this subsystem is already integrated into the required document, no additional actions are required: the command to open the Related documents report is automatically displayed in the Reports submenu.
- If the configuration does not include the Attachable commands subsystem, add the selected document types to the parameter types of the
RelatedDocumentscommon command.
To set up links between parent and child documents, catalogs, and charts of characteristic types displayed in the Related documents report, you need to configure the RelatedDocuments filter criterion. In the Type property, specify possible types of parent documents, and in the Contents property, specify attributes of child documents, catalogs, and charts of characteristic types that will be searched for parent documents. For example, you can specify that the Contract sales order attribute contains a reference to a parent contract.
Setting Up Overridable Modules
If necessary, implement your logic into the functions of the SubordinationStructureOverridable overridable module.
User Access Setup
To manage user access to the subsystem, assign a user the role specified in the table below.
| # | Role Description |
|---|---|
| 1. | ViewRelatedDocumentsGrants the right to view documents related to the object of interest. |
How to Use the Subsystem in Development
Data Exchange Setup
The subsystem does not participate in data exchange.
To-Do List
With the To-do list subsystem, you can display the user to-do list on the desktop (new emails, tasks, requests, unapproved orders, and so on). A to-do list is defined by the configuration developer during the subsystem integration and can include important and normal to-do items, single-line and multi-line items, and items with and without quantitative indicators. A to-do list is grouped by command interface sections. You can set up the visibility of to-do items, the order they appear in the list, and automatic update at a specified interval.
Subsystem Setup
Add the main form of the ToDoList data processor to the right column of the home page work area.
Select to-do items to be displayed on the desktop. For example, these can be notifications of new emails, tasks, requests, unapproved orders, and other matters related to the user's duties. Link each to-do item to the form of a list or a workstation that must open when clicking the to-do item hyperlink.
Organize the to-do items into groups so that they match the respective command interface sections. For example, if operations with emails and tasks are supposed to be performed in the Organizer section, the matching to-dos are to be displayed in the same section of the To-do list panel.
You can use the OnDetermineCommandInterfaceSectionsOrder procedure of the ToDoListOverridable common module to set the same order of panel sections as in the application interface.
Adding a New To-Do Item
To add a new to-do to the To-do list panel, in the OnDetermineToDoListHandlers procedure of the ToDoListOverridable common module, declare a common module or an object manager module that will provide information about this to-do. Example:
Procedure OnDetermineToDoListHandlers(Handlers) Export
Handlers.Add(Documents._DemoSalesOrder);
EndProcedureThen define the OnFillToDoList export procedure in the specified module as follows:
// Populates a user to-do list.
//
// Parameters:
// ValueTable - Defines the parameters of a to-do item:
// * Id - String - Internal to-do item ID used by the subsystem.
// * HasToDoItems - Boolean - If True, the to-do item is displayed in the user's to-do list.
// * Important - Boolean - If True, the to-do item is highlighted in red.
// * OutputInNotifications - Boolean - If True, the to-do item notification is duplicated as a pop-up notification
// and displayed in the notification center.
// * HideInSettings - Boolean - If True, the to-do item is hidden from the to-do list settings form.
// It can be applied to nonrecurring to-do items.
// Once completed, these to-do items are no longer
// displayed in the infobase.
// * Presentation - String - To-do item presentation displayed to a user.
// * Count - Number - To-do item counter displayed in a to-do item's title.
// * Form - String - Full path to the form that is displayed when a user clicks
// a to-do hyperlink in the To-do list panel.
// * FormParameters - Structure - Indicator form's opening parameters.
// * Owner - String
// - MetadataObject - String ID of the to-do item that is the owner of the current to-do item,
// or a subsystem metadata object.
// * ToolTip - String - Tooltip text.
// * ToDoOwnerObject - String - Full name of the metadata object that hosts the to-do list population handler.
//
Procedure OnFillToDoList(ToDoList) Export
EndProcedureIn the procedure, write the code for adding to-do items to the ToDoList table.
Notice.
When adding a to-do item, check the Edit access right of a user to the metadata object that provides this to-do item, as well as the functional option values (if provided).
An example of how to populate a to-do item based on the _DemoSalesOrder documents:
Procedure OnFillToDoList(ToDoList) Export
If Not AccessRight("Edit", Metadata.Documents._DemoSalesOrder) Then
Return;
EndIf;
SalesOrdersCount = SalesOrdersCount();
FilterList = New ValueList;
FilterList.Add(Enums._DemoCustomerOrderStatuses.NotApproved);
FilterList.Add(Enums._DemoCustomerOrderStatuses.Approved);
SalesOrdersID = "BuyerSOrders";
ToDoItem = ToDoList.Add();
ToDoItem.Id = SalesOrdersID;
ToDoItem.HasToDoItems = SalesOrdersCount.Total > 0;
ToDoItem.Presentation = NStr("en = 'Sales orders'");
ToDoItem.Count = SalesOrdersCount.Total;
ToDoItem.Form = "Document._DemoSalesOrder.Form.ListForm";
ToDoItem.FormParameters = New Structure("Filter", New Structure("OrderStatus", FilterList));
ToDoItem.Owner = Metadata.Subsystems._DemoOrganizer;
ToDoItem = ToDoList.Add();
ToDoItem.Id = "SalesOrdersNotApproved";
ToDoItem.HasToDoItems = SalesOrdersCount.NotApproved > 0;
ToDoItem.Important = True;
ToDoItem.Presentation = NStr("en = 'Not approved'");
ToDoItem.Count = SalesOrdersCount.NotApproved;
ToDoItem.Owner = SalesOrdersID;
ToDoItem = ToDoList.Add();
ToDoItem.Id = "SalesOrdersApproved";
ToDoItem.HasToDoItems = SalesOrdersCount.Approved > 0;
ToDoItem.Presentation = NStr("en = 'Approved'");
ToDoItem.Count = SalesOrdersCount.Approved;
ToDoItem.Owner = SalesOrdersID;
EndProcedureUser Access Setup
To manage user access to the subsystem, assign a user the roles specified in the table below.
| # | Role Description |
|---|---|
| 1. | UsingCurCasesGrants the permission to view and set up the to-do list. |
How to Use the Subsystem in Development
Data Exchange Setup
The subsystem does not participate in data exchange.
Marked Object Deletion
With the Marked object deletion subsystem, you can permanently delete infobase objects.
Marked object deletion can be scheduled.
You can also use the subsystem to display UI elements managing the visibility of objects marked for deletion in list forms of catalogs, chart of characteristic types, and so on.
Subsystem Setup
Hiding Marked Objects in Lists
Select metadata objects and forms in whose lists items marked for deletion must be hidden and which will display the commands managing the visibility of objects marked for deletion.
This setup is recommended for all list forms of catalogs, documents, charts of characteristic types, charts of accounts, and charts of calculation types, as well as for data processors with item lists where users do not normally need to see items marked for deletion. However, if necessary, you can show objects marked for deletion using the respective command in the More actions menu.
You can add commands managing the visibility of objects marked for deletion to forms using the AttachableCommands subsystem (recommended) or the subsystem API.
If you use the AttachableCommands subsystem, list selected objects in the OnDefineObjectsWithShowMarkedObjectsCommand procedure of the MarkedObjectsDeletionOverridable common module.
In the selected forms in the OnCreateAtServer event handler, call the OnCreateAtServer procedure of the MarkedObjectsDeletion common module:
- For a form with one dynamic list:
MarkedObjectsDeletion.OnCreateAtServer(ThisObject, Items.List); - For a form with multiple lists:
MarkedObjectsViewSettings = DeleteMarkedObjects.MarkedObjectsDisplaySettings(); Setting = MarkedObjectsViewSettings.Add(); Setting.FormItemName = Items.List1.Name; Setting = MarkedObjectsViewSettings.Add(); Setting. FormItemName = Items.List2.Name; DeleteMarkedObjects.OnCreateAtServer(ThisObject, MarkedObjectsViewSettings);
If the object does not use the AttachableCommands subsystem, you can output the Show/hide objects marked for deletion and Go to objects marked for deletion commands to a form:
&AtServer
Procedure OnCreateAtServer(Cancel, StandardProcessing)
// Deleting marked objects
MarkedObjectsDeletion.OnCreateAtServer(ThisObject, MarkedObjectsViewSettings);
MarkedObjectsDeletion.SetShowMarkedObjectsCommandMark(ThisObject, Items.List, Items.ShowObjectsMarkedForDeletion);
// End Deleting marked objects
EndProcedure
&AtClient
Procedure GoToMarkedForDeletionItems(Command)
MarkedObjectsDeletionClient.GoToMarkedForDeletionItems(ThisObject, Items.List);
EndProcedure
&AtClient
Procedure ShowObjectsMarkedForDeletion(Command)
FormButton = Items.ShowObjectsMarkedForDeletion;
MarkedObjectsDeletionClient.ShowObjectsMarkedForDeletion(ThisObject, Items.List, FormButton);
EndProcedureDisplaying the Subsystem Settings in Custom Forms
If the configuration does not contain the Application settings subsystem, add the Marked object deletion data processor to the Administrator workspace.
As an example, see the Organizer form of the SSLAdministrationPanel data processor.
To display the subsystem settings in a custom form:
- Create the
AutomaticallyDeleteMarkedObjectsform attribute of theBooleantype to control the settings check box to be displayed in form items. - In the
OnCreateAtServerform event handler, call theModeDeleteOnScheduleprocedure of theMarkedObjectsDeletioncommon module:If Common.SubsystemExists("StandardSubsystems.MarkedObjectsDeletion") And Users.IsFullUser(,True) Then ModuleMarkedObjectsDeletion = Common.CommonModule("MarkedObjectsDeletion"); AutomaticallyDeleteMarkedObjects = ModuleMarkedObjectsDeletion.ModeDeleteOnSchedule().Use; EndIf; - When changing the
AutomaticallyDeleteMarkedObjectsform attribute, call theOnChangeCheckBoxDeleteOnScheduleprocedure of theMarkedObjectsDeletionClientcommon module.
Clearing Occurrences When Deleting Marked Objects
When an object is being deleted, 1C:Enterprise searches for references to this object to maintain the database reference integrity. If other application objects refer to the object being deleted, 1C:Enterprise does not delete it and shows the results of reference search to a user.
However, deletion is not blocked by references from register dimensions with the Master flag and references from metadata objects specified as subordinate. For information register dimensions with the Master flag, special processing is not required as all records for the dimension are automatically deleted when the reference is deleted. For more information on subordinate objects, see Duplicate Cleaner.
In other cases, when references to objects are not relevant for an operation like object deletion or search for references to an object, do the following:
- Exclude such objects from a reference search by specifying them in the
OnAddReferenceSearchExceptionsfunction in theCommonOverridableoverridable module. For more information on reference search exceptions, see Core. - Clear the references to an object being deleted from the excluded objects in the
BeforeDeletehandler of the object being deleted (or using a subscription to theBeforeDeleteevent). As an example, see theReportsOptionsBeforeDeleteMetadataObjectIDevent subscription.
For information register dimensions with the Master flag, special processing is not required as all records for the dimension are automatically deleted when the reference is deleted.
Disabling Control Over the Use of Objects to Be Deleted Upon Deletion
For objects in which dead references are allowed and record time is critical when performing a deletion operation, checking whether objects to be deleted are used is disabled by adding the DontControlObjectsToDelete property to the AdditionalProperties collection:
DocumentObject = Document.GetObject();
DocumentObject.AdditionalProperties.Insert("DontControlObjectsToDelete", True);User Access Setup
To manage user access to the subsystem, assign a user the roles specified in the table below.
| # | Role Description |
|---|---|
| 1. | FullAccess (the Core subsystem user role)Grants the right to permanently delete the infobase objects. |
How to Use the Subsystem in Development
See the subsystem API description in the API documentation (in Russian).
Data Exchange Setup
Do not add the subsystem's objects to exchange plans of distributed infobases and standalone workstations or to exchange plans used for data synchronization between different applications. The subsystem can operate only in one node. So, subsystem data in different nodes must be stored independently.
Access Management
With the Access management subsystem, you can configure user rights to infobase data items (catalog items, documents, register records, business processes, tasks, and other objects).
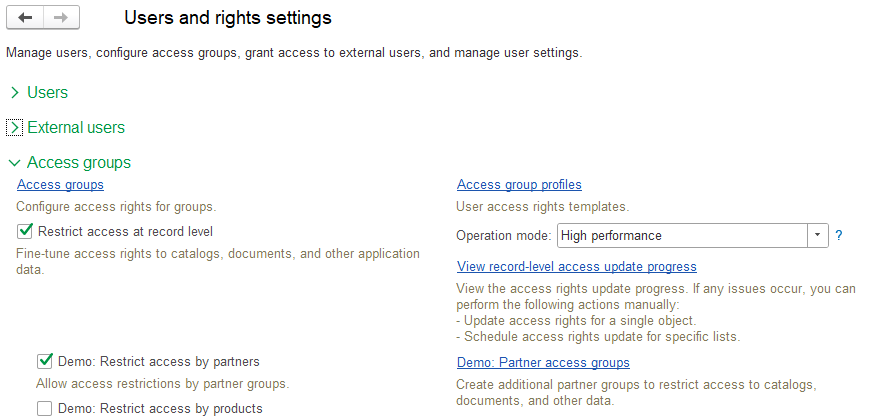
You can restrict rights to particular metadata object types, or to records within one object type. You can also separately configure access rights to particular infobase objects similarly to folders storing operating system files.
The subsystem uses functionality of the Users subsystem.
Access Groups and Their Profiles
To configure rights for users and user groups, use the Access groups catalog. If access by external users is permitted for some infobase objects, you can also add external users and groups of external users to access groups.
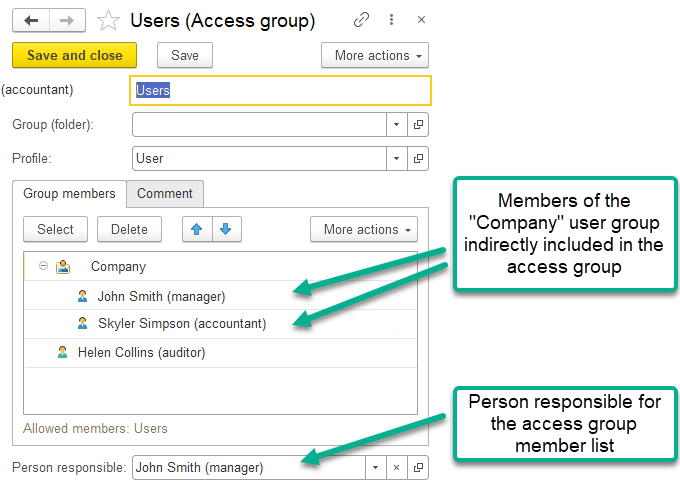
The content and logic of access right restriction is defined by a profile specified in the access group.
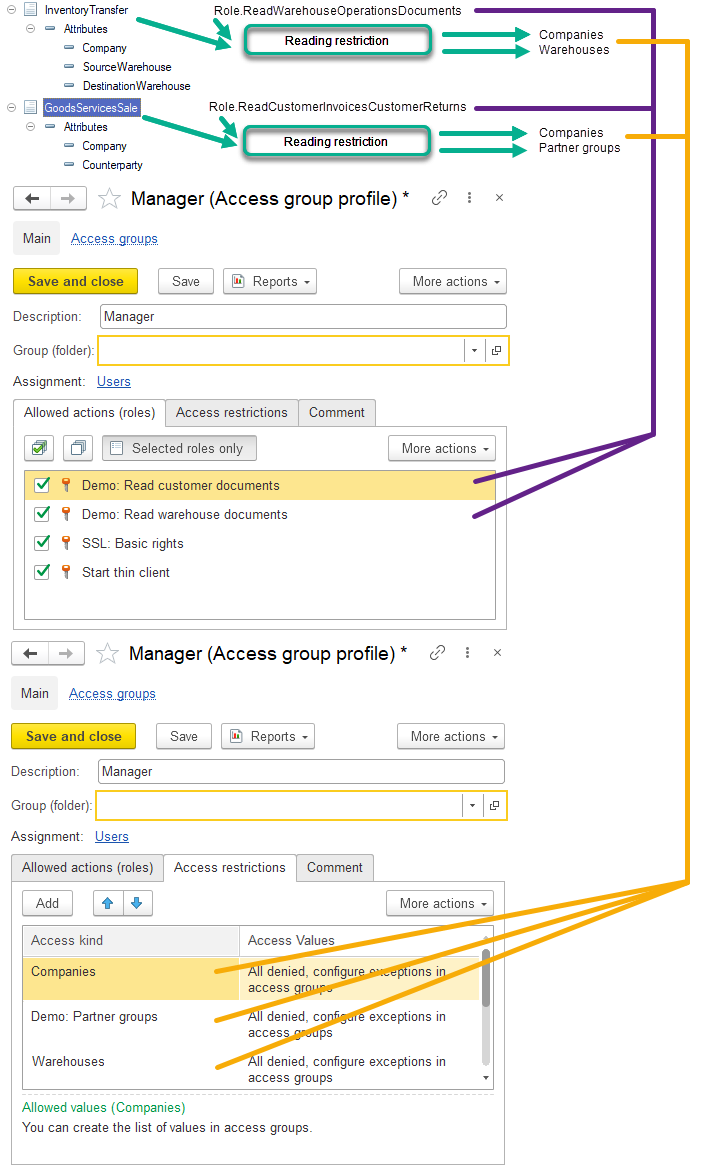
Access group profile is a collection of roles (permitted actions) and access kinds used to restrict access to infobase data.
Access kind is a type or several types of infobase objects used to restrict access rights to infobase data. For example, you can restrict the right to read infobase documents by particular companies permitted for a user. In the simplest scenario, if the read right is restricted by the Companies access kind, users will be able to read only those data items (documents) whose Company field contains a permitted or non-prohibited company. If the restriction by the Companies access kind is not set in the access group, users will be able to read all documents as if an empty list of prohibited companies is specified.
In the access group, configure lists of permitted and prohibited values by access kinds (for example, lists of companies, partner groups, warehouses, product groups, and so on), which are used in the right restriction logic for infobase objects.
Thus, a user has an access right to an infobase object if access kind values related to this object are permitted for the user.
See also Developing Configuration Roles and Developing Access Group Profiles.
Configuring Access Rights to Infobase Objects
You can separately configure access rights to particular infobase objects similarly to folders storing operating system files.
For example, for the File folders catalog items, you can configure access to particular folders, subfolders, and the Files catalog items. You can separately configure access rights to folders only for users who are included in a user access group with the Operations with file folders role.
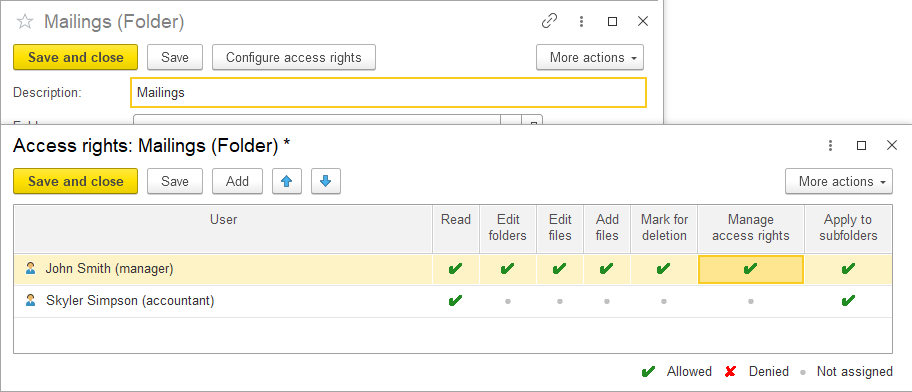
An example of how to configure user access groups:
- The Operations with file folders (additional) profile contains the Operations with file folders role, which provides users with access to the File folders and Files catalogs.
- The Operations with file folders (additional) access group contains the Operations with file folders (additional) profile.
We recommend that you use one access group for all users. In this case, combination with other access groups is simply to imagine as the group will contain all rights to folders, files, and other lists, access to which depends on settings of rights to file folders.
Subsystem Setup
- Selecting High-Performance or Standard Mode.
- Selecting Regular or Simplified Interface Mode.
- Describing Access Restriction Logic and Required Access Kinds.
- Developing Access Kinds.
- Configuring Access Rights to Individual Objects.
- Developing Configuration Roles.
- Developing Access Group Profiles.
- Developing Access Right Restrictions.
- Converting Access Right Restrictions Into Standard Mode.
- Setting Up Metadata Object Properties.
- Creating Details of Built-in Access Group Profiles for Initial Population and Update of the Infobase.
- Command Interface Setup.
- User Access Setup.
Selecting High-Performance or Standard Mode
You can develop access restrictions at the record level (RLS) in the high-performance mode or standard mode.
The high-performance mode is based on the precalculation of access rights. The mode ensures high performance of queries with RLS as it adds a simple and static snippet to the query texts in the roles. Due to this, it also ensures equally good performance for different applied logic of access restrictions. Precalculation of access rights takes some time, so changes in rights take effect with an insignificant delay.
In contrast, in the standard RLS mode, the calculation of rights is performed immediately when accessing data. The more complex the applied logic of access restriction is, the slower the calculation of rights is. The calculation directly affects execution speed of main user operations: viewing lists, generating reports, and opening documents.
The high-performance mode is recommended for the applications being developed. For smooth migration of users of previous application versions from the standard to the high-performance mode, we recommend that you support both operation modes for some time. The synchronous development scheme involves developing access restrictions for the high-performance mode and converting them to the standard mode. To ensure synchronous development, use the SSLImplementationCheck.erf report. This report validates the subsystem integration for both modes at the same time.
Selecting Regular or Simplified Interface Mode
For configurations intended for a small number of users (approximately up to 15), we recommend that you use the simplified interface for setting access rights. In such companies, employees usually have a unique set of access rights configured individually for each user. In this mode, one or several profiles are assigned to a user. You can configure access right restrictions for each profile.
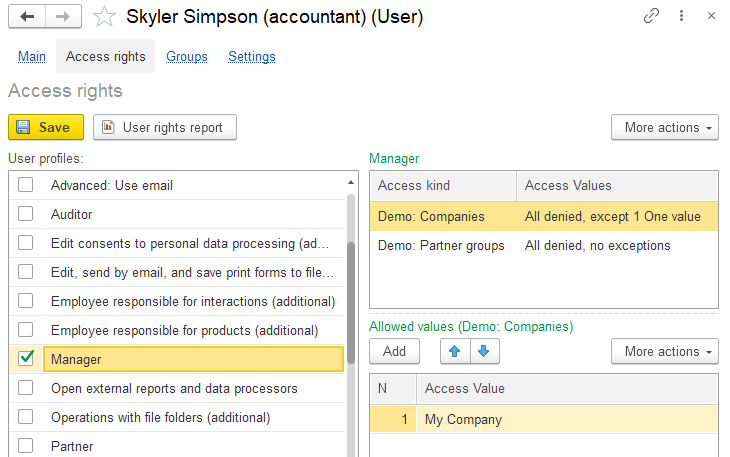
For companies with numerous users, we recommend using the regular interface for bulk setup of access rights with user groups and access groups.
To enable the simplified interface:
-
Change the return value in the overridable module:
Procedure OnDefineAccessSettingInterface(SimplifiedInterface) Export SimplifiedInterface = True; EndProcedure -
In the
AccessRightscommon command, change theGroupproperty from Form navigation panel.Go to to Form command bar.Important.
In the simplified interface, do not add lists of access groups and profiles to the Administrator workspace.
Describing Access Restriction Logic and Required Access Kinds
We recommend that you use the following approach when developing the access restriction logic. For each metadata object, formulate access restriction rules:
- Describe rules to restrict reading.
- Describe rules to restrict adding and editing.
When describing rules, use particular object attributes containing references to objects (companies, counterparties, hereafter called as access values) that will be used to filter permitted objects (for example, documents). Clarify how filters must function (hereafter called as the restriction logic). For example, you can restrict access to an object by both the company and the counterparty, or by either of them.
Let us describe access restriction logic for the Goods transfer document with the following conditions:
- Permit a user to read the document if a company and shipping warehouse or receiving warehouse specified in the document are permitted for the user.
- Permit a user to add and edit the document if a company and shipping warehouse or receiving warehouse are permitted for the user.
- Deletion is always prohibited, except for a user with the
FullAccessrole.
Thus, access to the document is to be restricted by Companies and Warehouses catalog items. Therefore, add the Companies and Warehouses access kinds to the access kinds list.
You can also use access kinds for object groups. This is useful when there are numerous items in a catalog, and you want to restrict access to data not by individual items of this catalog but by entire groups, segments, or categories. For example, you need to configure access to documents not by products (this is inconvenient since there are numerous products in the Products catalog), but by product groups (the ProductAccessGroup catalog). If necessary, one product can also be included in several groups, for example, in household chemicals and food.
As a result, we create a full list of access kinds and their properties for all configuration metadata objects. Besides, the subsystem already includes the Users and External users predefined access kinds. For more information, see Predefined Access Kinds.
Then, according to the rules above, you need to set these access kinds in the configuration and develop the texts restricting access to objects in manager modules of these objects, which is described below.
Developing Access Kinds
To add access kinds to the configuration, specify their details in the OnFillAccessKinds procedure of the AccessManagementOverridable common module and extend the type list of type collections.
For example, the procedure code can be as follows:
Procedure OnFillAccessKinds(AccessKinds) Export
AccessKind = AccessKinds.Add();
AccessKind.Name = "StorageLocations";
AccessKind.Presentation = NStr("en = 'Storage locations'");
AccessKind.ValuesType = Type("CatalogRef._DemoStorageLocations");
AccessKind = AccessKinds.Add();
AccessKind.Name = "ProductGroups";
AccessKind.Presentation = NStr("en = 'Product groups'");
AccessKind.ValuesType = Type("CatalogRef._DemoProducts");
AccessKind.ValuesGroupsType = Type("CatalogRef._DemoProductAccessGroups");
AccessManagement.AddExtraAccessKindTypes(AccessKind,
Type("CatalogRef._DemoProductsKinds"),
Type("CatalogRef._DemoProductAccessGroups"));
...
EndProcedureAn access kind can be linked to catalog or enumeration items. In this example, the StorageLocations access kind is defined by the StorageLocations catalog items. For the ProductGroups access kind, the Products and ProductAccessGroup catalogs are specified. The second option is suitable when access must be restricted not by individual catalog items but by their groups (segments, categories).
If you want to assign several value types to an access kind, for example, when products and product types are restricted by the same product access groups, specify them using the AddExtraAccessKindTypes procedure of the AccessManagement common module.
The MultipleValuesGroups property is used for group access kinds. If a value (for example, a product) can be included into several groups, set this property to True. In this case, if at least one of the product access groups is prohibited, calculating the ForAllRows(ValueAllowed(Goods.Products)) condition will give the False result (access denied).
For group access kinds, do the following:
- Create an additional catalog for access value groups. For example,
ItemAccessGroups. - If the
MultipleValuesGroupsproperty is set toFalse, create theAccessGroupattribute with the value group type. For example, for a product with theItemAccessGroupstype. - Otherwise, create the
AccessGroupstable with theAccessGroupattribute. For example, for a product with theItemAccessGroupstype. - Display the added
AccessGroupattribute or theAccessGroupstable with theAccessGroupattribute in the form of an access value item (for example, the Products catalog). - Create the
LimitAccessAtRecordLevel<ApplicationName>functional option. For example,LimitAccessAtRecordLevelTradeManagement. Set theLimitAccessAtRecordLevelconstant in itsLocationproperty and include the added attributes and tables in it.
Add access value types and access value group types to the AccessValue and AccessValueObject type collections.
Notice.
To apply the changes during development and debugging, update the service data. For more information, see Service Data Update.
See an example of implementation of the OnFillAccessKinds procedure in the demo infobase.
Using Access Kinds Depending on the Application Settings
If data access restrictions must change depending on functional options or other application settings, you need to define dependences for access kinds. For example, data access must be restricted by storage locations only if the goods accounting in warehouses is enabled in the application.
To do this, specify the dependences in the OnFillAccessKindUsage procedure of the AccessManagementOverridable common module, for example:
// Populates the usage of access kinds depending on the configuration functional options,
// for example, UseItemAccessGroups.
//
// Parameters:
// AccessKind - String - the access kind name specified in the OnFillAccessKinds procedure.
// Use - Boolean - the initial value is True.
//
// Procedure OnFillAccessKindUsage(AccessKindName, Use) Export
If AccessKindName = "_DemoProductGroups" Then
Use = Constants._DemoRestrictAccessByProducts.Get();
ElsIf AccessKindName = "_DemoPartnerGroups" Then
Use = Constants._DemoRestrictAccessByPartners.Get();
ElsIf AccessKindName = "_DemoIndividuals" Then
Use = Constants._DemoRestrictAccessByIndividuals.Get();
EndIf;
EndProcedureWhen changing the access kind usage, you need to call update of allowed values, for example, from the manager module of the constant value:
Procedure OnWrite(Cancel)
If DataExchange.Load Then
Return;
EndIf;
AccessManagement.UpdateAllowedValuesOnChangeAccessKindsUsage();
EndProcedureIn the standard RLS mode, a session restart is required to change the current value in object access restrictions. In the high-performance RLS mode, a session restart is required only when the infobase user roles are changed (same as for 1C:Enterprise platform).
See an example of implementation of the OnFillAccessKindUsage procedure in the demo infobase.
Configuring Access Rights to Individual Objects
To configure access rights to individual infobase objects, define types of these objects. For each type, specify rights used to automatically create a setting form of these rights in the OnFillAvailableRightsForObjectsRightsSettings procedure of the AccessManagementOverridable module.
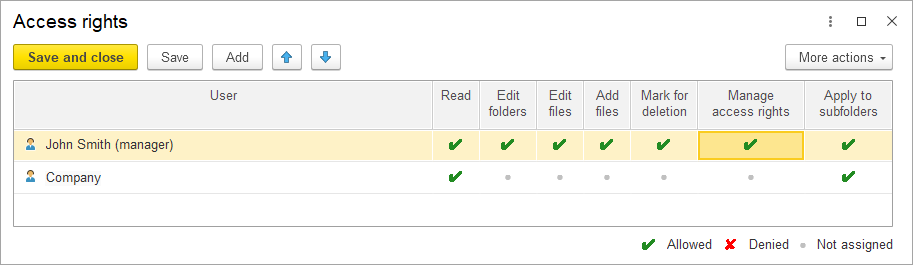
For example, to get rights (columns) as in the figure, use the following code block:
Procedure OnFillAvailableRightsForObjectsRightsSettings(AvailableRights) Export
////////////////////////////////////////////////////////////
// Catalog.FilesFolders
// Right "Read folders and files".
Right = AvailableRights.Add();
Right.RightsOwner = Metadata.Catalogs.FilesFolders.FullName();
Right.Name = "Read";
Right.Title = NStr("en = 'Read'");
Right.ToolTip = NStr("en = 'Read folders and files'");
Right.InitialValue = True;
// Rights for standard access restriction templates.
Right.ReadInTables.Add("*");
// Right "Edit folders".
Right = AvailableRights.Add();
Right.RightsOwner = Metadata.Catalogs.FilesFolders.FullName();
Right.Name = "FoldersModification";
Right.Title = NStr("en = 'Edit
|folders'");
Right.ToolTip = NStr("en = 'Add, edit, and
|mark folders for deletion'");
// Rights required for this right.
Right.RequiredRights1.Add("Read");
// Rights for standard access restriction templates.
Right.ChangeInTables.Add(Metadata.Catalogs.FilesFolders.FullName());
// Right "Edit files".
Right = AvailableRights.Add();
Right.RightsOwner = Metadata.Catalogs.FilesFolders.FullName();
Right.Name = "FilesModification";
Right.Title = NStr("en = 'Edit
|files'");
Right.ToolTip = NStr("en = 'Edit files in a folder'");
// Rights required for this right.
Right.RequiredRights1.Add("Read");
// Rights for standard access restriction templates.
Right.ChangeInTables.Add("*");
// Right "Add files".
Right = AvailableRights.Add();
Right.RightsOwner = Metadata.Catalogs.FilesFolders.FullName();
Right.Name = "AddFilesAllowed";
Right.Title = NStr("en = 'Add
|files'");
Right.ToolTip = NStr("en = 'Add files to a folder'");
// Rights required for this right.
Right.RequiredRights1.Add("FilesModification");
// Right "Mark files for deletion".
Right = AvailableRights.Add();
Right.RightsOwner = Metadata.Catalogs.FilesFolders.FullName();
Right.Name = "FilesDeletionMark";
Right.Title = NStr("en = 'Mark for
|deletion'");
Right.ToolTip = NStr("en = 'Mark files in a folder for deletion'");
// Rights required for this right.
Right.RequiredRights1.Add("FilesModification");
Right = AvailableRights.Add();
Right.RightsOwner = Metadata.Catalogs.FilesFolders.FullName();
Right.Name = "RightsManagement";
Right.Title = NStr("en = 'Manage
|access rights'");
Right.ToolTip = NStr("en = 'Manage folder access rights'");
// Rights required for this right.
Right.RequiredRights1.Add("Read");
EndProcedure- Add object types specified as right owners in the
OnFillAvailableRightsForObjectsRightsSettingsprocedure to:- Type collection
RightsSettingsOwner. - Type collection
RightsSettingsOwnerObject. - Common command
SetRights.
- Type collection
- Use the
HasRightfunction in theAccessManagementmodule for a user to get a permission to the rights described in the overridable procedure above. - You can check the Read and Update rights in restriction texts using the
ObjectReadingAllowedandObjectUpdateAllowedfunctions (in the standard mode using the specialRightsSettingsaccess kind).
Notice.
To apply the changes during development and debugging, update the service data. For more information, see Service Data Update.
See an example of implementation of the OnFillAvailableRightsForObjectsRightsSettings procedure in the demo infobase.
Developing Configuration Roles
For guidelines on how to develop roles in the configuration, see the Core section.
For each created role:
- Add the "role" metadata object to the configuration, and set its name and synonym.
- Clear the Set rights for new objects check box.
- Clear the General rights of subordinate objects check box.
- Select the check boxes next to the required rights for each configuration metadata object.
- Specify standard access restriction templates for each access right of a metadata object. Standard templates used in the role are to be preliminarily copied from the
EditAccessGroupMembersbuilt-in role.- The restriction logic is implemented in the
OnFillAccessRestrictionprocedures of metadata object manager modules. TheForObjectandForRegistertemplates and their parameters, which are calculated strictly based on the specified restriction logic (see details below), are specified in the role rights.
- The restriction logic is implemented in the
- In the standard RLS mode, the restriction logic is implemented via parameters of standard templates
ByValues,BySetsOfValuesByValuesExtended, andByValuesAndSetsAdvanced.- When setting access right restrictions, you need to specify them for all fields (in the Fields column, select the Other fields option without specifying restrictions for particular fields). This is because lines in lists and reports for a user must not depend on columns that the user configured to display.
- In particular, you need to display unconditionally prohibited fields (for example, for everyone, except for the administrator) in a separate table and assign rights to it.
- Unconditionally allowed fields are not required. Previously, for 1C:Enterprise operation, it was necessary to provide access to some standard attributes, for example, Code. This is no longer required as now 1C:Enterprise uses the privileged mode for technological access.
- When setting access right restrictions, you need to specify them for all fields (in the Fields column, select the Other fields option without specifying restrictions for particular fields). This is because lines in lists and reports for a user must not depend on columns that the user configured to display.
To avoid performance decrease when several roles provide access to the same metadata object, specify identical restriction texts for access rights in such roles (See the Effective query conditions standard, clause 7 (in Russian)).
If you need to rename a role, follow guidelines in section Storing References to Metadata Objects.
Developing Access Group Profiles
We recommend that you define access group profiles based on the employees' job responsibilities. For example, for accounting applications you can create the Accountant and Chief accountant profiles with different authority levels, for trade-related applications you can create the Sales manager and Sales director profiles, and so on.
Each application also has the built-in Administrator profile providing unrestricted access to any data and operations. In SaaS, it allows you to administer only its own data area but not the whole infobase. In single-user applications, it corresponds to standard user privileges.
In 1C:Enterprise mode, create the required number of user access group profiles and fill them with roles and access kinds created in the previous step. Notice.
Include in the profile only those access kinds that are used in restrictions of rights to tables configured in the roles selected for the profile. Setting access kinds in the profile and the access group does not affect restriction of rights to those tables in whose restriction the access kinds are not used.
In a profile, any access kind can be predefined if it is required for the consistent setting of all access groups of this profile. For example, it is more convenient to make the access kind used to "cut" tables based on the BusinessOperation flag predefined. A cashier and an advance holder have their own lists of business transactions, and an accountant has a list of all business transactions, for example, for the Cash voucher documents.
Then, in the OnFillSuppliedAccessGroupProfiles procedure of the AccessManagementOverridable common module, enter a code for creating and updating built-in access group profiles during initial population and update of the infobase. To automatically generate the text of this procedure, use the AccessManagement.epf data processor that generates code based on the access group profiles existing in the infobase. See also Creating Details of Built-in Access Group Profiles for Initial Population and Update of the Infobase. See an example of implementation of the OnFillSuppliedAccessGroupProfiles procedure in the demo infobase.
Developing Access Right Restrictions
The restriction development entails the creation of the restriction logic text in the OnFillAccessRestriction procedures in the object manager modules. Based on the specified logic, 1C:Enterprise automatically calculates a template variant to insert into roles and the type list of type collections. For more information, see Standard Restriction Logic Examples and Developing Access Right Restrictions below.
- For a restriction to work, the object must be attached to the subsystem (see Attaching Objects to the Subsystem below).
- To view the required template variant with parameters and the type list of type collections, use the
AccessManagement.epfdevelopment tool. - If you specify an incorrect template variant or its parameters, an error will occur in 1C:Enterprise mode when executing a query with RLS. If any types are missing in the type collections, an error will occur on access update. The
SSLImplementationCheck.erfreport can detect and automatically correct such errors. - When changing the restriction logic, we recommend that you run the
SSLImplementationCheck.erfreport with the selected Correct errors check box and with the filter by the Access management subsystem. You can use it to update restrictions in roles as well as type collections and predefined items in theMetadataObjectIDscatalog.
Note.
We recommend that you add predefined items of all registers to the MetadataObjectIDs catalog, so that when changing access restrictions in manager modules, you do not have to add predefined items when you customize the configuration during integration and use configuration extensions.
Attaching Objects to the Subsystem
Specify all metadata objects, for which the restriction logic is described, in the OnFillListsWithAccessRestriction procedure of the AccessManagementOverridable common module.
In the form module of the selected metadata objects, in the OnReadAtServer event handler procedure, insert the following call:
AccessManagement.OnReadAtServer(ThisObject, CurrentObject);During the call, the right to edit the object is checked. If there is no edit right, the ReadOnly form property is set to True.
In the object form module, in the AfterWriteAtServer event handler procedure, insert the following call:
AccessManagement.AfterWriteAtServer(ThisObject, CurrentObject, WriteParameters);During the call, an access update is started if it has been scheduled but not yet performed. This speeds up the calculation of rights for dependent objects. For example, for objects whose restrictions contain dot syntax or joins or one of the following functions: ObjectReadingAllowed or ObjectUpdateAllowed.
Inserting Restrictions in Role Rights
After attaching an object to the subsystem, you need to manually insert a restriction in the role rights. If you do not do this and leave the restriction text in the role empty, it is considered that the access right in this role is unrestricted (the Unrestricted role option). In this case, the SSLImplementationCheck.erf report will not display an error in the access right restriction in the role and accordingly will not update the restriction when required after changing the restriction logic. The required format of an access right restriction is as follows:
#If &RecordLevelAccessRestrictionIsUniversal #Then
<restriction template with parameters for high-performance mode>
#Else
<restriction template with parameters for standard mode>
#EndIfIf the standard operation mode is not supported, instead of a restriction template, write WHERE FALSE to support the standard mode, for example:
#If &RecordLevelAccessRestrictionIsUniversal #Then
#ForObject("")
#Else
WHERE FALSE
#EndIfRestrictions in roles are implemented using one of the following templates:
#ForObject("<Optional owner object field name>")
#ForRegister("<Register details>", "<Field name 1>", "<Optional field name 2>", "<Optional field name 3>", "<Optional field name 4>", "<Optional field name 5>")A template variant and its parameters are calculated automatically based on restriction descriptions in manager modules.
Upon compilation of preprocessor commands, it is checked whether a used template and its parameters are correct (using session parameters). If a template variant or its parameters are specified incorrectly, an error occurs. For example, if you specify the
#ForObject("Company")restriction for the Read right in the role for the Document._DemoSalesOrder list, an error occurs when a user with restricted rights attempts to open the list:
Error<<?>>: Access restriction update is required. Reason: Cannot determine the access restriction option in session parameters for the ForObject template with the "Company" parameter value. Object: "Document._DemoSalesOrder", Right: "Read".You can get the calculation result using the AccessManagement.epf developer tool, which is convenient for restriction development. This tool generates a step-by-step instruction with text fragments and type lists of type collections that you can insert manually into required locations.
For example, part of instruction:
In roles assigned to users, set a restriction of the Read, Insert, and Update rights
to the InformationRegisters._DemoCompaniesEmployees metadata object
(and add the appropriate restriction template if it is not included in the role yet):
#If &RecordLevelAccessRestrictionIsUniversal #Then
#ForRegister("MetadataObjectIDs.InformationRegister_DemoCompaniesEmployees", "Company", "Individual", "", "", "")
#Else
#ByValues( "InformationRegister._DemoCompaniesEmployees", "", "",
"_DemoCompanies", "Company",
"_DemoIndividuals","Individual", "","", "","", "","", "","", "","", "","", "","", "","", "","", "","", "","", "","", "","", "","")
#EndIfStandard Restriction Logic Examples
Below you can find simple examples of restriction logic implemented in the OnFillAccessRestriction procedure.
- Company and counterparty are in the document header:
Restriction.Text = "AllowReadUpdate |WHERE | ValueAllowed(Company) |AND ValueAllowed(Counterparty)"; - Company is in the document header, counterparty is in the table, and one allowed counterparty is sufficient:
Restriction.Text = "AllowReadUpdate |WHERE | ValueAllowed(Company) |AND ValueAllowed(Vendors.Counterparty)"; - Company is in the document header, counterparty is in the table, and one allowed counterparty is sufficient (if the table is empty, access by counterparty is granted):
Restriction.Text = "AllowReadUpdate |WHERE | ValueAllowed(Company) |AND ValueAllowed(Vendors.Counterparty, Null AS True)"; - Company is in the document header, counterparty is in the table, and all counterparties must be allowed (if the table is empty, access by counterparty is denied):
Restriction.Text = "AllowReadUpdate |WHERE | ValueAllowed(Company) |AND ForAllRows(ValueAllowed(Vendors.Counterparty))"; - Company and counterparty are in the table, and any allowed company–counterparty pair is sufficient:
Restriction.Text = "AllowReadUpdate |WHERE | ValueAllowed(Vendors.Company) |AND ValueAllowed(Vendors.Counterparty)"; - Company and counterparty are in the table, and all company–counterparty pairs must be allowed:
Restriction.Text = "AllowReadUpdate |WHERE | ForAllRows( | ValueAllowed(Vendors.Company) | AND ValueAllowed(Vendors.Counterparty))"; - Company and counterparty are in the table, and one of the companies and one of the counterparties must be allowed:
Restriction.Text = "AllowReadUpdate |WHERE | ForAtLeastOneRow(ValueAllowed(Vendors.Company)) |AND ForAtLeastOneRow(ValueAllowed(Vendors.Counterparty))"; - Sender is a dimension of the flexible type. Only the
Catalog.Warehousesreferences are to be checked:Restriction.Text = "AllowReadUpdate |WHERE | ValueAllowed(Sender ONLY Catalog.Warehouses)"; - Company is in the header (Owner), parent company is in the Companies catalog. Editing is to be allowed when the company in the header is allowed. Reading is to be allowed when:
- The company in the header (Owner) is allowed.
- The non-empty parent company of the company in the header is allowed.
- The company, for which the company in the header (Owner) is the parent company, is allowed.
Restriction.Text = "AttachAdditionalTables |ThisList AS ThisList | |LEFT JOIN Catalog.Companies AS Owners | ON Owners.Ref = ThisList.Owner | |LEFT JOIN Catalog.Companies AS SeparateBusinessUnits | ON SeparateBusinessUnits.ParentCompany = Owners.Ref |; |AllowRead |WHERE | ValueAllowed(Owner) | OR ValueAllowed(Owners.ParentCompany, EmptyRef AS False) | OR ValueAllowed(SeparateBusinessUnits.Ref) |; |AllowUpdateIfReadingAllowed |WHERE | ValueAllowed(Owner)"; - Inheriting access rights from the owner object (for example, by attachments).
Restriction.Text = "AllowRead |WHERE | ObjectReadingAllowed(FileOwner) |; |AllowUpdateIfReadingAllowed |WHERE | ObjectUpdateAllowed(FileOwner)"; - Restricting access by owner reading (for example, the document journal).
Restriction.Text = "AllowReadUpdate |WHERE | ObjectReadingAllowed(Ref)"; - Checking settings of the Read and Update access rights for objects. For example, access right settings for the
FilesFolderscatalog items.Restriction.Text = "AllowRead |WHERE | ObjectReadingAllowed(Ref) |; |AllowUpdateIfReadingAllowed |WHERE | ObjectUpdateAllowed(Ref)"; - Checking settings of the Read and Update access rights for additional objects (for example, access right settings for the
Filescatalog configured as per settings for theFilesFolderscatalog items).Restriction.Text = "AllowRead |WHERE | ObjectReadingAllowed(FileOwner) |; |AllowUpdateIfReadingAllowed |WHERE | ObjectUpdateAllowed(FileOwner)"; - Account and counterparty are in the header, and either of them must be allowed. When the restriction by accounts is disabled, the restriction by counterparties remains enabled, and vice versa. If both restrictions are disabled, access is granted.
Restriction.Text = "AllowReadUpdate |WHERE | ValueAllowed(Account, Disabled AS False) | OR ValueAllowed(Counterparty, Disabled AS False)"; - Checking access rights to metadata objects linked by the applied logic.
Restriction.Text = "AllowReadUpdate |WHERE | ValueAllowed(Company) | AND (AccessRight(View, Document.CustomerProformaInvoice) | OR AccessRight(View, ChartOfAccounts.SelfSupporting) | OR AccessRight(Use, HTTPService.ExternalAPI.URLTemplate.ManagerMonitorIndicators.Method.Get) | AND MonitorSectionToPublish)"; - Checking the role used as an additional access right. For example, when the
AddEditCustomerDocumentsWithoutPostingrole is created, 1C:Enterprise checks whether the user has a role that allows posting if the document is not posted.Restriction.Text = "AllowReadUpdate |WHERE | ValueAllowed(Company) | AND ValueAllowed(Partner) | AND (NOT Posted OR IsInRole(AddEditCustomerDocuments))"; - Allow access if the
Companyattribute contains an allowed value or an empty reference:Restriction.Text = "AllowReadUpdate |WHERE | ValueAllowed(Company, EmptyRef AS True)"; - Allow access if the
Counterpartyattribute in theVendorstable contains an allowed value or an empty reference, while the table itself is not empty:Restriction.Text = "AllowReadUpdate |WHERE | ValueAllowed(Vendors.Counterparty, EmptyRef AS True)"; - Allow access if the
Counterpartyattribute in theVendorstable contains an allowed value, an empty or a non-existing reference, or the table itself is empty:Restriction.Text = "AllowReadUpdate |WHERE | ValueAllowed(Vendors.Counterparty, EmptyRef AS True, Null AS True)"; - Allow access if the dot-separated attribute (
WarehouseorCompany) contains an allowed value or an attribute "to the left of the dot" (Owner,Addition, orDimensionKey), an empty or a non-existing reference:Restriction.Text = "AllowReadUpdate |WHERE | ValueAllowed(Owner.Warehouse Null AS True) | Or ValueAllowed(Addition.DimensionKey.Company, Null AS True)"; - Allow access if the
Orderattribute contains a reference to a document with the Read right, or an empty or a non-existing reference:Restriction.Text = "AllowReadUpdate |WHERE | ObjectReadingAllowed(Order, Null AS True)";
Restriction Logic Syntax
The structure of all possible options of restriction logic description in the OnFillAccessRestriction procedure:
Restriction.Text =
"AttachAdditionalTables
|ThisList AS <Alias>
|LEFT JOIN <Any table> AS <Alias>
|ON <Simple condition>
|… <Other joins>
|;
|AllowRead
|WHERE
| <Condition>
| AND/OR NOT <Condition>
| AND/OR CASE
| WHEN <Condition>
| THEN <Condition>
| ELSE <Condition>
| END
|;
|AllowUpdateIfReadingAllowed
|WHERE
| <Condition> …";
Restriction.TextForExternalUsers =
"<the same as the text for users>";A Condition can be in the form of the following restriction functions:
ValueAllowed(<Attribute> [<types to check>] [, <comparison clarification 1> [, <comparison clarification 2>] …]), where types to check can be as follows (values of types not being checked are prohibited unless clarified separately):ONLY<Table name>;ONLY(<Table name 1>, <Table name 2>, … );EXCEPT<Table name>;EXCEPT(<Table name 1>, <Table name 2>, … );
- A comparison clarification can be as follows:
EmptyRef AS False/True;Undefined AS False/True;Null AS False/True;Disabled AS False/True(only for theValueAllowedfunction);<Table> AS False/True(for example,Catalog.Projects AS True).
ObjectReadingAllowed(the same as for theValueAllowedfunction).ListReadingAllowed(the same as for theValueAllowedfunction).ObjectUpdateAllowed(the same as for theValueAllowedfunction).ListUpdateAllowed(the same as for theValueAllowedfunction).- You can specify the last two functions only in the
AllowUpdateIfReadingAllowedsection. IsAuthorizedUser(the same as for theValueAllowedfunction).AccessRight(<Access right name>, <Full metadata object name>) checks the access right in the access group profile roles. The parameters are similar to the AccessRight platform method.IsInRole(<Role name>) checks whether the role is available in the access group profile.
Examples of how to use extended comparison properties in special functions:
ValueAllowed(Owner ONLY Catalog.Companies)ValueAllowed(Owner EXCEPT (Catalog.Projects, Catalog.Products), EmptyRef AS True)ValueAllowed(Owner, Undefined AS True)AccessRight(Use, Metadata.HTTPServices.ExternalAPI.URLTemplates.ManagerMonitorIndicators.Methods.Get)IsInRole(CustomersDocumentsPosting)
A Condition provides the following standard comparison kinds:
- <Attribute>
Equal to|Not equal to<predefined value>; - <Attribute>
In list|Not in list<predefined value 1>, … - <Attribute>
IS NULL; ValueType(<Attribute>) =Type(<Table name>).
Examples of how to use standard comparison kinds:
SupplierType = Value(Enum.SupplierTypes.Main);SupplierType IN (Value(Enum.SupplierTypes.Main), Value(Enum.SupplierTypes.Additional)).
A Condition is also represented by two modifiers that indicate how to add results of checks (the results column) performed in the condition if the checks used a table or additional table attribute that may contain several values (the values column).
ForAllRows(<Condition>). Combine check results in rows using the logical AND.ForAtLeastOneRow(<Condition>). Combine check results in rows using the logical OR. This is the default behavior, but sometimes it is not sufficient.
Syntax depending on whether there are restrictions by rights:
- No read restriction and no edit restriction:
Restriction.Text = ""; - Similar read and edit restrictions:
Restriction.Text = "AllowReadUpdate |WHERE ... "; - Different read and edit restrictions:
Restriction.Text = "AllowRead |WHERE ... |; |AllowUpdateIfReadingAllowed |WHERE ... "; - No read restriction, edit restriction only:
Restriction.Text = "AllowRead |WHERE TRUE |; |AllowUpdateIfReadingAllowed |WHERE ... ";
| Key words in English |
|
|---|
Applying Access Restriction Functions
Use the ValueAllowed function as the main method of building an access restriction.
- The function searches for the value to be checked among the allowed values in the access groups whose profiles provide the respective rights to the list. Search is performed only for access values. Types of access values are specified in the
ValuesTypeproperties of access kinds in theOnFillAccessKindsprocedure of theAccessManagementOverridablecommon module. For values that are not access values, the check result will beTrue, except forNullandUndefinedas their result is alwaysFalse. - In the
Readright restriction sections (AllowReadandAllowReadUpdate), a value will be checked in access groups with the profile that grants theReadright for the list. In theUpdateright restriction sections (AllowReadUpdateandAllowUpdateIfReadingAllowed), a value will be checked in access groups with the profile that grants theUpdateright for the list. At the record level, theInsertright is equal to theUpdateright, but only for access groups whose profiles grant theInsertright for the list. - Consider specifics of using the
ValueAllowedfunction to check values with reference types of theUsers,User groups,External users, andExternal user groupscatalogs. Such usage creates an increased amount of access keys as well as records as a result of right calculation since it must be accurate to users and not to access groups (access group sets). - When merging the check results of access values with
OR, you can use theDisabledvalue, which can be clarified withAS False(Trueby default). When an access value of an access kind that is disabled by functional option or not specified in the access group profile is found in the attribute, this value is considered to beDisabled. The following restriction will work according to the remaining access kind, when one of them is disabled. When both access kinds are disabled, access is granted.Restriction.Text = "AllowReadUpdate |WHERE | ValueAllowed(EmailAccount, Disabled AS False) | OR ValueAllowed(ResponsibleUser, Disabled AS False)";
Use the IsAuthorizedUser function only if you need to perform a check without considering the restriction by the Users or External users access kind.
- The function works as a filter of the
Document.EmployeeResponsible = &AuthorizedUserkind. For all values, except for an authorized user, the check result will beFalse. - Note that the function creates an increased number of access keys and right calculation records similarly to the check of user reference types in the
ValueAllowedfunction.
Use the ObjectReadingAllowed and ObjectUpdateAllowed functions if you want the calculation of rights to one object to depend on rights to another object. This might be a dependency of an attachment on its owner, a document journal line on a document, an information register record on a recorder, and so on.
- The function checks the right to a specific object of the list by its reference. The check result is always
Truefor objects that are not involved in the access restriction (not specified in theOnFillListsWithAccessRestrictionprocedure of theAccessManagementOverridablecommon module). - Note that document access restrictions in the
ValueAllowed(Company)kind and theObjectReadingAllowed(Company)kind are different. In the first case, it is checked whether the value is allowed in access groups with rights to the document. In the second case, it is checked whether the access group with rights to the document grants theReadright to the company being checked. - When using the functions, you need to consider their effect on application performance. For more information, see Effective Inheritance of Rights from the Owner Object below.
Use the ListReadingAllowed and ListUpdateAllowed functions when you want a right to one object to depend on a right to a list of another object. For example, a document journal has several document types. Rights to different document types are granted to users not in full but in parts. This means you need to display only those journal lines that correspond to document types to whose lists a user has rights in roles.
- The functions check for the right to the whole list and not to a specific object.
- If you decide not to use the
ObjectReadingAllowedfunction for the document journal, consider that a user might not have rights to all documents and apply theListReadingAllowedfunction to theReffield. - If all journal documents do not use restrictions, use the
ListReadingAllowedfunction instead of theObjectReadingAllowedfunction. - Keep in mind that the functions do not create an increased number of access keys and right calculation records. Therefore, you can use them whenever required.
Converting Access Right Restrictions Into Standard Mode
The high-performance mode is recommended for the applications being developed. For smooth migration of users of previous application versions from the standard to the high-performance mode, it might be required to support both operation modes for some time. The synchronous development scheme involves developing access restrictions for the high-performance mode and converting them to the standard mode. To ensure synchronous development, use the SSLImplementationCheck.erf report. This report validates the subsystem integration for both modes at the same time.
In the standard mode, the restriction logic is implemented using the parameters of one of the following templates:
#ByValues(…)
#BySetsOfValues(…)
#ByValuesExtended(…)
#ByValuesAndSetsAdvanced(…)Note.
For more information on the templates and their parameters, see comments at the beginning of template texts. We recommend that you study this information before reading further. Standard templates are supplied in the EditAccessGroupMembers role.
Converting Standard Examples of Restriction Logic to the Format of Template Parameters
Below you can find some conversion examples for the cases from section Standard Restriction Logic Examples (see above).
- Company and counterparty are in the document header:
Restriction.Text = "AllowReadUpdate |WHERE | ValueAllowed(Company) |AND ValueAllowed(Counterparty)"; #ByValues("Document.SalesOrder", "","", "Companies", "Company", "CounterpartiesGroups","Counterparty", "","", "","", "","", "","", "","", "","", "","", "","", "","", "","", "","", "","", "","", "","") - Company is in the document header, counterparty is in the table, and one allowed counterparty is sufficient:
Restriction.Text = "AllowReadUpdate |WHERE | ValueAllowed(Company) |AND ValueAllowed(Vendors.Counterparty)"; #ByValuesExtended("Document.OrderOfMaterials", "", "", "LEFT JOIN Document.OrderOfMaterials.Vendors AS T1 ON T1.Ref = T.Ref", "", "Companies", "T.Company","AND", "CounterpartiesGroups", "T1.Counterparty", "", "","","", "","","", "","","", "","","", "","","", "","","", "","","", "","","", "","","", "","","", "","","", "","","", "","","", "","","") - Company is in the document header, counterparty is in the table, and one allowed counterparty is sufficient (if the table is empty, access by counterparty is granted):
Restriction.Text = "AllowReadUpdate |WHERE | ValueAllowed(Company) |AND ValueAllowed(Vendors.Counterparty, Null AS True)"; #ByValuesExtended("Document.OrderOfMaterials", "", "", "LEFT JOIN Document.OrderOfMaterials.Vendors AS T1 ON T1.Ref = T.Ref", "", "Companies", "T.Company","AND(", "CounterpartiesGroups", "T1.Counterparty", "OR", "Condition", "T1.Counterparty IS NULL",")", "","","", "","","", "","","", "","","", "","","", "","","", "","","", "","","", "","","", "","","", "","","", "","","", "","","") - Company is in the document header, counterparty is in the table, and all counterparties must be allowed (if the table is empty, access by counterparty is denied):
Restriction.Text = "AllowReadUpdate |WHERE | ValueAllowed(Company) |AND ForAllRows(ValueAllowed(Vendors.Counterparty))"; #ByValuesExtended("Document.OrderOfMaterials", "", "", "", "", "Companies", "T.Company","AND NOT FALSE IN ( SELECT FIRST 1 FALSE FROM Document.OrderOfMaterials.Vendors AS T1 WHERE T.Ref = T1.Ref AND NOT (", "CounterpartiesGroups", "T1.Counterparty", "))AND TRUE IN ( SELECT FIRST 1 TRUE FROM Document.OrderOfMaterials.Vendors)", "","","", "","","", "","","", "","","", "","","", "","","", "","","", "","","", "","","", "","","", "","","", "","","", "","","", "","","") - Company and counterparty are in the table, and any allowed company–counterparty pair is sufficient:
Restriction.Text = "AllowReadUpdate |WHERE | ValueAllowed(Vendors.Company) |AND ValueAllowed(Vendors.Counterparty)"; #ByValuesExtended("Document.PurchasePlanning", "", "", "LEFT JOIN Document.PurchasePlanning.UsedMaterials AS T1 ON T1.Ref = T.Ref", "", "Companies", "T1.Company","AND", "CounterpartiesGroups", "T1.Counterparty", "", "","","", "","","", "","","", "","","", "","","", "","","", "","","", "","","", "","","", "","","", "","","", "","","", "","","", "","","") - Company and counterparty are in the table, and all company–counterparty pairs must be allowed:
Restriction.Text = "AllowReadUpdate |WHERE | ForAllRows( | ValueAllowed(Vendors.Company) | AND ValueAllowed(Vendors.Counterparty))"; #ByValuesExtended("Document.PurchasePlanning", "", "", "", "NOT FALSE IN ( SELECT FIRST 1 FALSE FROM Document.OrderOfMaterials.UsedMaterials AS T1 WHERE T.Ref = T1.Ref AND NOT (", "Companies", "T1.Company","AND", "CounterpartiesGroups", "T1.Counterparty", "))AND TRUE IN ( SELECT FIRST 1 TRUE FROM Document.OrderOfMaterials.UsedMaterials)", "","","", "","","", "","","", "","","", "","","", "","","", "","","", "","","", "","","", "","","", "","","", "","","", "","","", "","","") - Company and counterparty are in the table, and one of the companies and one of the counterparties must be allowed:
Restriction.Text = "AllowReadUpdate |WHERE | ForAtLeastOneRow(ValueAllowed(Vendors.Company)) |AND ForAtLeastOneRow(ValueAllowed(Vendors.Counterparty))"; #ByValuesExtended("Document.PurchasePlanning", "", "", "", TRUE IN ( SELECT FIRST 1 TRUE FROM Document.OrderOfMaterials.UsedMaterials AS T1 WHERE T.Ref = T1.Ref AND", "Companies", "T1.Company",") AND TRUE IN ( SELECT FIRST 1 TRUE FROM Document.OrderOfMaterials.UsedMaterials AS T1 WHERE T.Ref = T1.Ref AND", "CounterpartiesGroups", "T1.Counterparty", ")", "","","", "","","", "","","", "","","", "","","", "","","", "","","", "","","", "","","", "","","", "","","", "","","", "","","", "","","") - Sender is a dimension of the flexible type. Only the
Catalog.Warehousesreferences are to be checked:Restriction.Text = "AllowReadUpdate |WHERE | ValueAllowed(Sender ONLY Catalog.Warehouses)"; #ByValuesExtended("Document.InventoryTransfer", "", "", "", CASE WHEN VALUETYPE(T.Sender) = TYPE(Catalog.Warehouses) THEN", "Senders", "T.Sender","ELSE TRUE END", "","","", "","","", "","","", "","","", "","","", "","","", "","","", "","","", "","","", "","","", "","","", "","","", "","","", "","","", "","","") - Company is in the header (Owner), parent company is in the Companies catalog. Editing is to be allowed when the company in the header is allowed. Reading is to be allowed when:
- The company in the header (Owner) is allowed.
- The non-empty parent company of the company in the header is allowed.
- The company, for which the company in the header (Owner) is the parent company, is allowed.
Restriction.Text = "AttachAdditionalTables |ThisList AS ThisList | |LEFT JOIN Catalog.Companies AS Owners | ON Owners.Ref = ThisList.Owner | |LEFT JOIN Catalog.Companies AS SeparateBusinessUnits | ON SeparateBusinessUnits.ParentCompany = Owners.Ref |; |AllowRead |WHERE | ValueAllowed(Owner) | OR ValueAllowed(Owners.ParentCompany, EmptyRef AS False) | OR ValueAllowed(SeparateBusinessUnits.Ref) |; |AllowUpdateIfReadingAllowed |WHERE | ValueAllowed(Owner)"; #ByValuesExtended("Catalog.DivisionsOfOrganizations", "Read", "", "LEFT JOIN Catalog.Companies AS T1 ON T1.Ref = T.Owner "LEFT JOIN Catalog.Companies AS T2 ON T2.ParentCompany = T1.Ref", "", "Companies", "T.Owner","OR", "Companies", "T1.ParentCompany", "AND", "Condition", "T1.ParentCompany <> VALUE(Catalog.Companies.EmptyRef)", "OR", "Companies", "T2.Ref","", "","","", "","","", "","","", "","","", "","","", "","","", "","","", "","","", "","","", "","","", "","","", "","","") #ByValues("Catalog.DivisionsOfOrganizations", "Update", "", "Companies", "Owner", "","", "","", "","", "","", "","", "","", "","", "","", "","", "","", "","", "","", "","", "","", "","") - Inheriting access rights from the owner object (for example, by attachments).
Restriction.Text = "AllowRead |WHERE | ObjectReadingAllowed(FileOwner) |; |AllowUpdateIfReadingAllowed |WHERE | ObjectUpdateAllowed(FileOwner)";- When there are few types in the
FileOwnerattribute:#ByValues("Catalog.SalesOrderAttachedFiles", "","", "Companies", "FileOwner.Company", "CounterpartiesGroups"," FileOwner.Counterparty", "","", "","", "","", "","", "","", "","", "","", "","", "","", "","", "","", "","", "","", "","") - When there are numerous types in the
FileOwnerattribute (writing access value sets is required for all owners):#ByValuesAndSetsAdvanced("Catalog.Files","","", "", "", "Object","T.FileOwner","", "","","", "","","", "","","", "","","", "","","", "","","", "","","", "","","", "","","", "","","", "","","", "","","", "","","", "","","", "","","")
- When there are few types in the
- Restricting access by owner reading (for example, the document journal).
Restriction.Text = "AllowReadUpdate |WHERE | ObjectReadingAllowed(Ref)";- When all fields for a restriction condition can be moved to columns:
#ByValues("DocumentJournal.Orders", "","", "Companies", "Company", "CounterpartiesGroups","Counterparty", "","", "","", "","", "","", "","", "","", "","", "","", "","", "","", "","", "","", "","", "","") - Otherwise and when there are few types in the Ref attribute:
#ByValues("DocumentJournal.Orders", "","", "Companies", "Ref.Company", "CounterpartiesGroups","Ref.Counterparty", "","", "","", "","", "","", "","", "","", "","", "","", "","", "","", "","", "","", "","", "","") - Otherwise and when there are numerous types in the Ref attribute (writing access value sets is required for all owners):
#ByValuesAndSetsAdvanced("DocumentJournal.Orders","","", "", "", "Object","T.Ref","", "","","", "","","", "","","", "","","", "","","", "","","", "","","", "","","", "","","", "","","", "","","", "","","", "","","", "","","", "","","")
- When all fields for a restriction condition can be moved to columns:
- Checking settings of the Read and Update access rights for objects. For example, access right settings for the
FilesFolderscatalog items.Restriction.Text = "AllowRead |WHERE | ObjectReadingAllowed(Ref) |; |AllowUpdateIfReadingAllowed |WHERE | ObjectUpdateAllowed(Ref)"; #ByValues("Catalog.FilesFolders", "", "", "RightsSettings", "Ref", "","", "","", "","", "","", "","", "","", "","", "","", "","", "","", "","", "","", "","", "","", "","") - Checking settings of the Read and Update access rights for additional objects (for example, access right settings for the
Filescatalog configured as per settings for theFilesFolderscatalog items).Restriction.Text = "AllowRead |WHERE | ObjectReadingAllowed(FileOwner) |; |AllowUpdateIfReadingAllowed |WHERE | ObjectUpdateAllowed(FileOwner)";- When
FileOwneris of theFilesFolderscatalog type only:#ByValues("Catalog.Files", "", "", "RightsSettings", "FileOwner", "","", "","", "","", "","", "","", "","", "","", "","", "","", "","", "","", "","", "","", "","", "","") - When
FileOwneris of flexible type (writing access value sets is required):#ByValuesAndSetsAdvanced("Catalog.Files", "", "", "", "", "Object","T.FileOwner","", "","","", "","","", "","","", "","","", "","","", "","","", "","","", "","","", "","","", "","","", "","","", "","","", "","","", "","","", "","","")
- When
- Account and counterparty are in the header, and either of them must be allowed. When the restriction by accounts is disabled, the restriction by counterparties remains enabled, and vice versa. If both restrictions are disabled, access is granted.
Restriction.Text = "AllowReadUpdate |WHERE | ValueAllowed(Account, Disabled AS False) | OR ValueAllowed(Counterparty, Disabled AS False)"; #BySetsOfValues("Document.MailMessage","","AdvancedOR","")
It is required to write access value sets in the MailMessage document object module:
Procedure FillAccessValuesSets(Table) Export
String = Table.Add();
String.SetNumber = 1;
String.AccessValue = Account;
String = Table.Add();
String.SetNumber = 2;
String.AccessValue = Counterparty;
EndProcedureSpecifics and Purpose of Access Restriction Templates
Each template is designed to meet specific needs. For example, the #ByValues and #BySetsOfValues templates allow you to accomplish most of simple tasks.
Special functions such as Condition, Object, RightsSettings, ReadRight1, and EditRight are used in templates as parameters of access kind names. The Condition function is available in all templates. The Object function is available only in the ByValuesAndSetsAdvanced template. The RightsSettings, ReadRight1, and EditRight functions are available in the ByValues, ByValuesExtended, and ByValuesAndSetsAdvanced templates. These functions are also called access kinds, although they are available only in the specified standard templates.
The Condition special function in the access kind name parameter means that the attribute name parameter contains an arbitrary condition in the query language.
The Object and RightsSettings special functions in the Read right restriction work similarly to the ObjectReadingAllowed function (high-performance mode). However, in the Update and Insert right restriction they are similar to the ObjectUpdateAllowed function (high-performance mode).
The special RightsSettings function in the access kind name parameter means that an attribute with a type from the RightsSettingsOwner type collection is specified in the attribute name parameter. In this case, only right settings are checked. If the type is different, the check result will be False.
For the #ByValuesAndSetsAdvanced (for the Object access kind only) and #BySetsOfValues templates, you can use the AdvancedOR modifier that changes calculation of restrictions with several checks whose results are combined with OR. The modifier works in the same way as the Disabled AS False clarification of the ValueAllowed function (high-performance mode). For example, access to an email is granted if Account or Company is allowed. Without the modifier, if the restriction by accounts or companies is not used, all emails are allowed. Disabled when: the access kind usage constant is disabled, there is no access kind in the profile, or record-level access restriction is disabled.
Templates with the AdvancedOR modifier run slower, that is why we do not recommend using the modifier if there is no restriction logic by OR. If the Object access kind is used in the restriction and object types and their restriction logic are not known in advance, specify the modifier when the advanced OR calculation is required.
Templates support an alphabetical comma-separated list of access kinds in the access kind name parameter. This list does not include special access kinds such as Condition, Object, RightsSettings, ReadRight1, and EditRight. If an attribute of the flexible type is checked, for example, the Owner attribute of the Company and Counterparty types, you can make a simpler and more effective restriction (with only one check and without type analysis). Example:
#ByValues("Catalog.BankAccounts", "", "",
"CounterpartiesGroups,Companies","Owner",
"","", "","", "","", "","", "","", "","", "","", "","", "","", "","", "","", "","", "","", "","", "","")#ByValues Template
Use the #ByValues template to check whether access values are allowed in table fields (you need to specify access kinds for the restriction text to be automatically optimized when the access kind is not used). For example, the access restriction text:
#ByValues("Document.GoodsRecordingAsReceived", "", "",
"Companies", "Company",
"Warehouses", "Warehouse",
"","", "","", "","", "","", "","", "","", "","", "","", "","", "","", "","", "","", "","", "","")restricts reading so that a user sees in the Goods acceptance documents list only those documents, in which the Company attribute has a value allowed to the user by the Company access kind and the Warehouse attribute has a value allowed by the Warehouses access kind. The values must be allowed in the user access group simultaneously, and the profile of user access groups must include a role with the right to read the Goods acceptance documents.
The maximum number of checks performed in the template is 16.
This template and the other ones support transfer of conditions in the query language. To do this, specify the Condition name instead of the access kind name and a text in the query language instead of the field name. Example:
#ByValues("Document.GoodsRecordingAsReceived", "", "",
"Companies", "Company",
"Warehouses", "Warehouse",
"Condition", "T.BusinessOperation = Value(Enum.BusinessTransactions.Inventory_)", "","", "","", "","", "","", "","", "","", "","", "","", "","", "","", "","", "","", "","")In this example, the condition is added: the document is available only for the Physical inventory business transaction. It means that for a different business transaction, for example, Other, the document will not be available to any user, except for users with the Full access role.
#BySetsOfValues Template
Use the #BySetsOfValues template to restrict reading of document journals whose documents have different reading restrictions. For example, when access is restricted by different attributes. Normally, you need to analyze a document type and then apply the checks used for this type of document. It means you have to repeat the restriction logic for all documents in each journal. This method can adversely affect performance and requires a lot of development and maintenance efforts. Therefore, it is advisable to prepare in advance access values of object data items required for the access restriction logic and write them to the AccessValuesSets register. Such data is called access value sets.
If the AccessValuesSets register has records for the Goods acceptance document:
<Document1>, , "Companies", "Company1"
<Document1>, , "Warehouses", "Warehouse1";to use them, a text of the right restriction to read the journal containing this document must be as follows:
#BySetsOfValues("DocumentJournal.WarehouseDocuments", "", "", "Ref"),where Ref is the name of a standard journal attribute.
In this case, the logic of the #BySetsOfValues template is as follows: by the passed value of the Ref standard attribute of the journal line in the Access value sets register, 1C:Enterprise finds all lines containing Access value and checks whether all access values are permitted to a user in one of their access groups.
Besides document journals, you can use the #BySetsOfValues template to implement the access restriction logic for other metadata objects. Using value sets prepared in advance allows you to avoid restrictions that are imposed by the query language. To use the #BySetsOfValues template, you need to additionally configure the metadata object. Add the Access value sets table with attributes that correspond to dimensions and resources of the Access value sets information register to the metadata object. In the access restriction text, specify an empty string as the fourth parameter of the #BySetsOfValues template. Add types of these objects to the OwnerLimitedByAccessValuesSetsObject or OwnerWithRestrictedAccessValueSetsDocument type collection.
#ByValuesExtended Template
In some cases, features of the #ByValues and #BySetsOfValues templates are not enough. For example, you need to restrict access to the Goods transfer document so that a user can read the document only if the Company and DestinationWarehouse or SourceWarehouse are permitted and write the document only if all three components are permitted: Company, DestinationWarehouse, and SourceWarehouse. In this case, use the #ByValues template to restrict the Write right without restricting the Read right.
For restrictions with the OR logic, there are advanced templates such as #ByValuesExtended. For example, the restriction for the Read right looks like this:
#ByValuesExtended("Document.InventoryTransfer", "", "",
"",
"",
"Companies", "T.Company", "AND(",
"Warehouses", "T.SourceWarehouse", "OR",
"Warehouses", "T.DestinationWarehouse", ")", …)You need to explicitly specify an alias of the current "T." table before the field.
In addition to the OR logic, you can use advanced templates to check attributes of tables with the help of attachable tables. To attach a table to the main table, pass a text in the query language to the fourth template parameter, for example:
"INNER JOIN Document.InventoryTransfer.Products
AS T2 ON T.Ref = T2.Ref",For a template, the main table is extended by fields of the attached table. Due to the explicit usage of aliases, you can specify them similarly to the fields of the main table. It means that you can add a check of a table attribute to the template, for example:
"ProductGroups", "T2.Products", ""As a result, the restriction looks like this:
#ByValuesExtended("Document.InventoryTransfer", "", "",
"INNER JOIN Document.InventoryTransfer.Products AS T2 ON T.Ref = T2.Ref",
"",
"Companies", "T.Company", "AND(",
"Warehouses", "T.SourceWarehouse", "OR",
"Warehouses", "T.DestinationWarehouse", ")AND",
"ProductGroups", "T2.Products", "", …)When the main table is extended by fields of an attached table, rows are multiplied. For example, an attached table contains two rows with different products. In this case, the document will be available if conditions of checking the main table (the document header) are met and at least one of two products in the attached table is available.
#ByValuesAndSetsAdvanced Template
To restrict access to metadata objects depending on access restrictions of other objects, you can use the #ByValuesAndSetsAdvanced template.
For example, access to a file (the Files catalog item) attached to the Receipt of goods and services document must be granted under the same conditions as for the document.
You can accomplish this task by repeating the restriction logic of the Receipt of goods and services document in the Files catalog restriction. However, in practice, you will have to synchronously change the restriction logic of documents and files. Besides, as items of the Files catalog can be attached to an arbitrary number of metadata objects (for example, to file folders, the Order, Sales invoice documents, and so on), the task of implementing the file access restriction logic is comparable in complexity to restricting access to a document journal that contains all kinds of configuration documents.
In some cases, when the number of owners is small (no more than 10), you can repeat the owner restriction logic and have acceptable performance indicators, especially if the logic is the same. When repeating the restriction logic, you need to not only check the owner access values, but also consider the availability of rights to the owner table, otherwise files of owners that are themselves unavailable by rights (according to roles) will be available. For this purpose, use the ReadRight1 and EditRight access kinds to check availability of the Read and Update rights to the owner table, for example:
#ByValues("Catalog.Files", "Read", "",
"ReadRight", "T.FileOwner",
"Companies", "T.FileOwner.Company", …).When there are many owners, this method is not suitable. For such cases, the Access management subsystem provides an access kind by an owner object. To use this access kind, specify Object as the access kind name in the template. The Object access kind implies that the field contains a value that is a reference to a data object (for example, a document). Similarly to the #BySetsOfValues template, value sets for this object that need to be checked are written in the Access value sets register. The exception is owners of right settings, because you do not need to write access value sets for them, but the population procedure may be required if they are used to populate access value sets of dependent objects.
So, using the #ByValuesAndSetsAdvanced template, you can check not one access value, but a set of values prepared when writing a document, the reference to which is in an attribute, for example, in the Owner attribute of the Files catalog item.
#ByValuesAndSetsAdvanced("Catalog.Files", "", "",
"",
"",
"Object","T.FileOwner","", "","","", "","","", "","","", "","","", "","","", "","","", "","","", "","","", "","","", "","","", "","","", "","","", "","","", "","","", "","","")Value sets of the Files catalog items are to be updated upon changing, for example, access value sets of a document that owns the Receipt of goods and services files.
When using the Object access kind, not only the sets but also rights to the object are checked. It means that you need to add the check used in the ReadRight1 and EditRight access kinds. In the restriction of the right to read the table, 1C:Enterprise checks for the right to read an object and for sets of object reading restrictions. In the restriction of rights to add, edit, and delete the table, 1C:Enterprise checks for the right to edit an object and for sets of object editing restrictions.
You can override rights of the object that are checked in the restriction by the Object access kind in the OnFillAccessRightsDependencies procedure of the AccessManagementOverridable module.
The structure of the Access value sets register supports the OR logic for access values and various sets by access rights. To implement the OR logic, the Set number dimension of the Number type is added, and for sets by rights, two resources are added: Read and Update of the Boolean type.
You cannot write the complex OR logic into the register directly. The set number allows you to make several value sets for a single reference data item (for example, a document), which check the document availability. Moreover, it is enough that the values of at least one set of values are available simultaneously. It means that results of checking access values by access kinds within a set with one number are combined with AND and results of checking whole sets are combined with OR. For example, for the Goods transfer document, the Access value sets register contains records for the Read right logic:
<Document2>, 0, "Companies", "Company1"
<Document2>, 0, "Warehouses", "Warehouse1";
<Document2>, 1, "Companies", "Company1"
<Document2>, 1, "Warehouses", "Warehouse2";You can see that although there are three access values: Company1, Warehouse1, and Warehouse2, there are four register records. This is due to opening brackets in the C1 and (W1 or W2) logical expression, which leads to the logical expression of the C1 and W1 or C1 and W2 products sum.
The opening of brackets in the primary logical expression that merges access value check results is required to populate the Access value sets information register.
Records for the Update right logic:
<Document2>, 0, "Companies", "Company1"
<Document2>, 0, "Warehouses", "Warehouse1";
<Document2>, 0, "Warehouses", "Warehouse2";You can see an example of the population procedure below.
The only difference of the #ByValuesAndSetsAdvanced template from the #ByValuesExtended template is that it supports the Object access kind.
Developing the "Populate Access Value Sets" Procedures
When using the #BySetsOfValues or #ByValuesAndValuesSets standard templates with the Object access kind, you need to write info required for their operation to the Access value sets register.
Access value sets are written when writing objects, for example, documents. Before writing, a user procedure for populating access value sets is called.
Add the population procedure to the object module and include the object type into the Save access value sets event subscription and into the Object dimension types of the Access value sets information register.
When populating access value sets, you can use only the following table properties:
- Set number (if there is only one set, you can leave it empty).
- Access kind (only for the
ReadRight1andEditRightaccess kinds). - Access value (assign explicitly).
- Read and Update (if the set is for all rights, you can leave it empty).
The number of populated records must be greater than zero, otherwise, an exception is thrown. It is important as the procedure for populating access value sets is called from the Access restriction data population scheduled job after enabling the Restrict access at record level mode for objects that have an empty record set in the Access value sets register. When the Restrict access at record level mode is disabled, an empty set is written. Therefore, when the mode is enabled, the cleared sets are populated (or all sets). The scheduled job runs multiple times and processes a population batch. Sets are cleared while objects are rewritten.
The technology of batch population or clearing uses am empty record set as a status flag. When you need to write a set known to be forbidden, write not an empty set but the following one:
String = Table.Add();
String.AccessValue = Enums.AdditionalAccessValues.AccessDenied;When you need to write a set known to be permitted, write not an empty set but the following one:
String = Table.Add();
String.AccessValue = Enums.AdditionalAccessValues.AccessAllowed;The procedure example:
FillAccessValuesSets is in the object module. The object type is included in the AccessValuesSetsOwnerObject type collection.
Procedure FillAccessValuesSets(Table) Export
String = Table.Add();
String.Update = True;
String.AccessValue = Company1;
String = Table.Add();
String.AccessValue = Warehouse1;
String = Table.Add();
String.AccessValue = Warehouse2;
String = Table.Add();
String.SetNumber = 1;
String.Read = True;
String.AccessValue = Company1;
String = Table.Add();
String.SetNumber = 1;
String.AccessValue = Warehouse1;
String = Table.Add();
String.SetNumber = 2;
String.Read = True;
String.AccessValue = Company1;
String = Table.Add();
String.SetNumber = 2;
String.AccessValue = Warehouse2;
EndProcedureIf a set number is not specified in the population procedure, it is considered that one set with number 1 is added. If neither the Read nor the Update rights are specified within the set with one number, it is considered that the set refers to all rights.
Only one record with the same access value is allowed in the set. Duplicate rows and sets are deleted automatically in the AddAccessValuesSets procedure. It runs before writing access value sets to the AccessValuesSets information register with compression of sets (redundant sets are deleted according to logical function simplification rules).
Notice.
To apply the changes during development and debugging, update the service data. For more information, see Service Data Update.
Dependent Access Value Sets
When access value sets are to be created considering access to another object (for example, access to the _DemoJobWithRoleAddressing business process is defined by access to its base object, for example, by the Files catalog item), you need to include sets to other sets.
To include sets to other sets, use the AddAccessValuesSets procedure of the AccessManagement common module. This procedure adds sets from the Source source table to the Receiver destination table either by logical addition or by logical multiplication. For example, task sets:
Procedure FillAccessValuesSets(Table) Export
String = Table.Add();
String.AccessValue = Performer;
// Create an empty table.
BusinessProcessTable = AccessManagement.AccessValuesSetsTable();
// Populate business process sets.
AccessManagement.FillAccessValuesSets(BusinessProcess, BusinessProcessTable);
// Logical addition of sets in tables (by "OR").
AccessManagement.AddAccessValuesSets(Table, BusinessProcessTable);
EndProcedureYou need to develop the FillAccessValuesSets procedures for all objects that can be base objects or are involved in generating access value sets.
There might be objects whose access value sets are not written in the AccessValuesSets information register but they are used only when generating other access value sets being written. The types of such objects must be included in the ExternalValuesOwnerInAccessValueSetsObject type collection.
To implement dependencies, develop the logic for overwriting access value sets of dependent objects in the OnChangeAccessValuesSets handler of the AccessManagementOverridable common module, for example:
Procedure OnChangeAccessValuesSets(Val Ref, RefsToDependentObjects) Export
FullName = Ref.Metadata().FullName();
If FullName = "Task.PerformerTask" Then
// Dependent object types:
// BusinessProcess.Job
Query = New Query(
"SELECT
| Job.Ref
|FROM
| BusinessProcess.Job AS Job
|WHERE
| Job.SubjectOf = &SubjectOf");
Query.SetParameter("SubjectOf", Ref);
RefsToDependentObjects = Query.Execute().Unload().UnloadColumn("Ref");
ElsIf FullName = "BusinessProcess.Job" Then
// Dependent object types:
// BusinessProcess.Job
/ via Task.PerformerTask in the base.
Query = New Query(
"SELECT DISTINCT
| Job.Ref
|FROM
| BusinessProcess.Job AS Job
| INNER JOIN Task.PerformerTask AS PerformerTask
| ON Job.SubjectOf = PerformerTask.Ref
| AND (PerformerTask.BusinessProcess = &BusinessProcess)");
Query.SetParameter("BusinessProcess", Ref);
RefsToDependentObjects = Query.Execute().Unload().UnloadColumn("Ref");
EndIf;
EndProcedureThe ReadRight1 and EditRight access kind names are required when you need to develop a restriction with dependency of rights of a subordinate object on a leading object. The check by the Object access kind in RLS templates has the built-in logic for checking dependent rights, as in these access kinds. Therefore, you do not need to combine these access kinds with the Object access kind. Also, do not use these access kinds when populating dependent access value sets. For this purpose, use the third parameter in the FillAccessValuesSets procedure. When you specify this parameter, the checks are added automatically.
Notice.
To apply the changes during development and debugging, update the service data. For more information, see Service Data Update.
Details of Access Kinds Used in Object Restrictions for the "Access Rights" Report
In the standard option of access restriction, to use the Access rights report, you need to specify the list of access kinds used in restrictions of metadata object rights. The list is specified in the overridable module as a multiline string in the <Full table name>.<Right>.<Access kind> format. To generate the procedure code automatically, use developer tools. An example of how to fill in the procedure:
Procedure OnFillMetadataObjectsAccessRestrictionKinds(LongDesc) Export
LongDesc =
"
|BusinessProcess.Job.Create.Users
|BusinessProcess.Job.Update.Users
|BusinessProcess.Job.Read.Users
|…
|…
|…
|Catalog.FilesFolders.Update._DemoFilesFolders
|Catalog.FilesFolders.Read._DemoFilesFolders
|Catalog.EmailAccounts.Read.EmailAccounts
|";
EndProcedureSetting Up Metadata Object Properties
| Metadata Object Property | Setting |
|---|---|
DefinedType.AccessValue |
|
DefinedType.AccessValueObject |
|
DefinedType.RightsSettingsOwner |
|
DefinedType.RightsSettingsOwnerObject |
|
DefinedType.AccessKeysValuesOwner |
All reference objects with the access restriction as well as objects without the restriction that write access keys for other objects, for example, document journals. It is updated automatically using SSLImplementationCheck.erf. |
DefinedType.AccessKeysValuesOwnerObject |
All reference objects (except for documents) from the AccessKeysValuesOwner type collection and objects involved in access restrictions of other objects (using dot syntax or joins).It is updated automatically using SSLImplementationCheck.erf. |
DefinedType.AccessKeysValuesOwnerDocument |
All documents from the AccessKeysValuesOwner type collection and documents involved in access restrictions of other objects (using dot syntax or joins). If there are no documents, specify the CatalogObject.MetadataObjectIDs type.It is updated automatically using SSLImplementationCheck.erf. |
DefinedType.AccessKeysValuesOwnerRecordSet |
All registers with the restriction (except for calculation registers) and registers involved in access restrictions of other objects using joins. It is updated automatically using SSLImplementationCheck.erf. |
DefinedType.AccessKeysValuesOwnerCalculationRegisterRecordSet |
All calculation registers with the restriction and calculation registers involved in access restrictions of other objects using joins. It is updated automatically using SSLImplementationCheck.erf. |
DefinedType.RegisterAccessKeysRegisterField |
All types of native register fields specified in their access restrictions (types of basic fields are an analog of an object reference). It is updated automatically using SSLImplementationCheck.erf. |
InformationRegister.AccessKeysToRegister<RegisterNameWithAccessRestriction> |
Create a separate information register to store access keys for the target register instead of using the AccessKeysForRegisters built-in common register if the target register can have a lot of combinations (tens of thousands or more) of field values that are used in the access restriction.To create a separate register, copy the AccessKeysForRegisters built-in information register and rename it. After this, delete the redundant Field* dimensions and specify the same set of types of the remaining Field* dimensions. It is obtained as a sum of all field types of the target register that are used for the access restriction. |
The type collections required for the standard operation mode are listed below.
| Metadata Object Property | Setting |
|---|---|
DefinedType.AccessValuesSetsOwnerObject |
|
DefinedType.ExternalValuesOwnerInAccessValueSetsObject |
Object types used in the FillAccessValuesSets procedures to generate sets but not included in types of access value set owners. It means that they are missing in the DefinedType.AccessValuesSetsOwnerObject type. For example, CatalogObject.Files is used to generate the BusinessProcessObject._DemoJobWithRoleAddressing sets (see also handler AccessManagementOverridable.OnChangeAccessValuesSets(…)) |
DefinedType.OwnerLimitedByAccessValuesSetsObject |
Used for objects (except for documents) that use access value sets in the #BySetsOfValues template to restrict access to an object. |
DefinedType.OwnerWithRestrictedAccessValueSetsDocument |
Used for documents that use access value sets in the #BySetsOfValues template to restrict access to an object. If there are no documents, specify the CatalogObject.MetadataObjectIDs type. |
TabularSection.AccessValuesSets.(SetNumber, AccessValue, Refinement, Read, Update) |
A table is created in the application metadata objects that use access value sets in the #BySetsOfValues template to restrict access to them.Table fields are the same for all such objects. Types are the same as in the fields in the AccessValuesSets information register. |
Creating Details of Built-in Access Group Profiles for Initial Population and Update of the Infobase
The built-in access group profiles and folders are specified in the FillInSuppliedAccessGroupProfiles procedure of the AccessManagementOverridable common module. They are automatically created upon initial population, updated when the infobase is updated, and can be restored to their default state according to these details by the administrator.
To create a details code in 1C:Enterprise language, use the AccessManagement data processor included in the library distribution package.
Procedure FillInSuppliedAccessGroupProfiles(ProfilesDetails, ParametersOfUpdate) Export
// The "Finance" profile folder.
FillFinanceProfilesFolder(ProfilesDetails);
// The "Accountant" profile.
FillAccountantProfile(ProfilesDetails);
// The "User" profile.
FillUserProfile(ProfilesDetails);
...
// Additional profiles that are not used independently when setting
// user rights but supplement the main profiles listed above.
// The "Person responsible for access group member lists (additional)" profile.
FillPersonResponsibleForAccessGroupsMembersListProfile(ProfilesDetails);
// The "Person responsible for products (additional)" profile.
FillPersonResponsibleForProductsProfile(ProfilesDetails);
...
EndProcedure
Procedure FillFinanceProfilesFolder(ProfilesDetails)
FolderDescription_ = AccessManagement.NewDescriptionOfTheAccessGroupProfilesFolder();
FolderDescription_.Name = "Finance";
FolderDescription_.Id = "6849f943-d8c7-11eb-881f-b06ebfbf08c7";
FolderDescription_.Description =
NStr("en = 'Finance'", Common.DefaultLanguageCode());
ProfilesDetails.Add(FolderDescription_);
EndProcedure
Procedure FillAccountantProfile(Val ProfilesDetails)
ProfileDetails = AccessManagement.NewAccessGroupProfileDescription();
ProfileDetails.Name = "_DemoAccountant";
ProfileDetails.Parent = "Finance";
ProfileDetails.Id = "75fa0eca-98aa-11df-b54f-e0cb4ed5f655";
ProfileDetails.Description =
NStr("en = 'Accountant'", Common.DefaultLanguageCode());
ProfileDetails.LongDesc =
NStr("en = 'Intended for general duties of accountants'");
// Use 1C:Enterprise.
ProfileDetails.Roles.Add("StartWebClient");
ProfileDetails.Roles.Add("StartThickClient");
ProfileDetails.Roles.Add("StartThinClient");
ProfileDetails.Roles.Add("OutputToPrinterFileClipboard");
ProfileDetails.Roles.Add("SaveUserData");
Using the application.
ProfileDetails.Roles.Add("BasicAccessSSL");
ProfileDetails.Roles.Add("ViewApplicationChangeLog");
...
// Basic profile features.
ProfileDetails.Roles.Add("_DemoAddEditBankDocuments");
ProfileDetails.Roles.Add("_DemoAddEditCashDocuments");
ProfilesDetails.Add(ProfileDetails);
EndProcedureNotice.
To apply the changes during development and debugging, update the service data. For more information, see Service Data Update.
Command Interface Setup
If the configuration does not contain the Application settings subsystem, add the following metadata objects to the administrator's command interface:
Catalog.AccessGroups(except for the simplified interface):- For the administrator to frequently view and edit access groups (for example, in the Important section next to the
UsersandExternalUserscatalogs). - For the administrator to frequently view and edit access group members (for example, in the Important section next to the
Userscatalog).
- For the administrator to frequently view and edit access groups (for example, in the Important section next to the
Catalog.AccessGroupProfiles(except for the simplified interface) for the administrator to rarely view the list and content of access group profiles (for example, in the See also section).LimitAccessAtRecordLevelto enable or disable record-level access restrictions (by administrators). If access restrictions use access value sets, when enabling the constant, you need to display a warning message that access restriction data must be filled in.Report.AccessRightsAnalysisfor the administrator to frequently edit user access rights (for example, in the Important section next to theUserscatalog).
As an example, see the UsersAndRightsSettings form of the SSLAdministrationPanel data processor.
To display the AccessRightsAnalysis report in list forms of objects, integrate the Attachable Commands subsystem into these objects.
User Access Setup
To manage user access to the subsystem, assign a user the roles specified in the table below.
| # | Role Description |
|---|---|
| 1. | BasicAccessSSL (the Core subsystem user role)Grants the right to view the list of users. Grants the right to view the list of your access groups in the Access rights form. Grants the right to generate and view a report on your access rights. |
| 2. | EditAccessGroupMembersGrants the right to change members and view access groups where the user is set as the access group administrator. |
| 3. | FullAccess (the Core subsystem user role)Grants the right to view and edit access groups (including assignment of access group administrators). Grants the right to delete subsystem objects marked for deletion. Grants the right to enable and disable record-level access restrictions. Grants the right to develop access group profiles. Grants the right to use the Update record-level access data processor. Grants the right to start the Access restriction data population scheduled job manually. |
The table below illustrates possible user groups and the roles they could be assigned with.
| # | User Group Description | Assigned Roles |
|---|---|---|
| 1. | Person responsible for access group member lists (additional). Required for a user assigned to manage access group membership (for example, the head of a department, or a project group manager). |
|
Special Cases of Integration
- How to Integrate "Business Processes and Tasks" and "Access Management" Subsystems
- How to Integrate "Report Options" Subsystem without "Access Management" Subsystem
- How to Integrate "Business Interactions" and "Access Management" Subsystems
- How to Integrate "Additional Reports and Data Processors" Subsystem without "Access Management" Subsystem.
- How to Integrate "Notes" Subsystem without "Access Management" Subsystem
- How to Integrate "Data Integrity" and "Access Management" Subsystems
- How to Integrate "User Reminders" Subsystem without "Access Management" Subsystem
- How to Integrate "Users" Subsystem without "Access Management" Subsystem
- How to Integrate "Email Management" Subsystem without "Access Management" Subsystem
- How to Integrate "File Management" and "Access Management" Subsystems
- How to Integrate "Report Distribution" Subsystem without "Access Management" Subsystem
- How to Integrate "Properties" and "Access Management" Subsystems
- How to Integrate "Access Management" Subsystem without Optional Subsystems
- How to Integrate "Access Management" Subsystem without "Report Options" Subsystem
How to Use the Subsystem in Development
When you create a new metadata object, you have to set up the subsystem policies on the new objects.
See the subsystem API description in the API documentation (in Russian).
Predefined Access Kinds
The subsystem already includes the Users and ExternalUsers access kinds. They allow you to create restrictions by access value types of the Users, UserGroups, ExternalUsers, ExternalUsersGroups catalogs.
They can be used, for example, to restrict access to email accounts or personal sales orders.
When developing the restriction logic, keep in mind that the current user is automatically included in the list of permitted users of the Users access kind. Similarly, the current external user is automatically included in the list of permitted users of the ExternalUsers access kind.
Developing Optimal Access Restrictions
Effective Inheritance of Rights from the Owner Object
In many cases, subordinate objects must be assigned with the same access rights as the owner object, so in a way, they "inherit" the owner's access rights. For example, files attached to a contract can be viewed and edited only if the contract itself is available for viewing and editing. In such cases, the ObjectReadingAllowed or ObjectUpdateAllowed function is used in the access restriction text. To implement such dependence, specify the restriction as follows:
Restriction.Text =
"AllowRead
|WHERE
| ObjectReadingAllowed(FileOwner)
| ObjectUpdateAllowed(FileOwner)";Or, for example, for document journals:
Restriction.Text =
"AllowReadUpdate
|WHERE
| ObjectReadingAllowed(Ref)";Such dependences can be one-level or multi-level, when, for example, invoice documents inherit the rights of orders, and a document journal inherits the rights of invoices.
A single-level and simple dependence with no additional conditions ensures maximum performance: the built-in optimizer uses the FileOwner field in the #ForObject template (...). This eliminates the need to calculate access rights when writing dependent objects, since the owner data is used. The FileOwner field can also be of the flexible type. Using the AccessManagement.epf development tool, you can see whether the owner field is used for optimization.
All other dependences require additional resources to recalculate access rights:
- At all levels of the dependence chain except for the last one. For example, an invoice document inherits order rights, and a document journal inherits invoice rights. In this case, access rights will be recalculated for the invoice but not for the journal.
- If any additional condition is added to the restriction, for example, for other object fields.
Technically, the access rights for dependent objects are updated (recalculated) after the owner object is written in the background as a cascaded queue:
- First, when updating the owner access rights, it is planned to update the access rights of dependent objects (targeting where possible only affected dependent objects, but under some circumstances, bulk update of access rights is possible, for example, if the owner has numerous dependent objects).
- Second, when the administrator reconfigures rights in access groups, it is planned to update access rights of dependent objects broken down by tables (not by individual objects), which increases the load on the background update of access rights.
- Third, a cascaded queue of access right update appears: the rights of owners are updated first, the rights of dependent objects are updated afterwards. Because of this, access rights of dependent objects will be updated with a delay, longer than usual. Also, for old objects (by date), this delay is more significant than for recently entered data.
Therefore, we do not recommend that you create multi-level access right dependences unless it is practical.
In some cases, you can specify a dot-separated owner field to reduce the number of dependence levels. For example, the Files catalog inherits access rights from the owner by the FileOwner field, and the subordinate FilesVersions catalog inherits access rights from the Files catalog by the Owner field. In this case, for the FilesVersions catalog, you can specify the Owner.FilesOwner field. This will slightly reduce the RLS query performance due to the additional left join but it will help to avoid cascaded access right recalculation for subordinate items of the FilesVersions catalog. However, this strategy is not recommended if the Owner attribute is of the flexible type or if the Files catalog access rights are already dependent on another parent object. In the first case, there will be more than one additional left join due to the flexible type, and in the second case, such optimization will not decrease the volume of the cascaded recalculation of access rights.
Efficient Dependences When Using Other Tables in Access Restrictions
In object access restrictions, you can attach custom tables and also use dot syntax, for example ValueAllowed(Owner.Company). This is a convenient development strategy, but it causes a dependence on field value changes in other tables. The system will automatically track such changes and schedule background updates of access rights, which will cause additional load on the system.
The load extent depends on the frequency of changes in the field values of other tables used in the access restriction logic. There are enough cases when they are updated very rarely. For example, a company in a contract will probably never change and therefore there will be no need to recalculate access rights to documents related to contracts with companies. In this case, performance will not be affected. Only the queries checking the relevance of access keys (checking that the values in access keys match the values from other tables) will cause insignificant load.
If data in other tables is expected to be modified quite frequently, consider changing the data storage structure or access restriction requirements.
In any case, you do not need to copy attributes of owner objects to dependent metadata objects and implement their population and update logic manually only to achieve higher performance. The automatic update mechanism is multithreaded and generally more efficient than similar manual implementations.
Efficient Volume of Internal Data
The high speed of RLS queries is achieved as access rights to objects are pre-calculated, stored as internal data in the database, and retrieved by simple queries. Generally, its volume is approximately 2-10% of the entire database depending on the complexity of RLS, as well as data amount and content.
However, developing complex or non-efficient access restrictions can result in disproportionate increase in the internal data volume. It leads to a number of negative consequences:
- Longer update of access rights (almost linear dependence on the internal data volume).
- Slightly reduced performance of queries with RLS.
- Increased requirements for available hard drive space for the database and its backups.
For this reason, it is important to consider the amount of internal data created by the selected access restriction and try to use optimal options whenever possible.
- Number of access keys
Access keys are the items of theAccessKeyscatalog. They are created automatically to describe different unique combinations of access values. For example, when access to documents is restricted by companies and warehouses, combinations of companies and warehouses actually mentioned in these documents are included in the access key. Access keys are mapped to documents with the same company—warehouse combination based on the one-to-many relationship. User access rights are calculated for access keys and saved to internal registers.
The fewer the expected number of access keys per table is, the better access restrictions work. A relatively small number of access keys is from 100 to 1,000, an average number is from 1,000 to 3,000.
The number of keys can be estimated based on the following factors.- The number of unique values in a field, which is checked in access restriction. For example, if access to a document depends on the company specified in it, the number of access keys to the document does not exceed the number of all companies entered to the infobase.
- The number of fields involved in access restriction. For example, if a company and a partner are checked in access restriction for a document, the combination of the company and the partner access group is placed in the access key. The more combinations of companies and partner access groups are in the document, the more access keys are created.
- If a tabular section or another table is used, all the different combinations of used fields are placed in the respective table of the access key. For example, if a company and a partner are in the document table, all the different combinations of the company and partner access group will be included in the access key table. The more different sets of such combinations are in different documents, the more access keys are created.
- Using dot-separated fields (except for table fields) is equivalent to using a header field. It means a value is placed in the key header. If you attach a table by the reference field, the value will be placed in the key table, which does not increase the number of keys but increases the load on the key check. For this reason, it is better to use dot syntax than attach a table.
- When a user (or an external user) is checked, a reference to the user is saved in the access key. In this case, it is impossible to use groups to reduce the number of access keys. For example, if the responsible person is checked in the document, the number of access keys will not be fewer than the number of different responsible persons specified in all documents.
Summary: - Using fewer checks significantly reduces the number of access keys.
- If you use access value groups when configuring rights in access groups instead of individual values (for example, partner access groups, product access groups instead of partners, or products), the number of access keys will be reduced by approximately 5-10 times.
- Using header attributes reduces the number of keys and makes the relevance check of access keys easier and faster.
- At the same time, using access checks by user (or external user) usually significantly increases the number of access keys, so use them only when it is really required.
Consider that the number of access keys depends on the application settings. Disabling unused restrictions by access kind in the application settings will also reduce the total number of access keys (for example, if you disable product access groups). This is effective when a universal application has numerous predefined access kinds and only a small number of them will be actually applied.
- Number of access rights records
When calculating user rights, the presence or absence of access rights is determined for each access key. This means that theAccessKey-Subjectlink is established, where access groups, access group sets, users, external users, user group sets and external user group sets can act as a subject. Technically, such link includes at least the right to read and is stored as a record in the internal register.
The number of links depends on the volume of data in the infobase, heterogeneity of data (greater heterogeneity increases the number of access keys), variety of access rights settings (the number of access groups and actually used sets of access groups), as well as the number of users. For example, there are 100,000 access keys and 5,000 users. Then in a situation when users have almost all access rights, there will be 500 million links that can be processed only by a very powerful server. For an average server, the approximate optimal number of such links is no more than 5 million, for a powerful server it can be up to 50 million. For small applications with a weak server, the optimal number of links is up to 0.5 million.
When developing access restrictions, it is not recommended that you use restrictions by users (external users) when not required, since access rights for such access keys are calculated for individual users, which significantly increases the number of access right records. - Number of register record groups
The link between access keys and data is stored in theAccessKeysForObjectsandAccessKeysForRegistersinternal information registers. In the standard mode, theAccessKeysForObjectsregister contains as many records as there are references in the database. Also, in the standard mode, theAccessKeysForRegistersinternal register must contain the number of records that is equal to the number of records in theAccessKeysForObjectsregister to quickly execute RLS queries and update access rights.
Unlike access keys for reference data, access keys for registers are generated and linked to data sets in a different way. Each time a register record set is written to theAccessKeysForRegistersinformation register, new combinations of basic field values are added, which directly or indirectly affects the register access restriction. More different combinations means more rows in theAccessKeysForRegistersregister. For example, access is restricted by the following register dimensions:Company,Department, dot-separatedItemsLocationAttributes.Partner,ItemsLocationAttributes.StorageLocation, andItemsLocationAttributes.Products. In this case, there are three basic fields whose value combinations divide register records into groups in terms of equal access:Company,Department, andItemsLocationAttributes.
For example, if there is only one basic field and there are few different values in it, for example, a field with a reference to theCompaniescatalog, there is nothing to worry about. However, if reference fields to documents are used in the register access restriction, numerous rows will be added to theAccessKeysForRegistersregister (probably, the same number as in the original register). That will significantly slow down RLS queries not only to this register but also to any other registers with RLS. In this case, you need to find another design solution or create a separate internal information registerAccessKeysToRegister<RegisterNameinstead of theAccessKeysForRegisterscommon register. In this case, large volume of internal data for one register with non-productive RLS will not reduce the performance of all other registers.
Restricting access to registers using the commonAccessKeysForRegistersinformation register can be considered efficient if the total number of rows in it is up to 10 million for an average server.
Load Testing
We recommend that you check the selected solution by load testing of the application. To assess the acceptability of additional delays from RLS, run the load testing when record-level access restriction is enabled and when it is disabled.
It is advisable to run load tests using the technology simulating multiuser work by selecting key operations and determining the number of operations per minute for one user as well as acceptable delays for key operations. As a result of testing, you will get an APDEX score for key operations according to the acceptable delay plan, which is easy to use to evaluate the application performance.
- The number of access update threads can sometimes significantly affect performance when there are numerous restrictions with dependent objects. Depending on the intensity of adding or changing leading objects that require access update for dependent objects when adding a targeted job for access update:
- For up to 10 per minute 2 threads are enough.
- For up to 50 per minute 5 threads are enough.
- For up to 100 per minute 10 threads are enough.
- For up to 250 per minute 20 threads are enough.
- If the processor clock frequency is low (2-2.5 GHz), the number of required threads may be 1.5-2 times more. If changes are frequent, it is better to use a processor with a high clock frequency of 4-5 GHz rather than increase the number of threads. Consider that after 40 threads further increase in performance through the thread number may be insufficient due to overall delays.
To configure regular load tests, you can use Test center in 1C:Corporate Tool Package application (in Russian).
Scheduling Sslimplementationcheck Report
Use the SSLImplementationCheck.erf report to regularly execute automatic checks and updates of the following:
- Template variants being used with their parameters in roles.
- Internal implementation of standard templates and their presence according to the actual use in roles.
- Type collections and auxiliary predefined items of the
MetadataObjectIDsandExtensionObjectIDscatalogs.
For this purpose, in the report, set a filter for checking in the Access management subsystem and the error correction mode marking all errors of the Access management subsystem. When correcting errors in roles, existing restrictions in SSL 2.0 format, for example:
#ByValues(… "Companies", "Company", ...)are not changed but wrapped with a mandatory standard condition:
#If &RecordLevelAccessRestrictionIsUniversal #Then
#ForObject(…)
#Else
#ByValues(… "Companies", "Company", ...)
#EndIfFor your information
- Auxiliary predefined items of the
MetadataObjectIDsandExtensionObjectIDscatalogs are used as the first parameter of theForRegistertemplate. They are accessed by name in the following format:<Catalog name>.<Full register name without the dot>. - Auxiliary predefined items of the
MetadataObjectIDsandExtensionObjectIDscatalogs can be deleted and created again. It means that they can have different internal IDs of 1C:Enterprise platform without consequences (data loss and performance issues). Redundant predefined items do not interfere with the correct operation of the configuration. - Do not use auxiliary predefined items in your code. Instead, use the
MetadataObjectIDfunction of theCommoncommon module. These auxiliary predefined items might no longer be supported in the future.
Checking Whether Templates and Access Restrictions Are the Same in Different Roles
The access restriction template must be the same in all roles. The access restriction for the same right of the same table must also be the same in all roles, if specified.
To compare templates and access restrictions manually, in Designer:
- Lock roles to be checked if the configuration is connected to a repository.
- At least temporarily set the Changes allowed w/o breaking support rule for the roles if they are supported by the vendor configuration.
- Open the All access restrictions window.
- If access restrictions are compared, stay on the Access restrictions tab. If templates are compared, click the Restriction Templates tab.
- Select two or more rows where you need to compare texts, and click Change current item (F2).
- When comparing access restrictions, the Access restriction window opens. When comparing templates, the Edit restriction template window opens.
- If the text in the opened window is blank, it does not match. If the text is not blank, it matches.
Note.
The Change current item (F2) button will be locked if at least one of the selected roles is unavailable for editing. The button might be available but not clickable if the configuration has the compatibility mode more than 8.3.12. Switch the compatibility mode to 8.3.12 for the time of template update, and then return it back.
To compare templates and access restrictions automatically:
- Close Designer (no need to close it for the file infobase).
- Start 1C:Enterprise, open the
SSLImplementationCheck.epfreport. - Set the Check subsystems deployment filter: select only Access management.
- Click Generate. The report shows all errors of the Access management subsystem, including differences in template texts.
Copying Access Restriction Templates on Development
To add a new access restriction using a template, copy the template from the EditAccessGroupMembers role to your role. To do that:
- Open the
EditAccessGroupMembersrole, click the Restriction Templates tab, select the template you want to copy, and copy its name from the cell to the clipboard. - Open your role, select the Restriction Templates tab, add a new row, and enter the name from the clipboard.
- Switch to the window of the
EditAccessGroupMembersrole, click Set the template text, select the entire template text in the Access restriction window, and copy it to the clipboard. - Switch to the window of your role, click Set the template text, insert text from the clipboard into the Access restriction window.
Note.
You need to copy the template text to the clipboard only from the separate window of setting or changing the template text and not from a cell of the templates list, otherwise, non-printable characters might be changed and the texts will not match exactly. Similarly for the restriction text.
Updating Access Restriction Templates in Roles
When changing access restriction templates supplied in the EditAccessGroupMembers role (ForObject, ForRegister, ByValues, BySetsOfValues, ByValuesExtended, and ByValuesAndSetsAdvanced), you need to update them in all configuration roles without exception (including libraries).
If the configuration is connected to a repository, you need to lock all roles. In Designer, in the Configuration repository window, you can bulk select roles by pressing Shift+PageDown and lock them once.
If the configuration is supported by libraries, you need to set the Changes allowed w/o breaking support rule for all roles of all libraries. In Designer, in the Support options window, you can expand the Roles vertex, bulk select roles by pressing Shift+PageDown, and set the support rule once. When updating a library, set a rule for new library roles, replace all changed roles with the roles provided by the library, and then update the templates again.
To update access restriction templates manually, in Designer:
- Open the
EditAccessGroupMembersrole and click the Restriction Templates tab. Select the first template you want to update and click Set the template text. Select the entire template text in the Access restriction window and copy it to the clipboard. - Open the All access restrictions window and click the Restriction Templates tab. Click Filter and clear the check box of the
EditAccessGroupMembersrole. In the Name field, select the first template you want to update and click OK. Select all roles (CTL+A) and click Change current item (F2). The Edit restriction template window opens. Clear the Edit name check box, select the Edit text check box, insert the template text from the clipboard, and click OK. - Repeat the previous two steps for all templates you want to update.
Note.
- If the text in the Edit restriction template window is not blank, it matches the selected roles.
- The Change current item (F2) button will be locked if at least one of the selected roles is unavailable for editing. The button might be available but not clickable if the configuration has the compatibility mode more than 8.3.12. Switch the compatibility mode to 8.3.12 for the time of template update, and then return it back.
- You need to copy the template text to the clipboard only from the separate window of setting or changing the template text and not from a cell of the templates list, otherwise, non-printable characters might be changed and the texts will not match exactly. This will display an empty text for the selected template rows when opening the Edit restriction template window. The
SSLImplementationCheck.erfreport will find template discrepancies. Similarly for the restriction text.
To update access restriction templates automatically:
- Close Designer, start 1C:Enterprise, and open the
SSLImplementationCheck.epfreport. - Set the Check subsystems deployment filter: select only Access management.
- Set the Correct errors filter. Mark only two errors: Access management. Template is missing in the role or does not match the built-in template and Access management. Template is not used in the role.
- Generate the report and save it to be able to clarify what was corrected.
- Close 1C:Enterprise, open Designer, and compare changes in the main configuration with the database configuration. Make sure that there are no unnecessary changes and record the result (place the changes in the repository and update the database configuration).
Note.
The SSLImplementationCheck.epf report has the CheckImplementation function in the object module in the API area. This function allows you to automate update of templates and correction of other errors in the Access management subsystem.
Ensuring Performance of Batch Data Processing (Full Access User)
When the LimitAccessAtRecordLevelUniversally constant is enabled, then upon changing objects or record sets including the DataExchange.Load = True mode, access keys for objects or registers are updated, which is necessary to correctly check access rights for users without full rights. Usually, this increases processing time of an object or record set by 5–20 ms, which might be time-consuming when recording a lot of objects that do not use much memory. To reduce the time, disable access key update for the import period, and then enable it. 1C:Enterprise will plan the access key update for tables that were modified since the disabling. Thus, the total import time will be reduced, and access keys will be updated in the background. This is more effective if there are many objects as in the background access keys are updated in batch but not one by one. To disable the access key update, use the DisableAccessKeysUpdate procedure of the AccessManagement common module (see examples in the comment to the procedure).
Checking the Right Restriction Logic
A data access error occurs due to insufficient or excessive access to the infobase data. In general, such non-standard situations occur due to reasons listed below.
- The following errors might occur while setting up access rights:
- Users or user groups of an access group are set up incorrectly. Include users or user groups in access groups or exclude them from there.
- An access group profile is incorrect. Select another access group profile, create an additional profile, or edit the existing one.
- Access restrictions in the access group (lists of allowed values, for example: companies, partner groups, warehouses) are set up incorrectly. Add an access value to the access group or remove it from there.
- The following errors might occur while developing or customizing the configuration during deployment (within the purview of a configuration developer):
- A set of roles is set up incorrectly in a profile.
- A set of access kinds is set up incorrectly in a profile.
- Configuration developer errors:
- An error in standard template parameters.
- An error in the set of event subscription types.
- An error in access kind details.
- An error in the access restriction logic in the
OnFillAccessRestrictionprocedure. - An error in the procedure of access value set population (standard mode).
- Subsystem developer errors:
- An error in a standard template.
- An error due to DBMS operation peculiarities.
- An error in common subsystem modules.
When troubleshooting data access errors, check the following:
- If the role for reading data is not added to the profile but roles to operate other related objects are included, fields of these objects might show Reference is not found (… : …) instead of the data.
- In the standard mode, make sure that the Access value sets information register contains access value sets written so that sets with the same numbers for one object comply with the access restriction logic under the
ANDcondition, and sets with different numbers are arranged under theORcondition:- If the information register does not have any records about the object, the object will be unavailable for all users.
- If there are no sets for the object that relate to a particular access right, all users do not have the right to this object.
Developing Infobase Update Handlers
When developing the configuration, you can make changes that require update of the access restriction data. Standard situations when the update is required are listed below.
- Each time the infobase is updated, update handlers are executed in the
AccessManagementInternalmodule:- To update shared service data (embedding property caches) saved to the
ApplicationRuntimeParametersinformation register, call theUpdateAccessRestrictionParametersprocedure. The procedure updates common parameters, role rights, access right dependencies, details of built-in profiles, a set of predefined profiles, and details of possible rights for setting up object rights, for example:- When adding metadata objects (access to which can be restricted) and adding or changing roles, the
RolesRightsinformation register is updated, and a set of metadata objects, for which changes are made, is registered. - When changing details of built-in access group profiles, their changes are registered.
- When changing access right dependencies between metadata objects, their changes are registered.
- When adding metadata objects (access to which can be restricted) and adding or changing roles, the
- To update separated service data (different for each data area), call the
UpdateAuxiliaryRegisterDataByConfigurationChangesprocedure. TheAccessRestrictionParametersinformation register is also updated.
Keep in mind that you need to run the handlers to apply the listed changes (before the current development is checked). If only a restriction text is changed in the manager module, the subsystem will automatically update access restriction parameters when you attempt to change this object.
Generally, you need to increment the configuration version to perform the update. To restart the handlers, in theSubsystemsVersionsinformation register, decrement the version number.
Notice:
During development, we recommend using the
AuxiliaryDataUpdate.epfdata processor. It is included in the library distribution package. When saving development results that require Service Data Update to the storage, place a new configuration version in the storage for the infobase to be updated for all development areas. - To update shared service data (embedding property caches) saved to the
- Update of built-in access group profiles. If details of the built-in access group profiles are changed in the configuration, in the
OnFillSuppliedAccessGroupProfilesprocedure of theAccessManagementOverridablecommon module, no further actions are required. The built-in profiles will be updated automatically upon the infobase update. To manage the update, use properties in theParametersOfUpdateprocedure parameter. You can override property values. For more information, see the comment to the procedure. - Initial population when enabling record-level restrictions is required in the following cases:
- If access value groups are applied among access kinds, you need to populate access value groups.
- In the standard mode, if the configuration roles have access right restrictions that use access value sets.
For initial population, use one of the two methods: - Allow execution of the
DataFillingForAccessRestrictionscheduled job. Use this method to perform initial population of access value sets in batch in the background without interfering with the administrator's operations. However, for the changes to take effect and other users to be able to use the infobase, wait until the scheduled job completes all batches. - Call the
DataFillingForAccessRestrictionprocedure of theAccessManagementcommon module withDataVolume= 0.
Note
The operation of updating access value sets is commensurate with overwriting all documents, access to which is restricted at the record level. Therefore, the update process can take a long time in a large infobase. That is why it is advisable that you use the scheduled job instead. Enable it (it will be disabled automatically).
- Access update in the high-performance mode is executed automatically. You can check the update progress in the View record-level access update progress form (Administration – User and rights settings).
- In the standard mode, you need to update access value sets in the following cases:
- If access kinds that use access value groups are added to the configuration or the existing access kinds are modified to use access value groups, you need to update access value sets. To do this, use the method described in clause 3.
- If the algorithm of generating access value sets is changed for certain configuration metadata objects or right dependencies are changed, choose one of the two options:
- Overwrite access value sets using the
UpdateAccessValuesSetsprocedure of theAccessManagementcommon module. - Clear access value sets for the respective objects and populate them using the method described in clause 3.
- Overwrite access value sets using the
Setting Up Access Value Choice Forms
Sometimes, item choice forms work unconventionally. Selecting access values may require adding a filter or disabling a redundant one. To implement this logic, the IsAccessValueSelection parameter is passed to choice form parameters. The presence of this parameter can be used as a flag to implement additional logic.
"Access Rights Analysis" Report
The Access rights analysis report provides information about the access level of tables and reports. It can also show information about the tables used in a specific report. Tables used in some reports must be explicitly specified. In this case, information about the tables in the Access rights analysis report will be displayed correctly. For more information, see Report Options.
Data Exchange Setup
For distributed infobases (DIB) and standalone workstations, add to the exchange plans all the subsystem's metadata objects except for the following:
- Constant
AccessUpdateThreadsCount - Constant
LastAccessUpdate - Information register
UsersAccessKeysCurrentJobs
Exclude the following metadata objects from the exchange plans of distributed infobases (DIB) and standalone workstations that use filters by companies, departments, and other objects:
- Catalog
AccessKeys - Catalog
SetsOfAccessGroups - Information register
AccessKeysForObjects - Information register
AccessKeysForRegisters - Information registers
AccessKeysToRegister - Information register
AccessGroupsAccessKeys - Information register
AccessGroupSetsAccessKeys - Information register
UsersAccessKeys - Information register
ExternalUsersAccessKeys - Information register
DataAccessKeysUpdate - Information register
UsersAccessKeysUpdate
For distributed infobases, disable in the exchange plans change registration for the following subsystem's metadata objects (see Creation of Subordinate Node Initial Image):
- Constant
FirstAccessUpdateCompleted - Catalog
AccessKeys - Catalog
SetsOfAccessGroups - Information register
AccessKeysForObjects - Information register
AccessKeysForRegisters - Information registers
AccessKeysToRegister - Information register
AccessGroupsAccessKeys - Information register
AccessGroupSetsAccessKeys - Information register
UsersAccessKeys - Information register
ExternalUsersAccessKeys - Information register
DataAccessKeysUpdate - Information register
UsersAccessKeysUpdate - Information register
AccessRestrictionParameters - Information register
RolesRights - Information register
AccessRightsDependencies - Information register
UsedAccessKindsByTables - Information register
AccessGroupsTables - Information register
AccessValuesGroups - Information register
AccessGroupsValues - Information register
DefaultAccessGroupsValues
Exclude the following metadata objects from the exchange plans used for data synchronization between different applications:
- Constant
AccessUpdateThreadsCount - Constant
LastAccessUpdate - Catalog
AccessKeys - Catalog
SetsOfAccessGroups - Information register
AccessKeysForObjects - Information register
AccessKeysForRegisters - Information registers
AccessKeysToRegister - Information register
AccessGroupsAccessKeys - Information register
AccessGroupSetsAccessKeys - Information register
UsersAccessKeys - Information register
ExternalUsersAccessKeys - Information register
DataAccessKeysUpdate - Information register
UsersAccessKeysUpdate - Information register
UsersAccessKeysCurrentJobs - Information register
AccessRestrictionParameters - Information register
RolesRights - Information register
AccessRightsDependencies(standard mode) - Information register
UsedAccessKindsByTables - Information register
AccessGroupsTables - Information register
AccessValuesGroups - Information register
AccessGroupsValues - Information register
DefaultAccessGroupsValues
Totals and Aggregates
The Totals and aggregates subsystem provides administration tools for totals and aggregates of infobase registers. With this subsystem, you can perform standard administrative operations and make use of the following features:
- Toggle the usage of totals and aggregates.
- Split totals.
- Set totals period and recalculation.
- Rebuild and update aggregates.
- Calculate optimal aggregates.
Subsystem Setup
After you embed the subsystem in a configuration, set a schedule and select the Use check box for the following scheduled jobs:
UpdateAggregatesRebuildAggregatesTotalsPeriodSetup
Command Interface Setup
To use all features of the subsystem, add the TotalsAndAggregatesManagement data processor to the administrator's command interface.
User Access Setup
To manage user access to the subsystem, assign a user the roles specified in the table below.
| # | Role Description |
|---|---|
| 1. | FullAccess (the Core subsystem user role) Grants access to administer totals and aggregates (access to the data processor). |
How to Use the Subsystem in Development
No further actions are required when developing the configuration.
Data Exchange Setup
The subsystem does not participate in data exchange.
Data Exchange Setup
Do not add the subsystem's objects to exchange plans of distributed infobases and standalone workstations or to exchange plans used for data synchronization between different applications. The subsystem can operate only in one node. So, subsystem data in different nodes must be stored independently.
Source Document Tracking
With the Source document tracking subsystem, you can track states of printed source documents. For example, when a document was printed, handed over to a customer, and the signed original is expected back. Arbitrary configuration documents, incoming, outgoing, and bilateral source documents can be applied in the subsystem. Each document in the information system can have multiple print forms.
A common document journal (document registry) must be present or created in the configuration before the subsystem can be used. As an example, see _DemoDocumentsRegistry.
Subsystem Setup
Command Interface Setup
If the configuration does not contain the Application settings subsystem, add the following metadata objects to the administrator's command interface:
- Constant
UseSourceDocumentsOriginalsRecordingto enable and disable the subsystem. - Catalog
SourceDocumentsOriginalsStatesto set up used states of originals.
As an example, see the PrintFormsReportsAndDataProcessors form of the SSLAdministrationPanel data processor.
If you plan to create a separate workspace, define the required command interface sections and add the SourceDocumentsOriginalsRecordingJournal common command to them. It is recommended that you select all sections that support document operations.
Defining Documents
Select documents whose originals need to be tracked. For example, documents related to sales and purchases of services and goods, sale and purchase adjustments, processing documents. These documents must also be included in the document registry. See an example of selected documents in the Ref dimension of the _DemoDocumentsRegistry information register.
Then specify documents that supply source document originals in the ObjectWithSourceDocumentsOriginalsAccounting type collection.
Define the list forms to host the commands for recording source document originals in the OnDefineObjectsWithOriginalsAccountingCommands procedure of the SourceDocumentsOriginalsRecordingOverridable common module. Example:
Procedure OnDefineObjectsWithOriginalsAccountingCommands(ListOfObjects) Export
ListOfObjects.Add("Document._DemoGoodsSales.Form.ListForm");
ListOfObjects.Add("Document._DemoInventoryTransfer.Form.ListForm");
ListOfObjects.Add("DataProcessor._DemoSourceDocumentsOriginalsRecordingJournal.Form.DocumentsList");
EndProcedureThe subsystem can track states of source documents for certain print forms. To do this, select the document print forms whose originals need to be tracked. For example, the "Leave" document can have four print forms, but only one of them requires an employee signature. That is, only its state needs to be tracked.
After that, list the documents that supply source document originals and print forms that require tracking in the FillInTheOriginalAccountingTable procedure of the SourceDocumentsOriginalsRecordingOverridable module. Example:
Procedure FillInTheOriginalAccountingTable(AccountingTableForOriginals) Export
NewRow = AccountingTableForOriginals.Add();
NewRow.MetadataObject = Metadata.Documents._DemoGoodsSales;
NewRow.Id = "ExpenseToPrint";
EndProcedureConsider that if a document is attached to the Source document tracking subsystem and in this overridable procedure:
· You do not specify anything for this document, then states of all print forms will be tracked.
· You specify print forms, then only states of these print forms will be tracked.
You can also track the states of "multi-employee" documents. As an example, see the _DemoEmployeesLeaves document. In the "Order on granting leave to employees (T-6a)" print form, signatures of several employees are required (they are stored in the document table). So, the states of such documents are tracked broken down by employees.
To include such documents in the tracking of originals, specify the required catalogs in the Employee type collection. Generally, these are Individuals and Employees catalogs. Select documents that require signatures of several employees. Specify the documents and the table with the list of employees in the WhenDeterminingMultiEmployeeDocuments procedure of the SourceDocumentsOriginalsRecordingOverridable common module. Example:
Procedure WhenDeterminingMultiEmployeeDocuments(ListOfObjects) Export
ListOfObjects.Insert(Metadata.Documents._DemoEmployeesLeaves.FullName(),"Employees_");
EndProcedureConsider that if a document is attached to the Source document tracking subsystem and in this overridable procedure:
· You do not specify such document, then the states will be tracked broken down by print forms as before.
· You specify the document and the table, then the states will be tracked for the document print forms broken down by employees.
Attaching Document Forms
To attach the document forms that need to display information about the current state of a source document original, in the forms of documents defined in the previous step, do the following:
-
In the
OnCreateAtServerprocedure (form event handler), insert a call as follows:// StandardSubsystems.SourceDocumentsOriginalsRecording SourceDocumentsOriginalsRecording.OnCreateAtServerDocumentForm(ThisObject, Item.<FormGroup>); // End StandardSubsystems.SourceDocumentsOriginalsRecordingwhere the second
Placementparameter is optional. It can be specified if theShouldDisplayButtonsOnDocumentFormproperty is disabled in theOnDefineSettingsprocedure of theSourceDocumentsOriginalsRecordingOverridablecommon module, to define the form group for displaying information about the current state of the original. If the parameter is not specified, the information is placed in the lower right corner of the form. -
In the
NotificationHandlerprocedure (form event handler), add the following code block:// StandardSubsystems.SourceDocumentsOriginalsRecording SourceDocumentsOriginalsRecordingClient.NotificationHandlerDocumentForm(EventName,ThisObject,Source); // End StandardSubsystems.SourceDocumentsOriginalsRecording -
Add the auxiliary procedure:
// StandardSubsystems.SourceDocumentsOriginalsRecording &AtClient Procedure Attachable_OriginalStateDecorationClick() SourceDocumentsOriginalsRecordingClient.OpenStateSelectionMenu(ThisObject); EndProcedure //End StandardSubsystems.SourceDocumentsOriginalsRecording
For examples of the subsystem integration and setup in object forms, see the _DemoInventoryTransfer and _DemoGoodsSales documents.
Attaching List Forms
To be able to display the current state of the original and attachable commands used for setting the state in object list forms, do the following:
- Attach the list form to the Attachable Commands subsystem.
- Add the following fields to the dynamic list query:
- Custom expression as follows:
NULLField name:
SourceDocumentOriginalState. - Custom expression as follows:
TRUEField name:
OverallState. - Custom expression as follows:
0Field name:
StateOriginalReceived.
- Custom expression as follows:
- In the form attributes, select the
Use alwayscheck box for theRef,OverallState, andSourceDocumentOriginalStatedynamic list columns. - In the
OnCreateAtServerform event handler, insert a call as follows:// StandardSubsystems.SourceDocumentsOriginalsRecording SourceDocumentsOriginalsRecording.OnCreateAtServerListForm(ThisObject, Items.<FormTable>, Items.<DynamicListColumn>); // End StandardSubsystems.SourceDocumentsOriginalsRecordingWhere the third
Placementparameter (optional) defines the dynamic list column before which the columns with data on the current state of the original will be placed. If the parameter is not specified, new columns will be placed at the end of the list. Example:// StandardSubsystems.SourceDocumentsOriginalsRecording SourceDocumentsOriginalsRecording.OnCreateAtServerListForm(ThisObject, Items.List, Items.Comment); // End StandardSubsystems.SourceDocumentsOriginalsRecording - In the
NotificationHandlerform event handler, add the following code block:// StandardSubsystems.SourceDocumentsOriginalsRecording SourceDocumentsOriginalsRecordingClient.NotificationHandlerListForm(EventName, ThisObject, Items.<FormTable>); // End StandardSubsystems.SourceDocumentsOriginalsRecording - In the
Selectionevent handler of the form table, add the following code block:// StandardSubsystems.SourceDocumentsOriginalsRecording SourceDocumentsOriginalsRecordingClient.ListSelection(Field.Name, ThisObject, Items.<FormTable>, StandardProcessing); // End StandardSubsystems.SourceDocumentsOriginalsRecording - In the
ListOnGetDataAtServerevent handler of the form table, add the following code block:// StandardSubsystems.SourceDocumentsOriginalsRecording SourceDocumentsOriginalsRecording.OnGetDataAtServer(Rows); // End StandardSubsystems.SourceDocumentsOriginalsRecording - Add auxiliary procedures:
// StandardSubsystems.SourceDocumentsOriginalsRecording &AtClient Procedure Attachable_UpdateOriginalStateCommands() UpdateOriginalStateCommands() EndProcedure &AtServer Procedure UpdateOriginalStateCommands() // Code from the OnCreateAtServer event handler of this form for attaching commands EndProcedure //End StandardSubsystems.SourceDocumentsOriginalsRecording Example: &AtServer Procedure UpdateOriginalStateCommands() AttachableCommands.OnCreateAtServer(ThisObject); EndProcedure- Optional. To optimize performance when opening the form, we recommend adding a submenu to the command bar:
- Name:
SetConfigureOriginalStateSubmenu. - Title: Original state.
- Type:
Submenu. - Representation:
Picture and text. - Picture:
SetSourceDocumentOriginalState..
And groups to display commands for setting the original state as follows: - Name:
SetOriginalReceivedGroup. - Type:
Submenu. - Representation:
Picture. - Picture:
SourceDocumentOriginalStateOriginalReceived.
- Name:
- Optional. To optimize performance when opening the form, we recommend adding a submenu to the command bar:
User Access Setup
To manage user access to the subsystem, assign a user the roles specified in the table below.
| # | Role Description |
|---|---|
| 1. | AddEditSourceDocumentsOriginalsStatesGrants the right to set up the list of life cycle states of a document original in the application. |
| 2. | SourceDocumentsOriginalsStatesChangeGrants the right to view and change current states of source document originals. |
| 3. | ReadSourceDocumentsOriginalsStatesGrants the right to view current states of source document originals. |
Additionally, you need to create auxiliary roles or re-use existing suitable roles to provide access to data.
| # | Auxiliary Role Description |
|---|---|
| 1. | <UseSourceDocumentsRecordingJournalDataProcessor>Grants the right to use the log of states of source document originals. |
The table below illustrates possible user groups and the roles they could be assigned with.
| # | User Group Description | Assigned Roles |
|---|---|---|
| 1. | Administrator |
|
| 2. | Designated person who can add states of originals to the States of source document originals catalog and change them. |
|
| 3. | User who is allowed to view and change the states of source document originals. |
|
| 4. | User who is only allowed to view the current states of source document originals. |
|
Special Cases of Integration
Switching the Command Interface Appearance for Primary Document Originals Tracking on Document Forms
On a document form, the command for switching states can be displayed either as buttons in the command bar or as a hyperlink (default). To display it as buttons, follow these steps:
-
Set the
ShouldDisplayButtonsOnDocumentFormproperty toTruein theOnDefineSettingsprocedure of theSourceDocumentsOriginalsRecordingOverridablecommon module:Procedure OnDefineSettings(Settings) Settings.ShouldDisplayButtonsOnDocumentForm = True; EndProcedure -
Add auxiliary procedures to the document form modules:
// StandardSubsystems.SourceDocumentsOriginalsRecording &AtClient Procedure Attachable_UpdateOriginalStateCommands() UpdateOriginalStateCommands(); EndProcedure &AtServer Procedure UpdateOriginalStateCommands() // Code from the OnCreateAtServer event handler of this form for attaching commands EndProcedure //End StandardSubsystems.SourceDocumentsOriginalsRecordingExample:
&AtServer Procedure UpdateOriginalStateCommands() AttachableCommands.OnCreateAtServer(ThisObject); EndProcedure -
Remove the
Attachable_OriginalStateDecorationClickprocedure from the document form modules.
Other Settings
Additional settings in the OnDefineSettings procedure of the SourceDocumentsOriginalsRecordingOverridable common module:
-
To disable the informational tooltip "The original state will be set based on print forms" in the Change original document state form, set the
ShouldDisplayHintInStatesChangeFormproperty toFalse(default isTrue). -
For list forms and document forms, you can specify the action for the hyperlink with the original document state: either show a dropdown menu with a list of original states or immediately open the Change Original Document State form to clarify the state based on print forms. This is controlled by the
ShouldOpenDropDownMenuFromHyperlinkproperty (default isTrue).
Integration with Other Subsystems
See How to Integrate "Source Document Tracking" Subsystem without "Attachable Commands" Subsystem
How to Use the Subsystem in Development
Developing a Workspace
Using the subsystem requires a special workspace in the form of a journal. The journal displays all infobase documents whose signed source document originals have been or have not been received and documents that have not been tracked yet. It also includes different filters and allows you to edit the source document state.
Main (SourceDocumentOriginalState, PrintForm, and so on) and additional (Counterparty, Company, IncomingNumber, DocumentNumber, Comment, DocumentDate, and so on) information records for the journal must be taken from the SourceDocumentsOriginalsStates information register and the common document registry (as an example, see _DemoDocumentsRegistry).
You can find the basis for the workspace development and a setup example in the _DemoSourceDocumentsOriginalsRecordingJournal data processor.
After the workspace is developed, to open the workspace, add the following code block to the OnOpenOriginalsAccountingJournalForm procedure of the SourceDocumentsOriginalsRecordingClientOverridable common module:
OpenForm("<WorkspaceForm>");As an example, see the SourceDocumentsOriginalsRecordingClientOverridable common module in the demo configuration.
Also, add a role to use this workspace (see the section on setting access rights).
If 1C:Peripheral Equipment Library is integrated into the configuration, you can quickly set the final original state in the workspace or in another custom journal using a barcode scanner.
To do this, describe the equipment connection functionality in the OnConnectBarcodeScanner procedure of the SourceDocumentsOriginalsRecordingClientOverridable common module. An implementation example for a standard connection via 1C:Peripheral Equipment Library:
EquipmentManagerClient.StartConnectingDevicesWhenYouOpenForm(Undefined, ThisForm, "BarcodeScanners");After that, in the default form of the subsystem workspace or in another custom journal:
- Add the following call to the
OnOpenform event handler:SourceDocumentsOriginalsRecordingClient.OnConnectBarcodeScanner(ThisObject); - Add the following code block to the
NotificationHandlerform event handler:// StandardSubsystems.SourceDocumentsOriginalsRecording SourceDocumentsOriginalsRecordingClient.ProcessBarcode(Parameter,EventName); // End StandardSubsystems.SourceDocumentsOriginalsRecording
See the subsystem API description in API documentation (in Russian) .
Data Exchange Setup
For distributed infobases (DIB) and standalone workstations, add to the exchange plans all the subsystem's metadata objects that contain data.
Monitoring Center
With the Monitoring center subsystem, you can collect impersonal statistics of application usage and settings. In the basic option, the subsystem collects information about technological dumps of the platform, the number of records in all tables of the infobase, as well as the values of functional options. You can add more collected parameters when integrating the configuration.
Subsystem Setup
In its basic form, the Monitoring center allows you to collect the following information:
- System information.
- Application usage statistics.
- Aggregated information on key operations if the Performance monitor subsystem is integrated.
System information:
ComputerName: "F27001CA71718F89FC74E2AA42ABD5DF"OSVersion: "version 6.1 Service Pack 1 (Build 7601)"AppVersion: "8.3.6.1848"ClientID: "1d77d7a0-3025-400f-9be0-3b5655bf2edf"RAM: "7876"Processor: "GenuineIntel Intel64 Family 6 Model 58 Stepping 9 3300 MHz"PlatformType: "Windows x86-64"CurrentLanguage: "English"CurrentLocaleCode: "en"CurrentSystemLanguage: "en"CurrentRunMode: "Managed application"SessionTimeZone: "Europe/Moscow"
The basic application usage statistics contains the number of records in metadata object tables:
- Exchange plan
- Catalog
- Document
- Document journal
- Enumeration
- Chart of characteristic types
- Chart of accounts
- Chart of calculation types
- Information register
- Accumulation register
- Accounting register
- Calculation register
- Business process
- Task
The basic statistics for configuration settings contains the value of functional options storing the value in a constant of the Boolean type.
If this statistics is not enough and it is required, for example, to analyze data filling by a certain flag, you need to generate the custom query text to collect statistics in the OnCollectConfigurationStatisticsParameters procedure of the MonitoringCenterOverridable common module.
Consider, for example, the Currencies catalog.

Procedure OnCollectConfigurationStatisticsParameters() Export
// Collect statistics on the exchange rate source of the Currencies catalog.
// The following records will be added to the ConfigurationStatistics information register:
//
// Catalog.Currencies.RateSource1 Count1
// Catalog.Currencies.RateSource2 Count2
// ...
MetadataNamesMap = New Map;
QueryText = "SELECT
| RateSource AS RateSource,
| COUNT(*) AS Count
|FROM
| Catalog.Currencies AS Currencies
|GROUP BY
| RateSource
|";
MetadataNamesMap.Insert("Catalog.Currencies", QueryText);
MonitoringCenter.WriteConfigurationStatistics(MetadataNamesMap);
EndProcedureNotice.
To protect confidential information, do not collect or transfer any data from the infobase or information about it, except for the following:
- Computer name hash.
- Operating system version.
- Application version.
- Client ID.
- RAM size.
- Central processor type.
- Platform type.
- Language settings.
- Current run mode.
- Time zone.
- Number of records in the infobase table.
- Number of records in the infobase table with grouping by dimension. A dimension grouping can include only flags containing a
BooleanorEnumsvalue or a predefined data value.
If you need to analyze the infobase statistics with grouping by dimension containing confidential information, you can use the dimension presentation hash as a flag.
The Monitoring center subsystem can also collect statistics on the configuration functionality usage, which is called business statistics. For example, you need to analyze information on the reports used with the CreateFromUserSettingsImmediately parameter and how frequently they are used. To register the business statistics, you need to find where this check is performed in the configuration on the server. Insert the required code in the OnCreateAtServer procedure of the ReportForm common form.
If ReportSettings.ReadCreateFromUserSettingsImmediatelyCheckBox Then
MonitoringCenter.WriteBusinessStatisticsOperation(ReportSettings.FullName + ".ReadCreateFromUserSettingsImmediatelyCheckBox", 1);
EndIf;Recommendation: for convenient viewing of business statistics, follow the operation naming order. For example, ConfigurationName.SubsystemName.OperationName or SubsystemName.OperationName.OperationProperty. Examples:
MonitoringCenter.CreatePackageToSend.ErrorStandardSubsystems.ConfigurationUpdate.Patches1.ManualPatchInstallation
Once the business statistics is aggregated, you get the following result.

Based on the obtained data, it can be concluded that during the period from 13:10:00 04/09/2015 to 13:29:59 04/09/2015 the _DemoTurnoverBalanceSheet report was opened with the CreateFromUserSettingsImmediately parameter four times, and the _DemoCustomerOrderStatuses report was opened with the CreateFromUserSettingsImmediately parameter five times.
The main difference between the business statistics registration and configuration usage statistics is that business statistics aggregates operations. Collecting configuration usage statistics slices the information, and the previous data is deleted.
The Monitoring center subsystem together with the Performance monitor subsystem can analyze and inform you on the TOP N worst performance operations that affect overall application performance (10 by default). Be careful when using this option. Performance monitor measurements are sent in aggregated form for the period of statistics collection, and the measurements themselves are not sent. The number of the worst performance operations is managed by the information receiving service. If necessary, all aggregated measurements for the period are collected.
User Access Setup
Roles used for the subsystem:
| # | Role Description |
|---|---|
| 1. | System administrator Agree/disagree to collect and send impersonal application statistics. Set up the data import service address. |
How to Use the Subsystem in Development
See the subsystem API description in the API documentation (in Russian).
Data Exchange Setup
Do not add subsystem metadata objects to exchange plans of distributed infobases (DIB) and standalone workstations or to exchange plans used for data synchronization between different applications as the monitoring is set up and operates differently for each node.
Message Templates
Use the Message templates subsystem to save time when creating emails and text messages from templates prepared in advance. In the text of message templates, you can define attributes that will be populated with data from the application documents or catalogs. The templates also support adding attachments, print forms and export files to an email.
The Message templates subsystem is used together with the Email Management, Text Messaging, and Business Interactions subsystems. If any of these subsystems is not integrated into the configuration, the respective functionality of email or text message templates is automatically hidden from the interface.
Subsystem Setup
To create message templates based on documents or catalogs:
- Select the types of such objects (define message template subjects). For example, you can select proforma invoice documents, the Counterparties or Employees catalogs, and so on.
- Specify the selected objects in the
Typeproperty of theMessageTemplateSubjecttype collection. Add the following procedures to manager modules of these objects and, if required, add their implementation logic:
// StandardSubsystems.MessageTemplates
// Called when preparing message templates. Overrides the list of attributes and attachments.
//
// Parameters:
// Attributes - See MessageTemplatesOverridable.OnPrepareMessageTemplate.Attributes
// Attachments - See MessageTemplatesOverridable.OnPrepareMessageTemplate.Attachments
// AdditionalParameters - Structure - Additional information about the message template.
//
Procedure OnPrepareMessageTemplate(Attributes, Attachments, AdditionalParameters) Export
EndProcedure
Called when creating a message from a template. Populates values in attributes and attachments.
//
// Parameters:
// Message - Structure:
// * AttributesValues - Map of KeyAndValue - List of template's attributes:
// ** Key - String - Template's attribute name.
// ** Value - String - Template's filling value.
// * CommonAttributesValues - Map of KeyAndValue - List of template's common attributes:
// ** Key - String - Template's attribute name.
// ** Value - String - Template's filling value.
// * Attachments - Map of KeyAndValue:
// ** Key - String - Template's attachment name.
// ** Value - BinaryData
// - String - Attachment binary data or its address in the temporary storage.
// MessageSubject - AnyRef - The reference to a data source object.
// AdditionalParameters - Structure - Additional information about the message template.
//
Procedure OnCreateMessage(Message, MessageSubject, AdditionalParameters) Export
EndProcedure
// Populates a text message recipient list (when generating a message from a template).
//
// Parameters:
// SMSMessageRecipients - ValueTable:
// * PhoneNumber - String - Recipient's phone number.
// * Presentation - String - Recipient's presentation.
// * Contact - Arbitrary - The contact this phone number belongs to.
// MessageSubject - AnyRef - The reference to a data source object.
// - Structure - Structure that describes template parameters:
// * SubjectOf - AnyRef - The reference to a data source object.
// * MessageKind - String - Message type: Email or SMSMessage.
// * ArbitraryParameters - Map - List of arbitrary parameters.
/ * SendImmediately - Boolean - Flag indicating whether the message must be sent immediately.
// * MessageParameters - Structure - Additional message parameters.
//
Procedure OnFillRecipientsPhonesInMessage(SMSMessageRecipients, MessageSubject) Export
EndProcedure
// Populates an email message recipient list (when generating a message from a template).
//
// Parameters:
// EmailRecipients - ValueTable - List of email recipients:
// * SendingOption - String - Messaging options: "Whom" (To), "Copy" (CC), "HiddenCopy" (BCC), and "ReplyTo".
// * Address - String - Recipient's email address.
// * Presentation - String - Recipient's presentation.
// * Contact - Arbitrary - The contact this email address belongs to.
// MessageSubject - AnyRef - The reference to a data source object.
// - Structure - Structure that describes template parameters:
// * SubjectOf - AnyRef - The reference to a data source object.
// * MessageKind - String - Message type: Email or SMSMessage.
// * ArbitraryParameters - Map - List of arbitrary parameters.
// * SendImmediately - Boolean - Flag indicating whether the message must be sent immediately.
// * MessageParameters - Structure - Additional message parameters.
// * ConvertHTMLForFormattedDocument - Boolean - Flag indicating whether the HTML text must be converted.
// Applicable to messages containing images.
// Required due to the specifics of image output in formatted documents.
// * Account - CatalogRef.EmailAccounts - Sender's email account.
//
Procedure OnFillRecipientsEmailsInMessage(EmailRecipients, MessageSubject) Export
EndProcedure
// End StandardSubsystems.MessageTemplatesIf the procedure code is left blank, subject attributes and print forms defined in it will be available in message templates. If a subject has contact information, the list of message recipients will be populated. Otherwise, it will be empty. See an example of implementation of these procedures in the _DemoIndividuals catalog.
- If the configuration includes the Attachable commands subsystem, use it to output sending commands. To do this, add the Attachable commands subsystem to all forms where you want to display sending commands. To optimize performance when opening the form, it is recommended that you add a submenu to the command bar to output sending commands as follows:
- Name:
SubmenuSend. - Title: Send.
- Type:
Submenu. - Representation:
Picture. - Picture:
SendMessage(standard picture).
Command Interface Setup
To use the subsystem, add the MessageTemplates catalog to the command interface of the person responsible for managing the message template list.
If the configuration does not include the Application Settings subsystem, add the MessageTemplates catalog and the UseMessageTemplates constant to the Administrator workspace to enable and disable the subsystem. As an example, see the Organizer form of the SSLAdministrationPanel data processor.
Special Cases of Integration
User Access Setup
To manage user access to the subsystem, assign a user the roles specified in the table below.
| # | Role Description |
|---|---|
| 1. | AddEditPersonalMessageTemplatesGrants the right to add and edit common and personal message templates. |
| 2. | AddEditMessageTemplatesGrants the right to manage common message templates. |
| 3. | ReadMessageTemplatesGrants the right to view message templates in the application. |
| 4. | FullAccess (the Core subsystem user role)Grants the right to enable and disable message templates and remove subsystem objects marked for deletion. |
The table below illustrates possible user groups and the roles they could be assigned with.
| # | User Group Description | Assigned Roles |
|---|---|---|
| 1. | Person responsible for the message template list |
|
How to Use the Subsystem in Development
By default, all message subject attributes are available in message templates, except for the attributes of the ValueStorage type and some standard attributes such as DeletionMark or IsFolder. There are also available fields of contact information, additional attributes, and information records. As email attachments, you can use print forms defined in the configuration, external print forms, and print forms from extensions. If a subject has contact information, the list of recipients will be populated from the fields with the "Email" contact information type for emails and from the fields with the "Phone" contact information type for text messages.
If standard tools are not enough when creating message templates, you can create your own attributes, print forms, and attachments.
-
Define required attributes and attachments in the
OnPrepareMessageTemplateprocedure:NewAttribute = Attributes.Add(); NewAttribute.Name = "CounterpartyState"; NewAttribute.Presentation = NStr("en = 'Counterparty state'"); NewAttribute.Type = New TypeDescription("String"); Map = Attachments.Add(); ButtonPicture.Name = "OfficeLocationMap'"; ButtonPicture.Presentation = NStr("en = Office location map'"); ButtonPicture.FileType = "jpg"; -
Fill in previously selected attributes and attachments in the
OnCreateMessageprocedure:Message.AttributesValues["CounterpartyState"] = VerificationOfCounterparties.CounterpartyState(MessageSubject.TIN, MessageSubject.CRTR); PictureURLToTempStorage = LocationMapOffice(); Message.Attachments["OfficeLocationMap"] = PictureURLToTempStorage; -
If a subject does not have contact information or a special list of recipients is required, fill in the list of email or text message recipients either from the contact information of the subject attribute, or using your own algorithm. To do this, fill in message recipients in the manager module of the object being a message template subject in the
OnFillRecipientsPhonesInMessageandOnFillRecipientsEmailsInMessageprocedures:Procedure OnFillRecipientsEmailsInMessage(EmailRecipients, MessageSubject) Export MessageTemplates.FillRecipients(EmailRecipients, MessageSubject, "Counterparty"); Recipient = EmailRecipients.Add(); Recipient.Address = MessageSubject.EmailString; Recipient.Presentation = MessageSubject.EmailPresentation; EndProcedure Procedure OnFillRecipientsPhonesInMessage(SMSMessageRecipients, MessageSubject) Export MessageTemplates.FillRecipients(SMSMessageRecipients, MessageSubject, "Counterparty", Enums.ContactInformationTypes.Phone); EndProcedureAs an example, see the
_DemoCustomerProformaInvoicedocument and the_DemoCounterpartiescatalog.
If you need to define the list of attributes, attachments, or recipients for all or several message template subjects at once, add the code to the procedures of the same name in the MessageTemplatesOverridable common module.
Developing Message Template Subjects Not Attached to Configuration Objects
If you need to assign a message template subject that is not a configuration object, add the code to the OnDefineSettings procedure of the MessageTemplatesOverridable common module, for example:
SubjectOf = Settings.TemplatesSubjects.Add();
SubjectOf.Name = "CustomerNotificationChangeOrder";
SubjectOf.Presentation = NStr("en = '""Order update"" notification'");To be able to select the required template in the form, create an attribute with the CatalogRef.MessageTemplates type and specify filter parameters in the ChoiceParameters property of the form item (input field) associated with the attribute:
Filter.Purpose(String). Name or presentation of the created assignment.Filter.ForEmailsorFilter.ForSMSMessages(Boolean). Depends on the required message template type.
See an example of using such assignments in the _DemoSalesOrder document.
Adding Common Attributes of Message Template Subjects
Besides the attributes specific to a certain message template subject, you can also define common attributes for all subjects. For example, to make the Main company attribute available for selection in all message templates, describe the common attribute in the OnDefineSettings procedure in the MessageTemplatesOverridable common module:
NewAttribute = Settings.CommonAttributes.Rows.Add();
NewAttribute.Name = "MainCompany";
NewAttribute.Presentation = NStr("en = 'Main company'");
NewAttribute.Type = Type("CatalogRef._DemoCompanies");You can fill in common attributes in the OnCreateMessage procedure of the MessageTemplatesOverridable common module similarly to other attributes.
Sending Emails and Text Messages from Templates with an Additional Filter
For interactive sending of emails and text messages using templates, use the GenerateMessage procedure of the MessageTemplatesClient common module. With this procedure, you can also limit the choice list of available templates by specifying the subject or owner of templates.
For example, if email templates must be different depending not only on the selected company but also on its department, at first you must:
- Include the
Companiescatalog in theTypeproperty of theMessageTemplateSubjecttype collection. - Include the
Departmentscatalog in theTypeproperty of theMessageTemplateOwnertype collection.
After that, to send an email from the template, call:
MessageParameters = New Structure(...); // email parameters
MessageTemplatesClient.GenerateMessage(Organization, "MailMessage",, Department_Company, MessageParameters);For more information, see the comment to the GenerateMessage procedure of the MessageTemplatesClient common module and the item form of the _DemoProjects catalog.
Data Exchange Setup
For distributed infobases (DIB) and standalone workstations, add to the exchange plans all the subsystem's metadata objects that contain data.
Digital Signature
The Digital signature subsystem provides an application and user interface to work with the following cryptography tools: digital signature, digital signature verification, certificate verification, encryption, and decryption.
Subsystem Setup
In the personal user settings interface, display the command for opening the DigitalSignatureAndEncryptionSettings common form using the OpenDigitalSignatureAndEncryptionSettings procedure of the DigitalSignatureClient common module. As an example, see the _DemoMySettings common form in the demo configuration.
If the configuration does not contain the Application settings subsystem, add the UseDigitalSignature and UseEncryption constants and the command for opening the DigitalSignatureAndEncryptionSettings common form to the Administrator workspace using the OpenDigitalSignatureAndEncryptionSettings procedure of the DigitalSignatureClient common module. As an example, see the CommonSettings form of the SSLAdministrationPanel data processor.
To use reminders on getting a certificate after applying for it and about the certificate expiration, you can integrate the User reminders subsystem. Add the DigitalSignatureAndEncryptionKeysCertificates catalog to the ReminderSubject (reference) and ReminderSubjectObject (object) type collections.
You can integrate the To-do list subsystem to display expiring certificates and pending applications in the to-do list.
Setting Up Objects for Signing
Select configuration objects of a reference type (catalogs, documents, and so on) that can be signed. Specify them in the SignedObject type collection. In the objects, implement commands for signing and digital signature verification. Choose the location of these commands in the object forms.
In the selected metadata objects, add the attribute as follows:
| Attribute | Type | Tooltip |
|---|---|---|
SignedWithDS |
Boolean |
Indicates whether the file is digitally signed. |
For an example of the attribute setup, see the Files catalog of the demo configuration.
Add the UseDigitalSignature<LibraryName> functional option and include in it the metadata object attributes described above. As an example, see the _DemoUseDigitalSignaturesSSL functional option.
Implement the commands for signing and digital signature verification using export functions of the DigitalSignatureClient common module. As an example, see the Sign and Verify commands in the Files catalog item form.
Select configuration objects of a reference type (catalogs, documents, and so on) that can be encrypted. Specify them in the SignedObject type collection. In the objects, implement the encryption and decryption commands. Choose the location of these commands in the object forms.
In the selected metadata objects, add the attribute as follows:
| Attribute | Type | Tooltip |
|---|---|---|
Encrypted |
Boolean |
Indicates whether the file is encrypted. |
For an example of the attribute setup, see the Files catalog of the demo configuration.
Add the UseEncryption<LibraryName> functional option and include in it the metadata object attributes described above. As an example, see the _DemoUseEncryptionSSL functional option.
Implement the encryption and decryption commands using export functions of the DigitalSignatureClient common module. As an example, see the Encrypt and Decrypt commands in the Files catalog item form.
Displaying a Digital Signature Stamp in a Spreadsheet Document
You can add a digital signature mark (stamp) to a digitally signed spreadsheet document. The stamp contains information about the person who signed the document and about the digital signature certificate. To do this, use the DigitalSignatureVisualizationStamp function and the AddStampsToSpreadsheetDocument procedure in the API of the common module. In the simplest scenario, digital signature stamps are added to the end of the document but if this option is not suitable, you can define special areas in the template to display them:
- The size of such area must be two columns wide and seven rows high. Set an arbitrary column width for these rows, which differs from the width of the rest of the spreadsheet document.
- The area name can be set in the standard format:
DSStamp+ the signature sequence number starting from one, for example,DSStamp1. In this case, you can pass an array of stamps to be added to the selected areas in the specified order to theAddStampsToSpreadsheetDocumentprocedure.- As an example, see the
PF_MXL_OrderInvoicetemplate of the_DemoCustomerProformaInvoicedocument.
- As an example, see the
If the configuration contains the File Management subsystem, to print a document with digital signature stamps, you need to save a finished print form to attachments in the spreadsheet document format (mxl). After signing, execute the Print – With digital signature stamp command in the list of attachments. Signatures will be displayed either at the end of the document or in specially selected areas (if they are named in the standard format described above) in the order the document was signed.
User Access Setup
To manage user access to the subsystem, assign a user the roles specified in the table below.
| # | Role Description |
|---|---|
| 1. | BasicAccessSSL (the Core subsystem user role)Grants the right to view certificates, digital signature and encryption apps, and subsystem settings. Grants the right to verify signatures and digital signature key certificates. |
| 2. | AddEditDigitalSignatureAndEncryptionApplicationsGrants the right to add digital signature and encryption apps. |
| 3. | AddEditDigitalSignatureAndEncryptionKeyCertificatesGrants the right to add applications for certificate issue. Grants the right to add digital signature key certificates and manage certificate renewal notifications. |
| 4. | AddEditDigitalSignaturesGrants the right to sign, enhance signatures and edit some properties of the user's own certificates in the catalog and manage certificate renewal notifications. |
| 5. | RemoveDigitalSignaturesRemoves signatures added by other signers. |
| 6. | EncryptAndDecryptDataGrants the right to encrypt and decrypt data. |
| 7. | DataDecryptionGrants the right to decrypt data. |
| 8. | FullAccess (the Core subsystem user role)Grants the right to change all available properties of all certificates in the catalog. Grants the right to change the following administrative settings of the subsystem:
Grants the right to set up and control automatic signature enhancement. |
How to Use the Subsystem in Development
See the subsystem API description in the API documentation (in Russian).
The signature verification code is implemented locally since it depends on the applied characteristics of the object being signed. For an example of implementation, see the CheckEverything command in the Filescatalog item form in the demo configuration.
Data Exchange Setup
For distributed infobases (DIB) and standalone workstations, add to the exchange plans all the subsystem's metadata objects except for the following:
- Constant
LatestErrorsClassifierUpdateDate - Constant
CryptoErrorsClassifier - Constant
VerifyDigitalSignaturesOnTheServer - Constant
GenerateDigitalSignaturesAtServer - Information register
CertificateRevocationLists - Information register
PathsToDigitalSignatureAndEncryptionApplicationsOnLinuxServers
Special Cases of Integration
In this section, you can find special cases of subsystems integration. Generally, such cases arise due to interconnection between some subsystems. For example, integrating a subsystem may require setting up the peer subsystem. Or, if you integrate a subsystem without the peer one, you may need to cancel the setting previously configured in this peer subsystem.
Instructions for setting up subsystems in chapter 3 contain references to the instructions in this section. The instructions are given both for shared and separate integration depending on the default method of supplying subsystems from the library. For example, if subsystems are supplied being not connected with each other by default, this section provides instructions on setting up the connection. If you need to disconnect subsystems, perform reverse actions as per the instruction.
How to Integrate "Banks" Subsystem without "Contact Information" Subsystem
By default, the Banks subsystem uses the features of the Contact Information subsystem to specify the bank country. Therefore, when integrating the Banks subsystem without the Contact information subsystem, do the following:
- Enable editing of the
BankClassifiercatalog. - Set the
Countryattribute toString, 100, Variable length.
How to Integrate "Business Processes and Tasks" and "Access Management" Subsystems
By default, to restrict access to the Business Processes and Tasks subsystem data at the record level, features of the Access Management subsystem are used. When integrating the Business processes and tasks subsystem without the Access management subsystem, delete templates and access restriction texts that use the Access management subsystem features in the following roles:
AddEditJobsEditCompleteTaskReadJobs
If you integrate the Access management subsystem without the Business processes and tasks subsystem, upon initial integration and update, Designer will alert you that there are unresolved references due to missing metadata objects of the Business processes and tasks subsystem. In this case, in the Unresolved references window, click Continue.
How to Integrate "Report Options" Subsystem without "Access Management" Subsystem
By default, to restrict access to additional reports and data processors of the Report Options subsystem at the record level, features of the Access Management subsystem are used.
When integrating the Report options subsystem without the Access management subsystem, make the following changes to the configuration:
- For the
ReportOptionsSettingsinformation register, for theReadandUpdateaccess rights in theBasicAccessSSLandBasicAccessExternalUserSSLroles, set the restriction text:WHERE (User = &AuthorizedUser OR Variant.Author = &AuthorizedUser) - For the
ReportsOptionscatalog:- For the
Readaccess right in theBasicAccessSSL,BasicAccessExternalUserSSLandAddEditPersonalReportsOptionsroles, set the restriction text:WHERE (Custom = FALSE OR AuthorOnly = FALSE OR Author = &AuthorizedUser) - For the
InsertandUpdateaccess rights in theAddEditPersonalReportsOptionsrole, set the restriction text:WHERE Author = &AuthorizedUser
- For the
- For the
UserReportSettingscatalog:- For the
Read,UpdateandInsertaccess rights in theBasicAccessSSL,BasicAccessExternalUserSSLandAddEditPersonalReportsOptionsroles, set the restriction text:WHERE User = &AuthorizedUser
- For the
How to Integrate "Business Interactions" and "Access Management" Subsystems
By default, to restrict access to the Business Interactions subsystem objects at the record level, 1C:Enterprise uses features of the Access Management subsystem.
To populate sets of access values for the Business interactions subsystem documents, use the OnFillingAccessValuesSets procedure of the InteractionsOverridable common module. See an implementation example in the demo infobase.
When integrating the Business interactions subsystem without the Access management subsystem, delete access restriction templates and texts that use the Access management subsystem features in the following role:
AddEditInteractions
If you integrate or update the Access management subsystem without the Business interactions subsystem, Designer will alert you that there are unresolved references due to missing catalogs and documents of the Business interactions subsystem. In this case, in the Unresolved references window, click Continue.
How to Integrate "Business Interactions" Subsystem without "Digital Signature" Subsystem
By default, the Digital Signature subsystem extends the functionality of the Business Interactions subsystem. Therefore, when integrating the Business interactions subsystem without the Digital signature subsystem, you need to:
- Allow editing of the following catalogs:
MeetingAttachedFilesPlannedInteractionAttachedFilesSMSMessageAttachedFilesPhoneCallAttachedFilesIncomingEmailAttachedFilesOutgoingEmailAttachedFiles
- In the catalogs listed above:
- Delete the
EncryptedandSignedWithDSattributes. - Delete the
DeleteDigitalSignaturesandDeleteEncryptionCertificatestabular sections.
- Delete the
How to Integrate "Business Interactions" Subsystem without "Properties" Subsystem
By default, the Properties subsystem extends the functionality of the Business Interactions subsystem. Therefore, when integrating the Business interactions subsystem without the Properties subsystem, you need to:
- Allow editing of the
Meetingdocument:- Delete the
AdditionalAttributestabular section.
- Delete the
- Allow editing of the
PlannedInteractiondocument:- Delete the
AdditionalAttributestabular section.
- Delete the
- Allow editing of the
SMSMessagedocument:- Delete the
AdditionalAttributestabular section.
- Delete the
- Allow editing of the
PhoneCalldocument:- Delete the
AdditionalAttributestabular section.
- Delete the
- Allow editing of the
IncomingEmaildocument:- Delete the
AdditionalAttributestabular section.
- Delete the
- Allow editing of the
OutgoingEmaildocument:- Delete the
AdditionalAttributestabular section.
- Delete the
How to Integrate "Additional Reports and Data Processors" Subsystem without "Access Management" Subsystem
By default, to restrict access to additional reports and data processors of the Additional Reports and Data Processors subsystem at the record level, features of the Access Management subsystem are used.
When integrating the Additional reports and data processors subsystem without the Access management subsystem, make the following change to the configuration:
- In the
ReadAdditionalReportsAndDataProcessorsrole, delete the template and the access restriction text for theAdditionalReportsAndDataProcessorscatalog.
How to Integrate "Notes" Subsystem without "Access Management" Subsystem
By default, to restrict access to additional reports and data processors of the Notes subsystem at the record level, features of the Access Management subsystem are used.
When integrating the Notes subsystem without the Access management subsystem, make the following changes to the configuration:
- For the
Notescatalog, for theReadandUpdateaccess rights in theAddEditNotesrole, set the restriction text:WHERE Author = &AuthorizedUser
How to Integrate "Data Integrity" and "Access Management" Subsystems
By default, to restrict access to the Data Integrity subsystem data at the record level, features of the Access management subsystem are used. When integrating the Data integrity subsystem without the Access Management subsystem, make the following changes to the configuration:
- Delete the
AccessKeysToRegisterAccountingCheckResultsinformation register. - In the
ReadAccountingCheckResultsrole, delete templates and access restriction texts that use the Access management subsystem features.
If you integrate the Access management subsystem without the Data integrity subsystem, upon initial integration and update, Designer might alert you that there are unresolved references due to missing metadata objects of the Data integrity subsystem. In this case, in the Unresolved references window, click Continue.
How to Integrate "User Reminders" Subsystem without "Access Management" Subsystem
By default, to restrict access to the additional reports and data processors of the User Reminders subsystem at the record level, features of the Access Management subsystem are used.
When integrating the User reminders subsystem without the Access management subsystem, make the following changes to the configuration:
- For the
UserRemindersinformation register, for theReadandUpdateaccess rights in theAddEditNotificationsrole, set the restriction text:WHERE User = &AuthorizedUser
How to Integrate "Application Settings" Subsystem without "File Management" Subsystem
When integrating the Application Settings subsystem without the File Management subsystem, make the following changes to the configuration:
- In the
SSLAdministrationPaneldata processor, delete theFilesOperationSettingsform.
How to Integrate "Data Exchange" Subsystem without "Email Management" Subsystem
By default, the Email Management subsystem extends the functionality of the Data Exchange subsystem. If you integrate the Data exchange subsystem without the Email management subsystem, when comparing and merging configurations, in the window displaying references to the Email management subsystem objects, click Continue.
How to Integrate "Users" Subsystem without "Contact Information" Subsystem
By default, the Contact Information subsystem extends the functionality of the Users subsystem. Therefore, when integrating the Users subsystem without the Contact information subsystem, you need to:
- Allow editing of the
Userscatalog. - Open Characteristics and delete the row with the
ContactInformationtabular section. - Delete the
ContactInformationtabular section.
How to Integrate "Users" Subsystem without "Properties" Subsystem
By default, the Properties subsystem extends the functionality of the Users subsystem. Therefore, when integrating the Users subsystem without the Properties subsystem, you need to:
- Allow editing of the
Userscatalog.- Open Characteristics and delete two rows with characteristic types of the
AdditionalAttributesAndInfoSetscatalog. - Delete the
AdditionalAttributestabular section.
- Open Characteristics and delete two rows with characteristic types of the
- Allow editing of the
ExternalUserscatalog:- Open Characteristics and delete two rows with characteristic types of the
AdditionalAttributesAndInfoSetscatalog. - Delete the
AdditionalAttributestabular section.
- Open Characteristics and delete two rows with characteristic types of the
How to Integrate "Users" Subsystem without "Access Management" Subsystem
By default, to restrict access to the Users subsystem data at the record level, features of the Access Management subsystem are used.
When integrating the Users subsystem without the Access management subsystem, make the following changes to the configuration:
- For the
ExternalUserscatalog, for theReadandUpdateaccess rights in theBasicAccessExternalUserSSLrole, set the restriction text:WHERE Ref = &CurrentExternalUser - For the
ExternalUsersGroupscatalog, for theReadaccess right in theBasicAccessExternalUserSSLrole, set the restriction text:WHERE Ref = Value(Catalog.ExternalUsersGroups.AllExternalUsers) - For the
Userscatalog, for theUpdateaccess right in theBasicAccessSSLrole, set the restriction text:WHERE Ref = &CurrentUser
How to Integrate "Email Management" Subsystem without "Access Management" Subsystem
By default, to restrict access to the Email Management subsystem data at the record level, features of the Access Management subsystem are used.
When integrating the Email management subsystem without the Access management subsystem, make the following changes to the configuration:
- For the
EmailAccountscatalog, in theAddEditEmailAccountsrole:- For the
Readaccess right, set the restriction text:
WHERE AccountOwner = VALUE(Catalog.Users.EmptyRef) OR AccountOwner = &CurrentUser- For the
UpdateandInsertaccess rights, set the restriction text:WHERE AccountOwner = &CurrentUser
- For the
How to Integrate "File Management" and "Access Management" Subsystems
By default, to restrict access to the File Management subsystem objects at the record level, features of the Access Management subsystem are used.
When integrating the File management subsystem without the Access management subsystem, delete templates and access restriction texts that use the Access management subsystem features in the following roles:
AddEditFoldersAndFilesFilesSynchronizationSetup
If you integrate or update the Access management subsystem without the File management subsystem, Designer will alert you that there are unresolved references due to missing FilesFolders and Files catalogs. In this case, in the Unresolved references window, click Continue.
How to Integrate "File Management" Subsystem without "Properties" Subsystem
By default, the Properties subsystem extends the functionality of the File Management subsystem. Therefore, when integrating the File management subsystem without the Properties subsystem, you need to:
- Allow editing of the
Filescatalog:- Delete the
AdditionalAttributestabular section.
- Delete the
- Allow editing of the
FilesFolderscatalog.- Delete the
AdditionalAttributestabular section.
- Delete the
How to Integrate "Report Distribution" Subsystem without "Access Management" Subsystem
By default, to restrict access to the Report Distribution subsystem data at the record level, features of the Access Management subsystem are used.
When integrating the Report distribution subsystem without the Access management subsystem, make the following changes to the configuration:
- For the
ReportMailingscatalog, for theReadaccess right in theAddEditReportBulkEmailsrole, set the restriction text:WHERE Author = &AuthorizedUser OR Personal = FALSE OR IsFolder = TRUE OR AccountOwner = &AuthorizedUser - For the
UpdateandInsertaccess rights, set the restriction text:WHERE AccountOwner = &CurrentUser
How to Integrate "Properties" and "Access Management" Subsystems
By default, to restrict access to additional information of the Properties subsystem at the record level, features of the Access Management subsystem are used.
When integrating the Properties subsystem without the Access management subsystem, delete templates and access restriction texts that use the Access management subsystem features in the following roles:
BasicAccessSSLandBasicAccessExternalUserSSL(only for theAdditionalAttributesAndInfochart of characteristic types and theAdditionalInfoinformation register)EditAdditionalInfoReadAdditionalInfo
How to Integrate "Properties" Subsystem without "Business Interactions" Subsystem
When integrating the Properties subsystem without the Business interactions subsystem, change the configuration by deleting predefined items of the Sets of additional attributes and information records catalog:
Document_MeetingDocument_PlannedInteractionDocument_PhoneCallDocument_SMSMessageDocument_IncomingEmailDocument_OutgoingEmail
How to Integrate "Properties" Subsystem without "File Management" Subsystem
When integrating the Properties subsystem without the File management subsystem, change the configuration by deleting predefined items of the Sets of additional attributes and information records catalog:
Catalog_FilesFoldersCatalog_Files
How to Integrate "Message Templates" Subsystem without "File Management" Subsystem
By default, the File management subsystem extends the functionality of the Message templates subsystem. Therefore, when integrating the Message templates subsystem without the File management subsystem, you need to:
- Delete the
MessageTemplatesAttachedFilescatalog. - Delete the
OverrideAttachedFileRetrievedFormMessageTemplatesevent subscription.
How to Integrate "Access Management" Subsystem without Optional Subsystems
By default, to restrict access to subsystems at the record level, features of the Access Management subsystem are used.
When integrating the Access management subsystem, in roles, place templates required to implement access restrictions in different subsystems. When integrating subsystems partially, during the comparison and merging process, access restrictions are automatically removed from roles but access restriction templates involved in the restrictions remain untouched.
After integration, you need to update templates in all roles including library roles. Missing templates will be added, the redundant ones will be removed, and the obsolete ones will be updated.
For more information, see Updating Access Restriction Templates in Roles in section How to Use the Subsystem in Development of the Access Management subsystem documentation.
How to Integrate "Access Management" Subsystem without "Report Options" Subsystem
To display the Access rights analysis and Role rights reports, the Report options subsystem features are used by default.
When integrating the Access management subsystem without the Report options subsystem, make the following change to the configuration:
- Delete the
AccessRightsAnalysisandRolesRightsreports from the configuration metadata.
How to Integrate "Source Document Tracking" Subsystem without "Attachable Commands" Subsystem
To display commands in list forms, the Source Document Tracking subsystem uses the Attachable commands subsystem features by default. Therefore, when integrating the Source document tracking subsystem without the Attachable Commands subsystem, do the following:
-
Add the following auxiliary procedures to the list forms attached to the subsystem:
// StandardSubsystems.SourceDocumentsOriginalsRecording &AtClient Procedure Attachable_SetOriginalState(Command) SourceDocumentsOriginalsRecordingClient.SetOriginalState(Command.Name, ThisObject, Items.<FormTable>); EndProcedure // StandardSubsystems.SourceDocumentsOriginalsRecording &AtClient Procedure Attachable_UpdateOriginalStateCommands() UpdateOriginalStateCommands(); EndProcedure &AtServer Procedure UpdateOriginalStateCommands() SourceDocumentsOriginalsRecording.UpdateOriginalStateCommands(ThisObject,Items.<FormTable>); EndProcedure //End StandardSubsystems.SourceDocumentsOriginalsRecording
-
If the Display of Subsystem Commands as Buttons is enabled in document forms, then add the following auxiliary procedures to the form modules:
// StandardSubsystems.SourceDocumentsOriginalsRecording &AtClient Procedure Attachable_SetOriginalState(Command) SourceDocumentsOriginalsRecordingClient.SetOriginalState(Command.Name, ThisObject); EndProcedure // StandardSubsystems.SourceDocumentsOriginalsRecording &AtClient Procedure Attachable_UpdateOriginalStateCommands() UpdateOriginalStateCommands(); EndProcedure &AtServer Procedure UpdateOriginalStateCommands() EndProcedure //End StandardSubsystems.SourceDocumentsOriginalsRecording
Specifics of Object Development in Configuration Extensions
When developing configuration extensions, you can attach native configuration extension objects to the following library subsystems:
- Report options
- Print tools
- Attachable commands
Attaching native configuration extension objects to the rest of the integrated subsystems is not available or limited. This is because the configuration extension functionality implemented in 1C:Enterprise platform does not support creation of event subscriptions, business processes and tasks, extension of type collections, as well as extension of the AnyRef type. For more information, see Specifics and limitations for the configuration extension functionality in the 1C:Enterprise platform documentation. These restrictions are not permanent and can be revised in future platform versions.
For example, for an exchange plan from the configuration extension, the Data exchange subsystem features are unavailable. For a document or catalog, it is impossible to set up access restrictions using the Access management subsystem or to attach it to Object versioning. To remove these restrictions, add new objects to the configuration without using extensions.
Appendix 1. Data Exchange Message File Format
In this document, you'll find the format of the data exchange message file used by the Data Exchange subsystem of Standard Subsystems Library 1.2. Format version: 3.2.
Exchange messages allow you to exchange data between infobases and with third-party databases. You can transfer both reference-type data and register record sets. Besides data, exchange messages contain rules for data import.
Exchange message is an XML file in the UTF-8 encoding.
Terms
- Exchange message is an XML file that contains data structured according to the format, exported from the source infobase to be imported to the destination infobase.
- Source infobase is an infobase that serves as a source for exporting data to an exchange message.
- Destination infobase is an infobase into which the exchange message data is imported.
- Sender node is a predefined exchange plan item of a source infobase on whose behalf an exchange message is generated.
- Recipient node is an exchange plan item of a destination infobase for which an exchange message is intended.
- Interactive import is a process of importing data using the interactive import service of the Data exchange subsystem. When importing data interactively, you can preview data being imported and map infobase objects.
- Version conflict is an event that occurs upon data import, when the same object is changed in the source infobase and the destination infobase. To automatically resolve version conflicts, set import object priorities in the exchange rules.
- Data migration restriction filter is an auxiliary service of the Data exchange subsystem, which allows you to configure data migration restrictions for syncing configurations.
- Object mapping information is the information for mapping source infobase objects to destination infobase objects. This information is used to map the same object to different reference-type objects. If object mapping information is not used, it will cause duplicate objects in syncing infobases.
- Event handler is an arbitrary text in 1C:Enterprise language executed during data exchange. For more information on event handlers, see 1C:Data Conversion help (Help – Handler information).
Abbreviations
- OCR is an object conversion rule
- PCR is an object property conversion rule
- VCR is an object value conversion rule
- PGCR is a property group conversion rule
Note.
For more information, see 1C:Data Conversion help (Help – Getting started).
Data Types
To read the values stored in the exchange message file, the XMLValue() 1C:Enterprise global context method is used. To record these values, XMLString() is used. Value presentation in the file depends on the value type:
Stringis presented as a string.Boolean–Truevalue is presented as "true".Falseis presented as "false".Dateis represented as the dateTime type presentation of the XML schema.Numberis represented as the decimal type presentation of the XML schema.System enumeration valuestores a string presentation of the enumeration value name.UUIDstores a UUID string presentation.Refsare presented as a UUID string presentation.ValueStorageandBinaryDataare presented as a string in the base64 format.
Default Values
If the node attribute is optional, it can be omitted. If the node attribute is not specified, its default value is used. The default value depends on the attribute value type, unless otherwise specified:
Stringis an empty stringBooleanisFalseDateis an empty dateNumberis zero
File Header
The exchange message file header must contain file encoding details in UTF-8:
<?xml version="1.0" encoding="UTF-8"?>The following is a description of exchange message file nodes:
- Appendix 1. Data Exchange Message File Format
- Terms
- Abbreviations
- Data Types
- Default Values
- File Header
- ExchangeFile
ExchangeFile
The ExchangeFile node (required). Used once.
Details:
Exchange message root node. The exchange message must start from this node. It contains child nodes divided into message header nodes, mapping data nodes, and message data nodes.
Message header nodes contain auxiliary message data and are included in the file once. Mapping data nodes contain object mapping data and are included in the file multiple times. Message data nodes contain the data itself and are included in the file multiple times.
The sequence of child nodes is the following:
- Header (required)
- Mapping data (optional)
- Data (optional)
The sequence of header nodes is the following:
ExchangeRulesDataFromExchangeAlgorithmParameterValueAfterParameterExportAlgorithm
FormatVersion(required) –String. The exchange message format version.ExportDate(optional) –Date. The exchange message generation date.SourceConfigurationName(optional) –String. Source infobase configuration name.DestinationConfigurationName(optional) –String. Destination infobase configuration name.ConversionRulesID(optional) –UUID. UUID of conversion rules in 1C:Data Conversion. Used upon exchange rules update.Comment(optional) –String. An arbitrary comment to the data being exported.
Format:
<?xml version="1.0" encoding="UTF-8"?><ExchangeFile>
{ HEADER
<ExchangeRules>…</ExchangeRules>
<DataFromExchange>…</DataFromExchange>
<ParameterValue>…</ParameterValue>
<AfterParameterExportAlgorithm>…</AfterParameterExportAlgorithm>
HEADER }
{MAPPING DATA
<ObjectRegistrationInformation>…</ObjectRegistrationInformation>
<ObjectRegistrationDataAdjustment>…</ObjectRegistrationDataAdjustment>
MAPPING DATA}
{DATA
<Object>…</Object>
<RegisterRecordSet>…</RegisterRecordSet>
<ObjectDeletion>…</ObjectDeletion>
DATA }
</ExchangeFile>
Example:
<?xml version="1.0" encoding="UTF-8"?>
<ExchangeFile FormatVersion="3.0" ExportDate="2010-07-30T17:09:02" SourceConfigurationName="TradeManagement" DestinationConfigurationName="EnterpriseAccounting" ConversionRulesID="24451442-943d-4182-bc1b-42e04d1fdf33"
Comment="">
</ExchangeFile>DataFromExchange
The DataFromExchange node (required). Used once.
Details:
Contains information about an exchange plan for data import and exchange message handshake functionality.
Attributes:
ExchangePlan(required) –String. The name of an exchange plan as a configuration metadata object for which the exchange message is intended.Whom(required) –String. Exchange plan node code of a destination infobase for which the message is intended.FromWhom(required) –String. The predefined exchange plan node code of a source infobase on whose behalf the message is sent.OutgoingMessageNumber(required) –Number. Outgoing message number of a sender node.IncomingMessageNumber(required) –Number. The number of the last message in the sender node successfully received from the recipient node.DeleteChangeRecords(required) –Boolean. Indicates whether to delete change records on the recipient node when getting a message.
Format:
does not contain child nodes.
Example:
<DataFromExchange ExchangePlan="ExchangeTradeManagementEnterpriseAccounting" Whom="001" FromWhom="000"
OutgoingMessageNumber="32"
IncomingMessageNumber="31"
DeleteChangeRecords="true"/>Object
The Object node (optional). Used multiple times.
Details:
The node contains one import object. Any reference-type object can be an import object: a document, a catalog item, and so on. The node contains child nodes, which contain property values, parameter values, tables, and register record tables (for documents) of an import object.
The node is generated according to the rules in Abbreviations.
Attributes:
Type(required) –String. An object type string presentation. Used to get the object type by theType()function.RuleName(required) –String. Object conversion rule name. Used to identify an import object with a conversion rule (see theCodenode for the Rule node).Sn(optional) –Number. Sequence number of the object being exported. Used to debug the exchange process and cache data being exported. See an example of using the attribute to cache data being exported in the Sn node details section.Source(optional) –String. Custom object details to display in the data exchange log.ExchangeObjectPriority(optional) –String. Import object priority in case of a Terms. Valid values: "Above", "Below", and "Matches". By default, "Above". Matches the Abbreviations "Import object priority" parameter value.WriteMode(optional) –String. Document writing mode. Applied only to theDocumentobject type. Valid values: "Record" (to write a document), "Posting" (to write and post a document), and "UndoPosting" (to write a document and cancel posting). By default, "Record". Matches theWriteModeparameter value of the "Before export" Abbreviations Implementing Event Handlers of Managed and Ordinary Application Modules.PostingMode(optional) –String. Document posting mode. Applied only to theDocumentobject type. Valid values: "Regular" and "RealTime". By default, "Regular". Matches thePostingModeparameter value of the "Before export" Abbreviations Implementing Event Handlers of Managed and Ordinary Application Modules.
Format:
<Object>
<Ref>…</Ref>
<Property>…</Property>
<ParameterValue>…</ParameterValue>
<TabularSection>…</TabularSection>
<RecordSet>…</RecordSet>
</Object>
Example:
<Object Sn="24"
Type="CatalogRef.Products"
RuleName="Products">
<Ref>
<Property Name="{UUID}"
Type="String"
SourceType="CatalogRef.Products"
DestinationType="CatalogRef.Products">
<Value>bd72d927-55bc-11d9-848a-00112f43529a</Value>
</Property>
<Property Name="IsFolder" Type="Boolean">
<Value>false</Value>
</Property>
</Ref>
<Property Name="Code" Type="String">
<Value>00000000057</Value>
</Property>
<Property Name="Description" Type="String">
<Value>Food processor BINATONE FP 67</Value>
</Property>
<Property Name="Parent" Type="CatalogRef.Products">
<Ref>
<Property Name="{UUID}"
Type="String"
SourceType="CatalogRef.Products"
DestinationType="CatalogRef.Products">
<Value>bd72d925-55bc-11d9-848a-00112f43529a</Value>
</Property>
<Property Name="IsFolder" Type="Boolean">
<Value>true</Value>
</Property>
</Ref>
</Property>
<Property Name="DescriptionFull" Type="String">
<Value>Food processor BINATONE FP 67</Value>
</Property>
<Property Name="VATRate" Type="EnumRef.VATRates">
<Value>VAT18</Value>
</Property>
<Property Name="OperationService" Type="Boolean">
<Value>false</Value>
</Property>
</Object>Ref
The Ref node (optional). Used once at the beginning of the Object parent node.
Details:
Contains property and parameter values to identify (search) an import object in the destination infobase. The node can contain Property.
The IsFolder property for hierarchical catalog items must be in the Ref node.
Properties in the node are called search properties.
Attributes:
Sn(optional) –Number. Number of the reference (object) being exported in the file in the export sequence. Used to debug the exchange process and cache data being exported. See an example of using the attribute to cache data being exported in the Sn node details section.RecordObjectChangeAtSenderNode(optional) –Boolean. Indicates whether an object needs to be recorded for export for a originating node (sending an object back). Matches theRecordObjectChangeAtSenderNodeparameter value of the "Before export" Abbreviations Implementing Event Handlers of Managed and Ordinary Application Modules.DontCreateIfNotFound(optional) –Boolean. New objects cannot be created. Used to update existing objects only. IfTrue, only the existing object in the destination infobase will be updated. Matches the Abbreviations "Do not create a new object in the destination infobase if it is NOT found" parameter value.ExchangeObjectPriority(optional) –String. Import object priority in case of a version conflict. Valid values: "Above", "Below", and "Matches". By default, "Above". Matches the Abbreviations "Import object priority" parameter value.ContinueSearch(optional) –Boolean. Defines the search mode for an object if it is not found by the reference UUID. IfTrue, the object search is continued by search fields and the search algorithm (if specified). IfFalse, no further search.
The attribute is used only if the object in the destination infobase is searched by the reference UUID and the node includes the{UUID}property. It is recommended that you use the attribute only for classifier catalogs.
Format:
<Ref>
<Property>…</Property>
<ParameterValue>…</ParameterValue>
</Ref>
Example:
<Ref>
<Property Name="{UUID}"
Type="String"
SourceType="CatalogRef.Products"
DestinationType="CatalogRef.Products">
<Value>bd72d927-55bc-11d9-848a-00112f43529a</Value>
</Property>
<Property Name="IsFolder" Type="Boolean">
<Value>false</Value>
</Property>
</Ref>Property
The Property node (optional). Used multiple times.
Details:
Contains import object property value. Property value can be a primitive type value; the Ref child node for a reference-type property; a reference sequence number (Sn) in the exchange message file if the reference was exported earlier; an arbitrary expression; an empty value.
The node is generated according to the rules in Abbreviations.
There are three types of Properties nodes:
- Object properties
- Extra dimension properties
- Internal properties
Object properties are used to transfer data directly to the object properties in the destination infobase. In this case, the Name attribute matches the object property name in the destination infobase as it is specified in 1C:Designer.
Extra dimension properties are used to pass values of extra dimension Dr and extra dimension Cr in document register records. The Name attribute can have only two values:
- Attribute
Name= Key - Attribute
Name= Value
Extra dimension properties are only used for the Record node.
Internal properties are used to identify reference objects being imported in the destination infobase. Names of internal properties are enclosed in braces "{" and "}".
Internal properties can have the following names:
- Attribute
Name= {UUID} - Attribute
Name= {PredefinedItemName1}
Notice.
Internal properties can be used only for the Ref node.
Note
The IsFolder property for hierarchical catalog items must be in the Ref node.
Attributes:
Name(required) –String. Object property name in the destination infobase as specified in 1C:Designer. For extra dimension properties the attribute can have only two values: "Key" and "Value".Type(required) –String. A property type string presentation.OCRName(optional) –String. The name of the Abbreviations used for property value conversion. Set the attribute only if a search algorithm is used to identify the property value. You can set a search algorithm in the "Search fields" Abbreviations Implementing Event Handlers of Managed and Ordinary Application Modules.DontReplace(optional) –Boolean. IfTrue, the object property value will not be changed if the object is found in the destination infobase. Matches the Abbreviations "Do not replace property value of existing objects in the destination infobase" parameter value.SearchByEqualDate(optional) –Boolean. Indicates whether documents are searched according to the specified date. If the attribute is not set, documents are searched within the specified numbering periodicity. You can use it only if theNameattribute is equal to theDatevalue. Matches the Abbreviations "Search by equal date" parameter value.
Attributes for the {UUID} internal property:
SourceType(required) –String. String presentation of an object type in the source infobase.DestinationType(required) –String. String presentation of an object type in the destination infobase.
Format:
<Property>
<Value>…</Value>
<Ref>…</Ref>
<Sn>…</Sn>
<Expression>…</Expression>
<Empty>…</Empty>
</Property>
Example:
<Property Name="OperationKind" Type="EnumRef.TransactionsKindsGoodsServicesReceipt">
<Value>PurchaseCommission</Value>
</Property>Value
The Value node (optional). Used once.
Details:
Contains a property value in a string presentation.
Attributes:
Property(optional) –String. Property name used to search for an object by the value passed in the node.
Format:
<Value>XMLLine</Value>
XMLLine – String containing a value string presentation.
Example:
<Value>VAT18</Value>Sn
The Sn node (optional). Used once.
Details:
Contains the sequence number of an object previously exported to the message file.
Used to optimize the data import process. It is useful if an object is exported to the exchange message multiple times. In this case, information about this object is exported to the file only once. After that, the object sequence number in the exchange message is used.
Example:
Here is a snippet of an exchange message with two objects. The first object is the Products catalog group "Materials and components". The item sequence number in the exchange message is 1. The second object is the Products catalog item "Compressor" located in the "Materials and components" folder. The item sequence number in the exchange message is 2. The Sn node is used as the Parent property for the second object to refer to the previously exported object with sequence number 1. As a result, the catalog group is exported to the exchange message only once.
<Object Sn="1"
Type="CatalogRef.Products"
RuleName="Products">
<Ref Sn="1">
<Property Name="{UUID}">
<Value>213d87ae-33d5-11de-b58f-00055d80a2b9</Value>
</Property>
<Property Name="Description">
<Value>Materials and components</Value>
</Property>
<Property Name="Parent"/>
<Property Name="IsFolder">
<Value>true</Value>
</Property>
</Ref>
<Property Name="DeletionMark">
<Value>false</Value>
</Property>
</Object>
<Object Sn="2"
Type="CatalogRef.Products"
RuleName="Products">
<Ref Sn="2">
<Property Name="{UUID}">
<Value>213d87ae-44d5-11de-b58f-00055d81a2b0</Value>
</Property>
<Property Name="Description">
<Value>Compressor</Value>
</Property>
<Property Name="Parent">
<Sn>1</Sn>
</Property>
<Property Name="IsFolder">
<Value>false</Value>
</Property>
</Ref>
<Property Name="DeletionMark">
<Value>false</Value>
</Property>
</Object>Attributes:
no
Format:
<Sn>XMLLine</Sn>
XMLLine – String containing a value (number) string presentation.
Example:
<Sn>122</Sn>Expression
The Expression node (optional). Used once.
Details:
Contains an expression to be calculated to get the property value. The value is calculated using the Eval() platform method.
Attributes:
no
Format:
<Expression>XMLLine</Expression>
XMLLine – String containing a value string presentation.
Empty
The Empty node (optional). Used once.
Details:
Used to indicate that an object property value is an empty value of the specified type.
Attributes:
no
Format:
<Empty>…</Empty>
Example:
<Empty></>ParameterValue (for Object)
The ParameterValue node (optional). Used multiple times.
Details:
Contains a custom parameter value for the import object. The same values as in the Property node can be passed in the object parameter.
Object parameters are available in the After import handler of exchange rules as the ObjectParameters variable. For more information, see the "After import" OCR handler details in 1C:Data Conversion.
Object parameters are used to pass custom service data.
The node is generated according to the rules in Abbreviations.
Attributes:
Name(required) –String. Object property name in the destination infobase as specified in 1C:Designer.Type(required) –String. A property type string presentation.
Format:
<ParameterValue>
<Value>…</Value>
<Ref>…</Ref>
<Sn>…</Sn>
<Expression>…</Expression>
<Empty>…</Empty>
</ParameterValue>
Example:
<ParameterValue Name="DescriptionFull" Type="String">
<Value>Cuban cigars, 20 pcs.</Value>
</ParameterValue>TabularSection
The TabularSection node (optional). Used multiple times.
Details:
Contains table data of the import object. The node is generated according to the rules in Abbreviations.
Attributes:
Name(required) –String. Object table name in the destination infobase as specified in 1C:Designer.DontReplace(optional) –Boolean. IfTrue, the object table will not be replaced if the object is found in the destination infobase. Matches the Abbreviations "Do not replace property value of existing infobase objects" parameter value.
Format:
<TabularSection>
<Record>…</Record>
</TabularSection>
Example:
<TabularSection Name="Goods">
<Record>
<Property Name="Price" Type="Number">
<Value>26</Value>
</Property>
<Property Name="Sum" Type="Number">
<Value>10400</Value>
</Property>
<Property Name="VATRate" Type="EnumRef.VATRates">
<Value>VAT18</Value>
</Property>
<Property Name="VATAmount" Type="Number">
<Value>1586.44</Value>
</Property>
</Record>
<Record>
<Property Name="Price" Type="Number">
<Value>35</Value>
</Property>
<Property Name="Sum" Type="Number">
<Value>350</Value>
</Property>
<Property Name="VATRate" Type="EnumRef.VATRates">
<Value>EXCLUDINGVAT</Value>
</Property>
<Property Name="VATAmount" Type="Number">
<Value>0</Value>
</Property>
</Record>
</TabularSection>Record
The Record node (optional). Used multiple times.
Details:
Contains data of one table row or document register record. The node is generated according to the rules in Abbreviations.
Attributes:
no
Format:
<Record>
<Property>…</Property>
<ParameterValue>…</ParameterValue>
<ExtDimensionDr>…</ExtDimensionDr>
<ExtDimensionCr>…</ExtDimensionCr>
</Record> Note.
The Extdimensiondr and Extdimensioncr child nodes are used only to pass extra dimension values of document register records.
Example:
<Record>
<Property Name="Price" Type="Number">
<Value>26</Value>
</Property>
<Property Name="Sum" Type="Number">
<Value>10400</Value>
</Property>
<Property Name="VATRate" Type="EnumRef.VATRates">
<Value>VAT18</Value>
</Property>
<Property Name="VATAmount" Type="Number">
<Value>1586.44</Value>
</Property>
</Record>Extdimensiondr
The ExtDimensionDr node (optional). Used multiple times.
Details:
Contains a record extra dimension Dr value of a document register record set. The node consists of two child Property. One of the properties contains the value of the record key, and the other one contains the value of the extra dimension. The node is generated according to the rules in Abbreviations.
Attributes:
no
Format:
<ExtDimensionDr>
<Property>…</Property>
<Property>…</Property>
</ExtDimensionDr>
Extdimensioncr
The ExtDimensionCr node (optional). Used multiple times.
Details:
Contains a record extra dimension Cr value of a document register record set. The node consists of two child Property. One of the properties contains the value of the record key, and the other one contains the value of the extra dimension. The node is generated according to the rules in Abbreviations.
Attributes:
no
Format:
<ExtDimensionCr>
<Property>…</Property>
<Property>…</Property>
</ExtDimensionCr>
RecordSet
The RecordSet node (optional). Used multiple times.
Details:
Contains document register record data. The node is generated according to the rules in Abbreviations.
Attributes:
Name(required) –String. Name of the object register record table in the destination infobase as specified in 1C:Designer.DontReplace(optional) –Boolean. IfTrue, the object register records will not be replaced if the object is found upon import. Matches the Abbreviations "Do not replace property value of existing infobase objects" parameter value.DontClear(optional) –Boolean. IfTrue, the existing records of the object register record set will not be cleared. Matches the DontClear parameter value of the "Before processing" Abbreviations Implementing Event Handlers of Managed and Ordinary Application Modules.
Format:
<RecordSet>
<Record>…</Record>
</RecordSet>
RegisterRecordSet
The RegisterRecordSet node (optional). Used multiple times.
Details:
Contains one import object. The information register record set acts as an import object. The node contains child nodes that include filter values and rows of the information register record set.
The node is generated according to the rules in Abbreviations.
Attributes:
Type(required) –String. An object type string presentation. Used to get the object type by theType()function.RuleName(required) –String. Object conversion rule name.Sn(optional) –Number. Sequence number of the object being exported. Used to debug the exchange process and cache data being exported. See an example of using the attribute to cache data being exported in the Sn node details section.ExchangeObjectPriority(optional) –String. Import object priority in case of a version conflict. Valid values: "Above", "Below", and "Matches". By default, "Above". Matches the Abbreviations "Import object priority" parameter value.BlankSet(optional) –Boolean. Indicates whether the object being imported contains an empty register record set. IfTrue, new objects are not created from the register filter values.
Format:
<RegisterRecordSet>
<Filter>…</Filter>
<RecordSetRows>…</RecordSetRows>
</RegisterRecordSet>
Example:
<RegisterRecordSet Sn="34" Type="InformationRegisterRecordSet.ExchangeRates" RuleName="ExchangeRates">
<Filter>
<Property Name="Currency" Type="CatalogRef.Currencies">
<Ref>
<Property Name="Code" Type="String">
<Value>036</Value>
</Property>
</Ref>
</Property>
</Filter>
<RecordSetRows>
<Object>
<Property Name="Currency" Type="CatalogRef.Currencies">
<Ref>
<Property Name="Code" Type="String">
<Value>036</Value>
</Property>
</Ref>
</Property>
<Property Name="Repetition" Type="Number">
<Value>1</Value>
</Property>
<Property Name="Rate" Type="Number">
<Value>1</Value>
</Property>
</Object>
</RecordSetRows>
</RegisterRecordSet>Filter
The Filter node (optional). Used once.
Details:
Contains filter property values of the information register record set.
Attributes:
no
Format:
<Filter>
<Property>…</Property>
<ParameterValue>…</ParameterValue>
</Filter>
Example:
<Filter>
<Property Name="Currency" Type="CatalogRef.Currencies">
<Ref>
<Property Name="Code" Type="String">
<Value>036</Value>
</Property>
</Ref>
</Property>
</Filter>RecordSetRows
The RecordSetRows node (optional). Used once.
Details:
Contains record set rows of the information register. The record set rows are presented by the Object child nodes. The Object child nodes can contain only the Property and ParameterValue nodes.
Attributes:
no
Format:
<RecordSetRows>
<Object>…</Object>
</RecordSetRows>
Example:
<RecordSetRows>
<Object>
<Property Name="Currency" Type="CatalogRef.Currencies">
<Ref>
<Property Name="Code" Type="String">
<Value>036</Value>
</Property>
</Ref>
</Property>
<Property Name="Repetition" Type="Number">
<Value>1</Value>
</Property>
<Property Name="Rate" Type="Number">
<Value>1</Value>
</Property>
</Object>
</RecordSetRows>ObjectDeletion
The ObjectDeletion node (optional). Used multiple times.
Details:
Contains information about the deleted reference-type object in the source infobase. Used to delete reference-type objects in the destination infobase upon different exchange scenarios. For example, during data export via the Data exchange subsystem, an object can be considered deleted if it was registered for export but did not pass the Terms.
An object to be deleted is identified by the reference UUID. Upon import the source UUID is replaced with the destination UUID using Terms (if necessary).
Attributes:
UUID(required) –String. String presentation of the deleted object reference UUID in the source infobase. Upon import the source UUID is replaced with the destination UUID using object mapping information (if necessary).DestinationType(required) –String. String presentation of an object type in the destination infobase.SourceType(optional) –String. String presentation of an object type in the source infobase.
Format:
does not contain child nodes.
Example:
<ObjectDeletion
DestinationType="DocumentRef.ExpenseReport" SourceType="DocumentRef.ExpenseReport"
UUID="49278eee-7ef4-11df-866e-00d0d0817f92"/>ObjectRegistrationInformation
The ObjectRegistrationInformation node (optional). Used multiple times.
Details:
Contains mapping information of one object in the source infobase and one object in the destination infobase.
Object mapping information is used for import of reference objects. The object import is followed by reference search to replace an object reference in the source infobase with an object reference in the destination infobase. It allows you to avoid duplications upon importing objects.
In case of any changes in mapping information, it is automatically exported to the exchange message.
Nodes are specified at the beginning of the message in the data mapping section and before the main data.
Attributes:
SourceUUID(required) –String. String presentation of the object reference UUID in the source infobase.DestinationUUID(required) –String. String presentation of the object reference UUID in the destination infobase.DestinationType(required) –String. String presentation of an object type in the destination infobase.SourceType(optional) –String. String presentation of an object type in the source infobase.BlankSet(optional) –Boolean. Indicates an empty record set of the mapping register. IfTrue, the current object mapping information will be deleted upon import.
Format:
does not contain child nodes.
Example:
<ObjectRegistrationInformation
SourceUUID="49278eee-7ef4-11df-866e-00d0d0817f92" DestinationUUID="49278eee-7ef4-33df-877e-00d0d0817f93" SourceType="DocumentRef.ExpenseReport" DestinationType="DocumentRef.ExpenseReport"
BlankSet="false"/>ObjectRegistrationDataAdjustment
The ObjectRegistrationDataAdjustment node (optional). Used multiple times.
Details:
Contains data to adjust object mapping information.
Information mapping adjustment is necessary to correct object mapping information in case of mapping failure or data corruption.
Mapping information is adjusted as follows upon import:
- If the destination infobase does not contain the object for which the mapping information is being imported, the adjustment is ignored.
- If the destination infobase already contains the mapping information, the adjustment is ignored.
Nodes are specified at the beginning of the message in the data mapping section and before the main data but after object registration nodes.
Attributes:
UUID(required) –String. String presentation of the object reference UUID in the source infobase.SourceType(required) –String. String presentation of an object type in the source infobase.DestinationType(required) –String. String presentation of an object type in the destination infobase.
Format:
does not contain child nodes.
Example:
<ObjectRegistrationDataAdjustment
UUID="49278eee-7ef4-11df-866e-00d0d0817f92" SourceType="DocumentRef.ExpenseReport" DestinationType="DocumentRef.ExpenseReport"/>ParameterValue
The ParameterValue node (optional). Used multiple times.
Details:
Contains a child node with a parameter value. Parameter value from the file is added to the Parameters structure.
Note.
After importing a parameter value from the file, the After import parameter handler is executed (if defined).
Attributes:
Name(required) –String. Name of the parameter the value is intended for. Used to identify a parameter value with a parameter rule (see theCodeattribute for the Parameter node). The name must meet the requirements for theStructureplatform object key.Type(required) –String. String presentation of a parameter value type. Used to get the type by theType()platform function.
Format:
<ParameterValue>
<Value>…</Value>
<Ref>…</Ref>
<Empty>…</Empty>
</ParameterValue>
Example:
<ParameterValue Name="DefaultProducts" Type="CatalogRef.Products">
<Ref>
<Property Name="{UUID}" Type="String" SourceType="CatalogRef.Products" DestinationType="CatalogRef.Products">
<Value>0e33e509-512e-11df-abe6-001eec035cea</Value>
</Property>
<Property Name="IsFolder" Type="Boolean">
<Value>false</Value>
</Property>
</Ref>
</ParameterValue>AfterParameterExportAlgorithm
The AfterParameterExportAlgorithm node (optional). Used once.
Details:
Contains the "After import parameters" conversion Implementing Event Handlers of Managed and Ordinary Application Modules text.
Attributes:
no
Format:
<AfterParameterExportAlgorithm>XMLLine</AfterParameterExportAlgorithm>
ExchangeRules
The ExchangeRules node (required). Used once.
Details:
Contains exchange rules to import exchange message data – global event handlers, parameters, algorithms, queries, object conversion rules, and so on. For more information about the exchange rules, see 1C:Data Conversion help (Help – Getting started).
Attributes:
no
Nodes:
<FormatVersion>(optional) –String. Format version of data exchange rules.<ID>(optional) –UUID. UUID of conversion rules in 1C:Data Conversion.<Description>(optional) –String. Description of exchange rules in 1C:Data Conversion.<CreationDateTime>(optional) –Date. Creation date of the exchange rule file.<Source>(optional) –String. Source configuration description. Contains a source configuration version number.<Receiver>(optional) –String. Destination configuration description. Contains destination configuration version number.<BeforeImportObject>(optional) –String. The "Before import object" conversion Implementing Event Handlers of Managed and Ordinary Application Modules text.<AfterImportObject>(optional) –String. The "After import object" conversion Implementing Event Handlers of Managed and Ordinary Application Modules text.<BeforeImportData>(optional) –String. The "Before import data" conversion Implementing Event Handlers of Managed and Ordinary Application Modules text.<AfterImportData>(optional) –String. The "After import data" conversion Implementing Event Handlers of Managed and Ordinary Application Modules text.<OnGetDeletionInfo>(optional) –String. The "On get deletion info" conversion Implementing Event Handlers of Managed and Ordinary Application Modules text.<AfterGetExchangeNodesInformation>(optional) –String. The "After get exchange nodes information" conversion Implementing Event Handlers of Managed and Ordinary Application Modules text.
Format:
<ExchangeRules>
\<FormatVersion>XMLLine\</FormatVersion>
\<ID>XMLLine\</ID>
\<Description>XMLLine\</Description>
\<CreationDateTime>XMLLine\</CreationDateTime>
\<Source>XMLLine\</Source>
\<Receiver>XMLLine\</Receiver>
\<BeforeImportObject>XMLLine\</BeforeImportObject>
\<AfterImportObject>XMLLine\</AfterImportObject>
\<BeforeImportData>XMLLine\</BeforeImportData>
\<AfterImportData>XMLLine\</AfterImportData>
\<OnGetDeletionInfo>XMLLine\</OnGetDeletionInfo>
\<AfterGetExchangeNodesInformation>XMLLine\</AfterGetExchangeNodesInformation>
<ObjectsConversionRules>…</ObjectsConversionRules>
<Parameters>…</Parameters>
<Algorithms>…</Algorithms>
<Queries>…</Queries>
</ExchangeRules>
Example:
(a title of exchange rules only)
<ExchangeRules>
<FormatVersion>2.01</FormatVersion>
<ID>24451442-943d-4182-bc1b-42e04d1fdf33</ID>
<Description>TradeManagement-EnterpriseAccounting</Description>
<CreationDateTime>2010-07-22T19:17:04</CreationDateTime>
<Source>TradeManagement</Source>
<Receiver>EnterpriseAccounting</Receiver>
...
</ExchangeRules>ObjectsConversionRules
The ObjectsConversionRules node (optional). Used once.
Details:
Contains child nodes of object conversion rules.
Attributes:
no
<ObjectsConversionRules>
<Rule>…</Rule>
</ObjectsConversionRules>
Rule
The Rule node (optional). Used multiple times.
Details:
Contains details of one rule for converting a source infobase object to a destination infobase object. The rule contains auxiliary information used when importing objects by this rule.
Attributes:
no
Nodes:
<Code>(required) –String. Conversion rule name. The rule name must be unique in the conversion rule namespace in the current exchange message. Used to identify an object being imported with a conversion rule (see theRuleNameattribute for the Object node).<Source>(required) –String. String presentation of an object type in the source infobase.<Receiver>(required) –String. String presentation of an object type in the destination infobase.<SynchronizeByID>(optional) –Boolean. IfTrue, the object will be identified (searched) by the reference UUID. The object mapping functionality will be used to replace the source infobase object reference with the destination infobase object reference (if necessary). IfFalse, the object will be identified by properties specified in the Ref node (search properties).<SearchBySearchFieldsIfNotFoundByID>(optional) –Boolean. IfTrue, the object will be identified (searched) by properties specified in the Ref node if it is not found by the reference UUID. Used only if the<SynchronizeByID>node is set toTrue.<GenerateNewNumberOrCodeIfNotSet>(optional) –Boolean. IfTrue, a code or number will be assigned to an object before it is written to the destination infobase if no code or number was assigned during import.<BeforeImport>(optional) –String. The Terms OCRevent handlertext.<OnImport>(optional) –String. The Terms OCRevent handlertext.<AfterImport>(optional) –String. The Terms OCRevent handlertext.
Nodes for Interactive Import support:
<TableFields>(required) –String. A list of all comma-separated object header attributes involved in the exchange.<SearchFields>(required) –String. A list of comma-separated object header attributes used as search fields.
Format:
<Rule>
\<Code>XMLLine\</Code>(String)
\<Source >XMLLine\</Source>
\<Receiver>XMLLine\</Receiver>(string)
\<SynchronizeByID>XMLLine\</SynchronizeByID>
\<SearchBySearchFieldsIfNotFoundByID>XMLLine\</SearchBySearchFieldsIfNotFoundByID>
\<GenerateNewNumberOrCodeIfNotSet>XMLLine\</GenerateNewNumberOrCodeIfNotSet>
\<BeforeImport>XMLLine\</BeforeImport>
\<OnImport >XMLLine\</OnImport>
\<AfterImport>XMLLine\</AfterImport>
\<TableFields >XMLLine\</TableFields>
\<SearchFields >XMLLine\</SearchFields>
</Rule>
Example:
<Rule>
<Code>Companies</Code>
<SynchronizeByID>true</SynchronizeByID>
<GenerateNewNumberOrCodeIfNotSet>true</GenerateNewNumberOrCodeIfNotSet>
<Source>CatalogRef.Companies</Source>
<Receiver>CatalogRef.Companies</Receiver>
<TableFields>TIN,CRTR,AbbreviatedDescription,Description,LegalEntityIndividual,RNCPSCode,NCBOCode,DescriptionFull</TableFields>
<SearchFields>TIN,CRTR,AbbreviatedDescription</SearchFields>
</Rule>Parameters
The Parameters node (optional). Used once.
Details:
Contains import parameter child nodes.
Attributes:
no
Format:
<Parameters>
<Parameter></Parameter>
</Parameters>
Parameter
The Parameter node (optional). Used multiple times.
Details:
Contains details of the parameter used for data import. The parameter is added to the Parameters structure. The structure is used to get parameter values and is available from any data import event handler.
Only the structure key is added. The parameter value is not passed. To pass parameter values, use the ParameterValue node.
Note.
For more information on the Parameters structure, see 1C:Data Conversion help (Help – Handler information).
Attributes:
Name(required) –String. Parameter name. The name must meet the requirements for theStructureplatform object key.Description(optional) –String. Custom description of the parameter.AfterImportParameter(optional) –String. TheAfter importparameter handler text.
Format:
<Parameter></Parameter>
Algorithms
The Algorithms node (optional). Used once.
Details:
Contains child nodes of data import algorithms.
Attributes:
no
Format:
<Algorithms>
<Algorithm>…</Algorithm>
</Algorithms>
Example:
<Algorithms>
<Algorithm UsedOnImport="true" Name="FillInTheIncomeItem">
<Text>Value = Parameters.DefaultIncomeItem;</Text>
</Algorithm>
</Algorithms>Algorithm
The Algorithm node (optional). Used multiple times.
Details:
Contains the algorithm text used for data import. The parameter is added to the Algorithms structure. The structure is used to get the algorithm code and is available from any data import event handler.
Note.
For more information on algorithms, see 1C:Data Conversion help.
Attributes:
Name(required) –String. Algorithm name. The name must meet the requirements for theStructureplatform object key.UsedOnImport(required) –Boolean. The attribute must always be set toTrue.
Format:
<Algorithm>
<Text>XMLLine</Text>
</Algorithm>
Queries
The Queries node (optional). Used once.
Details:
Contains child nodes of queries for data import handlers.
Attributes:
no
Format:
<Queries>
<Query>…</Query>
</Queries>
Query
The Query node (optional). Used multiple times.
Details:
Contains the query text used in data import handlers. The parameter is added to the Queries structure. The structure is used to get queries and is available from any data import event handler.
Note.
For more information on queries, see 1C:Data Conversion help.
Attributes:
Name(required) –String. Query name. The name must meet the requirements for theStructureplatform object key.UsedOnImport(required) –Boolean. The attribute must always be set toTrue.
Format:
<Query>
<Text>XMLLine</Text>
</Query>
Text
The Text node (required). Used once.
Details:
Contains a query or algorithm text.
Attributes:
no
Format:
<Text>XMLLine</Text>
Example:
<Text>Value = Parameters.DefaultIncomeItem;</Text>Appendix 2. Application Startup Parameters
Application startup parameters provided by the library:
SignInToDataArea
In SaaS mode, it allows you to log in to the specified infobase data area. Example:SignInToDataArea; 3ExecuteDeferredUpdateNow
For client/server infobases. Runs deferred handlers before users start working in the application. The key is not applicable if the application version is updated and only deferred handlers need to be executed. It is required when you need to quickly perform all the deferred update procedures. For example, in case of updating to a version that does not directly follow the integrated one, skipping versions is not supported and the application needs to be consequently updated and started to update the infobase.- In SaaS mode, when you start updating the area with this parameter, all handlers are executed regardless of their order, meaning that the
Orderproperty of deferred parallel handlers is ignored. This is done to force the area update without waiting for other areas to complete the update.
- In SaaS mode, when you start updating the area with this parameter, all handlers are executed regardless of their order, meaning that the
EndUserSessions
Denies user access to the application and closes already started sessions. After closing all sessions, it prompts you to close the session started with this key. The session cannot be closed forcibly. TheKeyCodeaccess code is set and can be used to establish connection with a locked infobase (the/UCstartup parameter).
If cluster administration parameters are set for a client/server infobase, they need to be passed and include comma-separated cluster administrator name and cluster administrator password. For example, if the cluster administrator is Administrator and the password is 1, passEndUserSessions;Administrator;1.
The following user session termination parameters are also available:Messageis a message text displayed to users to warn them about the upcoming connection lock.KeyCodeis a custom string to enter the application even if the lock is enabled (for the /UC startup parameter).WaitMinis the delay time before the application lock, in minutes.DurationMinis the application lock duration including the delay time, in minutes.
Example:1cv8.exe ENTERPRISE /F "<Infobase path>" /N "Administrator" /P /C "EndUserSessions, AdministratorName=Administrator, AdministratorPassword=1, Message=Exit the application to run an unscheduled update, KeyCode=Update, WaitMin=5, DurationMin=30"
StartInfobaseUpdate
Forcibly starts update handlers activated upon every version change (with "*" version) and updates service data. This can be useful, for example, when the configuration metadata changes but the configuration version number stays the same.
A session started with this key will not be closed after the update or if an error occurs.
To update the infobase in batch mode, start a session using theDisableSystemStartupLogicstartup parameter and call an external data processor that will call theInfobaseUpdate.UpdateInfobaseAPI. In the data processor, you can implement error trapping and session termination.DisableSystemStartupLogic
Disables all actions upon the application startup: a non-recommended platform version message, wizards, infobase updates, and so on. In this case, forms on the home page cannot be opened. TheAdministrationaccess right is required.
Recommended:- For automatic testing.
- For preliminary infobase data control after restructuring but before update handlers are started.
Any actions in the infobase in this mode can lead to data inconsistency that cannot be automatically fixed. If this startup parameter is used for operational infobases, make sure data integrity is preserved.
ExternalOperationStartupParameters
This parameter allows you to pass additional command-line parameters to the newly started 1C:Enterprise session after the application update and infobase backup. During these operations, the current session is closed and then restarted. For example, if you start 1C:Enterprise with theExternalOperationStartupParameters = /TestClient -TPort 48050 /C DebugModeparameter to connect to scripted testing,
the restarted session starts with the/TestClient -TPort 48050 /C DebugModeparameter.AllowUserAuthorization
Allows user authorization in the infobase. The session started with this key will be closed after the user operations are unlocked.DebugMode
Simplifies debugging. In particular:- All long-running operations are performed immediately with no background job started, except for certain operations that are always performed in a background job. For example, updating operating parameters without considering attached configuration extensions.
- When developing configuration extensions, it is possible to start with installed configuration extensions that are currently opened in 1C:Designer, provided that the configuration version and extension versions are not changed.
ForceDeferredUpdate
For client/server infobases. It increases the priority of deferred data processing for this session (the value is not saved at the next startup). To set the default priority, see a radio button with the same name (Administration > Support and service > Application update). Unlike theExecuteDeferredUpdateNowparameter, while updating the deferred handlers, authorization to the application will be allowed.UpdateThreadsCount
For client/server infobases. Allows you to change the number of parallel threads that register data for the deferred update. It is recommended that you set the number of threads equal to the number of the processor cores on the server to boost the update. In case of locking conflict errors, decrease the value. By default, 8.
Appendix 3. International SSL Version without National Specifics
The distribution package includes the international version of the 1Cv8_international.cf library intended to develop applications for other countries. The version excludes the functions based on the legislation and other national specifics of the Russian Federation:
- The Address classifier (Address classifier SaaS), Personal data protection, Companies, and Declension tool subsystems.
- Functions used to import Russian bank classifier and currency rates, manage Russian addresses, and send text messages via Russian providers, the certificate application wizard, and some other functions created specifically for Russian users.
See the full list of differences from the SSL version designed for Russian applications in the SSLObjectsToLocalize common template. The international version also includes the Russian 1C:Enterprise language for Russia's neighboring states where Russian is used for development instead of English.
The main idea of the international SSL version is that the configuration components to be localized are separated from the common functionality as individual modules, forms, and data processors. It makes it easier to develop localized applications, which applies both to new projects and to regular localized releases based on the applications created for the Russian Federation.
The release methods of the international version are also published as general rules for custom applications in "1C:Enterprise Development Standards". The following options are available for developers involved in localization:
- Developers can simply delete Russian specifics from the configurations aimed at Russian users and replace them with required national specifics.
- Developers can use international configurations (without Russian national specifics) as a basis and add required national specifics.
- Developers can use international versions of libraries to create required national versions of libraries that can be later used to release national applications.