By the project requirements, the applied solution must be capable of storing a list of people that the user contacts with and a list of events that are related to the user finances. In addition to storing data, those lists must be capable of classifying it. For the list of people, it must support the following classification: friend, acquainted, family, and so on. For a list of events also must let to classify events by status.
Thus, for meeting these requirements, you will create three catalogs. For friends and other people create the People catalog. For contact information of various type (phone, address, email, and so on) create the Contact types catalog. For storing types of people related to a user (family, friend, acquaintance, and so on) create the People relation types catalog.
Another two catalogs will be used to store data regarding events: the Events catalog, where the actual data on occurred and planned events will be stored, and the Event categories catalog, intended to store categories of events (for example, study, sport, vacation, and so on).
Catalogs are located in the Configuration tree branch named Catalogs. Add a new catalog, for this right-click the Catalogs branch, and then click Add  (Ins).
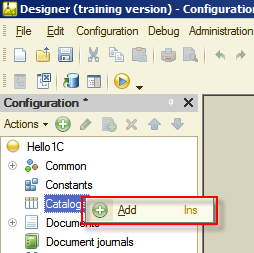
Figure 4-1. Adding a catalog
When you add a catalog, a new configuration object editor is opened. You already saw this window when created subsystems. The Catalog is a complex object to configure, therefore, this editor is intended to ease and speed up the configuration procedure.
Although the same catalog properties can be specified in Properties on the right, it is more convenient to use this dialog window. Following all the tabs of this editor ensures that all the necessary properties are filled in and nothing is missed.
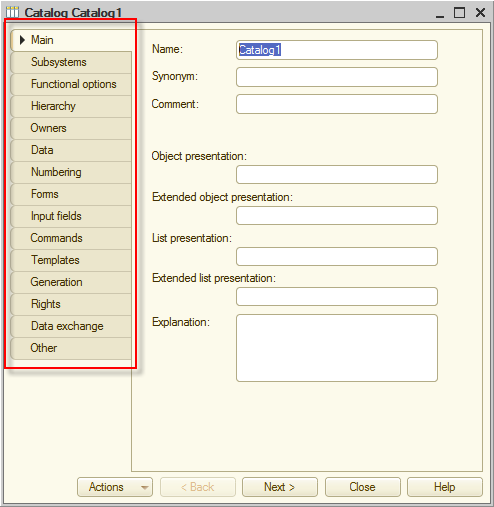
Figure 4-2. The Catalog configuration object editor
Type ContactTypes as the catalog name.
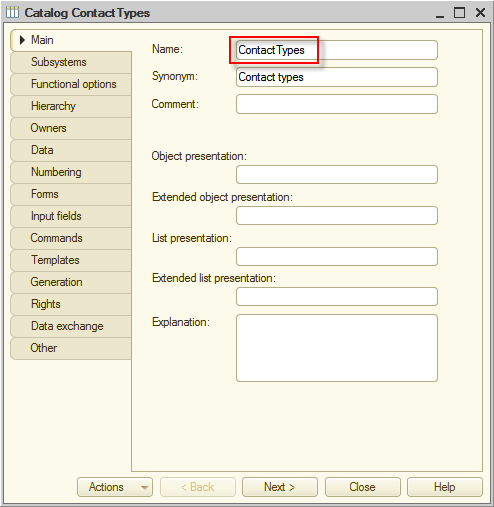
Figure 4-3. Adding the name and clicking Subsystems tab
There is nothing else to add on the Main tab, so click the Subsystems tab. On this tab, specify that this catalog belongs to the Contacts subsystem.
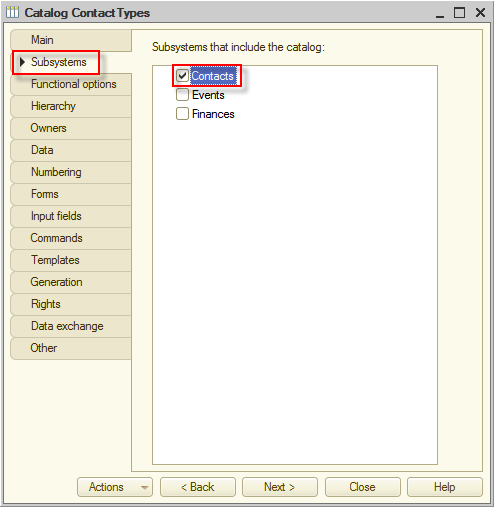
Figure 4-4. Specifying the subsystem
The storage for contact types is configured.
To start the application in 1C:Enterprise mode from Designer mode, click Start Debugging  (F5). In general, this is not 1C:Enterprise mode, but the Debug mode, but in this tutorial, this is not important. Now, look at how the Contact types catalog looks like.
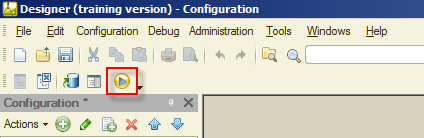
Figure 4-5. Start debugging
The platform will prompt you to update the database configuration, confirm this process.
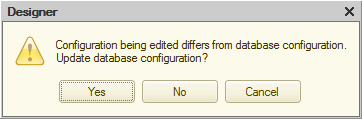
Figure 4-6. Updating the database configuration
The platform then will analyze the changes that had been made in configuration objects and inform you that a new object is added, named Catalog.ContactTypes.
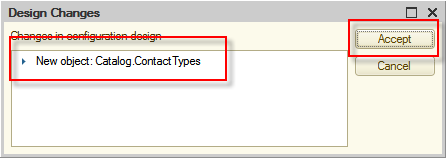
Accept changes by clicking Accept. This type of extensive system check might seem odd to you, but for large infobases that contain hundreds of configuration objects, it is necessary.
After a short period, the platform will start in 1C:Enterprise mode. You will see a blank main window of your application that will contain four sections, generated by 1C:Enterprise 8. These sections are a quick menu, and previously added subsystems: Contacts, Events, and Finances.
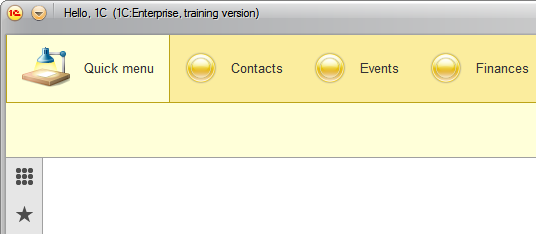
Figure 4-8. Subsystems in 1C:Enterprise mode at first run
The catalog that you have just created is included in the Contacts subsystem. Thus, click Contacts, and see the Contact types link on the screen.
After clicking this link, you will see a list of contact types, which is currently empty.
To reduce the amount of manual data entry, this tutorial includes an import utility and the sample data needed to populate the catalog. This utility is the data processor that will fill in the Contact types catalog data without entering the data manually.
The name of the data processor file is ImportXMLData83.epf. You can find it in the current distribution, for this, run setup.exe, click Custom setup and then click Hello, 1C additional files. In the opened folder, you can find the data processor. Copy it and all other files in that folder to your computer.
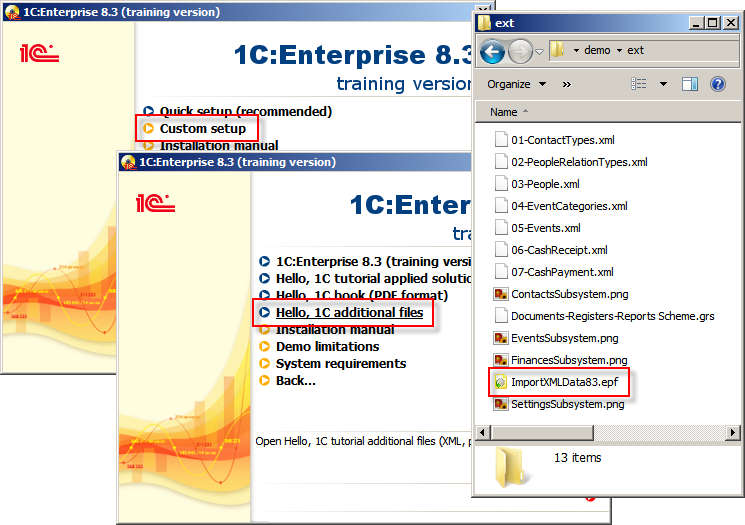
Figure 4-9. Data processor file
Important! This tutorial is designed and thoroughly tested using 1C:Enterprise version 8.3.5. It includes a few synchronous method calls. In 1C:Enterprise versions 8.3.6 or later synchronous method calls are disabled by default.
If you are using 1C:Enterprise version 8.3.6 or later, double-click the root configuration node to open the property palette. Scroll down the property palette to find the Synchronous call usage mode for extensions and add-ins property and change its value to Use.
To run this data processor, click Main menu  that is at the top left corner of the main application window.
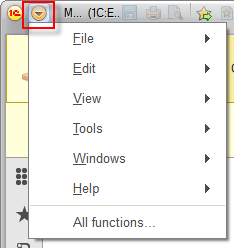
Figure 4-10. Main menu
In the Main menu click File and then click Open… (Ctrl+O). In the opened dialog select ImportXMLData83.epf, and click Open.

Figure 4-11. Opening the file
The data processor will let you import the data from XML files.
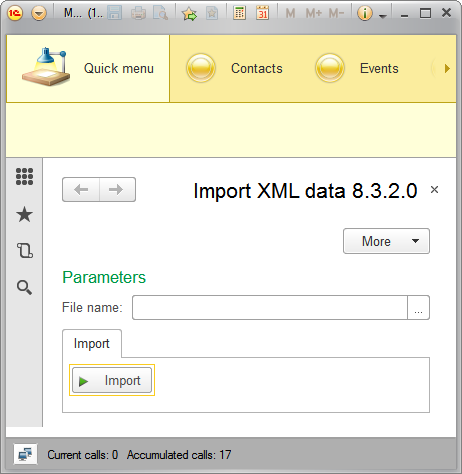
Figure 4-12. Importing data from XML file
In the opened data processor, click Select  , and then find and select the 01-ContactTypes.xml file.
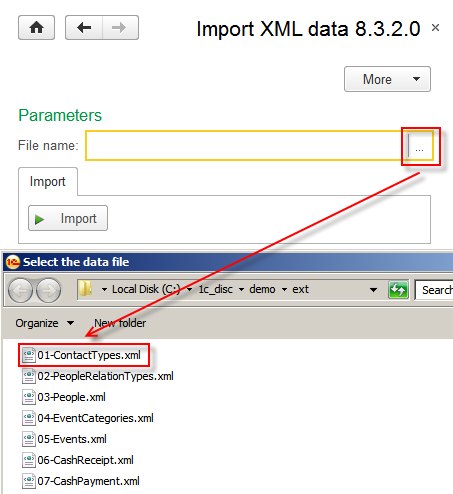
Figure 4-13. Selecting a file to be imported
After selecting the file, click Import. Shortly, the data processor will notify you that the data is imported.
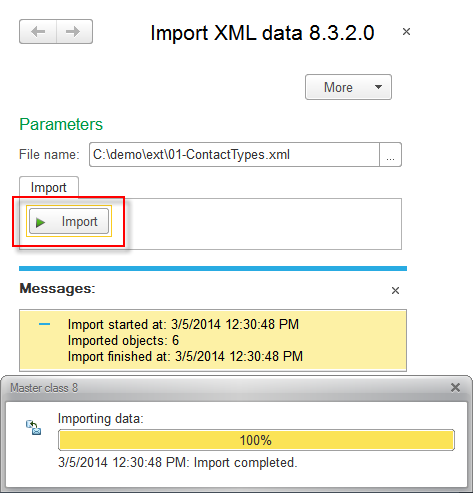
Figure 4-14. Importing the data
Close the data processor and open the list form of the Contact types catalog. If this form is already opened, press the F5 key to update it.
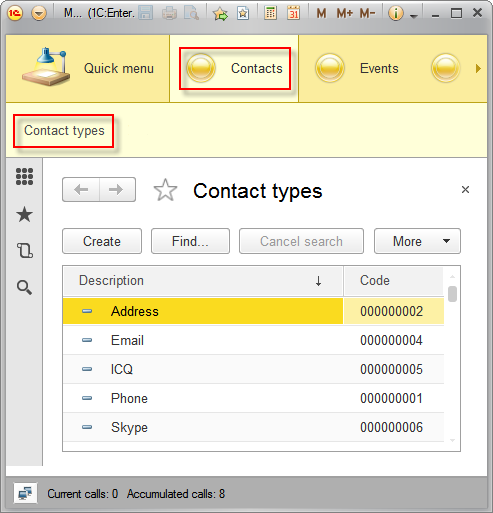
Figure 4-15. The list of items in the Contact types catalog
See that the data is correctly imported.
Notice that you did not create the list form for this catalog. A list form of a catalog is a list where all items of this catalog can be found. 1C:Enterprise generated this form for you automatically based on how you defined this catalog in the Configuration object tree. At the same time, all catalog commands are available, user can create a new item, delete, search, and execute other actions.
Excellent. Close the main application window and return to Designer mode. Here you will create remaining catalogs, and during that, you will learn about their individual properties.
Now create the People relation types catalog similar to the Contact types catalog. The only difference is that on the Data tab you will have to increase the length of the Description attribute to up to 150 characters.
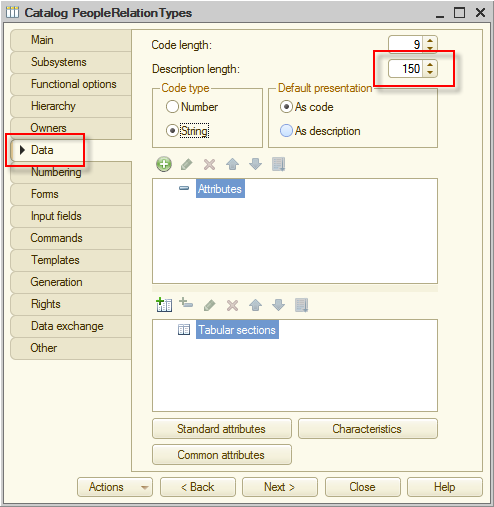
Figure 4-16. The People relation types catalog
Start the application in 1C:Enterprise mode again and import the prepared People relation types of data from 02-PeopleRelationTypes.xml.
Because of changes that had been made previously, the People relation types catalog will be displayed as follows:
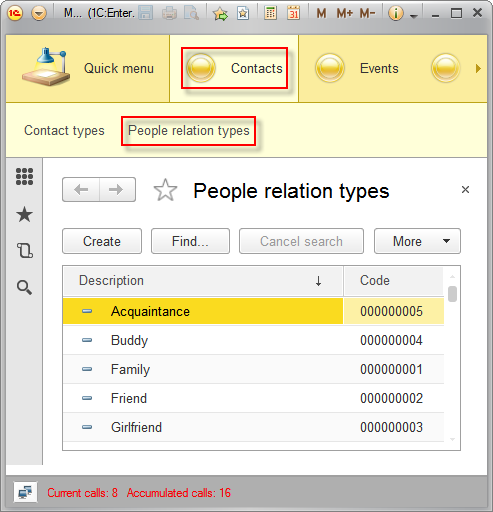
Figure 4-17. List of items in the People relation types catalog
Now, create a primary catalog, named People, where all people that a user knows will be stored. Same as previously created catalogs include this catalog to Contacts subsystem. Then, click the Data tab, set length of the Description attribute to 150 characters. This attribute will be used to keep the names of people.
Up to this point, it was nothing special, you have just created another catalog that will keep the list of names of friends and acquaintances and store those names in the Description attribute. However, there is very little benefit comparing to simply storing a list of names in a spreadsheet document. That is why you will use more features of 1C:Enterprise 8 and add more attributes to store additional information about people.
To store additional information, you can add any number of catalog attributes. In this tutorial, start with the following attributes: Gender, RelationType, and Comment.
- Gender attribute will store information about the gender of people.
- Relation type attribute will store types of relation between users and people.
- Comment attribute will store any additional information about people that might be necessary to keep.
To add Gender as a new attribute, click the Data tab, then click Add (Ins) for the People catalog.
In Properties, enter Name, and Synonym once again will be generated automatically. There is one more thing to do. You need to specify the way to store data in the Gender attribute. As you can see in Properties, the default type for an attribute is String.
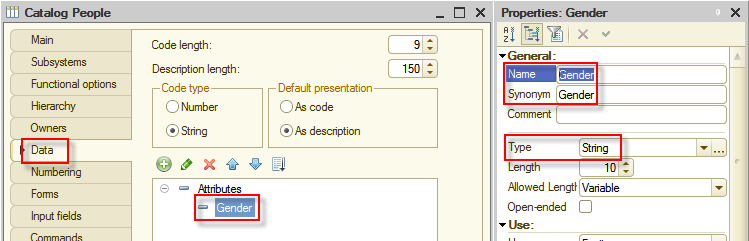
Figure 4-18. Adding the Gender attribute
You can leave everything as it is, but in that case, every time when adding a new person to the catalog, the user will have to enter gender manually in the Gender attribute. First, typing information manually for a large number of records is a very time-consuming job. Second, there is a high risk of human error such as typo, wrong information input, and inconsistent values as there are many variations of writing genders. These errors, regardless of their nature, will make complicated any future automatic analysis of this data.
The first thing that may come to mind is to create another catalog where specify both genders and then use those catalog items. It is a reasonable idea, but creating a new catalog for just two objects is a redundant task. Which way is better then? There is another, new for your configuration object.
Enumeration is an object that is created and filled with data at the development of an applied solution stage. An enumeration can store a limited, known beforehand, and the same type of data. Gender is precisely the type of data that is good to be stored as an enumeration, rather than as a catalog.
To create a new enumeration, leave People catalog as is for now and find Enumerations section in the configuration tree, then repeat the already familiar process of adding a new configuration object.
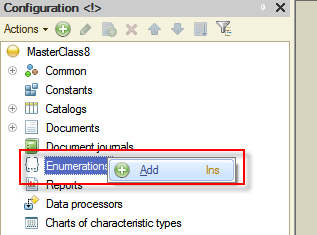
Figure 4-19. Adding an enumeration
In the opened window, as the Name of the new enumeration enter Genders. Then include the new object to the Contacts subsystem.
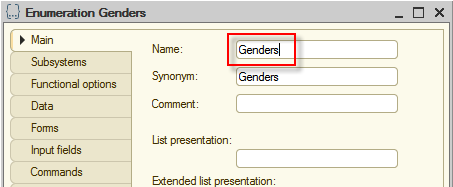
Figure 4-20. The Genders enumeration
Click the Data tab, and then add two values using Add (Ins), those values are Male and Female.
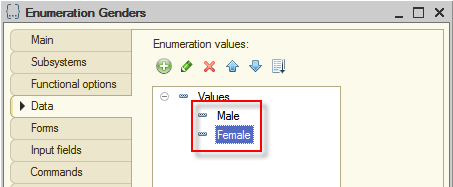
Figure 4-21. Values of the Genders enumeration
After the values are added, close the enumeration editor by clicking Close. You will see the previously opened People catalog editor. Now you can change the type of the Gender attribute from String to the newly created Genders enumeration. To do that, select the Gender attribute and in the Properties window in the Type property click Select  button. If you accidentally closed the Properties window, you can always open it by right-clicking on the configuration object and selecting Properties or by double-clicking the attribute.
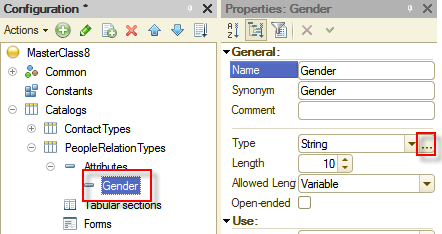
Figure 4-22. Changing the type of the Gender attribute
In the opened window, find and select the Genders enumeration, then click OK.
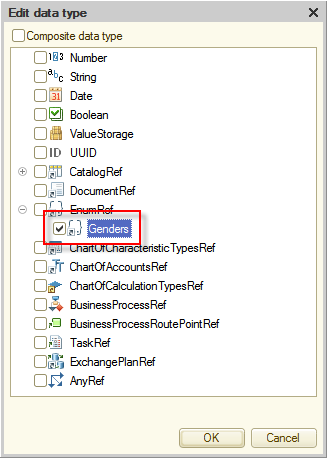
Figure 4-23. Selecting the Genders enumeration as the type of the attribute
The accuracy of the selection for the type can always be verified in the Properties window.
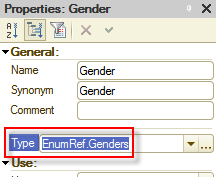
Figure 4-24. Verifying the attribute type
After making sure that everything is done correctly, return to the People catalog editor, and continue adding new attributes. Next attribute to be added is RelationType. Similar to Gender, add RelationType as an attribute and then select PeopleRelationTypes as its type, which is placed in the CatalogRef group in Edit data type window.
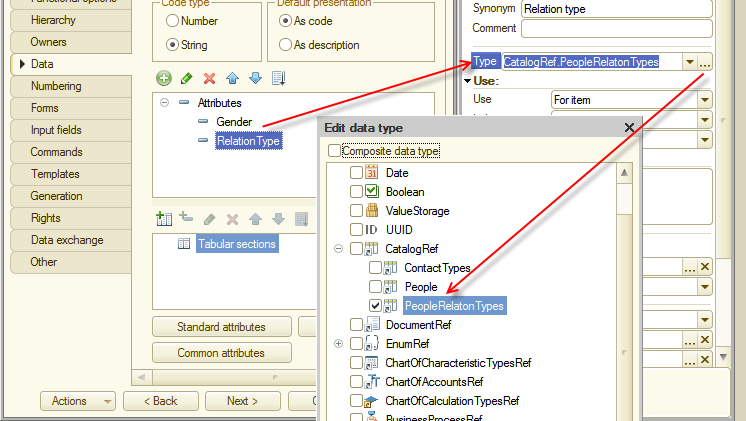
Figure 4-25. Creating the RelationType attribute
The last attribute to be added is Comment, which will keep notes and thoughts about a person. When adding this attribute, accept the default data type, String. However, the length value needs to be changed. To avoid any guessing while determining the appropriate length of comments, simply set the length of the Comment attribute string to Open-ended. For this select Open-ended checkbox in Properties.
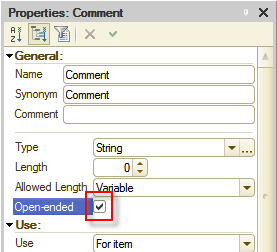
Figure 4-26. Setting length of Comment attribute string to Open-ended
Keeping in mind the task requirements, you should create another set of attributes where contact information of people will be stored. You might conclude that since you have created Contact types catalog, then should add the Contact type attribute of the CatalogRef.ContactTypes type, that will keep the information about the type of contact. Then add at least one more attribute that will store the value of that contact, and name it Contact value. In other words, to store a person's address, you will have to select the Address as the type of contact, and then input the actual address in the Contact value attribute.
At this point, consider one more thing. Once you will need to keep more than one contact, if you will store them in the same way as described above, you will have to add as many pairs of Contact type/Contact value attributes as you need to keep a required variety of contacts. But it breaks down the efficiency of the storage since every person will have own pairs of data. Furthermore, every time a new type of contact appears, you will be required to add a new pair of attributes. This procedure has to be repeated each time a new piece of information occurs.
Fortunately, there is no need to do that. It is clear that every person has their own set of contact information. 1C:Enterprise 8 solves this problem by allowing you to create tables for each catalog item.
Add the Contacts tabular section for People catalog. Click Add tabular section  , and then name the table Contacts.
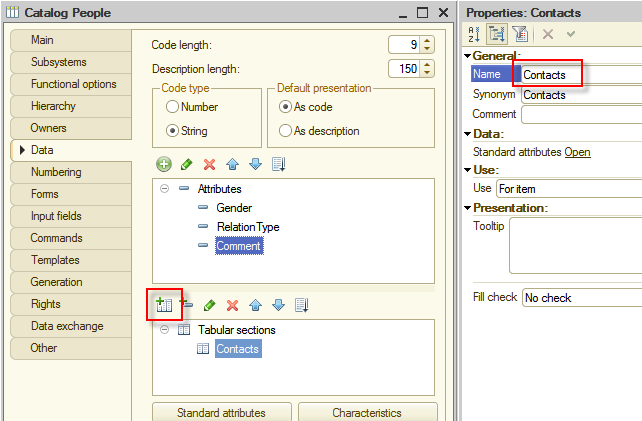
Figure 4-27. Adding the Contacts tabular section
Return to the People catalog editor, click on the Contacts tabular section, and add a new attribute to that tabular section by clicking Add attribute  . Name a new attribute Type and select the ContactTypes, which is located in the CatalogRef group as its type.
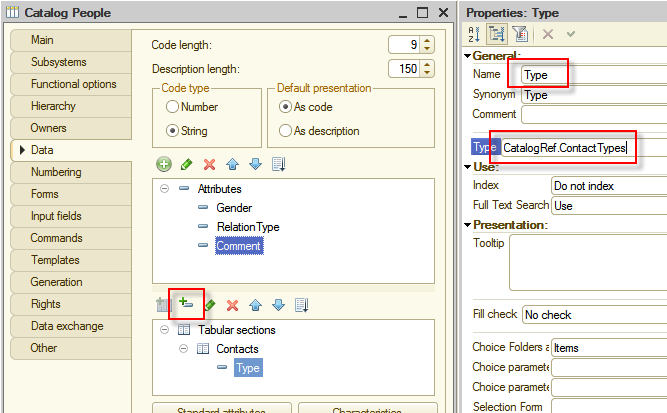
Figure 4-28. The Type attribute of the Contacts tabular section
In the same manner, add the Value attribute, which is going to be a String with a length of 1,024 characters.
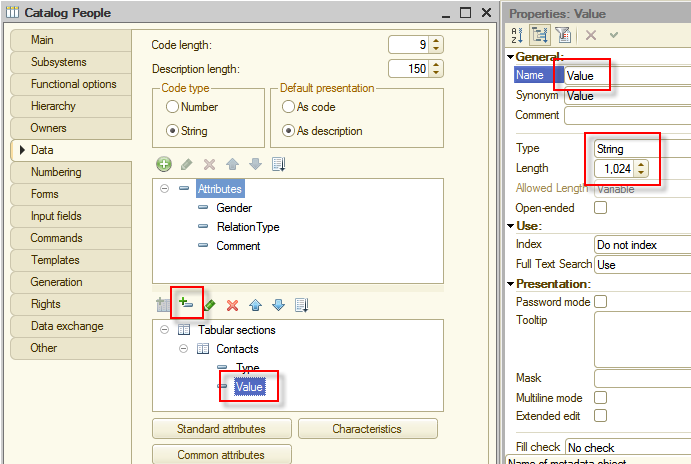
Figure 4-29. The Value attribute of the Contacts tabular section
At this point, the People catalog is considered finished. Take a look at what you have now. To start the application in 1C:Enterprise mode click Start Debugging (F5).
Confirm the system request to update the configuration, and then accept the changes to the configuration.
Now go to the Contacts section that you have seen already, and look at what you have created.

Figure 4-30. The People catalog in 1C:Enterprise mode
For now, this catalog is empty. Open the ImportXMLData83.epf data processor and import data from the 03-People.xml file. Press the F5 key to update the list, if it is empty.
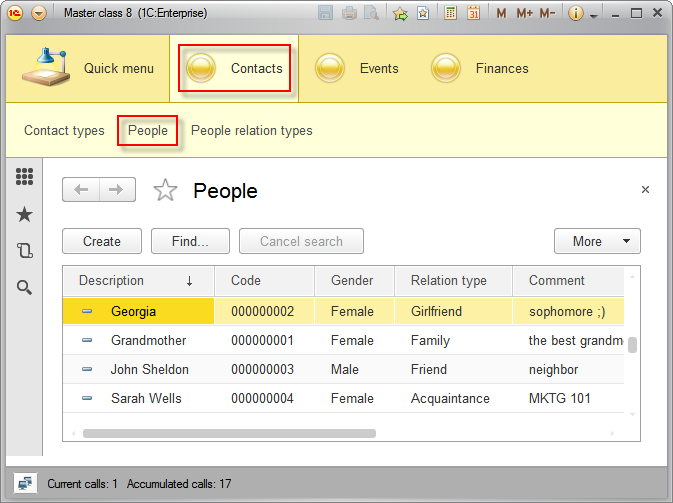
Figure 4-31. The People catalog, filled with data
Now the list contains people. To verify, which data is contained in individual records, double-click any record.
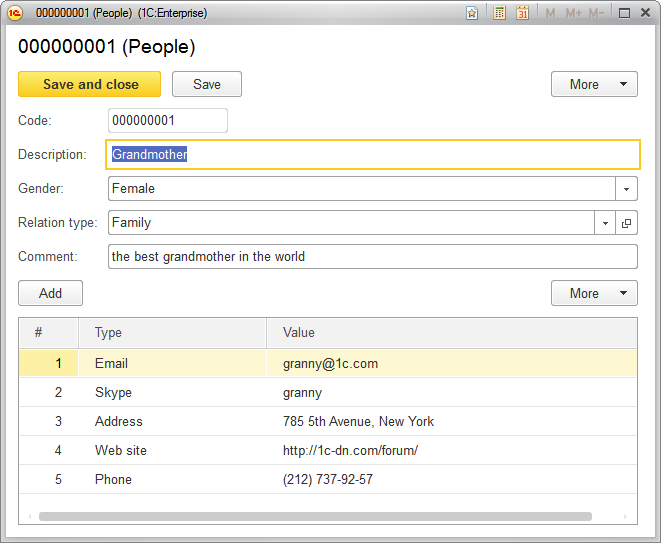
Figure 4-32. The item of the People catalog
As you can see, the main attributes, related to a person, are located on the upper part of the window, and the contact information is conveniently arranged in the tabular section on the bottom.
Note that in addition to the generation of forms to display lists of catalog items, the platform also automatically generated a form of catalog items.
Close the main application window and return to Designer mode to add two more catalogs, which are Event categories and Events.
The Event categories catalog is created in the same way as the People relation types catalog. The Description attribute length will be 150 characters as well. The only difference is the association with the subsystem. Event categories will be included to the Events subsystem.
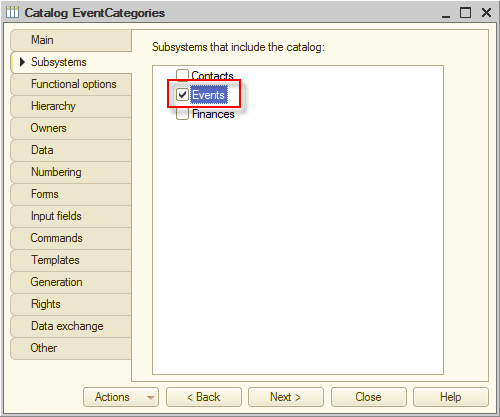
Figure 4-33. Making Event categories a part of the Events subsystem
In 1C:Enterprise mode, import the data for this catalog from the 04-EventCategories.xml file.
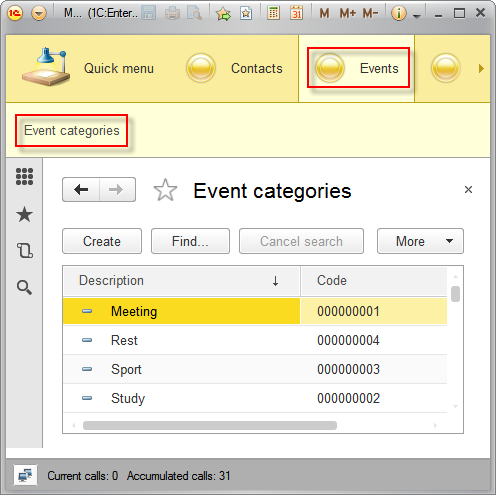
Figure 4-34. The Event categories catalog, filled with data
The last thing you need to do in this chapter is to add the only remaining catalog, named Events.
The Events catalog will also be included to Events subsystem. Set the length of the Description attribute to 150 characters. Then, add the following attributes to this catalog:
- Begin date with Type equals to Date and Date Content – Date and time.
- End date with Type equals to Date and Date Content – Date and time.
- Category with Type equals to CatalogRef.EventCategories.
- Details with Type equals to String and checked Open-ended box.
Add a new tabular section, named Participants and add an attribute Participant of CatalogRef.People type to this tabular section.
As a result of these changes, the Data tab will look as follows:
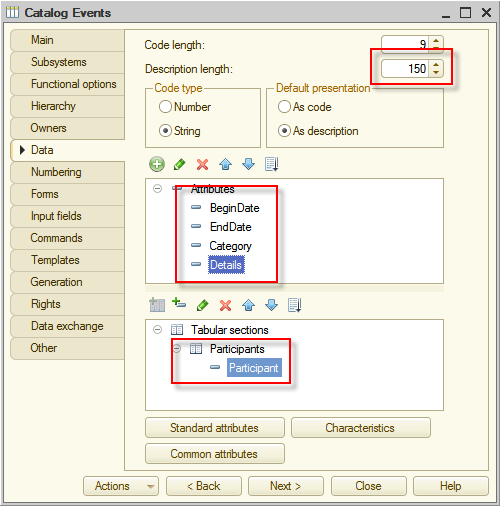
Figure 4-35. Properties of the Events catalog on the Data tab
Click Start Debugging (F5), and confirm all changes. In 1C:Enterprise mode import data into the Events catalog from the 05-Events.xml file.

Figure 4-36. The Events catalog, filled with data
See the result in one of the Event items.

Figure 4-37. The Events catalog item
Now you have created everything that is required to keep track of events in the life of users.
Excellent! The People catalog can store the information about all of the user's relatives, friends, and acquaintances, including a variety of contact information of these people. The Events catalog stores the information about past and planned events, also participants can be specified here. At the same time, three auxiliary catalogs, ContactTypes, PeopleRelationTypes, and EventCategories help users to customize data, related to primary catalogs.
Moving further.
Next page: Register