Let us enter the values required for data exchange in the central infobase.
- Start 1C:Enterprise in the debug mode.
First, let us set the numbering prefix. - In the Enterprise section, on the Tools menu, click General settings.
- In the Numbering prefix field, enter CI and then click Save and close (fig. 24.9).
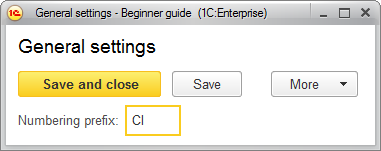
Fig. 24.9. Value of the NumberingPrefix constant
Then let us open the exchange plan and specify the default node parameters, i.e. the parameters of the current infobase. - In the Enterprise section, in the section commands panel, click Branches.
You can see that the list of exchange plans contains a single empty row. - Open that row, enter CI for the infobase code and Central infobase for its description (fig. 24.10), then click Save and close.
Remember that a code serves as a unique node ID across all infobases. Later you will create nodes with the same codes in the branch infobase.
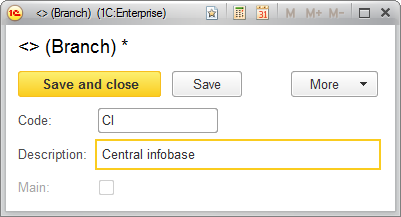
Fig. 24.10. Creating an exchange plan node
Then let us create the branch infobase node. - Click the Create button.
-OR-
On the Create menu, click Branch. - Enter BR for the infobase code and Branch for its description (fig. 24.11), then click Save and close.
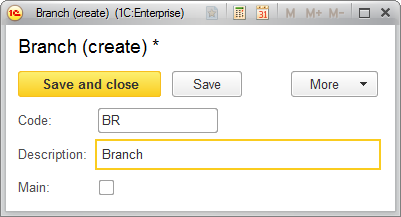
Fig. 24.11. Creating an exchange plan node
Note that the predefined infobase node (Central database) is marked with a special icon in the list of exchange nodes, and the Write changes button is not available for this node. - Click the Branch node and click Write changes.
- Open the Data exchange data processor and click Start data exchange.
The text shown in fig. 24.12 is displayed in the message window.
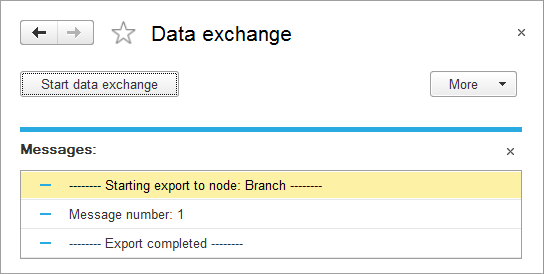
Fig. 24.12. Service message window
So as a result of the data exchange operation the central Infobase generated an exchange file containing the changes of all the data it exchanges with the branch.