Let us specify the report structure.
You need two nested groupings for this report:
- Top-level grouping by Technician field
- Nested grouping by Period field
Let us create the groupings.
- On the Settings tab, in the command bar, click the Add
 button to add a grouping and then, in the Field field, select Technician and click OK (fig. 13.63).
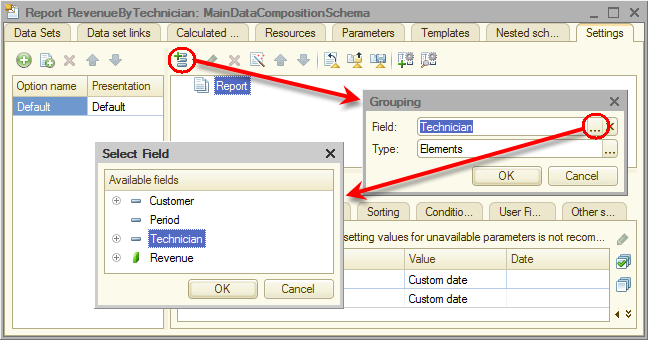
Fig. 13.63. Specifying the grouping field
Let us add the Period grouping that is subordinate to the Technician grouping. - Click the Technician grouping, click the Add button to add a grouping and then, in the Field field, select Period and click OK.
Then let us add the Detailed records grouping that is subordinate to the Period grouping (without selecting a grouping field). - Click the Period grouping, click the Add button to add a grouping, do not enter the grouping field, and click OK.
- Click the Selected fields tab and add Customer and Revenue to the list of selected fields.
You do not have to select the Technician and Period fields because these fields are used for grouping data, so their values are automatically displayed.
Once you perform these steps, the report structure should look as shown in fig. 13.64.
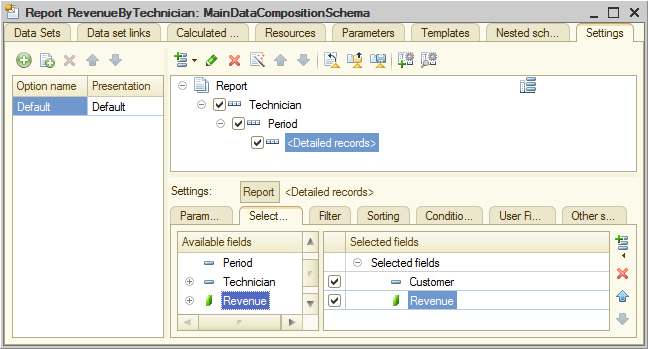
Fig. 13.64. Report structure and fields - Click the Other settings tab.
- In the Grouping field placement field, select Separately and only in totals.
By default grouping fields are arranged vertically in the report (fig. 13.65).
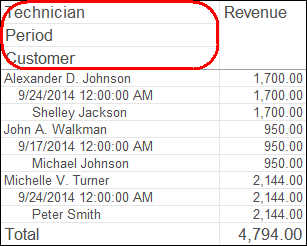
13.65. Default vertical arrangement of grouping and total fields
Selecting Separately and only in totals as the value for this property means that each grouping is located in a separate report area from left to right and its name is displayed only in this grouping (fig. 13.66).
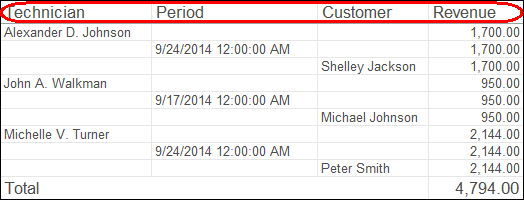
Fig. 13.66. Arrangement of grouping fields as Separately and only in totals - In the Vertical placement of overalls field, select Begin.
By default totals are located at the end of a vertical list (see fig. 13.66). Selecting this value for the property means that totals are displayed at the top, before the grouping rows (fig. 13.67).
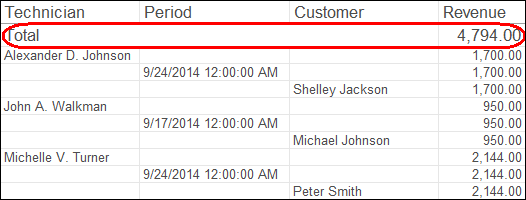
Fig. 13.67. Vertical arrangement with totals at the top
After these changes the report settings on the Other settings tab should look as shown in fig. 13.68.
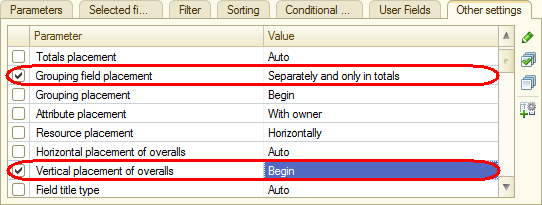
Fig. 13.68. Parameters of report display settings - In the Title field, type Revenue by technician.
- Specify that the Begin of period and End of period parameters are included in the list of user settings and displayed directly in the report form (in other words, they serve as quick settings).
It means that a user can define the report period before generating the report (fig. 13.69).
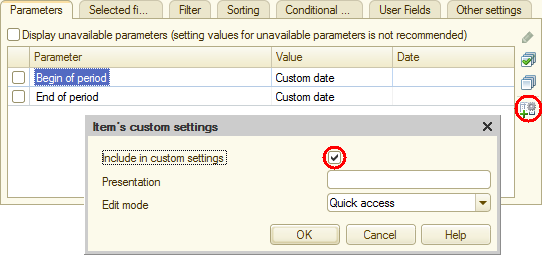
Fig. 13.69. Creating quick report period settings
Finally, let us specify the subsystems where the report is available. - Close the data composition schema wizard and then, in the editor of the RevenueByTechnician report configuration object, click the Subsystems tab.
- Select the Payroll and Services checkboxes.
This adds the links that open the report to the Reports menus in the command panels of these subsystems.