One more interesting thing is that the application that you have developed with almost no efforts can be started on iOS or Android mobile devices. This feature is provided by the mobile platform that is a part of 1C:Enterprise 8.3 platform.
The look and feel of applications for Android and iOS devices can be a slight difference.
Notice: Systematic instructions on how to create a mobile application for end users you can find in 1C mobile application rapid application development tutorial. In this tutorial, you are going to start your application on the mobile platform for developers.
Details on features of applications based on 1C:Enterprise platform for mobile devices you can see in Chapter 25. Developing solutions for the mobile platform of 1C:Enterprise Developer Guide.
1C:Enterprise 8 mobile platform is a set of tools that lets you create applications that work on Android or iOS mobile devices. Those devices are mostly smartphones and tablet PCs.
The 1C:Enterprise mobile application that you install on the mobile device is a combination of the mobile platform and the Infobase. The mobile Infobase is similar to the file Infobase. It consists of a database that stores data in a file and a mobile applied solution that is a program, which can be started on a mobile device and manage data in the database.

Figure 12-1. 1C:Enterprise 8 mobile platform
Thanks to the mobile platform you can right now, without using any third-party IDE, install, start, and see how works your application on the mobile device. As an example, you will do this for the Android device.
For this, you will need the following:
- Make your applied solution compatible with the mobile platform. You will have to do a few changes for that.
- The mobile platform for developers installed on an Android mobile device.
- The web server running on the computer where you develop the application, and accessible by IP from your mobile device.
Start the application in Designer mode and verify it for the capability of being started on mobile devices. For this, in Main menu click Configuration, and then click Check configuration...
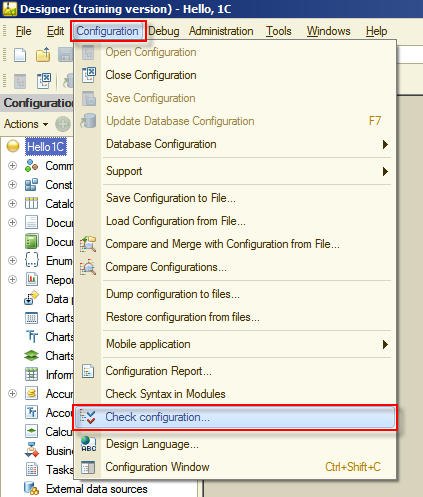
Figure 12-2. Open Configuration check
You can set the name for the current set of configuration verification options to make it easier to repeat this verification later. Let it be Mobile. Select the following checkboxes:
- Verifying configuration integrity and consistency;
- Find unresolved references;
- Mobile application - client;
- Mobile application - server;
- Search for unsupported functionality.
Click OK.
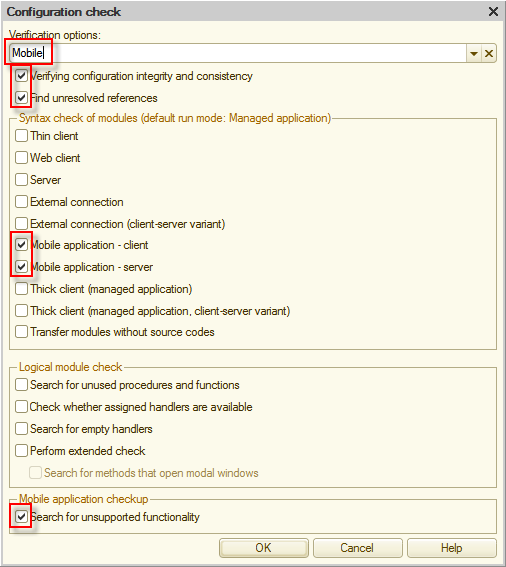
Figure 12-3. The Configuration check window
The configuration will be verified for compatibility with the mobile platform. The result of this verification will be 11 errors.
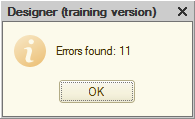
Figure 12-4. The result of verification
Those errors should not make you worry. Here they are:

Figure 12-5. The list of errors
If you look carefully, you might mention that there are several unsupported by the mobile platform features used in your application. This happened because until this moment you did not take care of compatibility with mobile devices and use all the features that you needed.
Now, as the simplest way, you will delete the use unsupported by the mobile platform features and configure Mobile desktop that will be compatible with the mobile platform.
Notice: To backup the current application, you can in Designer mode in Main menu click Administration, and then click Dump infobase... In the opened dialog select a file name and click Save. To restore the application, in Main menu click Administration, and then click Restore infobase... In the opened dialog select the previously saved DT file, and click Open.
So, delete all subsystems, functional options, and reports.
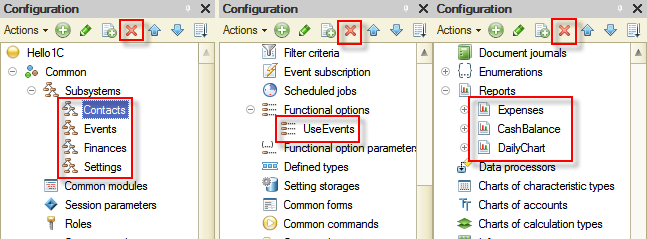
Figure 12-6. Deleting unsupported metadata objects
In Properties of the root of the Configuration tree, click Select  , and in Use purposes list select Mobile device check box and clear Personal computer check box. Then click OK.
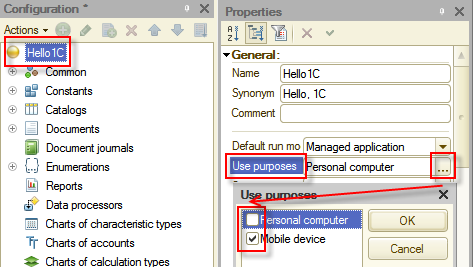
Figure 12-7. Adjusting Use purposes
Notice: Unsupported by the mobile platform application objects are disabled now.
The Mobile desktop of the mobile application is not configured yet. After it will be done, the application will be compatible with the mobile platform.
Create a common form.
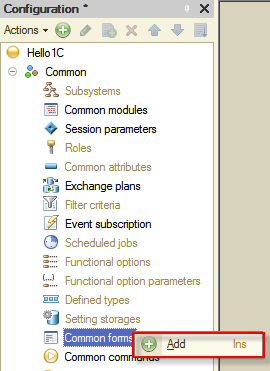
Figure 12-8. Creating a common form
Name it MobileDesktop and set Synonym to Hello, 1C. The form type should stay Generic form as for default. After that, click Finish.
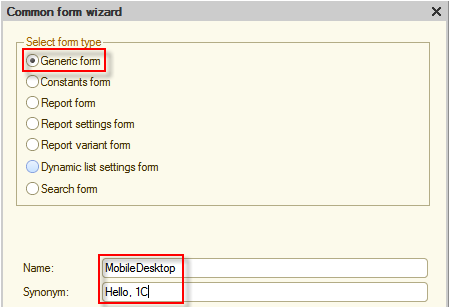
Figure 12-9. Adjusting the common form
It seems reasonable that users would like to see the most often used People and Events lists on the Mobile desktop. To provide this information to users, create two attributes of the DynamicList type. The first one will be People. To add the form attribute, in the top right panel of the form editor click Add attribute  (Ins). In Properties of the new attribute set Name value to People, and then click Select of the Type property, then select DynamicList.
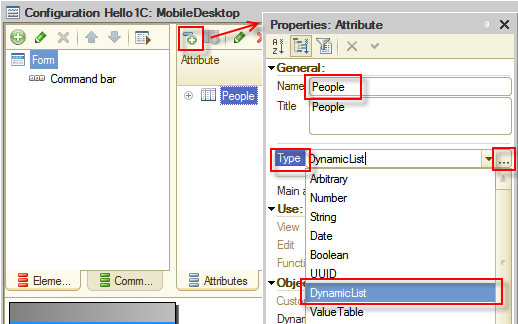
Figure 12-10. Adding the People attribute of the common form
For the MainTable property, click Select , then in Select table select the People catalog, and then click OK.
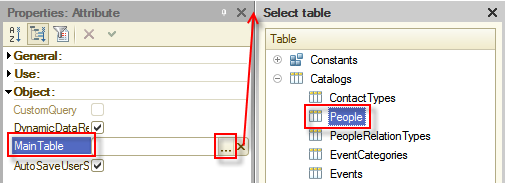
Figure 12-11. Selecting the main table of the dynamic list
In the same way, add the Events attribute. With the only difference, the MainTable property will be the Events catalog.
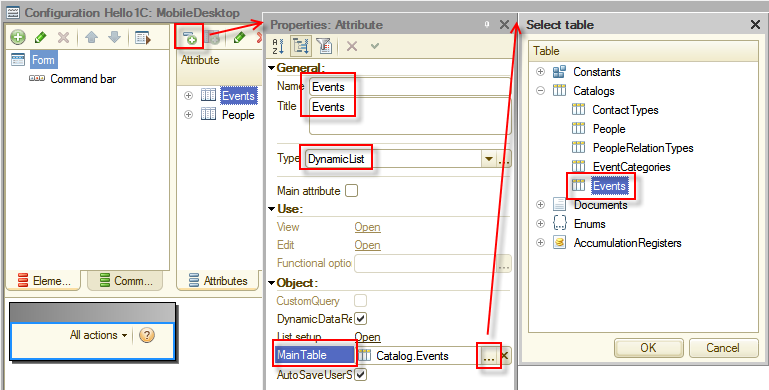
Figure 12-12. Adding the Events form attribute
Now, drag both attributes to the Form node on the top left panel of the form editor. You can select more than one form attribute by holding the Ctrl key and clicking form attributes, and then drag them all at a time to the destination.
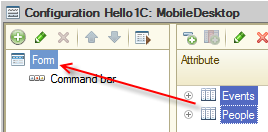
Figure 12-13. Placing form attributes on the form
On the opened confirmation dialog, click Yes to agree that columns of both tables will be added to the form automatically.
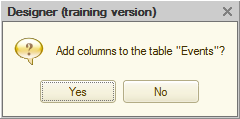
Figure 12-14. The confirmation of those columns will be added automatically
After that, you will have two tables on the form, displaying all attributes of the Events and the People catalogs.
Delete not required columns from the form. For that, in the People table holding the Ctrl key select PeopleCode, PeopleGender, and PeopleRelationType and then click Delete current item  (Del).

Figure 12-15. Deleting not required columns from the People table
From the Events table delete the EventCode and the EventCategory columns.
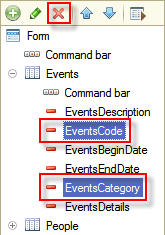
Figure 12-16. Deleting not required columns from the Events table
Open the Home page work area editor (see Figure 8-19). For that, right-click the root node of the Configuration tree and then click Open home page work area. Delete the Financial transactions accumulation register list form from the Left column and the People catalog list form from the Right column. In Home page template, select One column. After that, add the MobileDesktop common form to the list of forms.
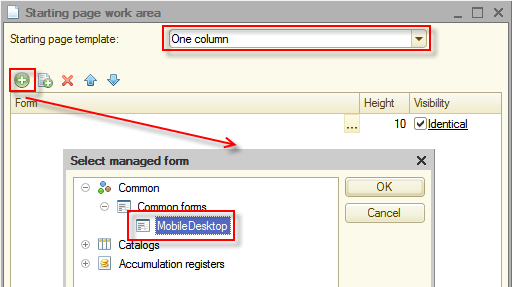
Figure 12-17. The single MobileDesktop form on the Home page
Now, you are done with the configuration changes. To save them press the F7 key. You can check the configuration again (see Figure 12-2), this time there will be no errors found.
The last step is to upload and start this application on the mobile device. You will use the tool that is similar to publication on the web server that was described in Web client chapter.
The web server will keep the application as a single XML file. The mobile platform for developers connects to this web server, downloads that XML file and install on the mobile device. After that, the application can be started on the mobile device.
In Designer mode in Main menu click Configuration, then click Mobile application, and then click Publish...
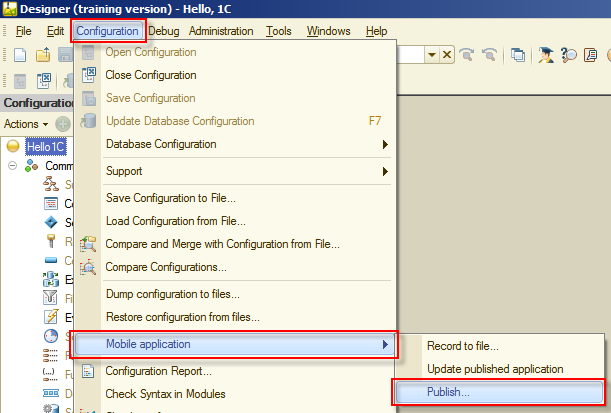
Figure 12-18. Opening Mobile application publishing
In the opened window select the Create virtual directory on web server and Update mobile application when a database configuration is updated checkboxes and input hello_1c_mob in Name. See that the last folder in Directory is also changed to hello_1c_mob. Then, click Publish.
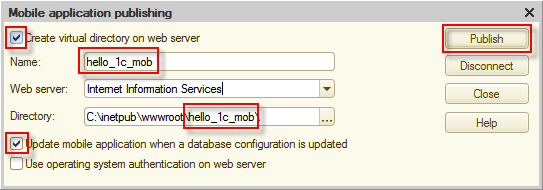
Figure 12-19. Publishing the mobile application
Confirm all actions that the platform will ask confirmation for, and your application will be published.
To install and start the application on iOS devices in the developer mode you will need the developer account. Moreover, you will need a Macintosh computer with XCode developer environment.
For Android devices, you only need to install 1C:Enterprise mobile platform for developers using packages that are available in the distribution kit of 1C:Enterprise mobile platform.
For this, upload one of APK installation packages to the mobile device, for example using USB-cable. These files are available in Android folder of the distribution kit. Install 1cem-arm.apk if you have a device with ARM processor (suits for most devices) or 1cem-x86.apk if you have a device with x86 processor.
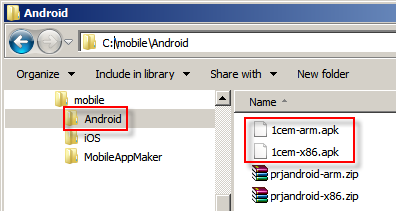
Figure 12-20. Mobile application for developer installation packages for Android
Then, run the installation package.
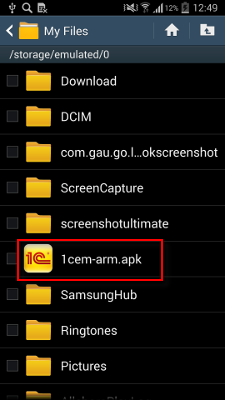
Figure 12-21. Running the installation package
It will require access to several system features.

Figure 12-22. Starting the installation
After that, it will install in a few moments.

Figure 12-23. Installing the mobile application
When you will have the mobile platform for developers installed, tap 1C:Enterprise icon to start it.
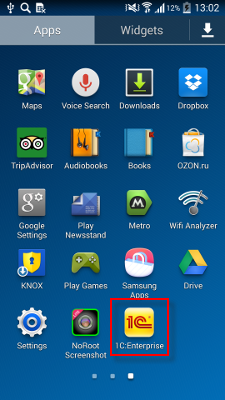
Figure 12-24. Starting the mobile platform for developers
If you start the mobile platform for the first time, it will show you an empty list of applications. To add a new application, tap Add application.
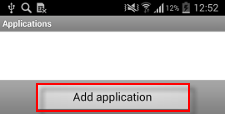
Figure 12-25. Adding a new mobile application
In Address input http://<your computer IP>/hello_1c_mob. Instead of <your computer IP> insert IP of the computer where you have the web server with the published mobile application.
Notice: To find out the computer IP, see its network connection properties. The mobile device and the server should be on the same network. The easiest way of doing that is using a Wi-Fi router. Both, the computer with a web server, and the mobile device should be connected to it.
Then, tap Download.
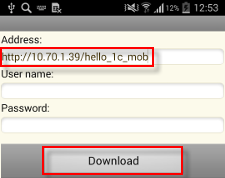
Figure 12-26. The mobile application URL
The mobile platform will download the application.
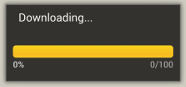
Figure 12-27. Downloading the mobile application
Then, the mobile platform will suggest you adjust some properties. Leave Application name as it is and select the Restart from designer check box. Then, tap Done.
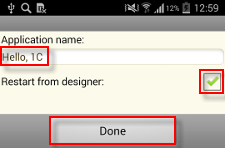
Figure 12-28. The mobile application startup parameters
The application will be installed.
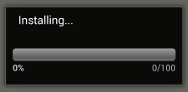
Figure 12-29. Installing the mobile application
You will see the application in the list of applications. To start it, tap the application name.
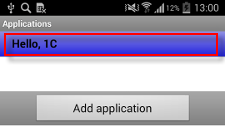
Figure 12-30. Starting the mobile application
The first screen that you see after that is the Mobile desktop form.
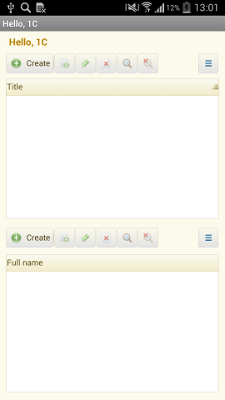
Figure 12-31. The Mobile desktop form
If you tap the menu button of your mobile device you will see the application menu. Notice that the command interface of the Main section is displayed in the application menu in the mobile platform.
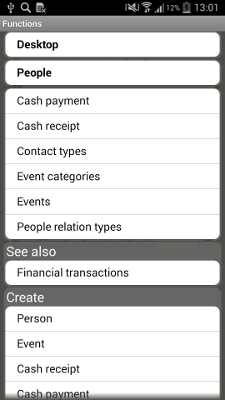
Figure 12-32. The mobile application menu
The important notice: the application that you developed and filled with data when opened on the mobile device contains no data. This is not an error. The data synchronization between several applications is an interesting, but separate topic. The 1C:Enterprise platform can solve these problems with ease. For example, see Homework 3 of 1C mobile application rapid application development tutorial.
In this chapter spending only a few minutes, you developed a mobile version of your CRM application, which is compatible with Android and iOS mobile devices.
To distribute your application for end users you need to create a solid package containing the mobile platform, the applied solution, and the database. For this, 1C:Enterprise platform has packing tools. You can read more about it in Mobile application building example chapter of 1C mobile application rapid application development tutorial. The packed application can be published in Google Play and Apple App Store.
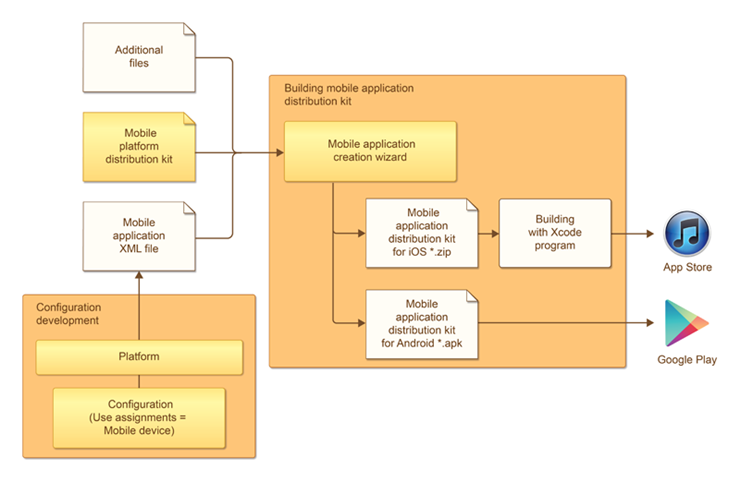
Figure 12-33. Publishing the mobile application for end users
Go to the page: Where and how to study 1C:Enterprise