Let us implement conditional appearance.
- Return to Designer, open the data composition schema and click the Settings tab.
- In the bottom of the window, click the Conditional appearance tab.
- Click the Add
 button on the right (fig. 13.43).
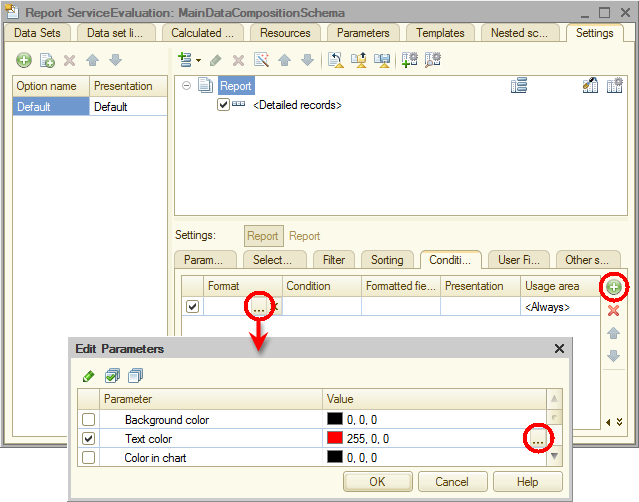
Fig. 13.43. Specifying conditional appearance settings
First let us specify the appearance, that is, how the fields are highlighted. - In the Format field, click the Select
 button, select red text color (see fig. 13.43), and click OK.
Then let us specify the condition when the appearance is applied (when the text turns red). - In the Condition field, click the Select button.
- In the Filter window, click the Add
 button and then click New item (fig. 13.44).
Note that each filter item specifies a single condition and you can add multiple conditions.

Fig. 13.44. Specifying conditional appearance settings - Specify the following filter values and then click OK:
- Left value = Revenue
- Comparison type = Less than
- Right value = 700
If you want to highlight the entire report row, you can leave this list blank.
Let us select the report fields to be highlighted. - In the Formatted fields cell, click the Select button and then, in the window that is opened, click the Add button to select the Service and Revenue fields, and then click OK (fig. 13.45).

Fig. 13.45. Specifying conditional appearance settings
Actually, in this case you can skip this step because Service and Revenue are the only report fields.
Finally let is specify a presentation for the conditional appearance. - In the Presentation cell, type Unpopular service (fig. 13.46).

Fig. 13.46. Specifying conditional appearance settings
"Unpopular service" is what users will see in their settings. So instead of the messy line "Revenue under 700…" users will see the human-readable text that you specify in the Presentation field.
You have defined a conditional appearance for the report where all the services with revenues under 700 dollars are considered unpopular and highlighted by red text color.
Let us add this condition to the user settings. - Click the Custom settings item property
 button, select the Include in custom settings checkbox, and then, in the Edit mode list, select Normal (see fig. 13.46).
So you included the conditional appearance in the regular user settings. Unlike quick settings, regular user settings are not available in the report form and can only be accessed in a new window that is opened by clicking Settings on the More menu. This is because such settings are used much less frequently than, for example, report period settings.