Let us implement script-based data exchange.
- Open the central infobase in Designer.
- Create a DataProcessor configuration object named DepartmentsExchange.
- On the Forms tab, create a default data processor form.
- In the form editor, on the Attributes tab, add a form attribute named DepartmentTextBox of the ExchangePlan.Departments type.
- Drag the attribute to the form controls pane.
- In the field property palette that is opened, set the field title to Department and keep the default field type (Text box, fig. 24.27).
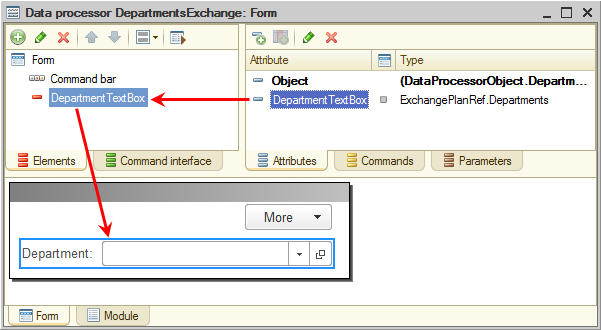
Fig. 24.27. Editing data processor form - On the Commands tab, create the following commands: CreateInitialImage, WriteChanges, and ReadChanges.
- For each of the commands, in the property palette, in the Action field, click the Open
 button and create a client handler.
Do not fill the event handlers for now. - Click the Form tab and drag all three commands to the form controls pane.
The resulting data processor form should look as shown in fig. 24.28.
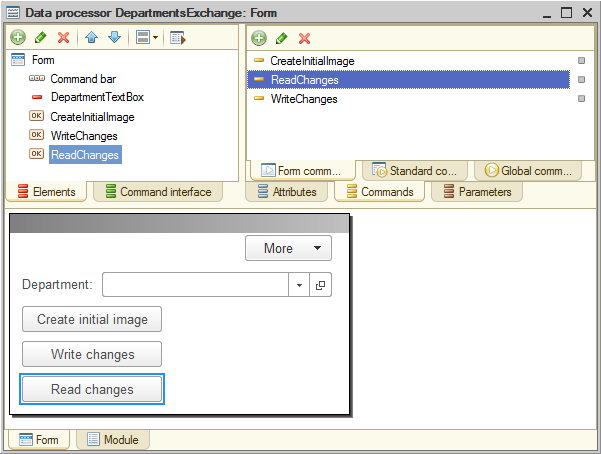
Fig. 24.28. Data processor form - Open the property palette of the CreateInitialImage button and clear the Availability check mark.
When you open the data processor, the button should not be available until you select an exchange plan node in the DepartmentTextBox field. And this button should not be available if you select the predefined node of the infobase. In other words, initial image creation should not be available if the selected node is a predefined one.
Let us implement this button behavior. - In the data processor form module, create a function that is executed on the server and returns True if the node passed to the function is the predefined one (listing 24.25).
Listing 24.25. PredefinedNode() function
&AtServerNoContext
Function PredefinedNode(Node)
    Return Node = ExchangePlans.Departments.ThisNode();
EndFunction
In the form controls pane, open the property palette of the DepartmentTextBox item, create the Selection processing event handler, and fill it as shown in listing 24.26.
Listing 24.26. TextBoxDepartmentChoiceProcessing() procedure
&AtClient Procedure TextBoxDepartmentChoiceProcessing(Item, SelectedValue, StandardProcessing)
The procedure sets the availability of the CreateInitialImage button depending on the value of the PredefinedNode() function. This value, in turn, depends on the reference to the selected node passed to the function (SelectedValue).If PredefinedNode(SelectedValue) Then Items.CreateInitialImage.Enabled = False; Else Items.CreateInitialImage.Enabled = True; EndIf;EndProcedure
- Fill the CreateInitialImage command handler as shown in listing 24.27.
Listing 24.27. CreateInitialImage button click handler
&AtClient Procedure CreateInitialImage(Command)
First, the procedure opens the dialog box for selecting the directory to store the infobase image. Then it calls the CreateInitialImageAtServer() procedure, which is executed on the server without context. This procedure calls the CreateInitialImage() method of the ExchangePlansManager object.Dialog = New FileDialog(FileDialogMode.ChooseDirectory); Dialog.Title = "Specify infobase directory"; If Dialog.Choose() Then CreateInitialImageAtServer(DepartmentTextBox, Dialog.Directory); Message = New UserMessage; Message.Text = "Initial image created."; Message.Message(); EndIf;EndProcedure
This method creates an image of a subordinate distributed infobase node. Its first parameter is a reference to the node (DepartmentTextBox form attribute) for which the initial image is created, and the second parameter is a connection string that specifies the infobase. - Create the procedure shown in listing 24.28.
Listing 24.28. CreateInitialImageAtServer() procedure
&AtServerNoContext Procedure CreateInitialImageAtServer(Node, ConnectionDirectory) ExchangePlans.CreateInitialImage(Node, "File =""" + ConnectionDirectory + """"); EndProcedure - Create an event handler for the WriteChanges command (listing 24.29).
Listing 24.29. WriteChanges button click handler
&AtClient Procedure WriteChanges(Command)
First, the procedure opens the dialog box for selecting the file to store the changes. Then it calls the WriteChangesAtServer() procedure that is executed on the server without context. The first parameter of the procedure is a reference to the node (DepartmentTextBox form attribute) for which the changes are recorded.Dialog = New FileDialog(FileDialogMode.Save); Dialog.Title = "Specify exchange file"; If Dialog.Choose() Then WriteChangesAtServer(DepartmentTextBox, Dialog.FullFileName); Message = New UserMessage; Message.Text = "Writing changes completed."; Message.Message(); EndIf;EndProcedure
The procedure creates an XMLWriter object to work with the file.
Next it creates an ExchangeMessageWriter object that will be used to create an exchange message. The second parameter of the BeginWrite() method is the exchange node for which the message is created.
Then the procedure calls the WriteChanges() method of the ExchangePlansManager object, which writes the changes intended for the selected node to the specified exchange message.
Finally, it ends the exchange message writing and closes the file. - Create the procedure shown in listing 24.30.
Listing 24.30. WriteChangesAtServer() procedure
&AtServerNoContext Procedure WriteChangesAtServer(Node, FileName)
Learn more! It is worth noting that the WriteChanges method lets you specify the limit of data items stored to a message within a single transaction. By default, all data is stored within a single transaction.// Creating and initializing XMLWriter object XMLWriter = New XMLWriter; XMLWriter.OpenFile(FileName); // Creating ExchangeMessageWriter object and starting message writing ExchangeMessageWriter = ExchangePlans.CreateMessageWriter(); ExchangeMessageWriter.BeginWrite(XMLWriter, Node); // Writing message body content for the // distributed infobase data exchange message ExchangePlans.WriteChanges(ExchangeMessageWriter); // Ending the writing and closing XMLWriter ExchangeMessageWriter.EndWrite(); XMLWriter.Close();EndProcedure
This is the recommended mode because it ensures the consistency of data stored to a message.
However, if a message is created in multiuser mode, lock conflicts may occur between transactions that store data to messages and transactions performed by other users. To reduce the chance of such conflicts, you can adjust the parameter value. The lesser the parameter value, the lesser the chance of conflict, but the higher the chance of storing inconsistent data to the message.
Considering all of the above, the ideal solution is to perform data exchanges in exclusive mode. However, this option is not always available given the way a specific infobase can be set up. - Create an event handler for the ReadChanges command (listing 24.31).
Listing 24.31. ReadChanges button click handler
&AtClient Procedure ReadChanges(Command)
First, the procedure opens the file selection dialog box to select the file to be read. Then is calls the ReadChangesAtServer() procedure that is executed on the server without context.Dialog = New FileDialog(FileDialogMode.Open); Dialog.Title = "Select exchange file"; If Dialog.Choose() Then ReadChangesAtServer(Dialog.FullFileName); Message = New UserMessage; Message.Text = "Reading changes completed."; Message.Message(); EndIf;EndProcedure
This procedure creates an XMLReader object to work with the file. Then it creates an ExchangeMessageReader object to read the message stored in the specified file.
Then it uses the ReadChanges() method of the ExchangePlansManager object to read the received message.
Finally, it ends the exchange message reading and closes the file. - Create the procedure shown in listing 24.32.
Listing 24.32. ReadChangesAtServer() procedure
&AtServerNoContext Procedure ReadChangesAtServer(FileName)
// Creating and initializing XMLReader object XMLReader = New XMLReader; XMLReader.OpenFile(FileName); // Creating ExchangeMessageReader object and starting message reading ExchangeMessageReader = ExchangePlans.CreateMessageReader(); ExchangeMessageReader.BeginRead(XMLReader); // Reading message body content ExchangePlans.ReadChanges(ExchangeMessageReader); // Ending the reading and closing XMLReader ExchangeMessageReader.EndRead(); XMLReader.Close();EndProcedure
- On the Subsystems tab, include the DepartmentsExchange data processor in the Enterprise subsystem.
Then let us set up the main section command interface for Administrator. - Right-click the root configuration object and then click Open main section command interface.
- Add the commands that open General settings, Data exchange, and Departments exchange forms to the list of main section commands and enable their visibility for Administrator only (fig. 24.29).
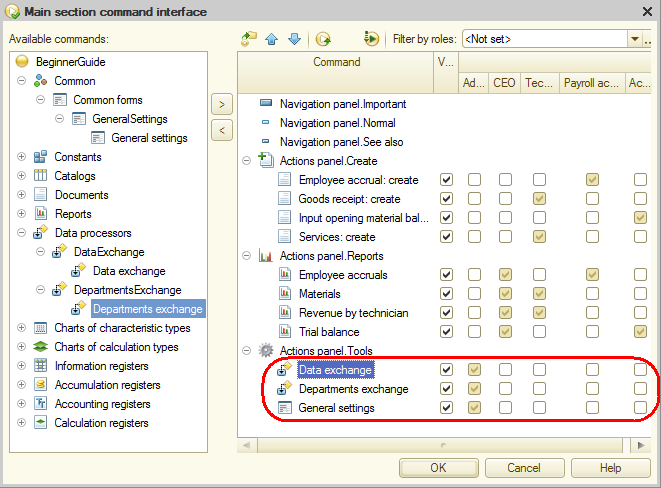
Fig. 24.29. Customizing main section command interface for Administrator
Let us add the list forms of Branches and Departments exchange plans to Administrator's home page. - Right-click the root configuration object and then click Open home page work area.
- For the Departments exchange plan, create a list form.
- Add the list forms of the Branches and Departments exchange plans to the left part of the home page and make them visible to the Administrator role only (fig. 24.30).
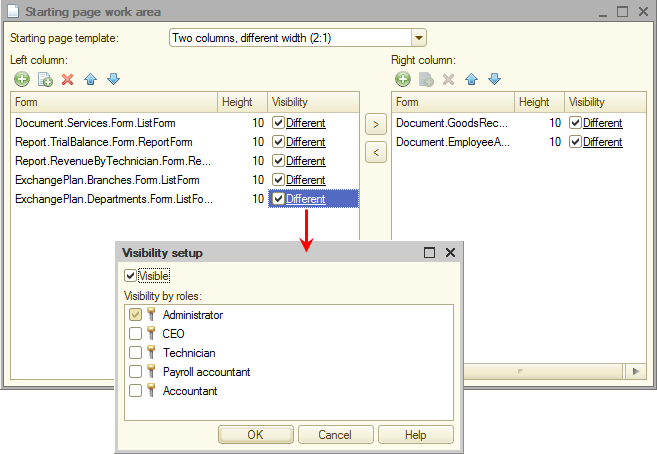
Fig. 24.30. Home page settings for Administrator
Then let us test the script-based exchange.
Note. You have to specify the source and target nodes correctly. If data is modified in the central infobase, you have to select the target subordinate node (Department) from the list of exchange plan nodes and then click Write changes. And in the target node infobase you have to select the source node (Central infobase) and then click Read changes.
- Run 1C:Enterprise as Administrator.
This opens the applied solution home page (fig. 24.31).
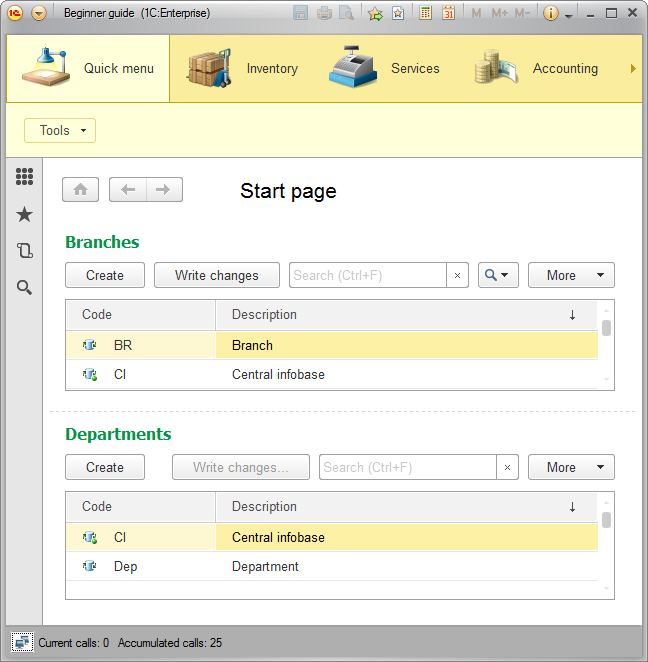
Fig. 24.31. Home page of a user with Administrator role - In the Quick menu section, on the Tools menu, click Departments exchange.
- In the Department field, select the Department node (fig. 24.32).
It is the node for which you will create an initial image.
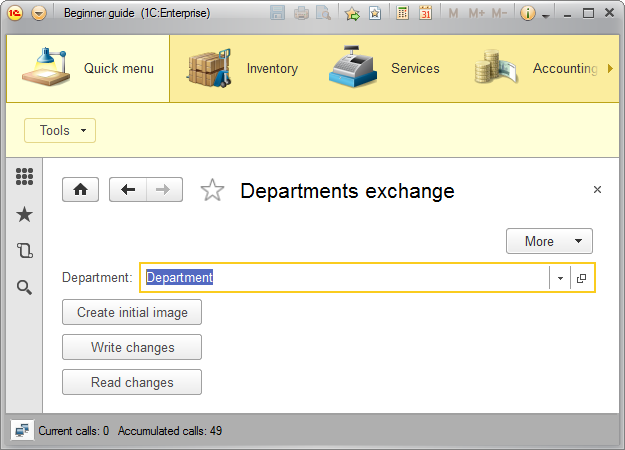
Fig. 24.32. Example of script-based exchange with departments - Click Create initial image.
- Create a directory for storing the initial image, select it in the directory selection dialog box, and click Select Folder.
- Create a new employee in the central infobase.
- In the Departments exchange form, in the Department field, select Department.
It is the node where you need to transfer the changes. - Click Write changes and specify the name of the file where you want to store the changes.
- Open the department infobase (based on the initial image that you created in steps 4-5) in Designer.
- On the Administration menu, click Users and create a single user: Administrator with Administrator role.
- Open the department infobase in 1C:Enterprise mode.
- In the Quick menu section, in the Departments exchange form, in the Department field, select Central infobase.
It is the node whose changes you need to transfer to the current infobase. - Click Read changes and specify the name of the file that stores the changes.
- Ensure that the new employee with a code having the CI prefix is present in the department infobase.
And now we will make a few final observations.
In a distributed infobase scenario four events become available for the ExchangePlanObject.<name> object:
- OnSendDataToMaster()
- OnSendDataToSlave()
- OnReceiveDataFromMaster()
- OnReceiveDataFromSlave()
You can use these events to manage sending and receiving data at the level of individual data items. They are called for each data item included in the message.
You can watch these events in action by adding the following script to the module of the Departments exchange plan object (listing 24.33).
Listing 24.33. Watching the execution of the ExchangePlanObject object events
Procedure OnSendDataToMaster(DataItem, ItemToSend)Message = New UserMessage; Message.Text = "OnSendDataToMaster: " + DataItem; Message.Message();EndProcedure
Procedure OnSendDataToSlave(DataItem, ItemToSend)
Message = New UserMessage; Message.Text = "OnSendDataToSlave: " + DataItem; Message.Message();EndProcedure
Procedure OnReceiveDataFromMaster(DataItem, ItemToReceive, SendBack)
Message = New UserMessage; Message.Text = "OnReceiveDataFromMaster: " + DataItem; Message.Message();EndProcedure
Procedure OnReceiveDataFromSlave(DataItem, ItemToReceive, SendBack)
Message = New UserMessage; Message.Text = "OnReceiveDataFromSlave: " + DataItem; Message.Message();EndProcedure
The first parameter in all of these events is the data item for which the event is called.
The ItemToSend parameter defines which data is stored to the message. It can have one of the three values:
- Auto. The data item is included in the message. It is the default value.
- Delete. A value indicating that the data item that should be deleted is included in the message.
- Ignore. No data related to the data item is included in the message.
The ItemToReceive parameter defines whether the read data item is recorded to the database. It can have one of the three values:
- Auto. If the data item is received from the master node, it is always recorded. If the data item is received from a subordinate node, it is only recorded if no changes are registered for that data item. It is the default value.
- Accept. A received data item is always recorded.
- Ignore. A received data item is ignored (so it is not recorded).
Data receipt events also have a third Boolean parameter: SendBack. This parameter enables forced registration of changes for the received item in the target infobase.
You might need this feature if an inconsistency is detected in the data received from the source node (for example, an error occurred during data modification in the source node).
If this is the case, you can ignore the received change and set the SendBack flag to force recording the changes of the received data items for the source node in the target infobase.
After the subsequent exchange, the state of that data item in the source node is taken from the target infobase.
Next page: Modifying distributed infobase node structure