Now that you know "almost everything" about accumulation registers, let us create one.
- In Designer, create an accumulation register configuration object named Sales and set its type to Turnovers.
- Set Extended list presentation to Sales register records (fig. 12.1).
The extended list presentation will serve as the title of the register record list window.
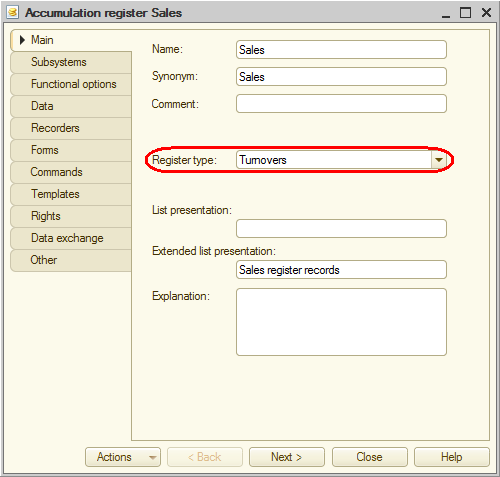
Fig. 12.1. Creating a turnover accumulation register - On the Subsystems tab, include the register in the Accounting, Inventory, and Services subsystems.
- On the Data tab, create the following dimensions:
- MaterialOrService. Type: CatalogRef.MaterialsAndServices
- Customer. Type: CatalogRef.Customers
- Technician. Type: CatalogRef.Employees
- Quantity. Type: Number, length: 15, precision: 3
- Revenue. Type: Number, length: 15, precision: 2
- Cost. Type: Number, length: 15, precision: 2
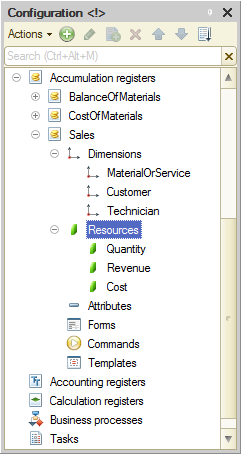
Fig. 12.2. Sales turnover accumulation register
Now let us edit the command interface to add the command that opens the turnover accumulation register to the Accounting, Inventory, and Services sections. - In the configuration object tree, right-click the Subsystems branch and then click All subsystems.
- In the All Subsystems window, in the Subsystems list, click Accounting.
The Command interface list displays all the commands of the selected subsystem. - In the Navigation panel.Normal group, enable visibility for the Sales command and drag it to the Navigation panel.See also group.
- Perform the same procedure for the Inventory and Services subsystems: in the Navigation panel.Normal group, enable visibility for the Sales command and drag it to the Navigation panel.See also group.