Let us enter the values required for data exchange.
- Start 1C:Enterprise in the debug mode.
- Set the Numbering prefix to BR (fig. 24.14).
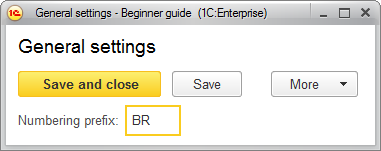
Fig. 24.14. Editing the constant
Then let us open the exchange plan and describe the predefined node (the current infobase node). - In the Enterprise section, on the navigation panel, click Branches.
You can see that the list of exchange plans contains a single empty row. - Open that row, enter BR for the infobase code and Branch for its description (fig. 24.15), then click Save and close.
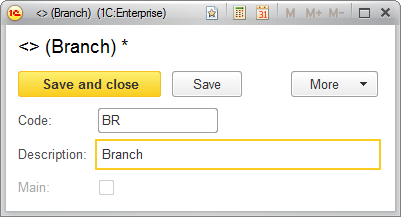
Fig. 24.15. Creating an exchange plan node - Create an exchange plan node with CI for the infobase code and Central infobase for its description, and the Main checkbox selected (fig. 24.16), then click Save and close.
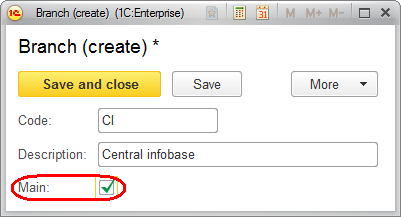
Fig. 24.16. Creating an exchange plan node - Click the new Central infobase node and then click Write changes.
To better understand the process, let us check some infobase catalogs. - Open the list of the Customers catalog and ensure that it is empty for now.
- Open the list of Warehouses and ensure that it is also empty.
It does not contain the predefined item because you set its Update predefined data property to Do not update automatically. - Open the Data exchange data processor and click Start data exchange.
This fills the catalogs with items, and also fills other objects that are included in the exchange. And the message window displays the messages shown in fig. 24.17.
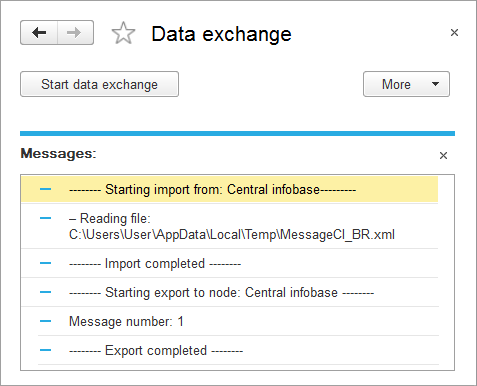
Fig. 24.17. Exchange plan messages
Note. To view the list of customers replicated from the central infobase, refresh the list (press F5).
Now let us test how exchange is processed on the other side. - In the Customers catalog, create a new customer with an arbitrary name.
Note that the customer code has the BR prefix and the code numbering starts from one. - Return to the Data exchange data processor and click Start data exchange.
- Return to the central Infobase, perform the data exchange there, and ensure that the customer created in the branch Infobase has been transferred to the central one.