1C:Enterprise platform supports building hierarchical lists with an unlimited number of nested levels (but the application design can add a limitation).
Hierarchical lists include multiple item levels, with the items of the lower levels subordinating to those of the higher levels. There are two types of list hierarchy: hierarchy of folders and items and hierarchy of items. The application design determines the hierarchy type.
A list that has a hierarchy of folders and items includes two types of items: folders and items. A folder is a node that includes subordinate folders and items. An item is an individual object.
In the lists with the hierarchy of items any item can be both a node and an individual object. For example, a list of departments can have item hierarchy. Each department can include other departments but all the departments have the same assortment of properties.
A hierarchical list has the following view modes: Hierarchical list, List, and Tree. To change a mode, on the All actions menu, click View mode.
The selected view mode appears checked in the menu.
List mode. If you select List view mode, the list displays all of the items. Folders and items are displayed together without separation.
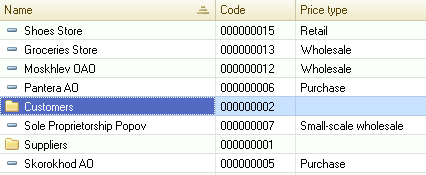
Fig. 77. A list view mode
Hierarchical list mode. If you select a Hierarchical list view mode for a list having a hierarchy of folders and items, the list displays only top-level items, and when you open a folder, the list displays only items that are subordinate to that folder.
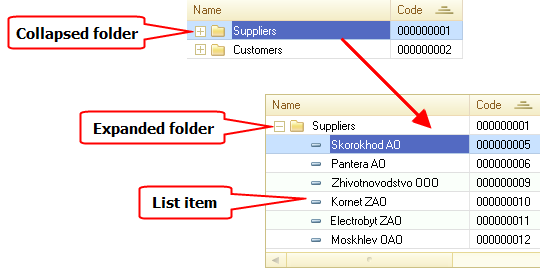
Fig. 78. A list of counterparties in hierarchical view mode
- Collapsed folder. The row displays a folder. Double-clicking the folder expands it and displays the items available in that folder.
- Expanded folder. The row displays a folder opened for viewing. This row is always located at the top of the table, right under the column headers. Double-clicking that row collapses the folder.
- List item. The row is a subordinate item.
You can expand a folder using one of the following methods:
- Double-click a folder row.
- Click the [+] icon to the left of a folder icon.
- Select a folder and press Ctrl + Down Arrow.
- Select a folder and press Plus Sign on the numeric keypad.
- Select a folder and then, on the All actions menu, click Down one level.
To return to the previous level, select an item and press Ctrl + Up Arrow or, on the All actions menu, click Up one level.
Tree mode. If you select Tree view mode, the list items are displayed as a tree.
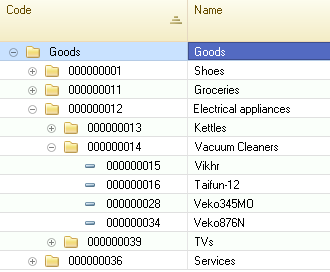
Fig. 79. A hierarchical list in tree view mode
You can expand and collapse tree parts. The + sign in a branch node indicates that this branch can be expanded. Clicking this sign expands the next tree level for viewing and changes the + sign to –. You can collapse a tree branch by clicking –.
When a tree is expanded, you can press Up Arrow and Down Arrow keys to move between the items.
To expand a folder and select the first item in that folder, press Ctrl + Down Arrow. To move to the parent folder, press Ctrl + Up Arrow.
To collapse a tree node and all its subordinate nodes, press Shift + Alt + Minus Sign (on the numeric keypad). To collapse all the tree nodes, press Ctrl + Shift + Alt + Minus Sign (on the numeric keypad). To expand a tree node and all its subordinate nodes, press Shift + Alt + Plus Sign (on the numeric keypad). To expand all the tree nodes, press Ctrl + Shift + Alt + Plus Sign (on the numeric keypad).
In the Tree or Hierarchical List mode, you can expand or collapse a node by pressing Plus Sign (on the numeric keypad) or Minus Sign (on the numeric keypad), respectively.
To quickly navigate to the beginning or to the end of a list, press Home or End, respectively.
Viewing lists with the hierarchy of items in the Tree mode is similar to viewing lists with the hierarchy of folders and items. Note that lists with the hierarchy of items have identical icons for items and folders.
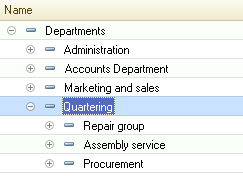
Fig. 80. A list with a hierarchy of items in tree view mode
Next page: Creating list items