Now, proceed to add documents that record money income and outgoings. The first document will be Cash receipt.
Documents are located in the Documents branch of the configuration object tree. Add a new document.
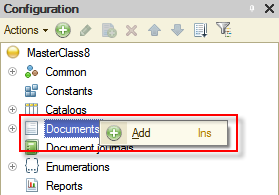
Figure 6-1. Adding a new document
Name it CashReceipt, and include it to the Finances subsystem, and then click the Data tab.
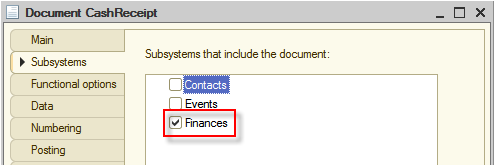
Figure 6-2. Creating the Cash receipt document
Each document, by default, has two attributes, Number and Date that indicate the sequential number of this document and the date when it was created. However, in addition to these attributes, it is usually required to have other information regarding specific business activity in the document. For example, in this master class users would like to understand what was the source of money: who or which event. In addition to simplify data input, make possible the same document to register several similar events. For example, it is convenient to group all receipts for one day in one document; this will allow a user to supervise documents that this user enters.
As you might have guessed already, a tabular section will help us to accomplish this.
Create the Receipts tabular section.
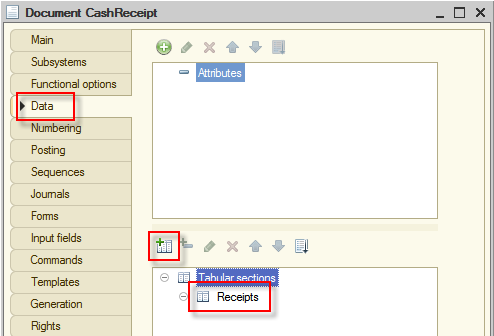
Figure 6-3. Creating the Receipts tabular section
In order to be able to track events and people, you need to create two attributes in the newly created tabular section, Event, and Person. To track the number of transactions, create the Amount attribute.
- Event with Type equals to CatalogRef.Events.
- Person with Type equals to CatalogRef.People.
- Amount with Type equals to Number, Length equals to 10, Precision equals to 2, and select the Non-negative check box.
Because of these actions, Data tab of the document will look as follows:
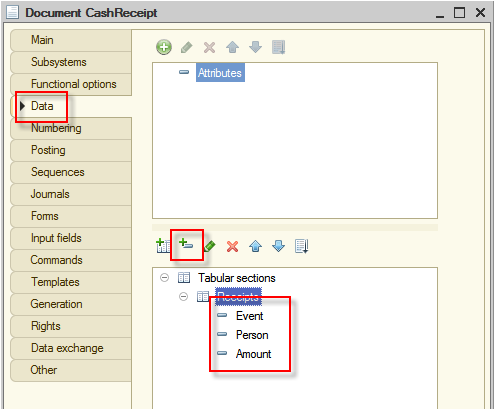
Figure 6-4. Adding attributes to the tabular section

Figure 6-5. Event attribute
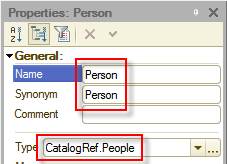
Figure 6-6. Person attribute
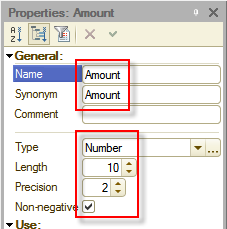
Figure 6-7. Amount attribute
To finish configuring this document, click the Posting tab.
As it is said above, documents write data to registers, and reports get this data from registers and display in a convenient form to users.
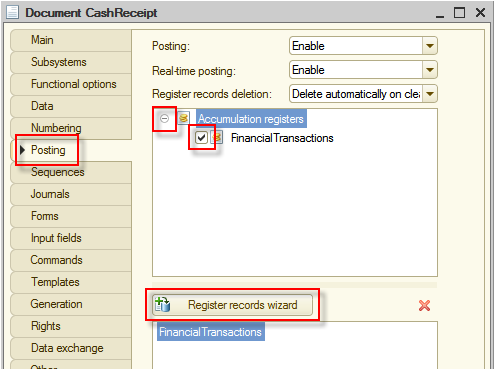
Document register records are records that documents make in registers; in this master class records will be made in Financial transactions register.
Expand Accumulation registers node and check Financial transactions accumulation register. By doing this you define that Cash receipt document will write records in the Financial transactions register. Then click Register records wizard and the platform will assist you in creating the data-writing algorithm for registers.
The Register Records Wizard window will open. Leave Register record type unchanged, equal to Receipt, since this document is a receipt of money. Then select Receipts in the Tabular Section field and click Fill Expressions.
In the table at the bottom of the window, see that the platform automatically found the correspondence between accumulation register attributes and document attributes. The value of the Event tabular section attribute of the document will be placed in Event register dimension. The value of Person tabular section attribute of the document will be placed in the Person register dimension. The value of the Amount tabular section attribute will be placed in the Amount register resource.
After filling out and verifying the correspondence table, click OK.
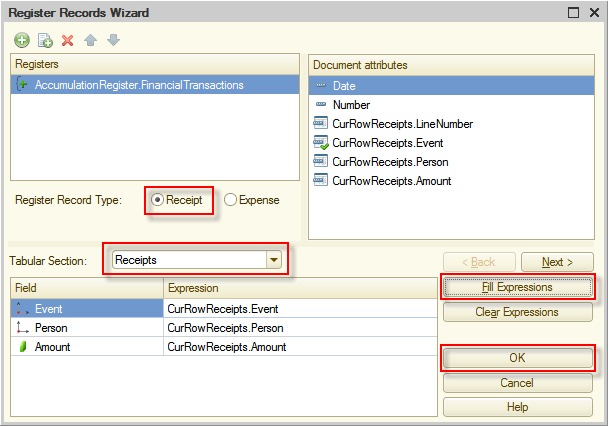
Figure 6-9. Register Records Wizard
The wizard will generate the procedure for writing document register records, in other words, for posting the document, and then display it on the screen.
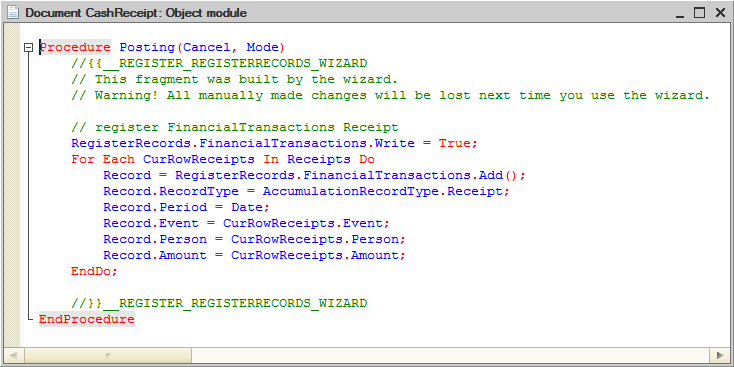
Figure 6-10. Procedure for posting the document
As you can see, the procedure is quite simple. For each row of the tabular section in the document, the new record is created in the register, and this record contains the data from the row.
You could write this algorithm yourself, but to minimize the amount of work it is better to utilize Register Records Wizard. The wizard generated this code automatically, which is mentioned in comments at the begin and the end of the procedure.
Now start the application in 1C:Enterprise mode by clicking Start Debugging  (F5), and using the ImportXMLData83.epf data processor import demo data into the Cash receipt document from the 06-CashReceipt.xml file.
Click the Finances tab and open the list of Cash receipt documents.
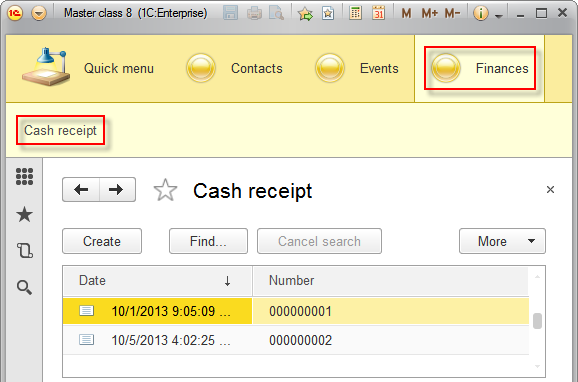
Figure 6-11. Cash receipt documents in the 1C:Enterprise mode
For now, documents are just imported, and they do not affect reports yet. In order for the data to be displayed in reports, documents have to be posted. When documents are posted, the data is being added to the Financial transactions accumulation register.
Open the first document. To post the document, click Post and close.
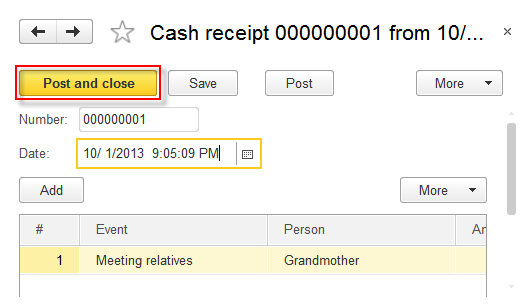
Figure 6-12. Posting the Cash receipt document
Successful document posting will display a notification on the bottom right of the screen.
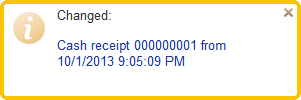
Figure 6-13. Successful posting of the Cash receipt document
The fact that the document posting was successful is displayed as a check mark on the icon of this document in the list of documents.
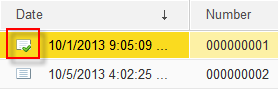
Figure 6-14. Posted document in the list of documents
To verify the way the document was posted, meaning the required information is recorded in the Financial transactions accumulation register, open Main menu  of the application, click All functions..., then expand accumulation registers node, then click Financial transactions, and then click Open.
Notice: The All functions... menu item is available by default if an application is started in the debug mode from Designer mode.
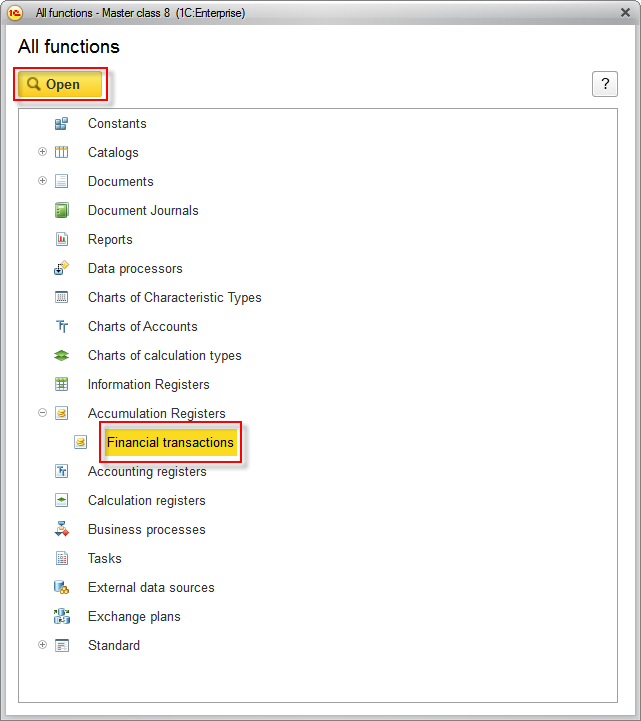
Figure 6-15. All functions
The list form of the Financial transactions accumulation register will open. For now, the register contains only one record that belongs to the first posted document. By double-clicking this record, you can always open the original document.
Notice the  icon, which means that the values of resources of this record are added to the total values of resources.
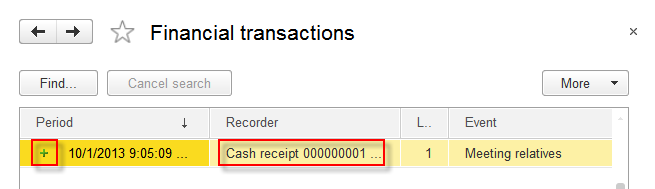
Figure 6-16. Accumulation register record
Switch to Cash receipt document list and post the second document. After the posting, return to the list of records of Financial transactions register. See that new entry, belonging to the second document, appeared. You can update the form with F5 key.
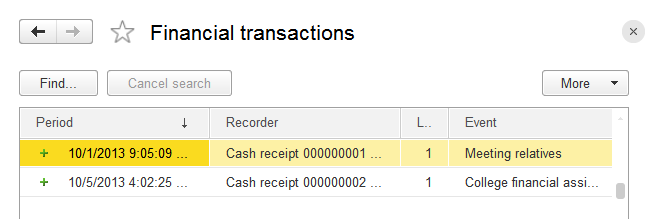
Figure 6-17. Accumulation register records
Finished with Cash receipts. However, users also need to track outgoings. Go back to Designer mode. It seems obvious, that it is necessary to create the Cash payment document. You could easily create it manually in the same way as you did already with the existing Cash receipt document because the compositions of two documents are identical. Another option, however, is to use the 1C:Enterprise 8 feature allowing you to create new configuration objects based on existing ones by simply copying them.
To do this, right-click the existing Cash receipt document in the list of metadata objects and click Add by cloning  (F9).
(F9).
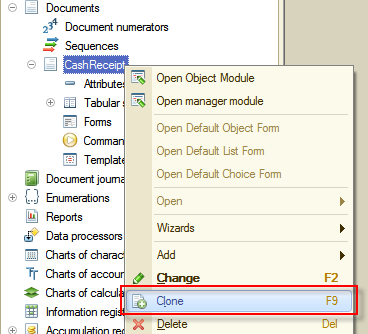
Figure 6-18. Adding by cloning an existing document
Once you click this button, a new CashReceipt1 document appears. It is going to be an exact copy of CashReceipt.
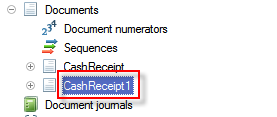
Figure 6-19. A copy of the Cash receipt document.
The only thing left to do is to rename the document and edit some of its properties. Do it.
First, open this document in the document editor and change the name of the document to CashPayment. Moreover, include the new document to the Finances subsystem.
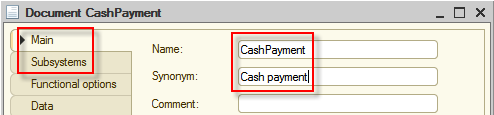
Figure 6-20. The Cash payment document
On the Data tab, using Properties, change the name of the tabular section to Expenses. Keep the remaining attributes unchanged as they meet project requirements.
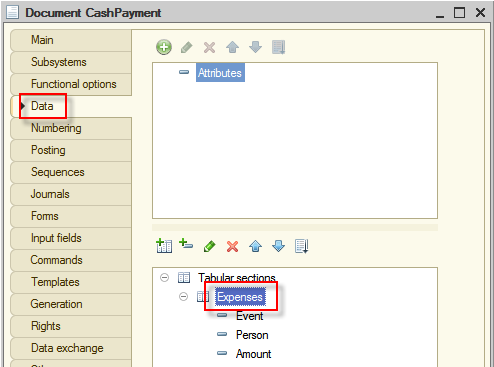
Figure. 6-21. Renaming the tabular section
Click the Posting tab. Here you will change the document posting. For now, the posting algorithm is copied from the Cash receipt document. That document keeps income but in the newly created document is designed to keep outgoings.
Open Register Records Wizard. The platform will prompt you to confirm that the existing script will be replaced. Click Yes.
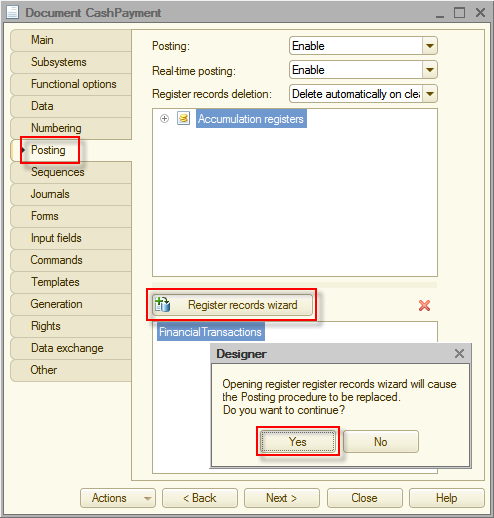
Figure 6-22. Opening Register records wizard
Here repeat all the steps that you performed for Cash receipts document. You only need to change the Register Record Type to Expense and select the tabular section Expenses. Then click Fill Expressions, and to update the module click OK.
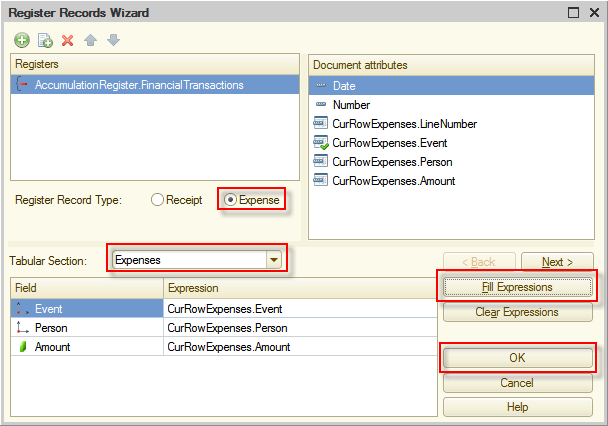
Figure 6-23. Register Records Wizard
You can see that there are only two differences between the two documents, the name of the tabular section and the type of the accumulation register record.
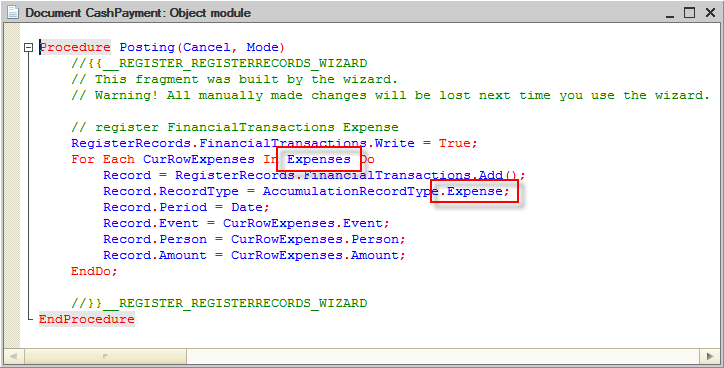
Figure 6-24. Posting procedure of the Cash payment document
Start the application in 1C:Enterprise mode and, using the data processor, import the Cash payment data from the 07-CashPayment.xml file. Then, switch to the Finances section and open the list of Cash payment documents.
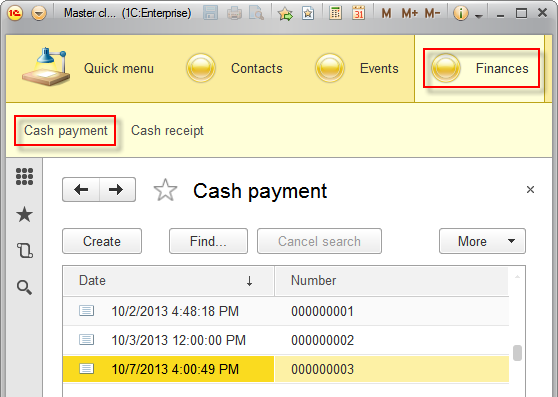
Figure 6-25. The Cash payment document list
Post these three documents and then verify that the data is recorded to the Financial transactions accumulation register.
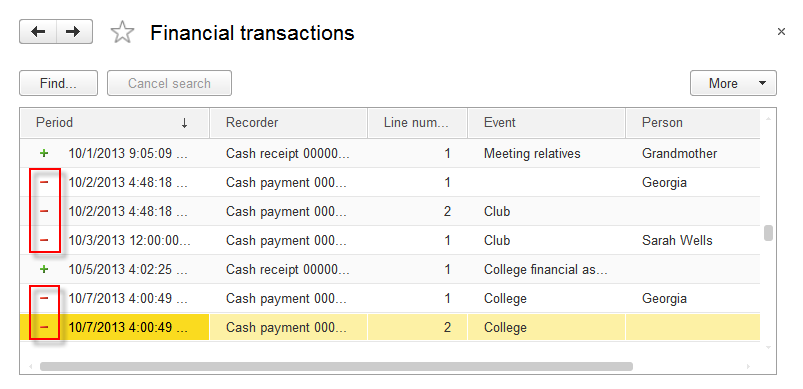
Figure 6-26. Records in the accumulation register
It is not difficult to understand that records in the register, belonging to Cash payment documents are marked with  icon. In addition, it is clear that a few lines of a document are recorded in the register in the form of individual entries. Note the Line number column.
At this point, the accounting part of the application is complete. Users are now able to fill a list of acquaintances and enter cash receipts and payments.
However, simple accounting is not enough. Users would also like to receive the information from the application in a convenient form. For this purpose, there are reports.
Next page: Reports