You can change the row height and column width automatically or manually.
Resizing rows and columns manually. To change row height, move the pointer over the bottom border of the row header until the pointer becomes a vertical double-headed arrow. Then drag the border.
To change the column width, move the pointer over the right border of the column header until the pointer becomes a horizontal double-headed arrow. Then drag the border. To resize a column to fit the content, double-click the column header. The column width is automatically adjusted to fit the text.
You can adjust the column width and row height by dragging their borders while holding down Ctrl. Press Ctrl and move the pointer over the border of any cell. When the pointer changes its shape, drag the cell border. This method is convenient when column and row headers are not displayed (usually for spreadsheet documents located in forms).
Resizing rows and columns automatically. To change the column width, select a column. Then, on the main menu, point to Table, point to Cells, and click Column Width. Enter the column width and click OK.
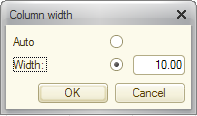
Fig. 244. Spreadsheet document editor. Column width
For automatic calculation of row height based on the text height, select the Auto fit row height check box. If you select the Maximum row height check box, specify the maximum row height. If the actual row height is less than the maximum height, the row is displayed with the actual height. If the actual height is greater than the maximum height, the row height is reduced to the maximum height. In this case a part of the text will not fit. If you clear the Maximum row height check box, the row height is always equal to the actual height.
If you clear the Auto fit row height check box, specify the height in the Row height field.
Automatic column width is set differently from the automatic row height. When you create a spreadsheet document, all the columns in this document have a default width that equals the width of nine characters of the default spreadsheet font.
To change the default column width, select the entire spreadsheet. Then, on the main menu, point to Table, point to Cells, click Column Width, and enter the new default column width as a number of characters of the spreadsheet document font. Click OK. This changes the width of all the columns to match the new value. Then, if you select Auto, the specified column width is applied to the entire spreadsheet document. If Auto is specified as column width value for the entire spreadsheet document, all the columns will have a width of 9 characters.
You can change the column width similarly to changing the row height.
If cells contain data and you need to set minimum column width or row height, double-click the column or row border. The application determines the maximum height or width of the text and resizes the cell to fit the text.
Next page: Moving and copying cells