So far, you have created the backbone of the application. Now it can register financial operations. At this point, the application is simple but not user-friendly.
Look at the main application window.
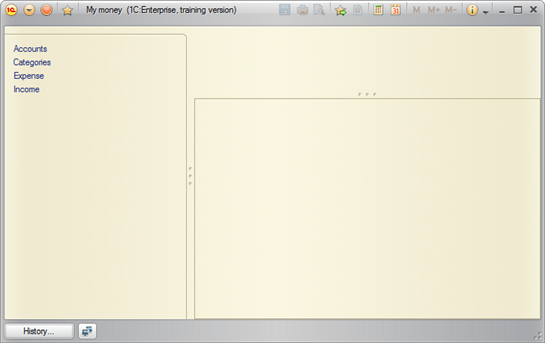
Figure 6-1. Desktop
The desktop is empty. To add a new document or catalog item, a user has to guess where to click. Of course, a user would not feel comfortable using this application. In this chapter, you are going to improve the workspace.
First, create a user workspace, which will be the starting point for user work with the application: the desktop form. Note, that before this time the platform generated all screen forms "on-the-fly" based on content and specifics of catalogs, documents, and registers we created.
According to the master class specification, the application should provide fast recording of incomes and expenses and efficient balance and turnover control. Those are the features that should be within the reach of the user's hand, they should be placed on the desktop.
Return to Designer mode, expand the Common metadata tree branch, right-click Common forms, and then click Add ![]() (Ins).
(Ins).
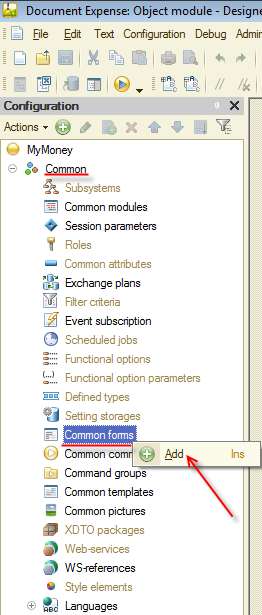
Figure 6-2. Adding a new common form
Click Generic form, type the name Desktop, type the synonym My money. Then click Finish.
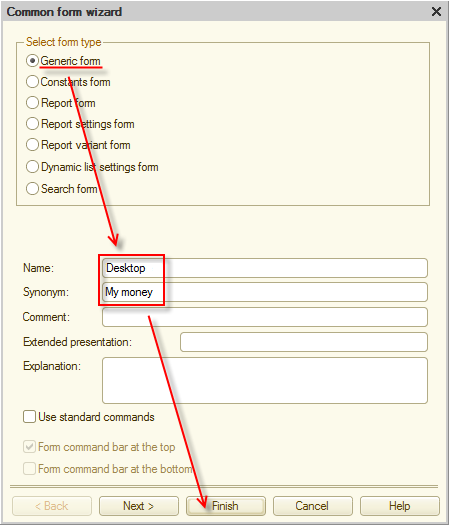
Figure 6-3. Common form parameters
Continue setting up the form in the form editor that is opened.
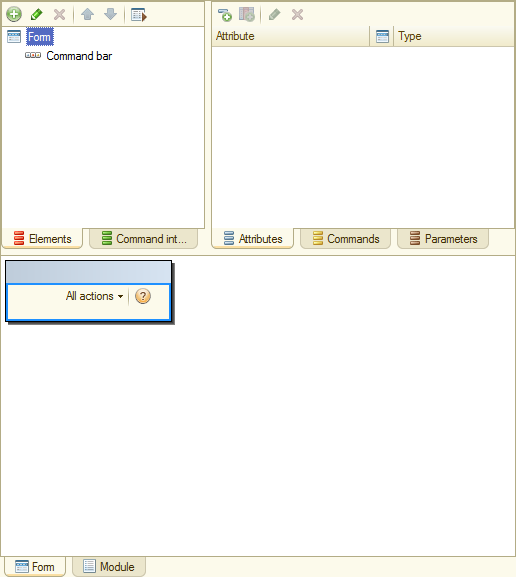
Figure 6-4. My money common form
By the project requirements, a user should see account balances and turnovers by categories. For this, add two tables with the required rates to the form.
First, the table with account balances. Add a new form item: Balance. Click Add attribute ![]() (Ins).
(Ins).

Figure 6-5. New form attribute
In the form property palette, type the Balance name and select the ValueTable type.

Figure 6-6. Balance form attribute
Then add two columns to the Balance attribute. To add a column, click Add attribute column ![]() .
.

Figure 6-7. New attribute column
Name the first column Account. In the property palette, select CatalogRef.Accounts.
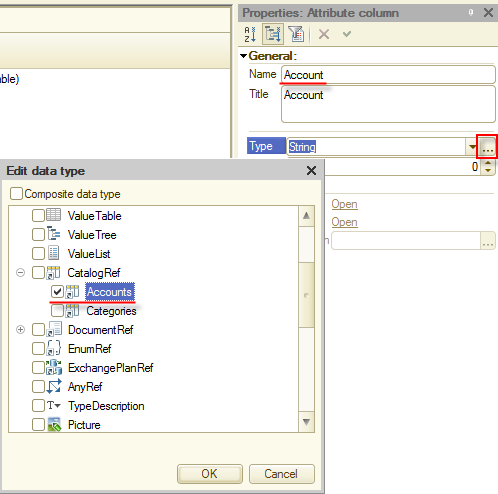
Figure 6-8. Account attribute column
Name the second column Amount. Type is Number, length is 10, Precision is 2.
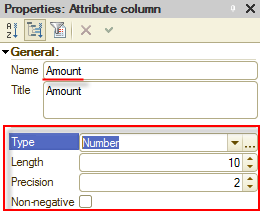
Figure 6-9. Amount attribute column
It is time to place the created attribute (the Balance table) to the form. Drag it to the form or to the Elements pane.
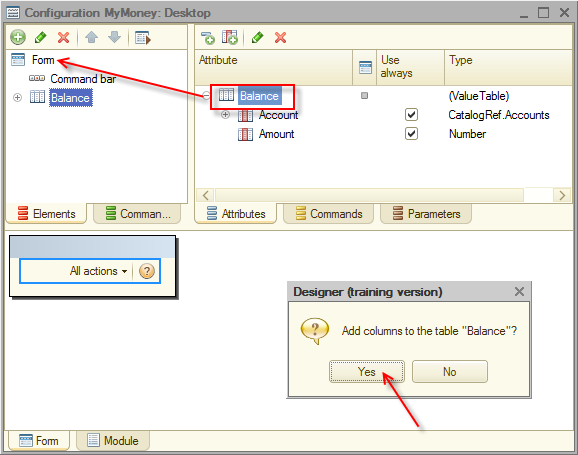
Figure 6-10. Placing the attribute on the form
The platform prompts you to add the table columns. Click Yes.
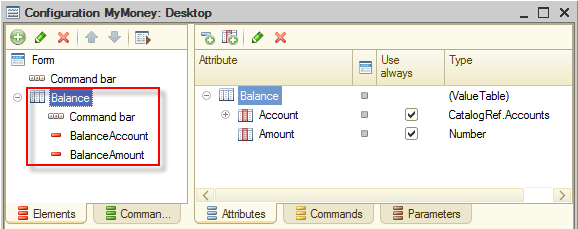
Figure 6-11. Balance table on the form
Now you can see the table on the form in the preview area in the lower part of the form editor (see figure 6-12).
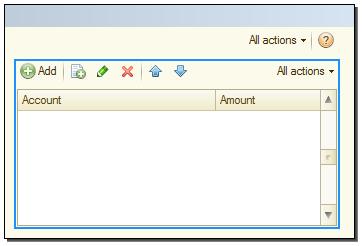
Figure 6-12. Form preview
Now add the second table, which will show turnovers by categories.
Add a new attribute and name it Expenses. The type is ValueTable.
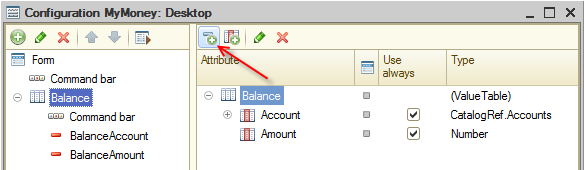
Figure 6-13. New attribute
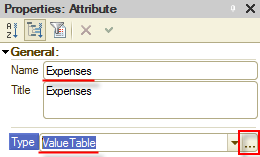
Figure 6-14. Expenses attribute
Add two columns: Category of the CatalogRef.Categories type and Amount of the Number type, Length is 10, Precision is 2. You can copy(Ctrl+C, Ctrl+V) the Amount column from the Balance table.

Figure 6-15. Category attribute column
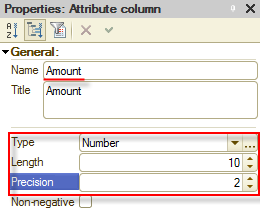
Figure 6-16. Amount attribute column
Now place the created attribute (the Expenses table) on the form. Drag it to the form, confirm to add columns, and check whether the Expenses table is placed under the Balance table. You can move form items by clicking Move up ![]() (Ctrl+Shift+Up Arrow) and Move down
(Ctrl+Shift+Up Arrow) and Move down ![]() (Ctrl+Shift+Down Arrow), or by moving them in the preview pane.
(Ctrl+Shift+Down Arrow), or by moving them in the preview pane.
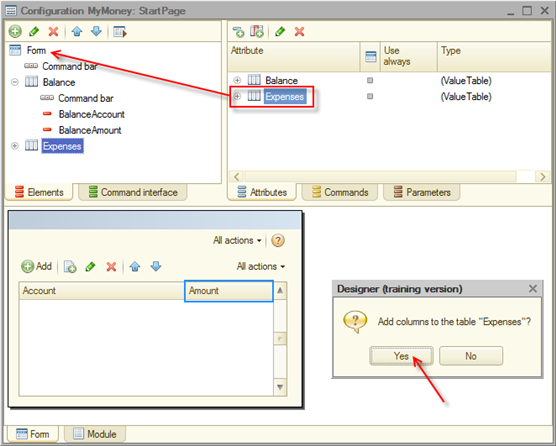
Figure 6-17. Placing the Expenses table
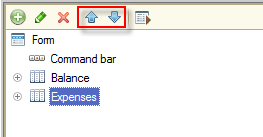
Figure 6-18. Moving buttons
As a result, the desktop form contains two tables (Balance and Expenses), one under another.
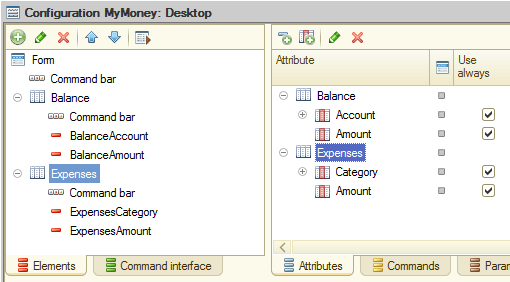
Figure 6-19. Desktop form
It is time to declare our form as a desktop form. In the property palette, find the Home page work area and open it for editing.
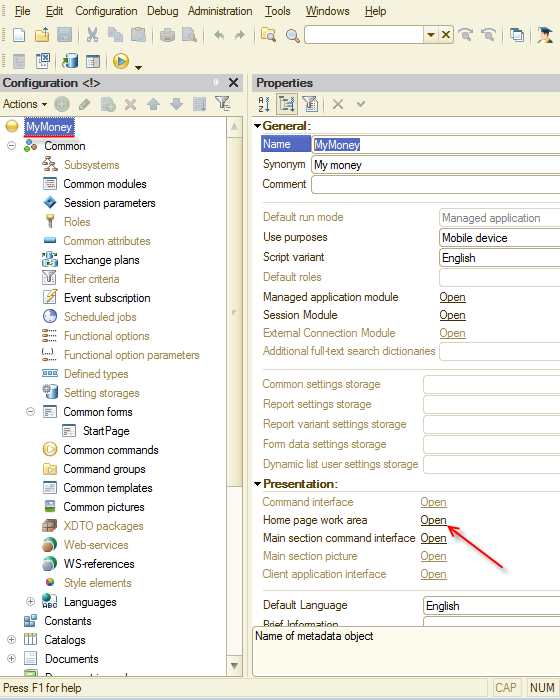
Figure 6-20. Home page work area
In the Home page template list, select One column.
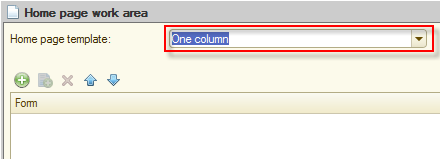
Figure 6-21. Home page template
To add the Desktop common form, click Add ![]() (Ins), expand the Common node, then expand the Common forms node, click Desktop, and click OK.
(Ins), expand the Common node, then expand the Common forms node, click Desktop, and click OK.

Figure 6-22. Adding the common form to the desktop
Run the application in 1C:Enterprise mode, confirm the changes. Take a look at the result.
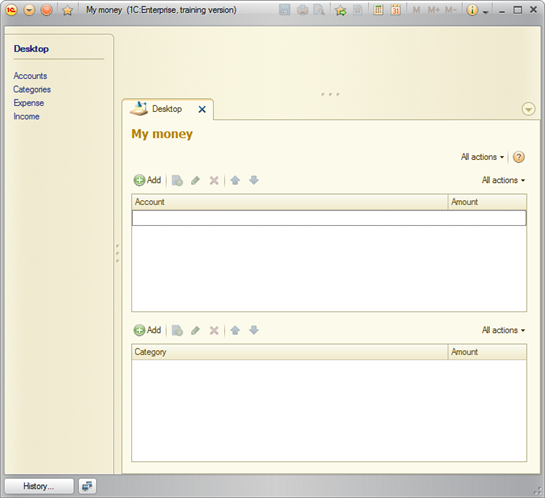
Figure 6-23. Desktop in 1C:Enterprise mode
The desktop became more useful, the user can control the flow of funds and account balance, and rapidly get catalog and document data to register financial activities.
Note. The desktop content looks pretty poor. It is striking on the personal computer when you develop the application. However, remember that you are developing a cross-platform mobile application. You do not know on which device a user will run your application, would it be a tablet with a big screen or a smartphone with a small one. That is why in the current application you should expect the worst, develop the desktop for a mobile device with a small screen.
Try to register some activities. It will help you check whether the application is easy-to-use.
There is a list on the left:
- Accounts
- Categories
- Expense
- Income
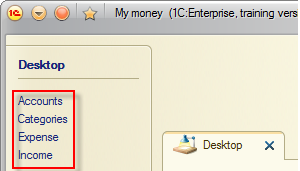
Figure 6-24. Navigation panel list
First, register a money receipt. On the navigation panel click Income, and then click Create (Ins) in the empty list of incomes.

Figure 6-25. Creating a new Income document
Register, for example, a part-time job salary of 100 received on a bank account. In the window of the new document fill the Amount field. Proceed to Account.
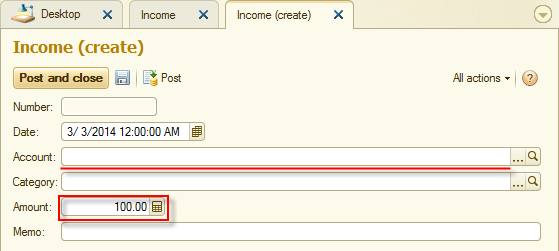
Figure 6-26. Amount is filled, proceeding to Account
Catalogs are empty for now and do not contain any data, it is necessary to fill them. In the 1C:Enterprise platform there are a lot of easy-to-use ways to do it:
- On the navigation panel, click Accounts. In the list of accounts create a new item (click Create, see figure 6-27). Then select the created catalog item in the document.
- In the document window, click Select
 button of the Account field and then click Select (figure 6-28).
 - Select the Account field and then press F8 (figure 6-29).
- Select the Account field and start typing a name. If the platform cannot find an item with this name in the catalog, it suggests you create a new one (figure 6-30).
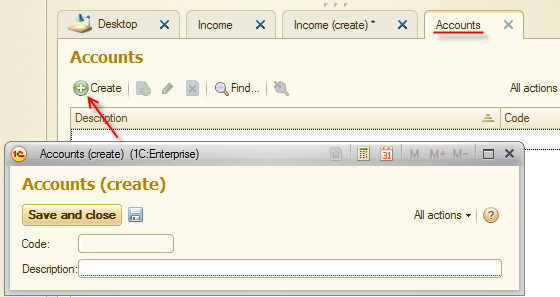
Figure 6-27. Creating a new Accounts catalog item in the separate list
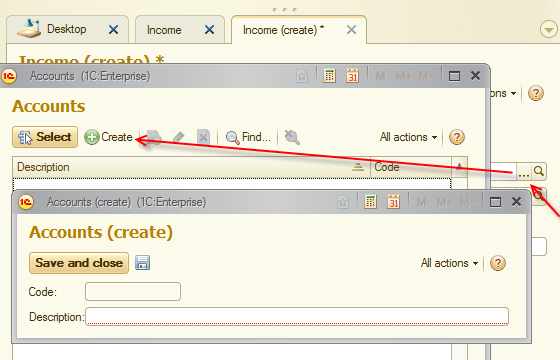
Figure 6-28. Creating a new Accounts catalog item with the Select button
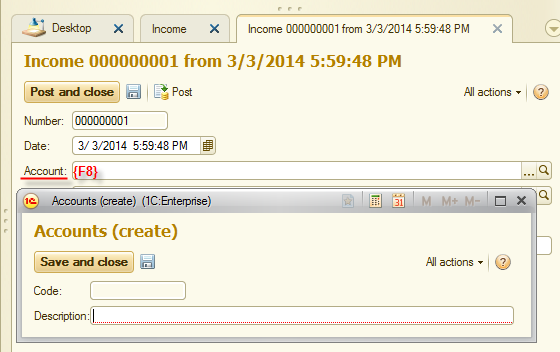
Figure 6-29. Creating a new Accounts catalog item with F8
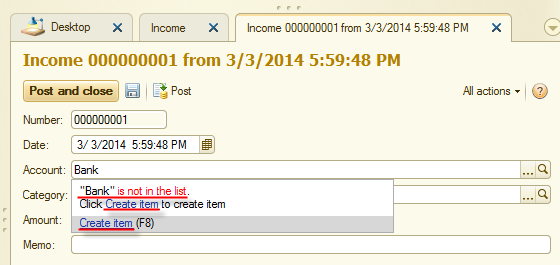
Figure 6-30. Creating a new Accounts catalog item by typing an item name
Try the last way. This way is the most comfortable because you do not know whether a user remembers, is there the item or it is a new one. The platform attempts to find the item by the typed characters, and if it doesn't, it suggests to create it.
Type Bank account in the Account field.
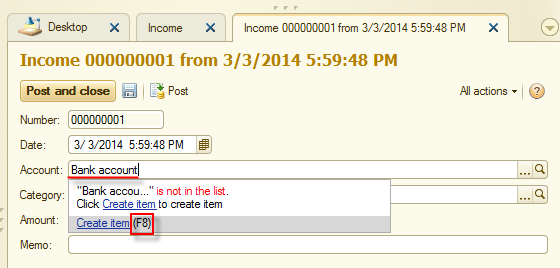
Figure 6-31. Creating a new Accounts catalog item
The 1C:Enterprise platform didn't find the required item in the catalog and suggests to create it. Do it.
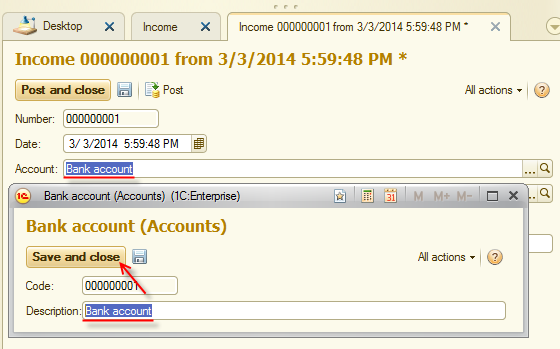
Figure 6-32. New Accounts catalog item
You can see that Desctiption of the item we are creating is filled automatically. Click Save and close and check out whether the Account document field is filled with the created item.

Figure 6-33. Selected account
Proceed to Category. The platform has a similar behavior as in the Account field.
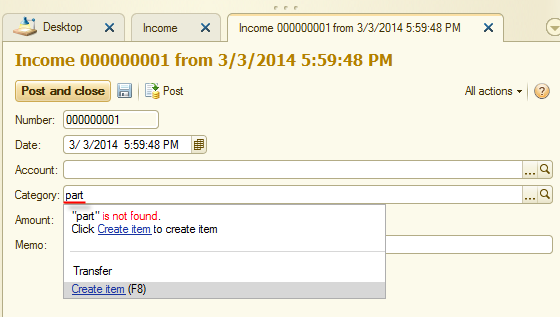
Figure 6-34. Selecting a category from a catalog
Create a Part-time job catalog item. Use any method you like. However, check that it is in the Income group. You can select a group of the item in the Parent field.
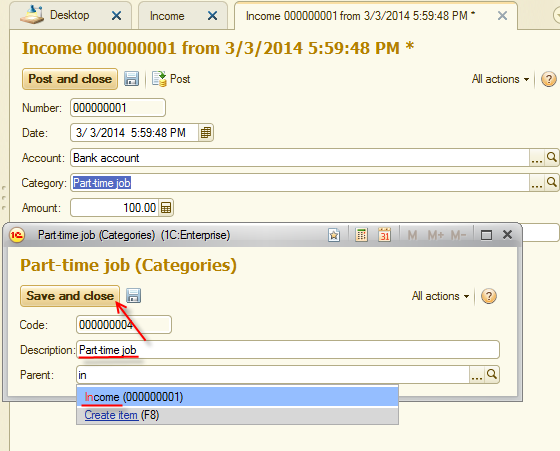
Figure 6-35. New item of the Categories catalog
You can always change item parameters, just open it by clicking the Open ![]() button in the document window. Also, you can find the item in the catalog list and double-click it.
button in the document window. Also, you can find the item in the catalog list and double-click it.
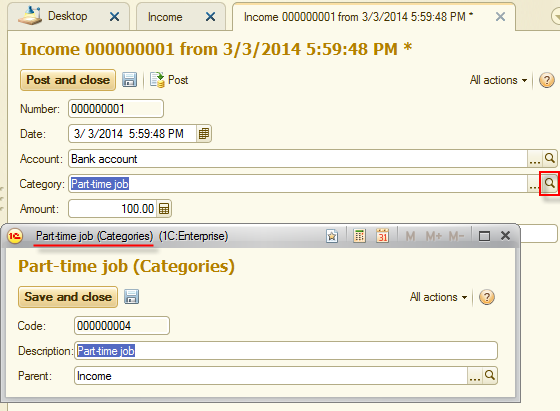
Figure 6-36. Opening the catalog item
Your first document is almost filled. If you want, type a memo. Then click Post and close to save the document and make changes in the registers.
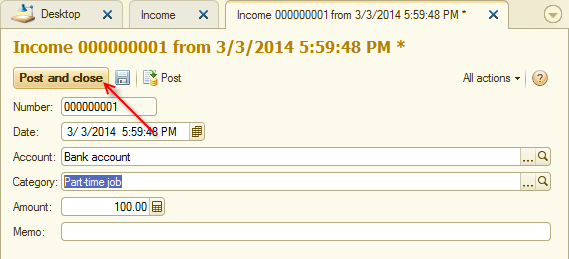
Figure 6-37. Saving and posting the document
Once the window is closed, you can check out lists of the catalogs and documents to see whether all data we provided is on its place.
Record one more financial event: withdrawing cash from an ATM. In fact, it is a transfer from one account to another.
In your application, the transfer is recorded with the Expense document. Create one. Let the amount be 30. The source account is Bank account and the target account is Cash.
Click Expense and then click Create.
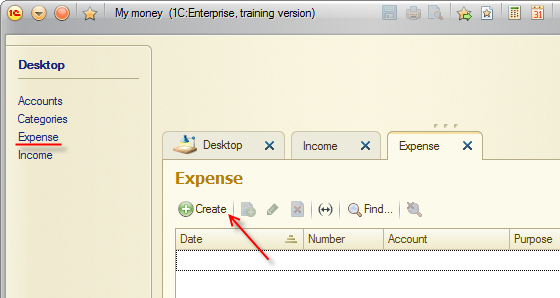
Figure 6-38. Creating the Expense document
Type 30 in the Amount field and proceed to Account.
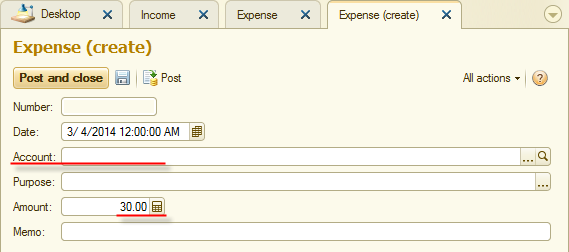
Figure 6-39. Amount is typed, proceeding to Account
In the Account field, select the Bank account, which already exists. You can start typing it and then click the found item in the list of matching values.
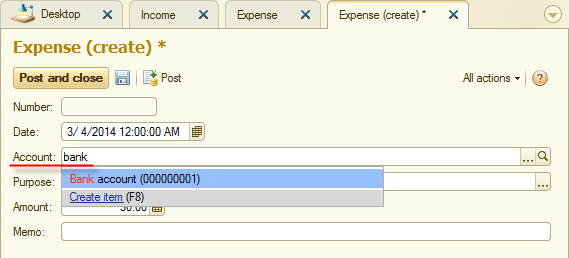
Figure 6-40. Selecting the account
In the Purpose field the platform prompts you to select the value type: Accounts or Categories. Select Accounts to record a transfer.
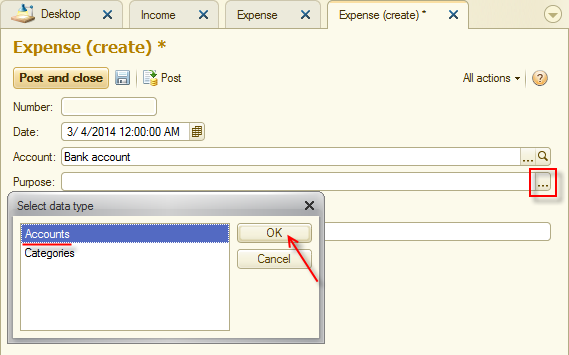
Figure 6-41. Selecting the target type
Add a new item: Cash. Save it and select it.
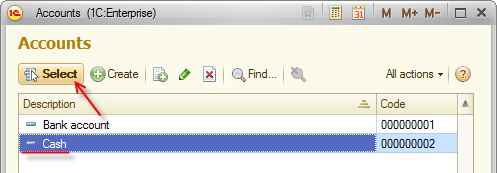
Figure 6-42. Target account
If you want, type a memo, then click Post and close to save the document and make changes in the registers.

Figure 6-43. Saving and posting the document
Check that all provided data is saved (the Expense document and Account catalog item). Now you can return to the desktop and check whether data is in the tables that must show financial indicators.
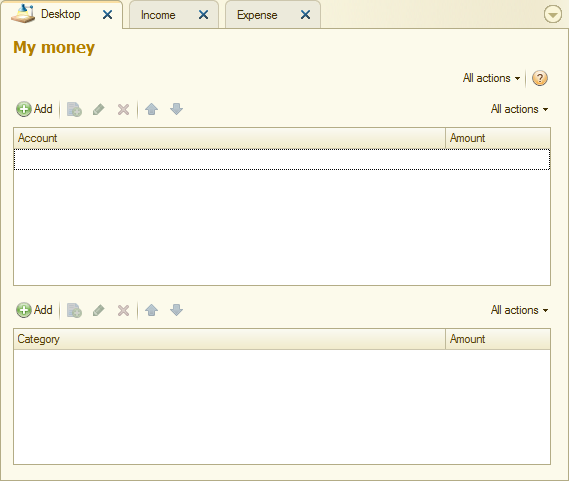
Figure 6-44. Desktop state after the documents have been posted
The tables are empty. Maybe the registers have been filled wrong? Check it out. Now it is not easy to get register records. The 1C:Enterprise platform normally hides these lists because they are not really useful for users. However, at the debugging stage, this data is useful for you.
Click Main Menu ![]() and then click All functions.
and then click All functions.
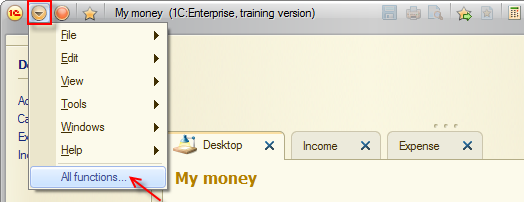
Figure 6-45. All functions
Expand the Accumulation Registers branch of the metadata tree and then click Accounts. The Expenses register is not interesting for you now because you have not made any expense records yet.
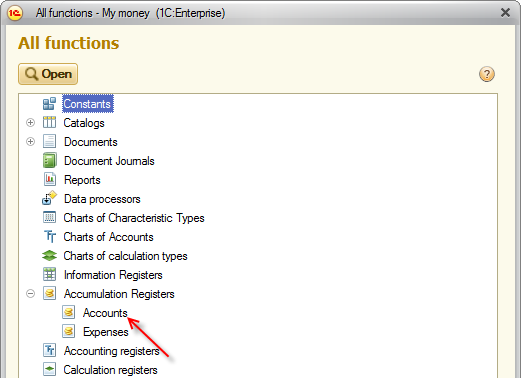
Figure 6-46. Accounts register
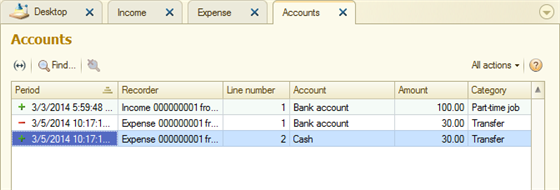
Figure 6-47. List of Accounts register records
You can see that the documents made their records correctly. The first document (Income) created one register record, which contains information about a receipt of 100 to Bank account. The second document (Expense) created two register records, which contain information about an expense of 30 from Bank account and a receipt of 30 to Cash. The predefined category Transfer was used, as we designed.
What is the matter? Why are the desktop tables empty? The point is that the desktop tables know nothing about register records. For filling the desktop tables, you have to program logic of their filling in the 1C:Enterprise script.
Next page: Improving desktop functionality